comp1839 Posted December 3, 2016 Author Posted December 3, 2016 (edited) tyrone, thanks buddy! john, always good to hear from you!! chris, thank you kind sir!! dave thanks! joe, your comments always make me feel better about the flaws i know are there. thanks! tim, thank you for your support. always good to hear what you have to say!!!!! scott, thanks! ray, thanks! so, this weekend i got to the drysump system. made a tank, a breather, the pump, and the two pulleys. doesn't sound like much but,.......... Edited December 3, 2016 by comp1839
John Teresi Posted December 4, 2016 Posted December 4, 2016 Dave......Great up-date !!!!......always a treat to see what you do next
Codi Posted December 4, 2016 Posted December 4, 2016 You're not foolin' me Dave when you preface that "it might not look like much".................the mark of genius is the pure engineering we're seeing here. You make it look simple, which is deceiving. I stare at the pics and see LOTS of thought in what you're doing. Beautiful beyond the bling. cheers, tim
gasser59 Posted December 4, 2016 Posted December 4, 2016 It may seem like not much to you, it sure is to us meager folks. Stellar achievements.
comp1839 Posted December 4, 2016 Author Posted December 4, 2016 john, thanks for stoppin' in! tim, thanks! always feel way better than i really am when i talk to you. brad, thanks for the compliment. i'm not to sure about the stellar part. hehe.....maybe more like stella. so this engine needs an oil pan. which was next on the agenda. machined one outta ren-shape and filler primed it. i now i keep talking about these really cool weld decals that archer transfer makes so i thought i'd give you a peek at the installation. most of you guys can probably do decals waaay better than me but,...here goes. these are the weld decals. you must cut them into strips which is a little tedious. for me the results are well worth the efforts. here are the decals installed on the oil pan. i used solva-set to get them to setup really nice. it takes time and patience ( something i'm usually not long on) i'll let them set over night. shoot a little more primer and then some color.
blackbeard Posted December 4, 2016 Posted December 4, 2016 those archer bead welds look killer on the oil pan
Mooneyzs Posted December 5, 2016 Posted December 5, 2016 Dave.... Outstanding work on the dry sump system along with the oil pan. I love how those weld decals look. I have some that I need to put to use on a build sometime. Every update is always a treat for us to drool over.
comp1839 Posted December 5, 2016 Author Posted December 5, 2016 henry, thanks. chris, thank you, sir! try not to drool on the front of your pants. i did it one time looking at your funny car and someone thought i pee'd myself...hehe!!! so here's the pan.
John Teresi Posted December 5, 2016 Posted December 5, 2016 Dave......WOW man.......that looks GREAT ......those welds are soooooo cool
my80malibu Posted December 5, 2016 Posted December 5, 2016 Oh Dang. I opened this looked at the first few pictures, and My head popped off. This is so Cool.
GoatGuy Posted December 8, 2016 Posted December 8, 2016 Viewing these posts is so dangerous, Gabriel's head popped off and my eyes popped out. My stupid question - do those decals come in 1/24 scale?
comp1839 Posted December 10, 2016 Author Posted December 10, 2016 john, gabriel and dave. thanks for the support guys!! dave, i make most of my own decals, the really cool foil ones i have a friend of mine do. here's a little update. plumbing the dry sump. if it helps the size of the lines in 1:1 would be as follows. pan to the pump (4 lines) -12 pump to tank (1 line) -16 tank to the pump -12 or -10 pump to the filter then the block (-10)
bobthehobbyguy Posted December 10, 2016 Posted December 10, 2016 Absolute work of art. Oil pan is great. All the machining is amazing.
blackbeard Posted December 10, 2016 Posted December 10, 2016 Wow awesome great craftsman ship and work of art it be ashame to put it in the frame rails I would display it by itself
Mooneyzs Posted December 10, 2016 Posted December 10, 2016 Dave... Outstanding work on this. That whole dry sump, oil pump and lines are a master piece of their own. It sure is great to see you getting bench time on this. I am looking forward to your next update already.
Art Laski Posted December 10, 2016 Posted December 10, 2016 Dave,That pan is pure perfection! Well, it all is, really...-Art
John Teresi Posted December 10, 2016 Posted December 10, 2016 Dave........those fitings are just top dog man.......I love it
iBorg Posted December 10, 2016 Posted December 10, 2016 The best way to improve this model is once finished, put it in my display cabinet.
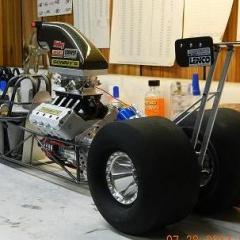
comp1839 Posted January 1, 2017 Author Posted January 1, 2017 thanks fellas!!! been super busy over the holiday. tim stopped in and we discussed some VERY cool stuff. i got some work done on the dragster. machined a rear wing mount and machined the housing to make it fit. if you're gonna make a wing mount you need a wing and some struts, sooooooo...... wired and plumbed some nitrous soleniods to the intake. re-finished the front wheels and put new hardware in.
comp1839 Posted January 1, 2017 Author Posted January 1, 2017 now for the hard work. i made a scoop tray. still needs to be hogged out but the exterior is done. you'll also see the beginningsof the carb linkage on the intake manifold. couple of engine shots for perspective.
blackbeard Posted January 1, 2017 Posted January 1, 2017 (edited) are you sure this is not a real motor your playing with great update everything is looking great Edited January 1, 2017 by blackbeard
Nytrozilla Posted January 2, 2017 Posted January 2, 2017 I have tried and tried to avoid the obvious and true accolade of "Jaw Dropping". Somehow, I am going to maintain my decorum.I'm a grown man. I am in total control of myself. I alone am responsible for my own actions.No matter how hard you try Dave, those words will never leave my lips.Thanks to the wonders of the Interweb, all I have to do is type "Jaw Dropping". Talk about rationalization.Beautiful as always.
Ace-Garageguy Posted January 2, 2017 Posted January 2, 2017 'Bout as close to building a real car as you can get without building a real car. Kinda makes my little pissant 1/25 scale stuff look...pissant. No way I'd ever see myself putting that much effort into something that didn't run, but man, it sure is something special to see somebody building a model at this level.Beautiful work, as you well know, and always pleasure to drop by to see the latest progress.
Codi Posted January 2, 2017 Posted January 2, 2017 So, you couldn't have had them made BEFORE I stopped by? Guess I'm going to have to stop by again soon. Knowing the time you had available to do all of this since my visit, I'm in as much awe over the quality and detail of what you made as the speed that you did them. It would take me an entire week to even attempt the "Mayan Stepped Pyramid" you did for the scoop base. (feel free to use that) Next visit you can explain the steps (pun intended) that you took to make it. The last 2 pics of the motor are just simply stunning but the pic showing the up close detail of the carbs & base...................well, I'll just leave it at that. Thanks Dave for the time, insight, knowledge & most importantly, the friendship. Can't wait to see what you tackle next on the dragster. btw, you should share a pic of your 37' Chevy with the wing on it and light buckets mocked up. In the words of Jason on Street Outlaws, it's just "hateful".
Recommended Posts
Create an account or sign in to comment
You need to be a member in order to leave a comment
Create an account
Sign up for a new account in our community. It's easy!
Register a new accountSign in
Already have an account? Sign in here.
Sign In Now