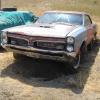
Samiches Posted March 16, 2016 Posted March 16, 2016 (edited) I painted the body and a few other parts last summer and let it dry for about a week before I put it away in my build pile. I usually paint several models in advance during the summer so I have something to build in the winter. I opened up the box last week to discover the following: Edited May 11, 2016 by Samiches
Samiches Posted March 16, 2016 Author Posted March 16, 2016 The clear coat fail was an unpleasant surprise. Its been soaking in the purple pond for a good week. I'll have to wait a little bit for a nice day to try and paint it once again. On the upside, the engine is coming out nicely. I tried to use the distributor points molded in the kit, but I had no luck with the 90 degree boots. I ended up cutting them off and drilling them out. I then used Spencer1984's method for making 90 degree boots which worked out nicely.
Samiches Posted March 16, 2016 Author Posted March 16, 2016 I had to look up the chassis to see what was frame and what is molded into the chassis. I thought the rear wheel wells might of had inserts so I made sure to give them full paint coverage. I don't think that is the case in real life. Thanks for looking!
Monty Posted March 16, 2016 Posted March 16, 2016 I had to look up the chassis to see what was frame and what is molded into the chassis. I thought the rear wheel wells might of had inserts so I made sure to give them full paint coverage. I don't think that is the case in real life. Thanks for looking! I like where you're going with this. What's your secret for detailing hard lines without slopping paint over onto the chassis?
StevenGuthmiller Posted March 16, 2016 Posted March 16, 2016 I'm curious.Did you use Testors clear for your clear coats?If so, this looks like a perfect example of why I stopped using it.I have had similar issues appear, (although not as badly) as long as a month after clear coating.After ruining 3 or 4 paint jobs this way, I swore off Testors clear.I've never had the same issue with the other clears that I use now. Steve
gtx6970 Posted March 16, 2016 Posted March 16, 2016 Looks like enamel clear over lacquer base coat ?or mixing different base coats with another manufacturers clear ?
Bob Ellis Posted March 17, 2016 Posted March 17, 2016 I agree, looks like 2 paints interacting poorly.
Samiches Posted March 17, 2016 Author Posted March 17, 2016 I like where you're going with this. What's your secret for detailing hard lines without slopping paint over onto the chassis?I paint the lines slowly with very little paint on a fine brush.
Samiches Posted March 17, 2016 Author Posted March 17, 2016 The paint was black petroleum 2x cover with either rustoleum 2x clear or krylon acrylic clear. I've had good results clearing with same combo before. Maybe I missed the within 1 hour or clear after 48 hours window. Oh well, it's all been stripped off now. It was just a weird surprise. Also, the paint didn't do that on the lower half of the vehicle.
Samiches Posted March 18, 2016 Author Posted March 18, 2016 I made a bit of progress this week and should be onto the interior soon. Comments and/or questions are appreciated and welcomed. Thanks for looking!
Oldmodelmaker Posted March 19, 2016 Posted March 19, 2016 (edited) What is Spencer 1984's method for making 90 deg boots?Great looking engine btw. Edited March 19, 2016 by Oldmodelmaker
Samiches Posted March 19, 2016 Author Posted March 19, 2016 What is Spencer 1984's method for making 90 deg boots?Great looking engine btw.He has made a nice how-to video on youtube. Here is a link to it: https://www.youtube.com/watch?v=QvIhmbbtmE4
vintagercr Posted March 19, 2016 Posted March 19, 2016 Looks good, too bad about the reaction with the paint
Samiches Posted March 25, 2016 Author Posted March 25, 2016 (edited) I got a little bit done on the interior. I still have to foil the console which should be fun since it has some interesting curves. There is no painting weather in the foreseeable future, so the body will have to wait a bit longer. Edited March 25, 2016 by Samiches
Samiches Posted March 26, 2016 Author Posted March 26, 2016 The center console was a little quicker to foil than I thought. I used a combonation of matte aluminium on the outside and ultra bright chrome on the inner parts of the metallic inlay on the console. I also had to trim a bit off of the shifter boot to get it to fit down into the proper place. Comments or suggestions are appreciated.
Canso65 Posted March 26, 2016 Posted March 26, 2016 Nice job on the interior and the plug wires.I'm looking forward to seeing this finished.I have one on the pile waiting to be built.
Eloveless Posted March 26, 2016 Posted March 26, 2016 Samiches, what did you use on motor for the wiring? I am looking to detail my motor on second build. What's on the motor besides the 90 degree boots and wiring out of the box?
Samiches Posted March 26, 2016 Author Posted March 26, 2016 (edited) Thanks MRN, and Canso for the comments.Samiches, what did you use on motor for the wiring? I am looking to detail my motor on second build. What's on the motor besides the 90 degree boots and wiring out of the box?I used 30 awg wire for the engine. It can be found at radio shack (if they are still in business) or, I have seen it on eBay. Everything else is from the kit. I did thin some acrylic black paint with water and brushed over parts of the engine to pick up some detail. Edited March 26, 2016 by Samiches
Eloveless Posted March 26, 2016 Posted March 26, 2016 Thanks MRN, and Canso for the comments.I used 30 awg wire for the engine. It can be found at radio shack (if they are still in business) or, I have seen it on eBay. Everything else is from the kit. I did thin some acrylic black paint with water and brushed over parts of the engine to pick up some detail.thank you
Samiches Posted March 31, 2016 Author Posted March 31, 2016 Nice weather is on its way, so I should be able to repaint the Torino this week. I got the body all cleaned up and primed. I found a few scratches after priming and quickly filled them in. I'm almost rethinking the black paint job and going with red instead.
American 185 Heavy Posted March 31, 2016 Posted March 31, 2016 Great choice if you go with the red. I have never ever had luck with anything that I wanted to paint black, so I avoid the color like the plague. Nice save on the body and clean up as well.
Dogfish_7 Posted March 31, 2016 Posted March 31, 2016 She's looking very good! Looking forward to watching your build.
Recommended Posts
Create an account or sign in to comment
You need to be a member in order to leave a comment
Create an account
Sign up for a new account in our community. It's easy!
Register a new accountSign in
Already have an account? Sign in here.
Sign In Now