restoman Posted February 3, 2017 Posted February 3, 2017 I bought this Revell kit 16 or 17 years ago and was all gung-ho to start it. Got the engine glued together and then, for some reason, it got shelved. Drug it out yesterday, gave it some thought and started back at it. My plan is to have it look like something a body shop or garage might have pressed into service as a pick-up and delivery wagon. A bit of a mild custom with the side glass filled in, most of the trim and emblems shaved off, slightly lowered with a set of Camaro rally wheels. Maybe a small block a little more potent looking than the kit's 265 engine. Thinking of an antique white and an antique red roof
jjsipes Posted February 3, 2017 Posted February 3, 2017 Looking like a cool idea. Have a similar project going.
espo Posted February 3, 2017 Posted February 3, 2017 I like your concept. I personally like the '56 Chevys, and my father had one when I was young. This kit has a disproportionately large over hang on the front bumper and gravel shield. Just something to consider. Making it into a Sedan Delivery type body is a great idea . I built a custom Nomad and removed the chrome strips on the tail gate. If you go that way, it is a lot of work and you will need to dedicate at least one sanding stick alone for that move. Wheel choice is always personal, but those 5 spokes would be my first choice. I have used a Chevy big block from various Revell kits and only had to fabricate basic motor mounts, If you stay with the small block it could be any displacement you want it to be. Use the duel Quads off of the '57 or even the Fuel Injection. I would check for headers in your stash or use the "Rams Horn" exhaust manifolds from the '57 kits. Didn't mean to tell you how to build your kit, just sharing some ideas.
restoman Posted February 3, 2017 Author Posted February 3, 2017 I like your concept. I personally like the '56 Chevys, and my father had one when I was young. This kit has a disproportionately large over hang on the front bumper and gravel shield. Just something to consider. Making it into a Sedan Delivery type body is a great idea . I built a custom Nomad and removed the chrome strips on the tail gate. If you go that way, it is a lot of work and you will need to dedicate at least one sanding stick alone for that move. Wheel choice is always personal, but those 5 spokes would be my first choice. I have used a Chevy big block from various Revell kits and only had to fabricate basic motor mounts, If you stay with the small block it could be any displacement you want it to be. Use the duel Quads off of the '57 or even the Fuel Injection. I would check for headers in your stash or use the "Rams Horn" exhaust manifolds from the '57 kits. Didn't mean to tell you how to build your kit, just sharing some ideas. Thanks for the comments. I've heard of that splash pan/bumper overhang but haven't gotten that far yet. It's my idea to leave the bumper stock but pull it back toward the body anyway, so it may be a necessity rather than a custom touch. Those torq-thrust style wheels are off of a diecast I butchered, they do look good there, but I'm looking for a bit more of a what-a-70s-bodyshop-might-have-run kind of look. The chrome wheels almost look too new period-wise, though I really do like them. Yep... those tailgate chrome strips... not looking forward to that. Wide open on engine choices at this point but I'd rather keep it simple for that period look. Headers are a definite, though...if I can find some.
espo Posted February 3, 2017 Posted February 3, 2017 Thanks for the comments. I've heard of that splash pan/bumper overhang but haven't gotten that far yet. It's my idea to leave the bumper stock but pull it back toward the body anyway, so it may be a necessity rather than a custom touch. Those torq-thrust style wheels are off of a diecast I butchered, they do look good there, but I'm looking for a bit more of a what-a-70s-bodyshop-might-have-run kind of look. The chrome wheels almost look too new period-wise, though I really do like them. Yep... those tailgate chrome strips... not looking forward to that. Wide open on engine choices at this point but I'd rather keep it simple for that period look. Headers are a definite, though...if I can find some. One way around the front bumper thing is to work on the Splash apron or gravel pan what ever you want to call it. What I did was to keep removing material from the surface where it meets the radiator support. I just kept going until it looked correct. The front bumper of course comes along with it and where it wraps around under the front fender will start getting into the wheel well opening. After you have the front apron where you want it you can remove what you need to from the bumper that is to far into the opening. This will require a little shaping of the bumper ends but it is pretty easy. For engine headers a couple of nice choices can be found in the small block Nova kit, and the '57 step side pick-up kit has some very nice headers. A set of Pegasus Chrome rims would look good with a little black wash to bring out the detail of the wheels and not make them look like kit chrome. If you can find a set of the Dog Dish hub caps from the '56 210 kit might also add to the look.
DumpyDan Posted February 4, 2017 Posted February 4, 2017 Great idea, seems I have a few of these kits myself and am doing kinda the same thing
restoman Posted February 6, 2017 Author Posted February 6, 2017 First coat of primer... two full-wet coats, no putty yet. Getting rid of those chrome strips on the tailgate was a rare treat! I took the side glass and tailgate reveal mouldings off completely. Might need to round over the edges slightly. So far, I'm liking it. Comments most welcome!
Belugawrx Posted February 6, 2017 Posted February 6, 2017 Nice start,..I like your idea for a panel ... Just a bit of ghosting on that rear end still Lookin good
horsepower Posted February 7, 2017 Posted February 7, 2017 If you keep having a ghosting problem, block it to bare plastic, or really close to it, then brush on a coat of liquid cement over the ghosting and scuff lightly then add primer. The liquid cement relaxes the surface tension on the plastic and goes deeper than any primer or paint coat will go, stopping it from popping back up again.
espo Posted February 7, 2017 Posted February 7, 2017 If you keep having a ghosting problem, block it to bare plastic, or really close to it, then brush on a coat of liquid cement over the ghosting and scuff lightly then add primer. The liquid cement relaxes the surface tension on the plastic and goes deeper than any primer or paint coat will go, stopping it from popping back up again.great tip .
espo Posted February 7, 2017 Posted February 7, 2017 This is going to look good with all of the Bel Air trim mostly gone.
restoman Posted February 7, 2017 Author Posted February 7, 2017 If you keep having a ghosting problem, block it to bare plastic, or really close to it, then brush on a coat of liquid cement over the ghosting and scuff lightly then add primer. The liquid cement relaxes the surface tension on the plastic and goes deeper than any primer or paint coat will go, stopping it from popping back up again. Thanks! This is only the first light coat of primer but I sure don't want too many more on there... I'll try this.
Lunajammer Posted February 7, 2017 Posted February 7, 2017 If you keep having a ghosting problem, block it to bare plastic, or really close to it, then brush on a coat of liquid cement over the ghosting and scuff lightly then add primer. The liquid cement relaxes the surface tension on the plastic and goes deeper than any primer or paint coat will go, stopping it from popping back up again.Hey, I like that. Clever.
restoman Posted March 17, 2017 Author Posted March 17, 2017 First mock up... A couple small putty spots to deal with and then it'll be ready for paint - off white with an antique red roof. I used the styrene tires from the Fuzz Duster kit and the chrome slots from the '60 Corvette for that early 70s look. The front should sit a little lower when done. Swapped the slip n'slide trans over to a four speed, modified some headers to fit, added a better intake and now the little 265 becomes a 327 or a 350. Topped off with one of Joseph's beautiful Quadra-Jets ~ it's going to be a shame to hide it under an air breather. Comments welcome.
espo Posted March 18, 2017 Posted March 18, 2017 Glad to see you are back after this build. The body looks great. look forward to seeing it painted. What all have you got in mind for the interior ??
restoman Posted March 18, 2017 Author Posted March 18, 2017 Nothing too drastic for the interior. I modified the rear seat cushion so the seat back (without the cushion) will lay flat, the rear floor mat will be black and the side panels will be a combo of red and white. ... And the correct number of pedals under the dashboard and a Hurst shifter poking through the tunnel...
chepp Posted March 20, 2017 Posted March 20, 2017 Your panel-Nomad idea really works well. The ride height and the 15" wheels/tires are perfect. That would be a cool shop truck in 1:1.
Cpt Tuttle Posted March 21, 2017 Posted March 21, 2017 I think you can swap the front splash pan/bumper assembly for the parts from the 56 Del Rey which is more correct.
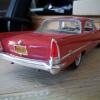
restoman Posted June 2, 2017 Author Posted June 2, 2017 Freshly painted, so I had to mock it up! Testors Insignia Red on the roof, Chrysler Cool Vanilla car paint on the body and a coat of urethane clear.
espo Posted June 3, 2017 Posted June 3, 2017 Nice to see that you're back after this one. The picture of the tailgate looks as though you were able to completely remove the tailgate moldings without any shadows.
Recommended Posts
Create an account or sign in to comment
You need to be a member in order to leave a comment
Create an account
Sign up for a new account in our community. It's easy!
Register a new accountSign in
Already have an account? Sign in here.
Sign In Now