hotrodmatty Posted July 9, 2017 Share Posted July 9, 2017 Hey all, As a new member, i thought i would document a build i've just started, and plan to finish in the next 3-4 weeks (business travel permitting). The base kit is the Revell '57 Ford Gasser, with some parts modifide, some parts scratch built, and some borrowed from other kits. 1 week in, i've chosen a wheel/tire combo - gasser inspired wheels from the Malco Gasser Mustang, front white walls from a '66 Fairlane MPC stock car kit, and rear Pie-crusts possibly from the Malco also, which are pre printed with detail. The front and rear suspension detailed and complete, to form an anchor point to work the rest of the car out from. I chopped the front clip off (first for me), built a new firewall out of styrene, and built the front engine plate for the Boss motor out of the Revell Motor-City Muscle '70 Boss Mustang kit. Engine has been painted a honeycomb color (will make more sense later in the build progress), added a scratch built intake, '90s funny car supercharger, Detail Master distributor, and parts box mechanical injection and bug catcher. Quote Link to comment Share on other sites More sharing options...
Metaldrumm Posted July 9, 2017 Share Posted July 9, 2017 Nice work so far, keep the updates coming Quote Link to comment Share on other sites More sharing options...
hotrodmatty Posted July 12, 2017 Author Share Posted July 12, 2017 I'm sure many of you have done this many times before, but i tried my hand at testing some Candy Apply paint techniques. I think i've landed on a theme which will define the color. I found some Rustoleum paints locally and am thinking Bright Metallic silver as a base coat, red or purple tinted clear coat, then a clear coat. I tried waiting 10 mins between coats for the test and seems to work ok. If i feel optimistic, i may tape some flames or lace after the silver base coat, add a few layers of the tinted clear coat, then remove the tape and continue with the same color tinted clear coat, to create a ghost flame or ghost pattern look. Any tips about doing Candy Apply paints i should think about or watch out for? Quote Link to comment Share on other sites More sharing options...
shoopdog Posted July 12, 2017 Share Posted July 12, 2017 I've never painted any Candy colors to give you any advice, but I like the ghost flame idea. Quote Link to comment Share on other sites More sharing options...
hotrodmatty Posted July 18, 2017 Author Share Posted July 18, 2017 I managed to get the flip front working and everything seems to line up. Very happy for my first ever flip front. I went with some long holes on some styrene, which lets the front move forward and then tilt - tilting alone made the lower portion of the front fenders make contact with the firewall sides, even after narrowing the firewall. The front is held in place with 2 pins - a portion of a large paper clip which is bent at 90 degrees - so that i can remove them and the clip comes off completely. I'll clean up the ends later on. With the hood opening forwards as well, the engine gets presented nicely. Quote Link to comment Share on other sites More sharing options...
hotrodmatty Posted July 24, 2017 Author Share Posted July 24, 2017 Spent some time on the interior - went with a stripped out and drilled out concept. Made a template from the original pieces, used some imagination to plan out the panel openings and where holes would be drilled, and cut it out of styrene. For the trunk door interior, i cut the original piece. The side panels, dash and roll cage got a few coats of Rustoleum Gold Metallic and clear coats, the folded down rear storage area was painted a Satin Latte, and the floor was meant to get a Rustoleaum Marigold Yellow Gloss, but the spray head went haywire splattering paint all over like a thick dust. Some wet sanding knocked the heads off and gave it textured look like real carpet, so went with it. Dash detailed with a silver strip, the radio has been "drilled out", dashpad mounted tacho with wire, accessory under dash gauges, and a CB radio for keeping tabs on the Po-Po during street racing meets..... Also made up some window winder mechanisms (black). Ill add some winders and handles later from the parts box. 1 Quote Link to comment Share on other sites More sharing options...
hotrodmatty Posted July 26, 2017 Author Share Posted July 26, 2017 The blown 429 is not finished, but its getting there. A few more details to add - the belt, fuel lines etc Some progress made on the chassis including running fuel lines from the rear tank up to the Moon tank mounting area. Also made a small radiator and a trunk mounted battery tray, holder, and wiring. Interior progress next 1 Quote Link to comment Share on other sites More sharing options...
Sledsel Posted July 31, 2017 Share Posted July 31, 2017 (edited) Looking REALLY good. Before you get to far on the body, cut off the lower part of the front fenders. If you want the front valance, get one from an AMT 57, it is closer to correct. The valance is one piece and attached to the fender and that lower area is not part of the fender. Sand the lower header panel to raise the grill, it is about a scale inch too low. Revell really dropped the ball on accuracy on their 57 Ford kits. They need A LOT of work to be made correct. Edited July 31, 2017 by Sledsel Quote Link to comment Share on other sites More sharing options...
KENNEDYJR Posted August 8, 2017 Share Posted August 8, 2017 Sweet project. Quote Link to comment Share on other sites More sharing options...
stavanzer Posted August 14, 2017 Share Posted August 14, 2017 Very Fine Work.What brand of transparent purple paint is that? Quote Link to comment Share on other sites More sharing options...
Johnt671 Posted August 15, 2017 Share Posted August 15, 2017 Wow! Super nice work. Quote Link to comment Share on other sites More sharing options...
hotrodmatty Posted October 9, 2017 Author Share Posted October 9, 2017 Been a while since the last update but will try fill in the details. Since this last post, the chassis & interior were finished, and the car went on to win a Monthly build-off with just a primered body & silver roof (and a few small details) The interior was finished with a few more details than originally planned, but felt they were needed given the "stripped out" theme. Scratch built some window winder mechanisms, retracted side windows, racing belts and buckles, and wired a parachute cable to the rear. Also continued running the fuel lines up to a custom mounted Moon tank (flip front fouled on the original mounted tank). Body in primer was as submitted to the build-off 1 Quote Link to comment Share on other sites More sharing options...
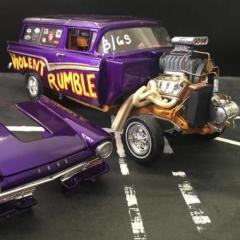
hotrodmatty Posted October 9, 2017 Author Share Posted October 9, 2017 With the monthly build-off won & done, the body was stripped back down and the necessary body work done to clean up some rough areas. The planned paint & overall theme was in mind from day 1 of the build. After several coats of a highly reflective silver, on went several coats of the transparent violet. the roof was then sanded back and 2 coats of gold flake added, followed by 2 coats of transparent violet again, and some purple pinstripe decals. Then, linking back to the original them after a chocolate bar "Violet Crumble", i hand lettered "Violent Rumble" on the sides. Like the bar, transparent violet over silver foil with honeycomb inside, the Gasser tried to keep the same color theme. And like all good Gassers, needed a cool Gasser name. This was my first candy paint job, and first time hand lettering. Not perfect, bud i thought it came out pretty good. Photo of the paints i used as a reference Quote Link to comment Share on other sites More sharing options...
hotrodmatty Posted October 9, 2017 Author Share Posted October 9, 2017 With the body now on, i quickly fell out of love with the headers, so used some styrene to build a new set of equal length fender pipes, painted in an off-white to suit the Gasser theme. Alot of work to plan the path of the pipes around steering, brakes, chassis, fuel lines etc, the same as a real car. Also added more fuel lines and details to the engine - bent a paper clip and painted with a bronze pen to look like copper etc Quote Link to comment Share on other sites More sharing options...
hotrodmatty Posted October 9, 2017 Author Share Posted October 9, 2017 For a bit of fun, i built a new parachute mount, used an older school parachute, and wired an opened parachute , which could interchange on the parachute mount. Quote Link to comment Share on other sites More sharing options...
disabled modeler Posted October 9, 2017 Share Posted October 9, 2017 Very cool..! I like wagons anyway but this is cool. Love the reflective silver look and the pinstripes....very nice detailing. Quote Link to comment Share on other sites More sharing options...
hotrodmatty Posted October 9, 2017 Author Share Posted October 9, 2017 and then all wrapped and and showing off at the local drag meet Quote Link to comment Share on other sites More sharing options...
disabled modeler Posted October 9, 2017 Share Posted October 9, 2017 AWESOME...! Quote Link to comment Share on other sites More sharing options...
DumpyDan Posted October 9, 2017 Share Posted October 9, 2017 Very cool, great detailing on the interior. Love the whole car! Quote Link to comment Share on other sites More sharing options...
David G. Posted October 9, 2017 Share Posted October 9, 2017 Excellent work!David G. Quote Link to comment Share on other sites More sharing options...
carman1 Posted October 10, 2017 Share Posted October 10, 2017 Very nice ! Quote Link to comment Share on other sites More sharing options...
Draggon Posted October 10, 2017 Share Posted October 10, 2017 Love your lettering! Quote Link to comment Share on other sites More sharing options...
DrKerry Posted October 10, 2017 Share Posted October 10, 2017 LOVE IT!!!!!!!!!! That purple really pops!!!!!!!!! Quote Link to comment Share on other sites More sharing options...
Metaldrumm Posted October 10, 2017 Share Posted October 10, 2017 Turned out pretty good. Quote Link to comment Share on other sites More sharing options...
Jimfromok Posted October 26, 2017 Share Posted October 26, 2017 I have a feeling those Racemaster slicks are in for a serious tannin Quote Link to comment Share on other sites More sharing options...
Recommended Posts
Join the conversation
You can post now and register later. If you have an account, sign in now to post with your account.
Note: Your post will require moderator approval before it will be visible.