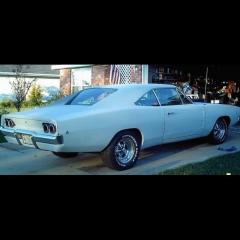
MOPARmaniac Posted June 6, 2018 Posted June 6, 2018 Hey guys, my dad gave me a model of revell's 1969 dodge charger he had never completed when he was a kid. He started to put dents in it to make it a junkyard car, but I thought it would be cool to make it look like someones ratty project car. I plan to have the doors open and close, the trunk already has hinges that he made a long time ago. I was also kinda thinking about making the headlight doors open and close, we'll see. Anyway, hope you guys enjoy!
espo Posted June 7, 2018 Posted June 7, 2018 Nice basis to work with. If you keep the vinyl roof you could have a little stuffing sticking out of a tear in the top. One headlight working and one not. Possibilities are endless.
MOPARmaniac Posted June 7, 2018 Author Posted June 7, 2018 3 hours ago, espo said: Nice basis to work with. If you keep the vinyl roof you could have a little stuffing sticking out of a tear in the top. One headlight working and one not. Possibilities are endless. speaking of which I was just about to ask of a good way to make the vinyl top look torn, because I was already planning on it, but I have never done it before.
MOPARmaniac Posted June 7, 2018 Author Posted June 7, 2018 Started some rust damage on the tail panel today what do you guys Think?
MOPARmaniac Posted June 7, 2018 Author Posted June 7, 2018 did some weathering to the chassis, put a few rust holes in the frame rails. I just did a brown wash for the base of the weathering. Then I sprayed clear coat on it and sprinkled cinnamon all over it, then sprayed clear coat on top of that. I'm not completely done with the weathering, but I think it looks good so far.
gman Posted June 7, 2018 Posted June 7, 2018 Never would have thought to use cinnamon...should give the finished model a nice scent
espo Posted June 8, 2018 Posted June 8, 2018 I agree with the cinnamon idea. Looks like the chassis was in a very wet environment for a long time. I have not done a torn vinyl roof but I have seen a few here on the forum that look good. Remember these cars didn't have any padding to speak off and were glued to the roof directly. The old cars I remember in 1:1 with a torn roofs the under side looked like an off white and the glue residue seemed to be a dull yellow color. Maybe sanding a small section smooth and some paint treatment might be worth trying. Another thought is that many of these tops would start coming apart along the seems and that might even be a more realistic idea. I think I would try something on the old picnic spoons first but that's just me. Look forward to what all you do to this build.
Pat Minarick Posted June 9, 2018 Posted June 9, 2018 On 6/7/2018 at 2:09 PM, MOPARmaniac said: did some weathering to the chassis, put a few rust holes in the frame rails. I just did a brown wash for the base of the weathering. Then I sprayed clear coat on it and sprinkled cinnamon all over it, then sprayed clear coat on top of that. I'm not completely done with the weathering, but I think it looks good so far. Looks good ! Going to need to add some old burnt rubber in the wheel wells?
MOPARmaniac Posted June 9, 2018 Author Posted June 9, 2018 3 hours ago, Pat Minarick said: Looks good ! Going to need to add some old burnt rubber in the wheel wells? LOL! I know right! I was also thinking about making the trunk floors rusted out too.
426 pack Posted June 11, 2018 Posted June 11, 2018 This thing looks horrible (I mean that in a good way). What type of motor are you going to put in it? I will be watching.
MOPARmaniac Posted June 12, 2018 Author Posted June 12, 2018 10 hours ago, 426 pack said: This thing looks horrible (I mean that in a good way). What type of motor are you going to put in it? I will be watching. I'm putting a 440 in it, nothing special, just a turquoise, greasy, nasty 440 that is 50 years old. however I don't have any pics right now, I have been very busy the past few days, so sorry about that guys.
MOPARmaniac Posted June 13, 2018 Author Posted June 13, 2018 well, I did it. After two days of planning, anger, and happiness, I know have one of the headlight doors functioning. Now I just have to get the other one working as well. I am quite happy with this, even though the mechanism to make the door open looks like BLAH_BLAH_BLAH_BLAH. It is the first time i have tried anything this complicated, S I am pretty proud of myself.
MOPARmaniac Posted June 13, 2018 Author Posted June 13, 2018 I also decided on my wheels, I really wanted to find some steel wheels laying around but didn't find any, so I just decided on cragars. I also decided to mismatch one of the tires, just because why not.
Slotto Posted June 13, 2018 Posted June 13, 2018 That headlight deal is cool! It's fun when you do something you have never done before and it works out. It gives you a big boost in encouragement. Great job!
MOPARmaniac Posted June 14, 2018 Author Posted June 14, 2018 13 minutes ago, Slotto said: That headlight deal is cool! It's fun when you do something you have never done before and it works out. It gives you a big boost in encouragement. Great job! Thanks! I really appreciate all the comments from you guys. I finalized the headlight mechanism on that side of the grill and decided to see how it would look when it was on the car, however im not done because I still need to make the other headlight door open and close. Also I need to sand on the driver side fender, because it is scratch built and making the grill sit crooked.
Mr. Moparman Posted June 14, 2018 Posted June 14, 2018 Some nice progress being made here. Should be an accurate representation of how many of the surviving cars are living their lives these days, rusting away somewhere waiting to be restored. Your scratch work on those headlight doors is nice, just clean up the inner buckets a bit and you'll be golden!
PlymouthFan Posted June 17, 2018 Posted June 17, 2018 This build looks amazing as it’s going normally I’m not a charger guy but the ratty chargers are just cool
MOPARmaniac Posted June 18, 2018 Author Posted June 18, 2018 Just finished the second headlight. They both open and close like butter now. I also started to paint the grill, however a lot of the chrome flaked off so I am gonna paint the whole thing silver to get it one color.
Recommended Posts
Create an account or sign in to comment
You need to be a member in order to leave a comment
Create an account
Sign up for a new account in our community. It's easy!
Register a new accountSign in
Already have an account? Sign in here.
Sign In Now