rickcaps55 Posted October 28, 2023 Share Posted October 28, 2023 Just now, Keef said: Beautiful boy, Russian Blue? Yes thank you i got him when he was 8 months old 1 Quote Link to comment Share on other sites More sharing options...
Steve H Posted October 29, 2023 Share Posted October 29, 2023 Hi Keith, so sorry for your loss. Our pets become such an important part of the family, and faithful companions. As for the build…Not sure how I missed this one, but absolutely love where this is headed. Nice work so far, I will be watching for when you get back to the bench. Take care. Cheers, Steve 2 Quote Link to comment Share on other sites More sharing options...
dino246gt Posted October 29, 2023 Share Posted October 29, 2023 I am also so sorry for your loss. Pets add so much to our lives. 2 Quote Link to comment Share on other sites More sharing options...
Keef Posted March 2 Author Share Posted March 2 Drug this one out and did a little more work on it today. Got my final mockup before I start gluing parts and prepping for paint. Decided to go with stock steelies and dog dishes. Going with the original (incorrect) AMT interior because I was going to have to cut too much of the Charger interior to make it fit. And I don’t have those AMAZING @StevenGuthmiller skills to scratchbuild a correct interior for this one. 1 Quote Link to comment Share on other sites More sharing options...
Steve H Posted March 3 Share Posted March 3 Nice to see this one back on the bench Keith. Funny, I was toiling away on the interior of my Olds today and thinking about Mr Guthmiller and his mad skills! Look forward to watching this one again. Cheers, Steve 1 1 Quote Link to comment Share on other sites More sharing options...
Keef Posted March 3 Author Share Posted March 3 12 hours ago, Steve H said: Nice to see this one back on the bench Keith. Funny, I was toiling away on the interior of my Olds today and thinking about Mr Guthmiller and his mad skills! Look forward to watching this one again. Cheers, Steve Funny thing, I was looking at the interior tub for this one and caught myself thinking “What would Mr Guthmiller do?” …. That’s when I realized that he would scratch build a new one like he did on that BEAUTIFUL 68 Coronet he built. I also realized that is beyond my skills and abilities so I decided to use the kit piece. Someone need to make a new correct interior for this kit. 1 Quote Link to comment Share on other sites More sharing options...
slusher Posted March 3 Share Posted March 3 On 10/28/2023 at 9:48 AM, Keef said: No progress to report as of today. Had a fur baby pass suddenly yesterday, he was a daddy’s boy and was always in the garage with me when I was down here working on stuff. It just doesn’t feel the same today without him. I’ll post some progress when I eventually make some. So sorry for your loss Keith.. 1 1 Quote Link to comment Share on other sites More sharing options...
Keef Posted March 3 Author Share Posted March 3 27 minutes ago, slusher said: So sorry for your loss Keith.. Thank you Carl 👍🏻 1 Quote Link to comment Share on other sites More sharing options...
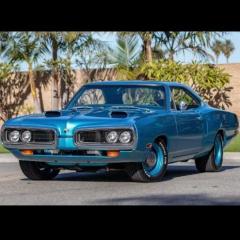
Keef Posted March 16 Author Share Posted March 16 Had some nice weather today so I shot some paint on this one. Duplicolor GM Medium Quasar Blue. Waiting on some decals to arrive then I can clear it. Then I get to start on everything else 😂🤣 2 Quote Link to comment Share on other sites More sharing options...
FoMoCo66 Posted March 17 Share Posted March 17 Like the color. Looks like the rustoleum metalic blue even though it's not. That's the color I painted the my top of my sox and martin cuda. 1 Quote Link to comment Share on other sites More sharing options...
Noah H. Posted March 17 Share Posted March 17 This build's looking good... looking forward to seeing what engine you go for! Quote Link to comment Share on other sites More sharing options...
Keef Posted March 17 Author Share Posted March 17 The GTO in the background is Rustoleum Metallic Blue. 3 Quote Link to comment Share on other sites More sharing options...
slusher Posted March 17 Share Posted March 17 Nice color Keith! 1 Quote Link to comment Share on other sites More sharing options...
Scott8950 Posted March 18 Share Posted March 18 That blue looks great on it. 1 Quote Link to comment Share on other sites More sharing options...
Moparman18064 Posted March 18 Share Posted March 18 That GM blue looks really good on it! Quote Link to comment Share on other sites More sharing options...
Keef Posted May 5 Author Share Posted May 5 Got the decals on today. Gonna let them dry while I’m out of town working this week. May try to clear it next weekend. 4 Quote Link to comment Share on other sites More sharing options...
Recommended Posts
Join the conversation
You can post now and register later. If you have an account, sign in now to post with your account.
Note: Your post will require moderator approval before it will be visible.