Raul_Perez Posted April 13, 2009 Author Posted April 13, 2009 I like this one. Yeah, I like the look of the pie-cut hood, too. It follows the profile of the chopped/slanted roof really well. I prefer the pie-cut hood also, interesting little project my friend!!! Thanks, Marcos!! I just hope that the carpal tunnel in my wrists stays away long enough for me to get this one finished soon... Later,
evilone Posted April 13, 2009 Posted April 13, 2009 Yeah, Kevin, normally I'd agree with you and go with a BB Ford engine. I'm using the old HEMI in this one because it's a cool engine and it's what came in the '41 Willys kit that I'm using for the chassis, tires, wheels... Later, oh i get you bro its gonna be a sweet build.
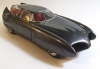
Raul_Perez Posted April 13, 2009 Author Posted April 13, 2009 (edited) My son left this afternoon to go back to school, so I had a bit of time to pie-cut and shape the hood before I had to call it a day. Here's how the hood looked after the pie cuts and prep of the opening with 180 grit sandpaper. As I mentioned, I used 180 grit sandpaper to finish off the pie-cut before I glued it back together. By squeezing the hood together and dragging the sandpaper through several times, you virtually create a perfect fit between the top and bottom of the cuts. Here's what the hood looked like after being glued back together and shaped a bit. If you look closely at the rear of the cut you'll see the small relief hole that I drilled in the hood to help relieve any tension in the plastic when I glued the pie-cut shut. By cutting the hood the way I did and using the 180 grit sandpaper to finalize the fit, I was also able to save the original body line and the molding on the hood. This was important to me for this build because I want to use the original molding as the separation point for the two-tone paint job that this one will get in a few weeks. Here's how the hood looked on the model before the pie-cut and reshaping. Here it is after the pie-cut and a slight slanting back/rounding off of the top of the nose of the hood. Well, that's all for me for today... Later, Edited May 12, 2009 by Raul_Perez
MikeMc Posted April 13, 2009 Posted April 13, 2009 that is SO subtle, but nice! .. a master at work Agreed.....excellent pics too!! Are you gonna scratchbuild a fuel tank or gonna "moon" it??
Peter Lombardo Posted April 13, 2009 Posted April 13, 2009 Very nice….the modifications are subtle yet very affective. The roof slant looks great…..off to a beautiful start.
Jantrix Posted April 13, 2009 Posted April 13, 2009 Great looking work. I'm gonna use some of these techniques on a 41 Willys soon.
Raul_Perez Posted April 14, 2009 Author Posted April 14, 2009 that is SO subtle, but nice! .. a master at work Agreed.....excellent pics too!! Are you gonna scratchbuild a fuel tank or gonna "moon" it?? Thanks, guys!! This is intended to be a street rod, so I'll add a gas tank behind the rear end.
Raul_Perez Posted April 14, 2009 Author Posted April 14, 2009 Very nice….the modifications are subtle yet very affective. The roof slant looks great…..off to a beautiful start. Thanks!! The '40 Ford was a GREAT design to start with, so it only takes a few subtle mods to make it more modern. Great looking work. I'm gonna use some of these techniques on a 41 Willys soon. The Revell '41 Willys kits are excellent to build or as parts cars. I bought several of them for both reasons. Let me know if you need any Willys body parts. I have a couple of spares. Later,
Raul_Perez Posted April 19, 2009 Author Posted April 19, 2009 (edited) Before I can finish the body work, I needed to figure out exactly where and at what angle the exhaust pipes will exit the passenger side of the car. That's because I'll be molding the running boards to the body and building exhaust cutouts into them like the ones on the Raptor hauler. (WOW!! I really pie-cut that hood...but that's a different story...). I used the mufflers from the '41 Willys hotrod kit, but the exhaust pipes are made from solder with aluminum sleeves where they enter and exit the mufflers and aluminum tubing for the tips. I still need to add the "H" cross-over pipe in front of the mufflers, flanges at the headers and some PE hangers. I'll polish the tips later... The color on the engine block is what will be used on the top portion of the two-tone paint job. Well, that's about all that I'll have time to do on this one this week...tomorrow is my dad's 70th birthday, so we'll be spending the day with him. Later, Edited April 19, 2009 by Raul_Perez
juergen Posted April 19, 2009 Posted April 19, 2009 hi raul !!! your design work is absolut amazing !!!!! :P i love this !!!! and i hope we can see more pics of our great work !!! greets jürgen
CB Posted April 19, 2009 Posted April 19, 2009 Nice work on the exhausts there, Raul. Interesting as well putting 'em both out the passenger sides. I don't think I saw the underneath of your Raptor Hauler before--- Catalytic converters, eh? Nice touch!
Raul_Perez Posted April 19, 2009 Author Posted April 19, 2009 hi raul !!! your design work is absolut amazing !!!!! i love this !!!! and i hope we can see more pics of our great work !!! greets jürgen Thanks, Jürgen!! Yes, I'll post more pics of the build as I go. Nice work on the exhausts there, Raul. Interesting as well putting 'em both out the passenger sides. I don't think I saw the underneath of your Raptor Hauler before--- Catalytic converters, eh? Nice touch! Thanks, John!! This mean machine is running a 392 HEMI. Since this one will ALWAYS run in the fast lane, there's nothing better than dumping your exhaust over onto the poor, undeserving young lad in the next lane over that's probably relegated to driving his mom's grocery getter. Yeah, the hauler is running the supercharged 5.4-liter V8 from the '99 Ford Lightning, so it needed the cats; plus, I live in CA!! Later,
MikeMc Posted April 19, 2009 Posted April 19, 2009 Looking Good as always Raul . love the color choice... only thought I have is those mufflers seem small for those big honkin pipes.... and enjoy the day with your dad...life is too short!
curt raitz Posted April 20, 2009 Posted April 20, 2009 all that pie cutting is makin' me hungry... i'm gonna have to try it on some of my future rod builds... this car is really comin' along nice!!! c'ya buddy
Raul_Perez Posted April 20, 2009 Author Posted April 20, 2009 Looking Good as always Raul . love the color choice... only thought I have is those mufflers seem small for those big honkin pipes.... and enjoy the day with your dad...life is too short! Yeah...the mufflers are on the small side, and probably barely legal in some states!! all that pie cutting is makin' me hungry... i'm gonna have to try it on some of my future rod builds... this car is really comin' along nice!!! c'ya buddy Yeah, give it a try!! Just not on one of those Ferraris!! Later,
Raul_Perez Posted April 20, 2009 Author Posted April 20, 2009 I had some time this morning to install the "H" pipe and notch the bottom-side of the running board for the exhaust outlets. There was plenty of room for the "H" pipe right between the tranny pan and the rear mount. Yeah, they are pretty small mufflers, but then this one is meant to be heard. These next two pictures pretty clearly shows the cutout on the bottom-side of the running board for the exhaust outlets. I still haven't decided what I'm going to do for taillights on this one...maybe I'll use the stock ones on this build... Later,
CB Posted April 20, 2009 Posted April 20, 2009 (edited) There oughta be a law! no upsides down pix allowed! shows off them pipes real well Raul, but....... dat poor Willys Wait a minute! Dat aint no Willys! Edited April 20, 2009 by CB
Foxer Posted April 20, 2009 Posted April 20, 2009 (edited) There oughta be a law! no upsides down pix allowed! shows off them pipes real well Raul, but....... dat poor Willys but if I turn this right side up I feel like I have my head laying on the ground looking at it ... and, nice pipes Raul!! Edited April 20, 2009 by Foxer
Fletch Posted April 20, 2009 Posted April 20, 2009 Very nice Mr Perez, the '40 Ford Coupe is a blank canvas waiting for the artist to come along and turn it into a thing of beauty. Excellent, Excellent build, love the angle chop and the pie sliced nose, all very cool. I will agree with everyone else my neck got stiff trying to stand on my head to look at the upside down photos.
Raul_Perez Posted April 20, 2009 Author Posted April 20, 2009 Very nice Mr Perez, the '40 Ford Coupe is a blank canvas waiting for the artist to come along and turn it into a thing of beauty. Excellent, Excellent build, love the angle chop and the pie sliced nose, all very cool. I will agree with everyone else my neck got stiff trying to stand on my head to look at the upside down photos. Thanks for the compliments!! That's too funny about the up-side down photo!! Later,
george 53 Posted April 20, 2009 Posted April 20, 2009 Raul, you KNOW ya did that on purpose! Ya were probly crackin up jus thinkin about ALL your forum brothers standin on their heads tryin ta get a better look . Me, I jus flipped the monitor over, it worked GREAT!
59 Impala Posted April 20, 2009 Posted April 20, 2009 I had some time this morning to install the "H" pipe and notch the bottom-side of the running board for the exhaust outlets. There was plenty of room for the "H" pipe right between the tranny pan and the rear mount. Yeah, they are pretty small mufflers, but then this one is meant to be heard. These next two pictures pretty clearly shows the cutout on the bottom-side of the running board for the exhaust outlets. I still haven't decided what I'm going to do for taillights on this one...maybe I'll use the stock ones on this build... Later, Kinda gives new meaning to the term F.ound O.n R.oad D.ead in these pics. Just kiddin ya. She looks great. I really like the work you've done so far Raul. Keep up the good work. Dan
Raul_Perez Posted April 21, 2009 Author Posted April 21, 2009 Kinda gives new meaning to the term F.ound O.n R.oad D.ead in these pics. Just kiddin ya. She looks great. I really like the work you've done so far Raul. Keep up the good work. Dan That's pretty funny, Dan!! She may look like roadkill now, but just wait 'til I get her back on her wheels. Then it'll be Driver Returns On Foot because I'm running a HEMI instead of a BBF!! Later,
Bernard Kron Posted April 21, 2009 Posted April 21, 2009 All those fine, fine. super fine details are adding up. It's definitely Got The Look. Love how the rear rolled pan extends to meet the ends of the frame. The exhaust work, of course, gives it a slick and modern touch that perfectly compliments the tubbed and in the weeds style resulting from the Willys frame. Looking forward to seeing some more details on those running boards... Are those posable front wheels I see?
Recommended Posts
Create an account or sign in to comment
You need to be a member in order to leave a comment
Create an account
Sign up for a new account in our community. It's easy!
Register a new accountSign in
Already have an account? Sign in here.
Sign In Now