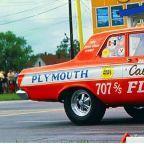
gtx6970 Posted March 27 Posted March 27 Been wanting to do this particular car for years. Sadly no one did the decals in the correct colors.......until. Chris Walsh released the decals in the correct colors a year or so ago. So... It's game on. Plan is stay close to box stock...kinda sorta. All the 67 gtx unique emblems and trim has been removed. I've added a mldg along the upper body line. Like the 1/1 . Will be 426 hemi. 4spd. And metallic red interior 10
gtx6970 Posted March 27 Author Posted March 27 (edited) Interior is painted With the correct metallic burgandy red color as the 1/1 car ( I had it on the shelf for my actual car ) Edited March 27 by gtx6970 7
gtx6970 Posted April 1 Author Posted April 1 (edited) Can anyone tell me what the decal is on the front fender, Below the belvedere emblem forward of the wheel opening? It looks like it MIGHT be a Champion or maybe B+M decal???? What about the oval decal on drivers window? small rectangular one on lower quarter window. Below Hurst decal? I'm trying to make this a reasonably accurate version of the actual car back in the day. Had to buy a 2nd decal sheet to get the trunk lid decal Early car had said trunk decal and NO hood scoop. Scoop was added at some point, then later the d=trunk decal was eliminated. Im undecided if I will add the scoop or not I got a resin bench seat in from Harts parts, Its not dead on accurate. But close enough I can live with it. Edited April 1 by gtx6970 5
gtx6970 Posted April 3 Author Posted April 3 (edited) Waiting on some detail supplies - seat belt components and photo etch pieces . So, in the meantime working on the chassis and interior Bench seat is Harts Parts..it's not exact. But it'll work. Hard to warm it in hot water to bring the backrest portion more vertical Made seat track risers Dana and springs are from the revell 68-69 Charger Chassis on the right is for the Grotheer car Edited April 3 by gtx6970 6
gtx6970 Posted April 7 Author Posted April 7 simple update. Found some photo etch emblems for the kit. So decided to use them Belvedere on front fender and the 426 Hemi emblems ( I had screwed up and sanded the molded in ones off. ) As this particular body was originally intended for a different version that didnt have said emblems. So when it was decided to do the Grotheer car I had to figure something else out Also tried my hand at making a stock body color twist off fuel filler car as opposed to the chrome flip cap for the GTX Working with pieces so small is trying on the patience believe me !!! 4
Nitro330 Posted April 8 Posted April 8 Great progress so far Bill and it looks great! I have those decals to do this also someday. I did the Styles and Stahl Belvedere many years ago and did a lot of the same mods. I did the gas cap also but it is covered by the decals so you can barely see it! Keep up the great work.
gtx6970 Posted April 10 Author Posted April 10 well, save for seat belt hardware. The interiors are done. White with bucket seats is the Sox-Martin car Red with bench seat is the Grotheer car 4
M W Elky Posted April 10 Posted April 10 I really like that bench seat interior and that white will really wake up the Sox & Martin car
gtx6970 Posted April 10 Author Posted April 10 (edited) edit, Going thru my vintage magazine stash. I found an article on this very car And I have just enough stuff wrong , That I will not be happy with it Changed a few detail items in the interior , tach and shifter BUT,,,,,I'm going to start over on the engine with a different one Edited April 10 by gtx6970 2
bytownshaker Posted April 10 Posted April 10 Great article on the car, shows that in 67 Super Stock cars were required to run full exhaust which most models only have headers.
1972coronet Posted April 11 Posted April 11 Shifter's different ; it's either a Verti-Gate or a Ram Rod . Appears to have linelock, too.
M W Elky Posted April 11 Posted April 11 6 hours ago, gtx6970 said: edit, Going thru my vintage magazine stash. I found an article on this very car And I have just enough stuff wrong , That I will not be happy with it Changed a few detail items in the interior , tach and shifter BUT,,,,,I'm going to start over on the engine with a different one Don’t be to hard on yourself you’re really capturing the look very well
gtx6970 Posted May 14 Author Posted May 14 (edited) Spent the afternoon today doing the BMF work on the body . That was fun, NOT. Its moving forward, even if it is quite slowly I have everything here I need for it. So, it should be finished next couple weeks Magazines for reference material are SSDI December 1967 and Car Craft April 1967 Edited May 14 by gtx6970 6 1
Brutalform Posted May 15 Posted May 15 Looking good Bill. You been pumping out some builds since retirement. 1
gtx6970 Posted May 15 Author Posted May 15 2 hours ago, Brutalform said: Looking good Bill. You been pumping out some builds since retirement. Thanks, Everyday is Saturday
Zippi Posted May 17 Posted May 17 Boy that's got a killer look to it. I really dig the old drag cars and that 67 body style is my favorite. Coming along nicely.
gtx6970 Posted May 22 Author Posted May 22 (edited) Small yet very time consuming update Used a prewired dist. from Morgan Automotive Detail ( very nice btw ) Photo etch wiring looms is from Model Car garage Stripped the chrome valve covers and painted them VHT wrinkle black . Machined valve cover breather on drivers side is unknown source Added a PCV valve line to pass side VC , It will connect the base of the rear carb once its on Then spent the better part of 3 hours or so getting the ignition wired up, and I had to do it the correct firing order. Good thing I have a lighted desk top magnifier. My eyes simply are not what they used to be Using the December 1967 Issue of SSDI to get the details right Edited May 23 by gtx6970 4
70Monte454 Posted May 23 Posted May 23 I really like this build. little details like making the ignition wires "lay" right can make a big difference and your absolutely nailing it! 1
gtx6970 Posted May 23 Author Posted May 23 I had some time at the bench this morning. So I decided to try my hand at replicating the exhaust that was on this car Started with the exhaust from the Revell 1967 Coronet to get the correct turned down tail pipes. I cut the stock mufflers out and using some 5/32" round plastistruc tubing. Chucked the pieces up in my drill ,,,and Sanded the ends down a touch to get the shape. ( that worked better than I thought it would actually ) Super glued them in place and painted them bright red to look like old Cherry Bombs,,,as I can only assume thats what was on the car For an idea that was just rolling around in my head the past few weeks on HOW to do this. I think I can live with it 3
gtx6970 Posted May 24 Author Posted May 24 Inching closer and closer to the finish line Hopefully, by end of next week 2
bill-e-boy Posted May 24 Posted May 24 This is looking good Bill I like the wrinkle paint effect you have on the valve covers - how did you do that please
gtx6970 Posted May 24 Author Posted May 24 (edited) 2 hours ago, bill-e-boy said: This is looking good Bill I like the wrinkle paint effect you have on the valve covers - how did you do that please Thanks Stripped the chrome in a tank of Wesleys Bleche white Taped the pair of valve covers to a board, I set them out in the sun for a few minutes wto warm out, same for the rattle can Using VHT wrinkle black Laid a light dust coat on them for coverage I let that tack up for maybe 5 minutes Then 2 heavier coats with maybe 5 minutes between coats setting in the sun I use a hair dryer to kind of push the process along , it helps get the effect your after. Just don't get so close you melt the parts Once all assembled, I took a toothpick dipped in gloss black and touched up the boots and base of the wires right where they enter the valve cover to simulate the full size cars In 1/1 car parts world the heavier the better , so to speak. But you cant really do that on model car parts without burying the details There is a photoetch wire loom on the covers to replicate the stock OE Like so Edited May 24 by gtx6970 1
gtx6970 Posted May 25 Author Posted May 25 Well The Hemi Is done. After breaking one of the linkage arms off the front carb. I decided its as done as far as Im willing to go . And Ive already gone so much farther with details than I normally do Throttle cab will attach to the firewall and the coil wire will attach to a coil mounted on the inner fender , to replicate the actual car. 4
Recommended Posts
Create an account or sign in to comment
You need to be a member in order to leave a comment
Create an account
Sign up for a new account in our community. It's easy!
Register a new accountSign in
Already have an account? Sign in here.
Sign In Now