sak Posted March 6, 2010 Posted March 6, 2010 (edited) Bought this at a yard sale for only a few dollars, planned to just use the body shell for airbrush practice but have now decided to build this entirely. Wasn't impressed with it as it has issues. The ends of the stabilzer bars are cast into the inner fenders and just seem to fade out from there and the frame is hollow and leave a visible groove that can be seen on the inside of the car. Crude steering rod assembly. Also the firewall forms part of the floorpan as well, leaving a gap that will have to be puttied up before any flocking is done. But I made new stabilizer bar ends and filled the groove in the floorpans and made a little less crude steering assembly that looks better to my eyes anyway. http://www.modelcarsmag.com/forums/uploads/post-2559-12678516811459_thumb.jpg Hopefully I can match the pictures up with these words. I hollowed out the exhaust tips. That thing in front is what is supposed to pass as the steering. Also no steering gear in this kit. Big pet peeve. http://www.modelcarsmag.com/forums/uploads/post-2559-1267851835225_thumb.jpg The steering wheel that I found in a junk box. looks like a grant classic spoke so I will use it. Could not find the belt so I made a pulley for the alternator and will make a belt from some thin styrene. http://www.modelcarsmag.com/forums/uploads/post-2559-12678519833954_thumb.jpg The firewall was atrocious with almost no detail whatsover, so I will use one from a cutlass, looks close enough for me, and also I oppened the opening in the front bumper and the gauge cluster in the dash. I never have luck detailing chevlle dashboards because of the strange shape so I cut out the gauges and will print out gauges I made in paintshop and glue that to a peice of styrene and put that behind the dash. I plan to open the front grille up too, just trying to concieve a way to fabrictae a grille. http://www.modelcarsmag.com/forums/uploads/post-2559-12678522994524_thumb.jpg A picture of the steering. The kit has poseable wheels so the tie rod ends rest on pins cast into the lower control arms. I removed them and made new ones and attached them to the spindle where they should be. I took the steering from my junk box(from a skylark I think) and I made tie rods. Not perfect but once its painted, it will look better. Also glued on a flange so the idler arm has a place to attach to. I will add the steering gear from the cutlass, just have to shim it so it fits right. Thats all for now, comments, criticism is always welcome. Thnaks Jeff Edited March 6, 2010 by sak
RodneyBad Posted March 6, 2010 Posted March 6, 2010 That is some fine work ya got going on. Really Micro fine
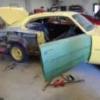
sak Posted July 17, 2010 Author Posted July 17, 2010 Thought I would update my WIp a little. Only have a few hours a week to work on these things.
Romell R Posted July 17, 2010 Posted July 17, 2010 Very nice work be careful its easy to get carried away with Chevelles LOL! (ask me how I know oneday) keep up the good work and I'll be watching this one.
W-409 Posted July 17, 2010 Posted July 17, 2010 Great start! I like very much that engine detail, it's very great. Waiting more updates....
sak Posted August 14, 2010 Author Posted August 14, 2010 (edited) Small update. Installed the "carpet". And finished the dash/ steering colunm. But I have trouble with the shape of these chevelles dashboards. Soon the interior can be assembled. And the body hopefully be primed this weekend. Edited August 14, 2010 by sak
W-409 Posted August 14, 2010 Posted August 14, 2010 Looking good, that steering wheel looks like 1:1. Dash is nice too, waitin' for more updates...
sak Posted August 22, 2010 Author Posted August 22, 2010 (edited) Finished interior. Looks like I used my limit for pictures so no more pictures untill I can make apost underglass. Actually I still have room on fotki as I am still new to it. http://public.fotki.com/1973Plymouth/ Edited August 22, 2010 by sak
Brutalform Posted August 22, 2010 Posted August 22, 2010 Love the interior detail, and under hood detail. BTW, what did you use for the heater hoses???
David G. Posted September 20, 2010 Posted September 20, 2010 I agree, your interior detail is great. I'd love to see some body work when you get more done.
sak Posted October 3, 2010 Author Posted October 3, 2010 I used electical wire. Not sure the gauge, it rubbed off the spool.
sak Posted October 3, 2010 Author Posted October 3, 2010 Small update, Got the shell painted, need to add more clearcoat and polish it still. Worried about how this is going to go together. Both the frame and the shell were badly warped and I straightened best I could. And I noticed that the interior parcal tray does not meet the shell so no way to secure it there. Very awfull design in this kit. But hopefully I can begin foiling it this month. Jeff
sak Posted October 3, 2010 Author Posted October 3, 2010 (edited) These are the slotted wheels I took from a monogram bel air. And the grille, still have to glue the verticle bars onto it. And put on a new liscense plate decal. Edited October 3, 2010 by sak
davyou5 Posted October 4, 2010 Posted October 4, 2010 I love what you have done with the interior , keep it up! I want to see it finished .
sak Posted December 26, 2010 Author Posted December 26, 2010 Little update, finished foilin. Some imperfections in the paint but just want to get this finished. Almost done though. chow.
crazyjim Posted December 26, 2010 Posted December 26, 2010 The whole build looks terrific. Can't wait to see it "under glass".
CaptainAhab Posted December 27, 2010 Posted December 27, 2010 Very clean. Excited to see it finished.
ajulia Posted December 27, 2010 Posted December 27, 2010 Hello there friend! Reminds me of the funny commercial of the guys swimming in caramel!! Excellent build up fella and the color choice is top notch! The gen 1 chevelles are the coolest lookin bowties and my favorite! Keep on wit the keepin on fella!! peace Tito
sak Posted January 30, 2011 Author Posted January 30, 2011 (edited) Amost finished. Just need to do some touchups. First time I used epoxy type glue and the stuff got everywhere even though I used gloves when I touched the tube or anything around it when I mixed it.Theres epoxy glue fingerprints everywhere that I had to polish down to become less noticeable. Also when the shell, interior and chassis were joined, the geometry of the front fenders changed and the front bumper then did not fit as it did before. I had to fight with it and rubbed some of the alclad off the edges. So I must touch that up too.The hood does not fit right anymore as well so I have to find a way to shave some off the sides without chipping pieces of paint off. I don't have anymore of that color so this scares me. I made one big mistake because the wheels are 1:24 scale and might look a little too big. Bah. Edited January 30, 2011 by sak
Recommended Posts
Create an account or sign in to comment
You need to be a member in order to leave a comment
Create an account
Sign up for a new account in our community. It's easy!
Register a new accountSign in
Already have an account? Sign in here.
Sign In Now