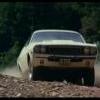
Nick Winter Posted June 16, 2011 Posted June 16, 2011 (edited) Well I started this yesterday about half an hour before my model car club's meeting. Ended up sanding the mold lines off at the meeting, but hey that's half the fun, building with friends . Anyway while talking about my plans for it with Randy Frost I said "I bet you've never seen the movie" Randy replied with "That's a bet you'd lose" turns out that it's a bet I'd win anyway the agenda thus far: Door vents, and Spolier mounts- gotta get filled Hood- has to be sanded flat and a strip added to center Interior- seats have to be sperated into buckets and console stripped and added Real Movie car: Basic idea of the movie: After a wave of unsolved car thefts, an insurance company calls in private investigator Pete Noveck (Joe Don Baker) to solve the case. While the chief of police isn't thrilled about having an outsider come and show up his men, one of the officers is a former girlfriend of Noveck's who's more than willing to help him out in any way she can. After a long and convoluted investigation with false leads, psychics and the mafia, Nobeck at last unravels the identity of the thief. Edited July 4, 2011 by Nick Winter
Nick Winter Posted June 16, 2011 Author Posted June 16, 2011 My Model so far: Base kit ($4 investment) found all required parts Sanded off mold lines and removed window posts marked area's to be filled sanded hood flat Started on Buckets Nick
GTMust Posted June 16, 2011 Posted June 16, 2011 Looks like a fun one Nick. Must admit I never heard of the movie before... but then I'm not a big movie fan. Take your time my friend and you'll do a great job. Tony
Rob Hall Posted June 16, 2011 Posted June 16, 2011 (edited) Neat idea... never heard of the movie, will have to look for it on Netflix. I like cheesy '70s movies, and anything w/ Joe Don Baker. Edited June 16, 2011 by Rob Hall
Nick Winter Posted June 16, 2011 Author Posted June 16, 2011 (edited) Neat idea... never heard of the movie, will have to look for it on Netflix. I like cheesy '70s movies, esp. w/ Joe Don Baker. Pretty good movie, lots of car chases and a pretty good story line, I managed to catch it on a local station late at night. Nick Edit: I'd post some Quotes but there not allowed here anymore Edited June 16, 2011 by Nick Winter
slantasaurus Posted June 17, 2011 Posted June 17, 2011 With those taillights I'll bet that the car in the movie was actually a Charger 500 and not a base model, the bucket seats are another tip off as those were standard on the 500.
Nick Winter Posted June 17, 2011 Author Posted June 17, 2011 With those taillights I'll bet that the car in the movie was actually a Charger 500 and not a base model, the bucket seats are another tip off as those were standard on the 500. Ron what threw me off the 500 beat and path is the lack of chrome, and no vinyl top, hence why I beleived it was a Hardtop. but I wouldn't Doubt a bit it being a 500. Nick
slantasaurus Posted June 17, 2011 Posted June 17, 2011 Ron what threw me off the 500 beat and path is the lack of chrome, and no vinyl top, hence why I beleived it was a Hardtop. but I wouldn't Doubt a bit it being a 500. Nick I just checked my 71 factory lit, vinyl top wasn't standard on the 500 although it was common. In the movie pics it looks like the car has the canopy vinyl top which was introduced mid-year as the "Topper" package. I can also see the thin chrome trim strip just above the rockers and wheel lip mouldings that a 500 should have. There should also be thin chrome trim on the edge of the hood/front fenders and decklid/quarter extentions, in the pics you posted it looks like it has the rear trim, but I don't see the front trim. In the broshure it shows Charger 500 badges on the front fenders that aren't on the movie car (which has obviously been repainted), the car I owned didn't have those badges and there were no holes to indicate that it ever had those badges. A friend of mine also had a 500 without those front fender badges and I know it was an original paint car as the Plum Crazy was very faided. At least the kit has the correct dash for doing a 500 as I don't think anyone does the standard dash cluster in resin. Hope that info helps, I'll be watching this build.
Rob Hall Posted June 17, 2011 Posted June 17, 2011 At least the kit has the correct dash for doing a 500 as I don't think anyone does the standard dash cluster in resin. Hope that info helps, I'll be watching this build. There used to be a standard dash available in resin, but I think the resin caster went out of business....Ayoatollah something, IIRC.
Romell R Posted June 17, 2011 Posted June 17, 2011 Good to see this one on the board Nick cant wait for the next up date. Keep up the excellent work bro!
charlie8575 Posted June 17, 2011 Posted June 17, 2011 A potentially very interesting build, Nick. I'll keep an eye on this one. Charlie Larkin
Scale-Master Posted June 17, 2011 Posted June 17, 2011 Anybody else notice the striking resemblance of the paint scheme to Starsky's Torino...?
spkgibson Posted June 17, 2011 Posted June 17, 2011 I did the same thing to my hood on the 71 Charger I have been working on and off for awhile, I did mine the same way, Put a skim coat of Bondo spot filler putty on it, And it smooth, Then heat up a piece of kit sprue with a lighter, stretch it to the thickness of the bodyline, Then glue it on with liquid cement, Make sure you center the peice on the hood, After that is dry, Take some of the same putty and lightly go over it with it on your finger, Make sure you can still see the color of the peice you added, After it drys sand just the sides , Not the center, It will blend in perfectly if you use this method, I'll post a photo of the before and after hoods I made . And do not fill in any of the vents on the hood, the 71 had them the way they are in the kit, That car in the photos has a 72-74 Hood .By the way, I'm very impressed with how well your skills are improving. Keep up the good work.
Space Cowboy Posted June 17, 2011 Posted June 17, 2011 You are doing a great job on a very rare movie car..It looks great keep on building...................
Nick Winter Posted June 17, 2011 Author Posted June 17, 2011 Thanks guys. Anybody else notice the striking resemblance of the paint scheme to Starsky's Torino...? Actually mark In my opinion it really resembles a mixture of the S&H Gran Torino and the Crazy Larry Dirty Marry Charger. i thought it looked more "Baldwin-Motion" pretty goofy movie car in an even goofier movie. i did like the part of the chase though where he curbs the Charger and how the windsheild is broken and then not i also thought it was interesting that it has chrome reversed wheels without caps up until he loses the chase to the flat tire, then it's all the sudden got baby moons? Actually Dave if you watch the whole movie, the car goes in out of having the baby moon caps with Joe Don just driving around or visiting his partner at his garage. anyway, I appreciate the intell guys. Nick
Nick Winter Posted June 18, 2011 Author Posted June 18, 2011 Update time: Got the trunk filled Did the Chassis/floor pan, all of which is done with rattle cans so far Door panels painted and BMFed Modified the bench into buckets Nick
charlie8575 Posted June 19, 2011 Posted June 19, 2011 Nice job with the interior updating and detailing, Nick. The chassis looks convincing, too. I'm agreeing with Doug's call on the trunk. Those scratches will show right through on the final paint. Rather than additional filler, try sanding it with progressively-finer sandpaper, up to and including polishing cloths. That may smooth it over enough so additional filler is unnecessary. I try to avoid filler and putty myself as much as possible. I find that all too often, it makes the bodywork harder to get done neatly, which is why I'm thinking you might want to polish out the scratch, and then touch up the primer if you need too. If you think the scratch can be touched up easily, use a very thin coat of putty, and then sand/polish down as described above. Scratch aside, this looks like it's coming out pretty well. Keep up the good work. Charlie Larkin
spkgibson Posted June 19, 2011 Posted June 19, 2011 Nick here is the after and before photo of the hood.
spkgibson Posted June 19, 2011 Posted June 19, 2011 This is the 72 through 74 Style hood. This one came from Time Machine Resin, narrowed and thinned from the underside to fit the AMT body.
Chuck Most Posted June 19, 2011 Posted June 19, 2011 Cool subject, Nick! I've been wanting to convert on of these into my former 1:1 '71 non-R/T. I wish somebody would cast that hood- every time I've tried 'flattening' it and adding the peak, something or other goes horribly wrong!
Nick Winter Posted June 19, 2011 Author Posted June 19, 2011 Like I thought I mentioned, it's only roughed in at this point, I'm still a long way away from paint, still have to figure out how to paint the stripe. Nick
Mr. Moparman Posted June 20, 2011 Posted June 20, 2011 I like it so far, I have to get this kit quickly!
Nick Winter Posted June 20, 2011 Author Posted June 20, 2011 Had a major mishap yesterday while finalizing the body work, the primer orange peeled like crazy, is that possible? anyway, she's gone for a DOT 3 swim. Nick
charlie8575 Posted June 20, 2011 Posted June 20, 2011 Nick, was it humid when you painted? With lacquer-based paints, humidity can cause all kinds of problems. Also, if the paint went on a bit heavy, that could cause issues, too. Charlie Larkin
Nick Winter Posted June 20, 2011 Author Posted June 20, 2011 Nick, was it humid when you painted? With lacquer-based paints, humidity can cause all kinds of problems. Also, if the paint went on a bit heavy, that could cause issues, too. Charlie Larkin Not sure Charlie, but as far as I know my Bondo should still be in place after the primer is gone, so atleast I'm not starting from scratch again. Nick
Recommended Posts
Create an account or sign in to comment
You need to be a member in order to leave a comment
Create an account
Sign up for a new account in our community. It's easy!
Register a new accountSign in
Already have an account? Sign in here.
Sign In Now