W-409 Posted October 20, 2011 Posted October 20, 2011 That last picture is my favorite! Looking very good Tyrone, as usual. Can't wait to see more progress on this, it looks very mean and with your skills, finishing is going to be amazing.
tyrone Posted October 20, 2011 Author Posted October 20, 2011 That last picture is my favorite! Looking very good Tyrone, as usual. Can't wait to see more progress on this, it looks very mean and with your skills, finishing is going to be amazing. I like that one also, thanks Niko, and Darryl..
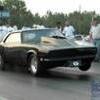
b_lever1 Posted October 20, 2011 Posted October 20, 2011 you build very nice cars i flip though text just what body is this i know its camaro 69 what maker?????????
tyrone Posted October 20, 2011 Author Posted October 20, 2011 Thanks Bob,,, this is the revell 69 camaro yenko body, I'm glad you like it, stay tuned for more updates later tonight
Randy D Posted October 20, 2011 Posted October 20, 2011 Hi Tyrone, Just wonderful stuff going on here!! Like how you did the upper attachment points of the wheelie bar on the differential, will try that on my car P.S. Where did you get that hood scoop? Thanks, Randy
Mooneyzs Posted October 21, 2011 Posted October 21, 2011 Tyrone... this is looking awesome man... like what you did with adding the cowl to the hood. Keep up the great work.
tyrone Posted October 21, 2011 Author Posted October 21, 2011 Thanks Chris, and Randy, I got a little done tonight, I got the rear end and wheelie bars painted added the braces and then nut and bolt heads from pro tech to finish it off I got one of the front struts done and the chassis is painted and I was able to get a coat of clear on also,, thanks for looking in and comments welcome...
Nitrozilla Posted October 21, 2011 Posted October 21, 2011 When I saw the "coming straight at me" pic, I didn't know whether to get out of the way or start waving my arms to back the car up after a burnout. Great front end attitude there Tyrone. Suspension is looking good too.
1320wayne Posted October 21, 2011 Posted October 21, 2011 The overall look is coming out great, as usual. You have such a true understanding of what these cars are supposed to look like.
tyrone Posted October 21, 2011 Author Posted October 21, 2011 (edited) When I saw the "coming straight at me" pic, I didn't know whether to get out of the way or start waving my arms to back the car up after a burnout. Great front end attitude there Tyrone. Suspension is looking good too. Thanks Joe I like that front pic also, I'm going to put the park lights back on the spoiler also, I dont know whether I'll keep this grille in or use the rally sport grill, we'll see. Randy I the hood scoop is made by flashpoint resins, I ordered it from Slixx decals, I wanted to use it on one of my pro mods builds but it would not fit with the ross gibson engine w/the split carbs, it's kind of narrow on the bottom, I had to take the dremel tool to it, but it should work fine on this one with the demon carbs from protech, Wayne thanks alot these types of cars and pro mods are my favorite type of cars and I really enjoy building these type of cars... Edited October 21, 2011 by tyrone
Mooneyzs Posted October 21, 2011 Posted October 21, 2011 Tyrone... You are doing a heck of a job on this build. Man that chassis is lookomg sweet! The colors just flow together. Keep up the great work.
Red rocket 10 Posted October 21, 2011 Posted October 21, 2011 Tyrone this build is nice man , what size tubing are you using when adding to your chassis ?
tyrone Posted October 21, 2011 Author Posted October 21, 2011 (edited) Tyrone this build is nice man , what size tubing are you using when adding to your chassis ? Thanks Chris and Leonard, I use evergreen rod #222... Edited November 29, 2011 by tyrone
eviltwincustoms Posted October 22, 2011 Posted October 22, 2011 Thanks Chris and Leonard, I use evergreen rod #221.... Tyrone, I see you are using Evergreen Rod vs. Plastruct... what are you using to weld it(I use Ambroid ProWeld)? Because I find it harder to work with (doesn't like to weld together as well) than the Plastruct and don't like Evergreen.
tyrone Posted October 22, 2011 Author Posted October 22, 2011 Brad I usually super glue or plain ole testors glue for plastic models in the orange and white tube I personally have had no issues with either, Well I got the front and rear suspension finished and installed, I also put in the rack and pinion and steering shaft,, here's a few pics...
Pro Tech Posted October 22, 2011 Posted October 22, 2011 Tyrone, great start, looking forward to your killer engine detailing Charlie Pro Tech
eviltwincustoms Posted October 22, 2011 Posted October 22, 2011 Brad I usually super glue or plain ole testors glue for plastic models in the orange and white tube I personally have had no issues with either, Well I got the front and rear suspension finished and installed, I also put in the rack and pinion and steering shaft,, here's a few pics... Nice job on the updates Tyrone. Very impressive that you use the old Testors tube glue, I find that stuff takes way to long to adhere to anything, especially for custom made styrene. I remember using that stuff way back when, use to much and it melts the plastic to the point of no return to where it will never set up. But it looks like you have conquered the right amount, because your builds always look perfect!
tyrone Posted October 23, 2011 Author Posted October 23, 2011 (edited) Thank you Andy, Charlie and Bart, well I got a little more done I've got all my fuel lines done and some of the oil lines done, the demon cards and hose are from Charlie at Pro Tech I decided to go with black lines on this one so I colored the hose with a black sharpie, here's a few pics, thanks for looking and comments welcome... Edited October 23, 2011 by tyrone
Pro Tech Posted October 23, 2011 Posted October 23, 2011 Tyrone, plumbing looking great and nice change-up on the line color. I have never tried the Sharpie approch but have used Polly Scale (railroad water based paint) Black and it works great for this too. Look forward to more buddy! Charlie Pro Tech
Mister Twister Posted October 23, 2011 Posted October 23, 2011 Thats a nice trick with the Sharpie on the fuel lines Tyrone. The details are looking great!
Nitrozilla Posted October 23, 2011 Posted October 23, 2011 Now THAT looks like a motor that WORKS for a living. Not some prettyfied show queen engine. Stopped me in my tracks. Actually, just seems like that when it blew by me at 200 + mph.
Mooneyzs Posted October 23, 2011 Posted October 23, 2011 Tyrone... Detail is looking great as always. You do nice work my friend. You are doing a great job on this build. Love every update.
Randy D Posted October 24, 2011 Posted October 24, 2011 Hi Tyrone, Awesome looking motor! You detail paint with the best of them. The front springs and the hoses all look great. Keep it coming! Randy
tyrone Posted October 24, 2011 Author Posted October 24, 2011 (edited) Charlie, Joe, Darryl ,Randy and Chris, thanks alot fellas I appreciate it. Well I got the fuel lines on the engine almost done only two more lines from the nos solenoids to the firewall are left, then I'll start on the oil lines and then on to the brakes. More updates soon thanks for looking and comments welcome Edited November 29, 2011 by tyrone
Recommended Posts
Create an account or sign in to comment
You need to be a member in order to leave a comment
Create an account
Sign up for a new account in our community. It's easy!
Register a new accountSign in
Already have an account? Sign in here.
Sign In Now