tyrone Posted November 9, 2011 Author Posted November 9, 2011 (edited) No problem Mike,.. Thanks Bart, and Danny I really appreciate it.. Brad, thanks for the pics now I can see what I'll be working with I think I'm leaning towards the black beadlocks with some bolt head details from protech, I was at the track this past weekend and there was a black car there with black beadlocks and it looked pretty good. This car wont have any decals or anything, maybe a few on the rear glass but that's about it, thanks alot guys for your feedback. Edited November 9, 2011 by tyrone
outlaw105 Posted November 9, 2011 Posted November 9, 2011 Car looks great tyrone! Where is that scoop from? I really like it. thanks
tyrone Posted November 9, 2011 Author Posted November 9, 2011 Car looks great tyrone! Where is that scoop from? I really like it. thanks Thanks RG I got that scoop from Slixx decals, but it's made by flashpoint resins, thanks again...
Moparkid13 Posted November 9, 2011 Posted November 9, 2011 All I can say is WOW. That is talent... I would never have the patience.
tyrone Posted November 10, 2011 Author Posted November 10, 2011 (edited) thanks Phillip I got the clearcoat on the body, added bmf, dzus fasteners to the hood and deck lid, and rivets to the rear wing... more to come.... Edited November 10, 2011 by tyrone
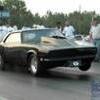
W-409 Posted November 10, 2011 Posted November 10, 2011 I can see nine rivets! Looks like you have one rivet missing, or then it can't be seen in thay picture... Great job with the paintjob on this one, very glassy. How you can get those roll cages fit perfectly to the body shapes, do you just mock up, bit modifications, mock up etc. Or do you have different technigue? I need to build roll cage to the Falcon, so I'm asking bit of help... Hope you understood what I'm trying to say.
thumper86 Posted November 10, 2011 Posted November 10, 2011 (edited) Looks very very Nice ! Edited November 10, 2011 by thumper86
tyrone Posted November 10, 2011 Author Posted November 10, 2011 I can see nine rivets! Looks like you have one rivet missing, or then it can't be seen in thay picture... Great job with the paintjob on this one, very glassy. How you can get those roll cages fit perfectly to the body shapes, do you just mock up, bit modifications, mock up etc. Or do you have different technigue? I need to build roll cage to the Falcon, so I'm asking bit of help... Hope you understood what I'm trying to say. Thanks NIko you're right there is a rivet missing, came off I guess when I was wiping the car off I'll fix that tonight, as far as the fit of the cage, It's just trial and error, no particular method, no jigs, or anything, just tack in place, mock up, and if it fits glue it down if not make the changes and try again...
Beavis Posted November 10, 2011 Posted November 10, 2011 bro this thing has turned out wicked! sweet and simple, just like how they should be. keep up the bad*ss skill my dude
tyrone Posted November 11, 2011 Author Posted November 11, 2011 (edited) thanks for the comments fellas, I got some more done to this one tonight, I added chrome foil around the rear tailights and put the rear tailights in, I got the front park lights in, I also got the rear chutes mounted, added dzus fasteners to the front end, and got the front and rear glasses in, then I put a little polish on her.. thanks for looking and comments welcome.... Edited November 11, 2011 by tyrone
Mooneyzs Posted November 11, 2011 Posted November 11, 2011 Tyrone... Man this build is just awesome... The camaro is sweet. I always love seeing your builds come together. You do some great work on these and the detail is always there. Keep up the great work.
brett Posted November 11, 2011 Posted November 11, 2011 I'm with him, in fact I think he read my mind. Excellente my friend
tyrone Posted November 11, 2011 Author Posted November 11, 2011 Thanks Brett, I appreciate it bro.. Thanks Chris, your build is looking flawless to btw....
1320wayne Posted November 14, 2011 Posted November 14, 2011 Saw this one in person yesterday and it looks great. Keep up the great work Tyrone and make sure you let us know how the polishing kit works out.
eviltwincustoms Posted November 14, 2011 Posted November 14, 2011 man that is just an awesome build! If this is going to another home, the owner is going to be getting an outstanding piece of Auto Art. The pictures do not do this car justice, but I am sure everyone knows that.
Prostreet Posted November 14, 2011 Posted November 14, 2011 Turned out amazing Tyrone, You nailed the black paint. Looks super smooth.
tyrone Posted November 14, 2011 Author Posted November 14, 2011 Thanks for the kind words, well fellas yesterday was my first tmie ever attending a model/show contest. I really had a great time, although I got there later than I had expected,,Wayne and Daryll are some real cool kats I enjoyed meeting and talking about models with you guys..One of the things we talked about was polishing kits, Of course I did'nt have one and they told me how much of a difference it would make,, so I picked one up, I cant believe the differecne it makes, night and day difference,, thanks Wayne and Darryl, I also got some work done on this today, I got the rear chutes done, I got the glasses detailed and installed, If you look closely at the cowl area I added lines to purge the nos......lol.. thanks for looking and comments welcome...
tyrone Posted November 14, 2011 Author Posted November 14, 2011 here's a few more, the finsh on this one is unbelievable,,,,,,,,,after polishng...
1320wayne Posted November 14, 2011 Posted November 14, 2011 There you go. With your building and detailing ability, now mixed with a better approach for that glass smooth finish, you will be unstoppable. Great job!
crowe-t Posted November 14, 2011 Posted November 14, 2011 Absolutely superb job and it shines like glass!! Well done Tyrone!
Mister Twister Posted November 14, 2011 Posted November 14, 2011 Tyrone you now have what it takes to put together a fantastic model. Your ability to get smooth finishes will just get better and better over time. Good job buddy! And, I hope to see you at more shows in the future (get there on time...LOL) so we can talk shop more.
brett Posted November 14, 2011 Posted November 14, 2011 As if you werent a killer builder already..................... they had to teach you this . WOW!! Great job T
RTK434 Posted November 14, 2011 Posted November 14, 2011 It was looking killer before but now it's completely over the top. Paint looks great!!!
Beavis Posted November 14, 2011 Posted November 14, 2011 this thing is straight nasty!! i've seen a bunch of cars like this makin money at the track!! great job and cant wait to see your next project!
Recommended Posts
Create an account or sign in to comment
You need to be a member in order to leave a comment
Create an account
Sign up for a new account in our community. It's easy!
Register a new accountSign in
Already have an account? Sign in here.
Sign In Now