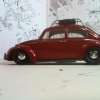
Geeti Posted March 20, 2013 Posted March 20, 2013 Hi all, This is my first post here on the scale model forums. I’ve been getting back into the model building hobby after a few years absence (~30 year hiatus ) Since the last bug model I build back in the mid- 80s, I decided to give the Tamiya '66 Beetle a try (lowered, just because ) It’s not perfect, but it was a fun little project. Here are some pictures. Me & paint still don't get along too well! It’s rustolem Garnet Red (the can I had was having spray problems ! !! ). I coated that with some Pledge Floor Wax w/ Future shine over it. Tamiya’s licence plates appear too big, so I filed 'em down [ Side notes: other things that I couldn't 'fix' from the Tamiya kit: this kit appears to be an adaptation of a Right Hand Drive Beetle, the wipers are 'parked' on the wrong side of the car (internet pix of real LHD cars don't lie ) & the mirrors are on the wrong side (the round mirror represents a LHD drivers side mirror!)....this bugged me a bit, so I just used the pear shaped one as a drivers side & chopped the passenger side mirror off...'cuz I couldn't correct it.! ] Interior coloring is incorrect (should be a black steering wheel, etc.), but I was playing with mixing acrylic paints to come up with these colors. Since the paint on the roof didn't come out as nice as I would have hoped, I decided to make a roof rack to 'cover it up'. . I tried to copy the rack on my real bug. I drew it up in CAD and printed the 'plans' out at 1/24 scale.
Geeti Posted March 20, 2013 Author Posted March 20, 2013 Test fitting... Getting there... I couldn't figure out a way to make the rail clamp until I saw noticed the profile of a 'to-go' plastic container from the recycling bin. Not exact, but close enough, so I glued it in place :laugh:
Geeti Posted March 20, 2013 Author Posted March 20, 2013 too many brush strokes, but whatever... oil leaks, of course :laugh: There was a place for them molded onto the body, so I made some bumper overrider braces out of the .03" rod. My bug model I built in 1984 is on the left, 2013 on the right (similar???!!!! HA!) I entered it in a model show, just for the heck of it. Didn't place, but had fun
Geeti Posted March 20, 2013 Author Posted March 20, 2013 I ‘sanded down’ some tires for the front (aka, I chucked them onto my dremel and spun them on some sandpaper to reduce the diameter for the big/little tire look. I may rebuild some things on this kit, like cut the front side windows out of it & maybe try and do the white rim barrel on the wheels to add a bit of contrast in the wheel area (BRMs would be nice, but I don’t have any in my limited stash ). Thanks for looking, lemme know what you think
ningoth4 Posted March 20, 2013 Posted March 20, 2013 A Bug freak here. Nice build. You did a great job on that roof rack! Great stance too. Kevin
Chuck Doan Posted March 20, 2013 Posted March 20, 2013 I like it! I agree, nice rack (!) and stance. I had a '63 for years-wish I still had it-even with those oil leaks!
Ford guy Posted March 20, 2013 Posted March 20, 2013 I think it's super cool Chris. You did a great job on that roof rack. It has the right look to it. Roy
Draggon Posted March 20, 2013 Posted March 20, 2013 Dang thats nice. I love it, great stance, and great work on the roofrack. The engine should have some Kadrons and a stinger though!
scalemodelworld Posted March 20, 2013 Posted March 20, 2013 Looks pretty good to me. Good recovery on the paint job
Foxer Posted March 20, 2013 Posted March 20, 2013 Very nice, Chris. I came back 5 years after a 30 odd year hiatus also. I like the color mix on the steering wheel .. looks just right. I always have problens finding all the cream colors on cars. The roof rack looks exactly like the one on the '69 I had .. nice work!
Jonathan Posted February 18, 2015 Posted February 18, 2015 Just stumbled across this. I'm impressed with that roof rack! Well done!
Pixie Posted March 3, 2016 Posted March 3, 2016 Really nice job! I'm building the same model and I'm wondering if you could share the blueprints for the roof rack. I can't seem to find any good ones and yours looks fantastic
Recommended Posts
Create an account or sign in to comment
You need to be a member in order to leave a comment
Create an account
Sign up for a new account in our community. It's easy!
Register a new accountSign in
Already have an account? Sign in here.
Sign In Now