Dinky Posted November 6, 2013 Share Posted November 6, 2013 (edited) My next project will be another hotrod Its a very early stage, got some off the parts from the sprue and engine glued. Now looking and thinking how to make it channeled Got some colors in mind but they might change so will tell later what I decided but it will be candy. Edited September 15, 2015 by Dinky Quote Link to comment Share on other sites More sharing options...
cobraman Posted November 6, 2013 Share Posted November 6, 2013 I have that kit also. I will be watching what your take is on it. Good luck ! Quote Link to comment Share on other sites More sharing options...
Dr. Cranky Posted November 6, 2013 Share Posted November 6, 2013 It's a wonderful kit and you will have fun with it. The results, in my opinion, are always satisfying. Quote Link to comment Share on other sites More sharing options...
crazyrichard Posted November 6, 2013 Share Posted November 6, 2013 (edited) if you are going to build this .. i'm sitting at the point of my chair ... hmm this thread will need some pop corn .. make some pics along the way arno , very curious here Edited November 6, 2013 by crazyrichard Quote Link to comment Share on other sites More sharing options...
DrKerry Posted November 6, 2013 Share Posted November 6, 2013 I'm ready to watch, let the build commence!!!!! Quote Link to comment Share on other sites More sharing options...
slusher Posted November 6, 2013 Share Posted November 6, 2013 Looking forward to your build. l have this kit also.... Quote Link to comment Share on other sites More sharing options...
Dinky Posted November 6, 2013 Author Share Posted November 6, 2013 Thanks all, I will post pics during the build First fit: This is way to high for what I want. The tank has to go This looks more like the idea in my head This is probably the final stance. Next step is modifying the chassis. Quote Link to comment Share on other sites More sharing options...
squirrel886 Posted November 6, 2013 Share Posted November 6, 2013 Nice! I have two of them in progress, one channeled, and one not. Quote Link to comment Share on other sites More sharing options...
PappyD340 Posted November 7, 2013 Share Posted November 7, 2013 Very NICE start Arno, just hanging out waiting for more, got the popcorn, going to get comfy!! Quote Link to comment Share on other sites More sharing options...
crazyrichard Posted November 7, 2013 Share Posted November 7, 2013 much better channeled like you did , nice stance , not to low and not to high Quote Link to comment Share on other sites More sharing options...
Dinky Posted November 8, 2013 Author Share Posted November 8, 2013 Thanks guys, im now waiting for styrene and glue before i can proceed. Quote Link to comment Share on other sites More sharing options...
Dinky Posted November 9, 2013 Author Share Posted November 9, 2013 After some time of hobbying this is the first setup of the chassis. The white plate is temporary there to keep the body in place Im happy so far for my first self build chassis Too bad i don't have time for this the rest of the weekend Quote Link to comment Share on other sites More sharing options...
Bernard Kron Posted November 9, 2013 Share Posted November 9, 2013 Nice so far. Glad to see you hid the step behind the firewall (a pet peave of mine). I did one like this earlier this year based on the old pre-Roaster kit. I threw every lowering trick in the book at it and it turned out almost too low (see: http://www.modelcarsmag.com/forums/index.php?showtopic=73674&page=2 and http://www.modelcarsmag.com/forums/index.php?showtopic=72032&hl= ). Looks like you are right in the pocket on this one. Looking forward to more. My only gripe with the Rat Roaster kit is that there's too much about it that draws you to its origins. Channeling helps this a lot. The interior is another "problem" because it's so unique. For various reasons like this I've begun a small stash of the older Highboy kit even though it has its own problems. Quote Link to comment Share on other sites More sharing options...
Speedfreak Posted November 9, 2013 Share Posted November 9, 2013 Hey Arno, looks good so far. Although, I'd raise the back end of the body just a little bit, needs some angle there. Just a thought. Quote Link to comment Share on other sites More sharing options...
rv1963 Posted November 9, 2013 Share Posted November 9, 2013 (edited) Your build is looking good so far, that kit looks like it has some really good parts in it. Edited November 9, 2013 by rv1963 Quote Link to comment Share on other sites More sharing options...
Dinky Posted November 11, 2013 Author Share Posted November 11, 2013 Nice so far. Glad to see you hid the step behind the firewall (a pet peave of mine). I did one like this earlier this year based on the old pre-Roaster kit. I threw every lowering trick in the book at it and it turned out almost too low (see: http://www.modelcarsmag.com/forums/index.php?showtopic=73674&page=2 and http://www.modelcarsmag.com/forums/index.php?showtopic=72032&hl= ). Looks like you are right in the pocket on this one. Looking forward to more. My only gripe with the Rat Roaster kit is that there's too much about it that draws you to its origins. Channeling helps this a lot. The interior is another "problem" because it's so unique. For various reasons like this I've begun a small stash of the older Highboy kit even though it has its own problems. Thanks! The step is hidden because i don't really like it, your Rod looks awesome, I really like the old style whitewall tires and the color is also very nice! I like the stance, its low but not too much The only thing I don't like from some old boxes are the molded belts in the seats, for some reason it does not fit those cars. Quote Link to comment Share on other sites More sharing options...
Dinky Posted November 11, 2013 Author Share Posted November 11, 2013 Hey Arno, looks good so far. Although, I'd raise the back end of the body just a little bit, needs some angle there. Just a thought. Thanks Gene, that's a good tip! I will take a look soon i can find time to proceed. Quote Link to comment Share on other sites More sharing options...
Dinky Posted November 11, 2013 Author Share Posted November 11, 2013 Your build is looking good so far, that kit looks like it has some really good parts in it. Thanks Robert, It has for sure! The only thing that does not fit the car when channeled is the firewall, the one from the earlier boxes is better if you ask me. Quote Link to comment Share on other sites More sharing options...
Bernard Kron Posted November 11, 2013 Share Posted November 11, 2013 (edited) ...The only thing that does not fit the car when channeled is the firewall, the one from the earlier boxes is better if you ask me. If you have any old style firewalls I would save the Rat Roaster one for a highboy build. Why waste all that detail when you'll cut away half of it? Besides, you may need some of the space that the old style one provides for the back of the motor... Edited November 11, 2013 by Bernard Kron Quote Link to comment Share on other sites More sharing options...
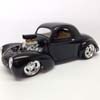
Dinky Posted November 11, 2013 Author Share Posted November 11, 2013 If you have any old style firewalls I would save the Rat Roaster one for a highboy build. Why waste all that detail when you'll cut away hald of it? Besides, you may need some of the space that the old style one provides for the back of the motor... Thats the plan i had I bought a "new" Camaro funnycar kit on model exhibition two weeks ago and when I opened the box I found they already started it and that the parts where twisted (turned) from the sprue and the windows had scratches and loads off glue on multiple parts so I send it back and in place i get a really new 32 Ford (see pic). I think that one has the deepened firewall. Quote Link to comment Share on other sites More sharing options...
Bernard Kron Posted November 11, 2013 Share Posted November 11, 2013 That'll work. Most of the lower half will be gone anyway... For some reason those 3-window kits, at least here in the USA, are not desired by builders and can be had more frequently and cheaply than most other Revell Deuces. Perhaps it's because it's an early, "pure", Revell Deuce with only the small block Ford engine and "Torq Thrust" wheels. The older Good Guys/HIghboy Roadsters are becoming fairly uncommon and people are starting to ask real money for them. They are still generally available on e-Bay but are largely gone from the shops and model car shows. As a result I;ve begun a small stash of the "old" roadster to avoid the body and chassis modifications the Rat Roaster requires and to get a more universal interior. I still buy the 3-window when I can find it cheaply, as well. I use the frames from Revell Deuces quite a bit in my hot rod builds. And thanx for the nice words on the lo-boy. I still think it landed up too low. Yours looks like it will sit just right. Quote Link to comment Share on other sites More sharing options...
horsepower Posted November 12, 2013 Share Posted November 12, 2013 I think it would look really nice if you sanded off the body reveal around the rear fender openings & used some appropriate sized half round stock to raise the line to match the radius of the rear tire a little better, just a little trick that will actually make the body look much closer to the ground visually. Quote Link to comment Share on other sites More sharing options...
Dinky Posted November 12, 2013 Author Share Posted November 12, 2013 I changed my mind and I used the original firewall Dont like the other one at all, and I only had to cut the small pieces from this one and a tiny round where the gearbox is. I should remove little more but thats for tomorrow. I also raised the back just a little so this will be the final stance. To be continued Quote Link to comment Share on other sites More sharing options...
jrherald420 Posted November 15, 2013 Share Posted November 15, 2013 Looking good. Cant wait to see more! Quote Link to comment Share on other sites More sharing options...
Dinky Posted November 15, 2013 Author Share Posted November 15, 2013 Because the body is lowered I had to change the floor with the tunnel for the gearbox and driveshaft I cut the tunnel from the floor and raised it 5mm, the glue is not so decent but there will come carpet flakes on the floor and tunnel so should be good :-) Quote Link to comment Share on other sites More sharing options...
Recommended Posts
Join the conversation
You can post now and register later. If you have an account, sign in now to post with your account.
Note: Your post will require moderator approval before it will be visible.