Custom Mike Posted December 8, 2013 Posted December 8, 2013 Jeremy, I had to go back twice to make sure this wasn't a 1/12th scale kit! The level of detail you're cramming into just the engine compartment is unreal, throw in the beautifully done under-hood work, and the accurate opening doors and you have a true masterpiece! I can't wait to see what this beauty looks like once it's all done!
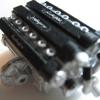
Jeremy Jon Posted December 8, 2013 Author Posted December 8, 2013 (edited) Thanks very much guys for the compliments! Yes, it certainly has been a lot of work involved, but the client will be certainly happily surprised! Pics come out more glossy / shiney than actually is, for some reason? as engine parts only in flat or satin black The fine copper wire is salvaged from old electronics parts, the tiny motors are best source to extract wire that fine, but are other useful components also A few more pics for this evening Front suspension & sub-frame modified, with exacto saw cut 7/8 way through spindle portion, allowing the cut gap to be glued closed, making for steering angle of front wheels as result, and is stronger than if cut through & glued Sub-frame anterior surface gaps filled & sanded smooth, white strip shows new angle of steering spindle, modification done to both sides & steering rack tie rod arms, for equal direction of spindles turn Stock plastic kit steering rack modified, with added pinion housing to rack, and power steering fluid return line added, made from wire stripped on ends, leaving black sheath in middle to simulate hose portion and painted, ready for installation Suspension modified, and wire coil springs fabricated for added realism, when viewed from behind wheels/tires Wire is wrapped around solid rod, and compressed to form coils Axle primed with argent paint, and differential housing painted in chrome, with fastening bolts detailed steel colour Coiled wires spaced evenly, using backside of firm exacto blade Coiled wire cut to length, and ends filed flat so to sit squarely on axle pegs Finished coils are test fit and ready for painting Axle housing painted steel tubes, and black differential housing Completed paint and axle with coil springs assembly Edited December 8, 2013 by Jeremy Jon
Kennyboy Posted December 8, 2013 Posted December 8, 2013 This is just unreal Jeremy! Unbelievable what you have done here!! I'm......speechless!
James2 Posted December 8, 2013 Posted December 8, 2013 Great WIP, Jeremy. I admire your attention to detail and eye for corrective modeling. It seem you approach each component as a separate model in it self.
Jeremy Jon Posted December 8, 2013 Author Posted December 8, 2013 Thank you guys! James you are right on the money, I believe that for any level of build, it's just as important to make each area of work of equal level to the other, for consistent presentation, it would be a shame to have a highly detailed & finished engine bay, but then a simpler interior (for example), not balanced IMO It does however mean a LOT more work, once you've begun down that path! LOL
Jeremy Jon Posted December 8, 2013 Author Posted December 8, 2013 (edited) Thanks Ray! A few more pics, then back to the work bench for a snowy Sunday! Different gauge wires used and formed to create engine bay air conditioning lines and brake line, modified anti-lock brake pump painted and ready to install, scratch built air conditioning dryer made and ready for paint before install Completed engine bay assembly, with all air conditioning hard lines & dryer, wire harnesses, master brake cylinder and booster & semi-transparent reservoir assembly, anti-lock brake pump and brake lines, fuse box and ECU installed, hood pin switch and wiring, and battery tray with hold-down, painted and installed Completed engine assembly, and other surrounding detailed parts (battery, radiator, hoses, front struts, coolant reservoirs, air box, etc.) also completed and ready for later installation Chassis painted, with only basic detailing added - since model will be secured to a base & not be seen, there is no need to go to detailed crazy! Suspensions installed, and inner fenders + gas tank liners painted flat black, painted sway bars and shocks painted ready for later installation Edited December 8, 2013 by Jeremy Jon
Erik Smith Posted December 8, 2013 Posted December 8, 2013 I hope the recipient can appreciate all that has gone into this model. Great work. Inspiring.
Jeremy Jon Posted December 10, 2013 Author Posted December 10, 2013 Your absolutely right Erik! Thanks
streetmachine11 Posted December 10, 2013 Posted December 10, 2013 this is turning out real nice. the amount of detail you've done is excellent. I've done one similar and know the details and kit well. can't wait for the next update
FullTimeHobbiest Posted December 22, 2013 Posted December 22, 2013 You sir, are my hero! Absolutely amazing work.
slusher Posted December 22, 2013 Posted December 22, 2013 Jeremy, your are an excellent craftsman so much detail wow...
Jeremy Jon Posted May 20, 2014 Author Posted May 20, 2014 Thanks Tyrone, Jason, Eric & Carl !! Polishing the bodywork now, and masked/painted semi black for external areas accordingly, and interior bucket is completely assembled now too, exhaust tips corrected from flat to angled face.
Dominik Posted May 20, 2014 Posted May 20, 2014 A W E S O M E Jeremy. just stunning, what you're making with this simple kit. Wow.
Johnny1973 Posted May 20, 2014 Posted May 20, 2014 I cant wait to see this finish plus all the great details that are going into the Mustang.
afx Posted May 20, 2014 Posted May 20, 2014 Outstanding as usual Jeremy, I checked this out on you FB page.
Jeremy Jon Posted May 21, 2014 Author Posted May 21, 2014 (edited) Thanks Dominik, always nice words from you! Thanks Jake, John, JC, Robin, Mike & Jonathan! Here's a pic of the diorama which the car will be set into, is a simplified version of the owners actual garage, but everything you see there I had to scratch build Edited May 21, 2014 by Jeremy Jon
Tompidom Posted May 21, 2014 Posted May 21, 2014 Very nice little diorama! And grait work on the interior and body. Looks spot on!
Recommended Posts
Create an account or sign in to comment
You need to be a member in order to leave a comment
Create an account
Sign up for a new account in our community. It's easy!
Register a new accountSign in
Already have an account? Sign in here.
Sign In Now