Kennyboy Posted February 11, 2014 Author Posted February 11, 2014 Thanks again guys! Been working on the seats......opening up all the belt harness holes. They will be painted the same as the original seats, (suede blue centers with black bolsters and neon yellow accents.) Also, been cleaning up the flash and sinkmarks on the underbody/suspension to get them ready for paint.
lanesteele240 Posted February 12, 2014 Posted February 12, 2014 Ken this is awesome work as usual. I just finished this kit. It was not that bad. I had pre trashed it in my head but it proved me wrong and that engine would be a great swap for some other builds. Keep it up. Cant wait to see how bad this makes my post look
Kennyboy Posted February 12, 2014 Author Posted February 12, 2014 (edited) Nah Gary, not trying to make anyone look bad with this... Just trying to do some justice to the car and show that there is potential there to end up with a nice display when completed. Thank you for the kind words! I will be putting up pics soon of progress.....I have been doing a LOT of cleanup and modification to get the chassis/interior ready for paint. Edited February 12, 2014 by Kennyboy
bryan_m Posted February 13, 2014 Posted February 13, 2014 wow! im lovin the way that engine looks Ken! nice work man.....and the tail lights look great too. keep it goin cheers bryan
slusher Posted February 13, 2014 Posted February 13, 2014 Looking forward to your progress pictures Ken, I always enjoy your work...
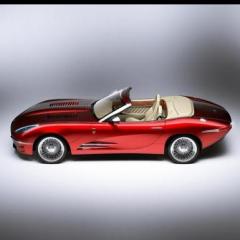
Kennyboy Posted February 15, 2014 Author Posted February 15, 2014 FINALLY made enough progress to show some pics......... Been working on various small tedious details Almost done with the interior...... you can see the direction the seats will be going.
Kennyboy Posted February 16, 2014 Author Posted February 16, 2014 Looking forward to your progress pictures Ken, I always enjoy your work... Thank you as always Carl! I appreciate the support!
Kennyboy Posted February 16, 2014 Author Posted February 16, 2014 wow! im lovin the way that engine looks Ken! nice work man.....and the tail lights look great too. keep it goin cheers bryan Thank you Bryan! I've got a few other details coming soon that will hopefully surprise a few.
geras24 Posted February 16, 2014 Posted February 16, 2014 Amazing job in the details...looks very good
Kennyboy Posted February 16, 2014 Author Posted February 16, 2014 Thanks guys! Hope to show some better things soon (bigger progress.)
Kennyboy Posted February 16, 2014 Author Posted February 16, 2014 great build ken Thank you Nor, your Escort is looking great! Been watching your build when I have the time to.
Wonderbread Kustomz Posted February 16, 2014 Posted February 16, 2014 Wow! Looks great! Love the exhaust!
bobthehobbyguy Posted February 16, 2014 Posted February 16, 2014 How did you do the coloring on the tip of the exhaust? Bobthehobbyguy
Kennyboy Posted February 16, 2014 Author Posted February 16, 2014 How did you do the coloring on the tip of the exhaust? Bobthehobbyguy Three different colors of Sharpie. The first was blue near the tip, then purple, then I used yellow to blend into the other colors.
DrKerry Posted February 16, 2014 Posted February 16, 2014 Kool beans, Sharpies work great. I use them a lot on my stuff as well. Copper, bronze, brass, black and silver and red and blue.... Great to work with as you did here Ken...
Shardik Posted February 17, 2014 Posted February 17, 2014 This is coming along very nicely, Ken. I was surprised you didn't remove the molded in seat belts in favor of after market or scratch built units until I saw that your detail painting skills make such an exchange unnecessary . I hope you don't mind that I copied the photo of your NOS system so I could create some decals for my next build.
Kennyboy Posted February 17, 2014 Author Posted February 17, 2014 (edited) This is coming along very nicely, Ken. I was surprised you didn't remove the molded in seat belts in favor of after market or scratch built units until I saw that your detail painting skills make such an exchange unnecessary . I hope you don't mind that I copied the photo of your NOS system so I could create some decals for my next build. Thank you. Not a problem Johann! Was great to hear from you again....it has been a while! Riceburner. Hee Hee........" This car will decimate all with about 10k worth of overnight parts from Japan." Edited February 17, 2014 by Kennyboy
Recommended Posts
Create an account or sign in to comment
You need to be a member in order to leave a comment
Create an account
Sign up for a new account in our community. It's easy!
Register a new accountSign in
Already have an account? Sign in here.
Sign In Now