GMCMAN52 Posted July 10, 2014 Posted July 10, 2014 great looking headlamps, thanks for the tip on the 59 Cadillac clear lens,,,, overall great project
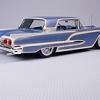
John Goschke Posted August 15, 2014 Author Posted August 15, 2014 Been tough to get to the bench lately, but did get a little bit done on the Bonneville. Scribed the panel lines where the front fenders meet the cowl... Starting shaving off the fender ornaments... Got the headlights, taillights, and rear bumper back from plating at Little Motor Kar Co... I also had Dale plate the dash and steering wheel to save foiling work down the line!
wayne swayze Posted August 15, 2014 Posted August 15, 2014 I keep coming back to this build because it's so well done! You've done an absolutely beautiful job on everything here. The chrome looks amazing, which suits this car! When I look at your model, I just have to smile.
Bob Ellis Posted August 15, 2014 Posted August 15, 2014 Good idea about chroming the dash board. I think your glass better than the kits glass.
72 Charger Posted August 16, 2014 Posted August 16, 2014 That chrome is great it looks so much better without the mold seam . Did it cost very much to get the chrome redone?
John Goschke Posted March 20, 2018 Author Posted March 20, 2018 Now that the '58 Ford is finished I can get back on another neglected project, this '58 Bonneville. Worked on fixing some nagging issues. Weak cowl vent detail resolved a with piece notched in from an AMT '58 Impala. Shaved the front fender ornament "jets" off and replaced the fender top raised crease detail with filed-down .030 triangle strip. Made a clear PVC windshield and replaced some damaged moldings at the rear of the roof with styrene strip. Good to have this one moving again!
krassandbernie Posted March 21, 2018 Posted March 21, 2018 Awesome work and attention to detail as usual John! I started back at page one and got caught up on this project again........love it!
StevenGuthmiller Posted March 21, 2018 Posted March 21, 2018 Well, I just learned something new. I never realized that the '58 Bonneville had a piece of chrome trim around the back of the roof! I just assumed that they were the same as the '58 Impala. Steve
Jantrix Posted March 21, 2018 Posted March 21, 2018 Glad to see this one back on the bench. Looking forward to it.
dino246gt Posted March 21, 2018 Posted March 21, 2018 Man I just LOVE this kind of stuff! The work you do is inspiring! I'm amazed at how much you can do to improve the look without major customizing. This and the '58 Ford are stunning, sweet!
Geno Posted March 21, 2018 Posted March 21, 2018 Man, this is just so cool. Gotta love the old Pontiac's. I'm still PO'd over GM killing off the brand. I haven't bought a GM vehicle since. I'll stick with my good ol' Ram trucks.
BigTallDad Posted March 21, 2018 Posted March 21, 2018 This brings back memories...the first car I ever drove equipped with power brakes was a '58 Bonneville hardtop...darned near threw my dad through the windshield the first time I hit the brakes!
geewhiz Posted March 21, 2018 Posted March 21, 2018 I'm glad to see this one back on your bench. It is looking ever so sweet with each step completed. I look forward to seeing more. By the way, the chrome looks flawless.?????????
Ron Hamilton Posted March 22, 2018 Posted March 22, 2018 John, That one brings back memories of my Dad's first new car. A Sierra Gold '58 Impala. He had alternated between the 4-bar Lancers, and 60 Buick Wheel Covers on his car, with a set of Foxcraft Skirts. That car was so cool, and I intend to do my next '58 Chevy (either Revell or AMT) as his car, but with updated paint in the same color family, and the 4-bars, and a beige interior with white roll and pleat inserts and copper carpets. As if he still owned the car, and restored it in the 2000's.
espo Posted March 22, 2018 Posted March 22, 2018 I'm going to enjoy watching this restoration. After following your '58 Ford you know how this will turn out. The '58 Pontiac is a car I always thought of a beautiful Cruiser.
rsxse240 Posted March 22, 2018 Posted March 22, 2018 How did you make the PVC windshield? Where did you get the material and what thickness did you use?
John Goschke Posted March 23, 2018 Author Posted March 23, 2018 Thanks for the responses, gentlemen! The Bonneville continues to move along!
thatz4u Posted March 23, 2018 Posted March 23, 2018 22 hours ago, rsxse240 said: How did you make the PVC windshield? Where did you get the material and what thickness did you use? x2
John Goschke Posted March 23, 2018 Author Posted March 23, 2018 22 hours ago, rsxse240 said: How did you make the PVC windshield? Where did you get the material and what thickness did you use? Ken, I covered the kit windshield with a piece of masking tape before installing it in the body. Then I used a pencil to trace the shape of the windshield opening onto the masking tape. Next I peeled the tape off the windshield and applied it to a piece of manila file folder to create a pattern by cutting it out approximately 1/16" larger than the pencil outline. Then I cemented pieces of styrene strip inside the windshield posts and the bottom corner of the windshield about 1/16" inside the opening. The strips act as brackets to hold the windshield in place. After peeling the tape off my new folder stock pattern I fit it inside the body and trimmed as needed to refine the fit until the pattern popped into place in the brackets and fit nicely around the opening. Then I used the pattern to cut the new "glass" out of the sheet of PVC. Before cutting I protected both sides of the PVC with masking tape. Once the new windshield was cut out and tape peeled off it was test fitted inside the body. Luckily this one popped into place without any adjustments to the fit. It sounds like a lot of work but this one only took about 1 1/2 hours and the results are sure worth it! Thanks to Steve Boutte for persuading me to give it a try. Here are some photos from when I did the windows in the '58 Ford...
rsxse240 Posted March 24, 2018 Posted March 24, 2018 They look amazing! I'm going to have to try this out. Thanks for the quick how-to! I'm sure I'm not the only one who will benefit from it.
Ron Hamilton Posted March 24, 2018 Posted March 24, 2018 On 3/23/2018 at 11:44 AM, John Goschke said: Ken, I covered the kit windshield with a piece of masking tape before installing it in the body. Then I used a pencil to trace the shape of the windshield opening onto the masking tape. Next I peeled the tape off the windshield and applied it to a piece of manila file folder to create a pattern by cutting it out approximately 1/16" larger than the pencil outline. Then I cemented pieces of styrene strip inside the windshield posts and the bottom corner of the windshield about 1/16" inside the opening. The strips act as brackets to hold the windshield in place. After peeling the tape off my new folder stock pattern I fit it inside the body and trimmed as needed to refine the fit until the pattern popped into place in the brackets and fit nicely around the opening. Then I used the pattern to cut the new "glass" out of the sheet of PVC. Before cutting I protected both sides of the PVC with masking tape. Once the new windshield was cut out and tape peeled off it was test fitted inside the body. Luckily this one popped into place without any adjustments to the fit. It sounds like a lot of work but this one only took about 1 1/2 hours and the results are sure worth it! Thanks to Steve Boutte for persuading me to give it a try. Here are some photos from when I did the windows in the '58 Ford... That is what separates the Masters from the Wannabes.
misterNNL Posted March 25, 2018 Posted March 25, 2018 Inspirational and carefully planned work on every aspect of this restoration. Nice to see this big beautiful car on it's way back to life. Thanks for sharing your procedures and photos with us.
Recommended Posts
Create an account or sign in to comment
You need to be a member in order to leave a comment
Create an account
Sign up for a new account in our community. It's easy!
Register a new accountSign in
Already have an account? Sign in here.
Sign In Now