Stray Posted April 27, 2015 Author Posted April 27, 2015 Thankyou all for dropping by and your kind comments. I have progress! Will post pics tomorrow, but the interior is fitted, and the engine bay is almost completed. Stay tuned...
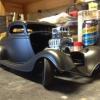
Stray Posted April 28, 2015 Author Posted April 28, 2015 Okay. So, I have assembled and glued the interior. Most of the plumbing and wiring too. I have the upper and lower radiator hoses ready, the battery to be connected, the washer bottle hose and the loom to be positioned and that will be the bay done. Why on earth I went so detailed I can't remember. But just because you can, doesn't mean you should! Having so many tiny fiddly pieces in and around the engine has led to a few slip ups with the glue. Is there some kind of syringe glue that can be used for precise application without the risk of getting blobs where you want dabs??? Here is how she is sitting at the moment:
microwheel Posted April 28, 2015 Posted April 28, 2015 I know what ya mean about the blobs sometimes Stray. It happens to me as well at times. I use model masters flat and/or gloss clear lacquer as a adhesive on tiny parts sometimes where strength isn't a issue. it dries strong enough to hold photo etched stuff especially and it doesnt leave a blob. But for high strength areas I'm still at the mercy of 2 part 5 minute epoxy or CA glue, I just put it on the area with a tooth pick and try not to appy too much.
Stray Posted April 28, 2015 Author Posted April 28, 2015 Yeah Jim it's frustrating. Trying to maneuver a tube of super glue so close to the Alclad rockers had a couple of contact blobs from the wires and it sticks out like dogs balls!
cartpix Posted April 29, 2015 Posted April 29, 2015 Yeah Jim it's frustrating. Trying to maneuver a tube of super glue so close to the Alclad rockers had a couple of contact blobs from the wires and it sticks out like dogs balls! I use a toothpick to apply super glue. I put a drop of super glue on a CD-R (I bought a 100 stack, on sale), then dip in the toothpick & apply as much or as little as I need.
Stray Posted May 1, 2015 Author Posted May 1, 2015 Ah good idea Jeff. I have a few cd's of bands that were pretty terrible I could use! I have paint and trim! Instead of using the course aluminium for the base I used AutoAir's BaddaBling. It gives a deeper shade and smaller flake. I still had too much paint build up, and as such the badges on the panels got buried. Completely! So I just sanded down over the top of them. I will come up with some way of finishing them, but if all else fails I may have to buy a photoetch set to use the scripts and badges. Poop. But thats what you get when the body has been sanded and painted a couple of times I guess. Here is how she is sitting and a mock up for now: I do have to fix a couple bits of trim. My panda paws are not great for precision work! And a couple pics with flash:
Stray Posted May 3, 2015 Author Posted May 3, 2015 My paint has cracked aaaaaaargh. I'm gonna have to strip this thing AGAIN. Guess I didn't leave it long enough before clearing.
mustang1989 Posted May 3, 2015 Posted May 3, 2015 (edited) When it rains it pours...and I hear you loud and clear. I had the perfect (or at least what I thought was the perfect) clear finish on my Challenger until I saw a freekin' run on the R/H rear quarter and a speck of I don't know what right in the middle of the drivers door. Needless to say there was some more work to do but like I always say, "That's modeling." Hang in there Greg. You'll get it all sorted out. Edited May 3, 2015 by mustang1989
Zarana-X Posted May 3, 2015 Posted May 3, 2015 (edited) Way to get back on the bike! Your work looks fabulous. I've never really taken a break, and you're better than me. My eyesight is also bad, but I'm nearsighted. Left eye is good, right eye is blurry no matter what. I tried to use the magnifying glass on a stand, but it is more of a drunk simulator, and messes up my depth perception. Never stop swearing (just not here... )I got tired of trying to make things perfect, and just started to clean them up as best I could, so all my "clean" builds still get weathered to resemble drivers, not show car customs. Edited May 3, 2015 by Zarana-X
microwheel Posted May 3, 2015 Posted May 3, 2015 (edited) My paint has cracked aaaaaaargh. I'm gonna have to strip this thing AGAIN. Guess I didn't leave it long enough before clearing. That sucks. I've had that happen a time or two myself. Usually though it ends up being a compatibility issue between the type of paint I used and the clear coat. Especially if I used a lacquer based clear over any type of enamel or acrylic. Those just don't play nice together. You can go the other way around though, with enamel or acrylic clear over lacquer paint. Otherwise I don't remember ever having a cracking issue in the clear top coat. Well once one my 70 1/2 BM Camaro build, but that was cuz I flexed the hood after I painted and polished it and noticed there was a slight warp in it that I tried to flex out of it and, when I did, I caused the crack myself LOL. But hang in there you'll get it my friend. Edited May 3, 2015 by microwheel
Stray Posted May 3, 2015 Author Posted May 3, 2015 lol thanks guys Yup Joe, thats modelling! Thanks for looking in Jason. I'm far from good, but I don't do shows and such it is just for my own entertainment. So the finish doesn't really matter so much. But I do like to have as few flaws as possible! Yeah Jim. Paint? Who needs it? I might just leave everything in primer now lol
Yo Jutt Posted May 3, 2015 Posted May 3, 2015 Hope it all works out and finishes up ok.That's a shame it cracked on you...
AussieDave1968 Posted May 4, 2015 Posted May 4, 2015 Fantastic looking work mate, sorry to hear about the paint problems.
slusher Posted May 4, 2015 Posted May 4, 2015 Hate to hear the bad news about your paint. i have had just enamel crack. sometime paint can be a mystery..Hang in there..
Stray Posted May 4, 2015 Author Posted May 4, 2015 Hey thanks for the words everyone! Yep, paint BLOWS! Ah well. The body and bonnet are in brake fluid for the third time lol. Hey thanks for the words everyone! Yep, paint BLOWS! Ah well. The body and bonnet are in brake fluid for the third time lol.
mustang1989 Posted May 4, 2015 Posted May 4, 2015 I have faith in you that you'll pull through there Greg!
Rotorbolt73 Posted May 4, 2015 Posted May 4, 2015 Sorry to hear that it messed up on you. Been there myself and it will make you mad. I remember when my first clearcoat job ruined the beautiful decal work and paint on a AMT 71 mustang I was building..Got so mad, I immediately threw it in the trash. Didn't know how to strip paint at the time so I thought the whole body was instant junk. It was a mess.. I later learned it was because I put a clear lacquer over my candy enamel and the paint chemistry wasn't compatible. Hard lesson learned and I moved on..Even today all these decades later, Applying clear coat to the body is still the most nerve wracking step for me. Especially, if I've got a bunch of decals on the body..
Metalmad Posted May 5, 2015 Posted May 5, 2015 I feel your pain I ended up repainting my Coronet Super Bee three times.
Stray Posted May 5, 2015 Author Posted May 5, 2015 I have faith in you that you'll pull through there Greg! lol... cheers Joe
Stray Posted May 5, 2015 Author Posted May 5, 2015 Sorry to hear that it messed up on you. Been there myself and it will make you mad. I remember when my first clearcoat job ruined the beautiful decal work and paint on a AMT 71 mustang I was building..Got so mad, I immediately threw it in the trash. Didn't know how to strip paint at the time so I thought the whole body was instant junk. It was a mess.. I later learned it was because I put a clear lacquer over my candy enamel and the paint chemistry wasn't compatible. Hard lesson learned and I moved on..Even today all these decades later, Applying clear coat to the body is still the most nerve wracking step for me. Especially, if I've got a bunch of decals on the body.. Yeah, I am pretty sure I put a coat on that was too wet, as it began fogging a little. So instead of letting that cure out I added a couple more light coats and then left it for the night. So I guess it cracked from the inside out as the middle coat tried to dry when the top coats already were. Eh! I feel your pain I ended up repainting my Coronet Super Bee three times. lol... ain't it grand? At least they are only little cars, if I did it to someones real car I would probably have high velocity lead poisoning pretty quick! As a bonus though, at least now I will just remove the scripts and badges. Thats one problem solved
Stray Posted May 9, 2015 Author Posted May 9, 2015 Paint today... I kind of figured that the blue might just be cursed for this car, so instead of using the AutoAir, I have used my little jars of Tamiya. Decided to go with transparent red over the gold leaf colour, with a basecoat of black. I REALLY need to get some kind of booth as I have a lot of dust specks on the paint! And ABing the tamiya paints is rather different than what I am used to. It can go on wetter without fish-eyeing but is more likely to run. Still, a learning experience. I am going to let it gas out and cure for a couple days before I start the clear (and maybe add a little light jade Gem colour shift). This is how she looks at the moment. First was the X12 Gold Leaf, then just plain old X27 Clear Red.
Recommended Posts
Create an account or sign in to comment
You need to be a member in order to leave a comment
Create an account
Sign up for a new account in our community. It's easy!
Register a new accountSign in
Already have an account? Sign in here.
Sign In Now