KJ790 Posted April 29, 2017 Posted April 29, 2017 So I have decided to start yet another K100 build. This is the first time I have built a Revell K100. I must say, this is a very detailed kit! Since I can't build anything straight out of the box, this build is getting a lot of modifications. I started by shortening the cab to an 86" version. I also shortened the frame. The frame was a bit of a challenge, because I had to take 22 scale inches out of the frame ahead of the rear cab mount to keep everything lined up with the shorter cab, but I didn't want the wheelbase to be that short. So after shortening it 22 scale inches, I added 4 scale inches back to it right in front of the rear suspension. I also added a set of dayton wheels.
KJ790 Posted April 29, 2017 Author Posted April 29, 2017 Next it was time to lay a little paint. There is still some touch-up necessary, but the idea is there. I used a set of AMT fuel tanks, tank mounts, and quarter fenders. I sanded all of the detail off of the quarter fenders and added my own using styrene tube and brass rod. I sanded the raised detail off of the AMT fuel tanks and added new straps. The 8" intake pipe is styrene tube with a 3D printed top on it. The exhaust is styrene tubing with a resin cast "rain cap" on top. I used perforated brass sheet painted with a molotow chrome pen for the heat shield.
Jim B Posted April 29, 2017 Posted April 29, 2017 Great looking build, KJ. I like it. Was there a 1:1 "RJ Humphreys" truck that this is based on?
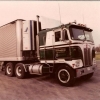
KJ790 Posted April 29, 2017 Author Posted April 29, 2017 Thanks guys! Here is the inspiration for this build.
KJ790 Posted April 29, 2017 Author Posted April 29, 2017 A good friend of mine currently owns this truck along with a few of its sisters. I swung out to his place last weekend and snapped a few reference pictures.
Jim B Posted April 29, 2017 Posted April 29, 2017 Going to take a serious tow truck to get those out. It is pool season again, though!
KJ790 Posted April 29, 2017 Author Posted April 29, 2017 Going to take a serious tow truck to get those out. It is pool season again, though!Haha, yeah they are in there for sure! He is digging a few of these old ones out this week to get rid of them, so I wanted to take pictures of all of them before they are gone.
Jim B Posted April 29, 2017 Posted April 29, 2017 I hope they are going to go get restored instead of ending up on the scrap heap.
extmcdriver Posted April 29, 2017 Posted April 29, 2017 As usual, outstanding work. I love what you have done with the ol' KW!
towman1271 Posted April 30, 2017 Posted April 30, 2017 Good looking KW..You are the master of the K100
Mopar - D Posted April 30, 2017 Posted April 30, 2017 KJ awesome paint job. Another master peace in the works.
DRIPTROIT 71 Posted April 30, 2017 Posted April 30, 2017 I hope they are going to go get restored instead of ending up on the scrap heap.x2 You certainly have a way with KW's!!! Looks Awesome!!
NY Modeler Posted April 30, 2017 Posted April 30, 2017 Love your work KJ, and enjoyed seeing lots of it and meeting you at NNL East.Truly outstanding work on this conversion!
KJ790 Posted May 7, 2017 Author Posted May 7, 2017 Thanks guys! The Revell kit comes with VIT interior, which was not available in the 86" cab. So I used some corrugated styrene sheet to make a standard interior.
gatorincebu Posted May 8, 2017 Posted May 8, 2017 Kurt , Nice work on the interior panels. This one is shaping up to be a real sharp looking rig ! Be Well Gator
KJ790 Posted May 9, 2017 Author Posted May 9, 2017 Well, I seem to have hit a snag. I cleared the cab tonight and I am not liking the way it is looking. Not sure what happened, but it just doesn't look right now. I think I am going to have to strip the paint off and start over. I felt like I was getting close to the light at the end of the tunnel, but now it is a going to be a bit more work.
jacobus Posted May 9, 2017 Posted May 9, 2017 thats very sad , color looks so good , everything was goodfollow how its go nowjacobus
KJ790 Posted August 22, 2019 Author Posted August 22, 2019 After 2 years, I am back to working on this one. I had initially painted the cab with Tamiya rattle can, but when I clear coated it, the paint turned funky, so the whole thing got stripped. This was when I lost interest and set it on a shelf. Recently I got a bug to work on it again, so I mixed up some Tamiya paints from the small jars and sprayed it through my airbrush. The result was much better. This kit has the best chassis of any K100 kit out there, but the cab is terrible. I have never had such a hard time getting a cab together. The door hinges are poorly designed and difficult to work with. The headlights are too large and look out of scale, but it is too late at this point. New pics will be coming shortly.
Sam I Am Posted August 22, 2019 Posted August 22, 2019 Love cabovers and love what your doing with this one. Glad to see you back at it.
Recommended Posts
Create an account or sign in to comment
You need to be a member in order to leave a comment
Create an account
Sign up for a new account in our community. It's easy!
Register a new accountSign in
Already have an account? Sign in here.
Sign In Now