GerN Posted February 17, 2018 Share Posted February 17, 2018 Really excellent! Quote Link to comment Share on other sites More sharing options...
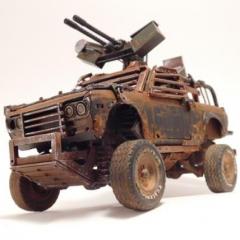
Daxman Posted February 19, 2018 Author Share Posted February 19, 2018 I applied more weathering and started on the exterior hose placement, More weathering to follow. Quote Link to comment Share on other sites More sharing options...
David G. Posted February 19, 2018 Share Posted February 19, 2018 It looks like something from Heavy Metal magazine! David G. Quote Link to comment Share on other sites More sharing options...
NYLIBUD Posted February 19, 2018 Share Posted February 19, 2018 Damm,hang on tight. Quote Link to comment Share on other sites More sharing options...
Daxman Posted February 25, 2018 Author Share Posted February 25, 2018 I thought the front window was too tall. I needed something to reduce it's overall size. I made a visor out of a semi truck rear fender. All my cars seem to have visors....it's a common theme. This VW really needed it. I added headlight assemblies to the screw mounts under the fender. Quote Link to comment Share on other sites More sharing options...
David G. Posted February 25, 2018 Share Posted February 25, 2018 It just keeps getting better! David G. Quote Link to comment Share on other sites More sharing options...
Daxman Posted February 27, 2018 Author Share Posted February 27, 2018 I believe that I got the rear window louvers from a Hemi-Cuda model that I've been stealing parts off of for years. I shortened them to fit the rear window. I made little hinges so that you could still take a peek at the turbines. I added metal straps to stabilize the 2 side intakes. I think I'll paint the headlight shrouds white. Quote Link to comment Share on other sites More sharing options...
bisc63 Posted February 27, 2018 Share Posted February 27, 2018 Beautiful and imaginative! I really love your builds! Quote Link to comment Share on other sites More sharing options...
Spex84 Posted February 27, 2018 Share Posted February 27, 2018 Brilliant! I love this thing. Lots of cool mechanical details, but they're sympathetic to the shape and feel of the original Beetle. The weathered paint really suits it...is that the hairspray technique? Quote Link to comment Share on other sites More sharing options...
afx Posted February 27, 2018 Share Posted February 27, 2018 I agree brilliantly designed and executed. Quote Link to comment Share on other sites More sharing options...
FabbricaP Posted February 27, 2018 Share Posted February 27, 2018 This is a really fun project to watch! Love the direction your're headed, excited to see more. Great job on the weathering, fits the car/craft perfectly! Quote Link to comment Share on other sites More sharing options...
Daxman Posted February 28, 2018 Author Share Posted February 28, 2018 19 hours ago, Spex84 said: Brilliant! I love this thing. Lots of cool mechanical details, but they're sympathetic to the shape and feel of the original Beetle. The weathered paint really suits it...is that the hairspray technique? I've tried the hairspray technique a few times with no luck. I even tried it on this model, but ended up repainting it. What I've done on my last few models is to start with a few coats of rust colored enamel primer. I'll then airbrush different shades of rust over that. I'll use light colored rust on the parts that would see the most sun. I use a dark rust for the lower areas. Then a few coats of Dullcoat to protect the rust colored paint. Then I airbrush grey acrylic over the rust/Dullcoat. This layer would be the "factory" primer from the auto manufacturer. You could sip this step, but I think it adds realism. It also adds a good buffer between the rust and the body color. Last step is to spray the body color over the gray. After it's dry, start sanding and chipping the acrylic away. The acrylic chips away with a X-acto blade pretty easy. The Dullcoat should provide a barrier for the rust paint. Just don't sand through the Dullcoat. Thanks for the comments guys!!!! Quote Link to comment Share on other sites More sharing options...
misterNNL Posted February 28, 2018 Share Posted February 28, 2018 looking better with every new post ! The new straps add weight to the top and draw to viewers eye to the roof area thus balancing the design IMO. Quote Link to comment Share on other sites More sharing options...
Recommended Posts
Join the conversation
You can post now and register later. If you have an account, sign in now to post with your account.
Note: Your post will require moderator approval before it will be visible.