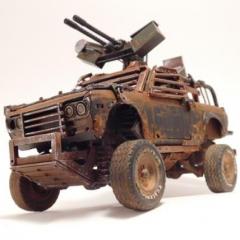
Daxman Posted August 8, 2019 Share Posted August 8, 2019 I had started this back in March. It was going to be a rusted out, heavily weathered old pick up. I was actually going to make a model with wheels for a change! I experimented with layering thin layers of paint, for the weathering. I wasn't happy with the way it was turning out and ended up putting the kit away for a few months...... Broke it out a few days ago and decided to make it into a jet truck, what else? I'm not sticking with this color, it will change. Just need to figure out where this whole thing is going to go....Is it a work truck? A delivery truck? Built for speed? I'll be trying to figure out a color scheme for the next few months....I'll probably end up repainting it a few times over. I love that fat exhaust I'll be replacing the little fins around the 2 rear exhaust. I made these temporary just to see how they looked. For me, the most difficult part of building one of these hover cars, is the action in the wheel wells. It's difficult to find parts that fit into the space and still look as if they preform some kind of function. I used half of a V8 and the air cooled cylinder block of a VW plus some styrene tube to make a V-TOL type take off system. I'll be adding more bits and pieces as I go. I still have to figure out what kind of front steering/propulsion I'm going to put on. This is usually the second most difficult part. Thanks for looking. I'll post more as i go. Quote Link to comment Share on other sites More sharing options...
Oldschool4x4 Posted August 8, 2019 Share Posted August 8, 2019 Really like these builds you do! Space on..... Quote Link to comment Share on other sites More sharing options...
Daxman Posted August 9, 2019 Author Share Posted August 9, 2019 (edited) 12 hours ago, Oldschool4x4 said: Really like these builds you do! Space on..... I like them too. I really wanted to make this into a traditional old beater truck. Rusted out, with tools in the back and torn seats. I had it sitting on my desk mocked up on 4 wheels. It looked cool, but I just wasn't excited about it. It sat on my desk for around 5 months and eventually got pushed behind my monitor. I started scratch building the big turbines about a week ago for a 71 Hemi that was going to be my next project, but I tried them on the 41 Chevy and they just looked too good. So I need to come up with a clever name for it...... Edited August 9, 2019 by Daxman changed word Quote Link to comment Share on other sites More sharing options...
Jonathan Posted August 9, 2019 Share Posted August 9, 2019 Epic. I love your work! Quote Link to comment Share on other sites More sharing options...
Danno Posted August 9, 2019 Share Posted August 9, 2019 Far. Out. Quote Link to comment Share on other sites More sharing options...
Daxman Posted August 11, 2019 Author Share Posted August 11, 2019 Thanks guys!!! I'm really enjoying this build. The original grill that comes with this kit is a large solid chrome piece. No gaps between each of the fins. I attempted to separate them, bad idea! A few of the fins broke off and they were too flimsy. Looks like I'll be scratch building a grill. Right now I'm imagining this truck in a medium 50's green. My daughter suggested a 50's cream. If you've seen my previous builds, this will probably change a few times. I opened the sides of the hood. I'll need to find something interesting to fill the void. Mechanical pieces, plumbing, wires. Thanks for looking! Quote Link to comment Share on other sites More sharing options...
Super28 Posted August 11, 2019 Share Posted August 11, 2019 Thats just sick! I like it! Quote Link to comment Share on other sites More sharing options...
Belugawrx Posted August 23, 2019 Share Posted August 23, 2019 Looking good Dax ! Maybe a whopping big intake plenum under the hood? Quote Link to comment Share on other sites More sharing options...
misterNNL Posted August 24, 2019 Share Posted August 24, 2019 Do you have some separate photos of the Side and rear thrusters before they were installed and painted so I can see how they were constructed? Any help appreciated. Quote Link to comment Share on other sites More sharing options...
Daxman Posted August 24, 2019 Author Share Posted August 24, 2019 (edited) Thank you all!!! 10 hours ago, Belugawrx said: Looking good Dax ! Maybe a whopping big intake plenum under the hood? I was searching for something interesting that would peek out of the two removed side covers. I really like the idea of big intakes feeding all of the turbines, but I just cant find anything that fits the shape. I need to fill the space with something and the theme is "steampunk junker" So I took 2 rims from a 1/25th semi and wrapped it with styrene. I use the hexagon rod styrene for the bolt heads. The front facing the grill has blades like a turbine. I'll include photos of it later. I experimented with different grills. This one was the best. It's recessed deep and looks aggressive. There's rust holes in some of the seams. I've moved the two main thrusters down to give more clearance for the side thrusters and the rear bumper. The fenders, doors and bed are full of dents and dings. I lost the hood last weekend! I have searched everywhere. I think I left it under the hood of my daughter's car. It's a long story and I feel like an idiot. I need to purchase another kit. I've searched all the hobby stored here in town and can't find it. I'll probably have to order it. 45 minutes ago, misterNNL said: Do you have some separate photos of the Side and rear thrusters before they were installed and painted so I can see how they were constructed? Any help appreciated. I will find and put up a few that I have. I just need to find them on my phone. I have a couple on my PC. The side thrusters are 1/2 a V8 engine block with a few large diameter styrene tubes attached. You can see the transmission housings facing towards the middle of the car. My son gave me a few of his old Gundam kits when he moved out. If you have any interest in building a hover car, I highly suggest taking parts from your kids Gundam kits. They're never going to build them anyways........ I use wheel rims for the main body of the intake and exhaust. Lots of styrene tube of different diameters. Edited August 24, 2019 by Daxman added a paragraph Quote Link to comment Share on other sites More sharing options...
Belugawrx Posted August 24, 2019 Share Posted August 24, 2019 ??? Quote Link to comment Share on other sites More sharing options...
misterNNL Posted August 24, 2019 Share Posted August 24, 2019 Great inspiration and very typical of the help available on the forums. Thanks for sharing your creativity. Quote Link to comment Share on other sites More sharing options...
Daxman Posted August 27, 2019 Author Share Posted August 27, 2019 Here's the two front thrusters and what looks like a generator. The generator goes under the hood. Since I'm removing the sides of the hood, I needed something interesting that could be seen. I was thinking of putting the fuel tank under the hood as I do on most of my hover cars, but that's boring to look at. This fills the void and has a cool Dieselpunk feel to it. I'm all about vents and intakes. Big turbines gotta breathe. There's a removable cover that goes over the two turbines, but the slats remain open. I crammed the area around the turbines with miscellaneous parts. There are suspension parts from a Jeep Wrangler and front bumper headlight bezels from a El Dorado. Remove the cover when you need to make repairs. Here's a photo without the bed. It's still just a mock up, not fully glued. Many of the parts are crooked in the photos. I ordered a new kit from Amazon to replace the hood I lost. It'll be here in a few days. I'll be ready to start painting the body soon after. Thanks for looking!!!! Quote Link to comment Share on other sites More sharing options...
afx Posted August 27, 2019 Share Posted August 27, 2019 Another great build Dax. Quote Link to comment Share on other sites More sharing options...
misterNNL Posted August 31, 2019 Share Posted August 31, 2019 The new under hood and bed features really balance nicely. Outstanding overall. Quote Link to comment Share on other sites More sharing options...
Daxman Posted September 14, 2019 Author Share Posted September 14, 2019 I painted it with Vallejo Air Red 71.003 RLM23 two nights ago and started the weathering last night. I'll be adding more. I hope to add more hoses and hopefully some realistic looking wire harnesses. I haven't weathered the visor enough yet. Not sure that I'm going to keep it red. I changed the rear turbines to match the front more closely. Much better! I will probably do more weathering on the bed. The vents and the access panels might look good in bare steel or gun metal. Quote Link to comment Share on other sites More sharing options...
Koellefornia Kid Posted September 14, 2019 Share Posted September 14, 2019 COOL!! Quote Link to comment Share on other sites More sharing options...
afx Posted September 14, 2019 Share Posted September 14, 2019 Your weathering skills are top notch! Might be the best I've seen. Quote Link to comment Share on other sites More sharing options...
Daxman Posted September 19, 2019 Author Share Posted September 19, 2019 I added some more details. Under the rear wheel wells, I added half a supercharger. It gave some needed bulk to the rear side thrusters. I'm really happy with the hood side cutouts. I used the piece that was removed and added some thin styrene to create the intake grill. I love the grill on this truck. I plan to fit a lot of hoses under there. Quote Link to comment Share on other sites More sharing options...
Daxman Posted September 23, 2019 Author Share Posted September 23, 2019 I can't believe how quickly this one is coming along. It's almost done! There are a few things left to do. I've decided to go without bumpers. I like the look of the grill. I don't want to break up the lines. I just used turn signals from another kit to cover the bumper holes. The two holes in the driver side turbine will need to be covered or plugged. I can't believe I got this far without addressing it. One of the holes is visible in the photo above. I might just make a cap to go over it. The front looks great without a bumper, but the rear looks incomplete. I think what I'll do is create a frame that looks like it's holing up the two large rear turbines. Right now they don't appear to have enough support. I may add more plumbing as well. I need to do streaks and a final wash. Can't forget the soot. The visor is not in it's correct position in the photos. It's a bit too high. I'll be putting in the final pieces soon! Turn signals, brake lights and mirrors. I'm happy with the "power plant" under the hood. My original thoughts were to put the fuel tank under there. All my hover cars have large fuel tanks. I was going to keep the tradition.... That changed when I removed the 2 side cut outs from the hood. I wanted something cool to appear through the gap. So I created this generator looking thing. One of the best parts about making hover cars, is that you don't have to make everything have a realistic purpose. It's up to you how much realism you want to set. A fuel tank would have just been a steel box, I think the generator gives it more interest. I figured that A hover car would need a few extra flight controls. I cut the wheel into a flight yoke. There's a ton of levers that unfortunately won't be seen. Thanks for looking!!!! Quote Link to comment Share on other sites More sharing options...
misterNNL Posted September 26, 2019 Share Posted September 26, 2019 On 9/18/2019 at 11:19 PM, Daxman said: I added some more details. Under the rear wheel wells, I added half a supercharger. It gave some needed bulk to the rear side thrusters. I'm really happy with the hood side cutouts. I used the piece that was removed and added some thin styrene to create the intake grill. I love the grill on this truck. I plan to fit a lot of hoses under there. What do you use for hoses? Quote Link to comment Share on other sites More sharing options...
Daxman Posted September 26, 2019 Author Share Posted September 26, 2019 4 hours ago, misterNNL said: What do you use for hoses? I use styrene rod, painted with Tamaya matte black. For the hoses under the frame of the truck, I used .125" diameter. On my VW jet car I used heat shrink tube that I found in a pack at Home Depot. It works great and has a rubber texture. Keeps it's shape fairly well when you heat it. Quote Link to comment Share on other sites More sharing options...
DrKerry Posted September 26, 2019 Share Posted September 26, 2019 Very kool, you should make a basket of fruit for the front seat, farmer going to market kind of vibe!!!! Quote Link to comment Share on other sites More sharing options...
Daxman Posted September 30, 2019 Author Share Posted September 30, 2019 On 9/26/2019 at 8:58 AM, DrKerry said: Very kool, you should make a basket of fruit for the front seat, farmer going to market kind of vibe!!!! The kit comes with wooden side rails for the bed. I might include them when it's finished. It definitely gives it a farmer truck look. The model is almost complete. I have added lots of little details since my last photos. I have photos with the visor on and off. I will probably have it on when it's complete. Not 100% decided yet. I beefed up the frame at the rear of the truck. It now has a cage surrounding the two rear turbines. In the earlier photos, they had no support. I also filled voids with bent styrene rod as pipes. I made some tail lights and might add rear amber turn signals. I added wiring under the hood. With the visor off, you can see that the windshield wipers are mounted from the roof. Rear turbine cover is off so you can see the wiring. The large cover comes off completely. The smaller cover is hinged. I made some front turn signals out of styrene tube and some clear sprue. I'll be adding the driver's spotlight and side mirror soon. I like it without the bed! The next time I put up photos it should be done. Hopefully this week. Thanks for looking. Quote Link to comment Share on other sites More sharing options...
DrKerry Posted September 30, 2019 Share Posted September 30, 2019 7 hours ago, Daxman said: The kit comes with wooden side rails for the bed. I might include them when it's finished. It definitely gives it a farmer truck look. Be the fastest grocery getter in town!!! LOL Quote Link to comment Share on other sites More sharing options...
Recommended Posts
Join the conversation
You can post now and register later. If you have an account, sign in now to post with your account.
Note: Your post will require moderator approval before it will be visible.