carl63_99 Posted March 9, 2023 Author Posted March 9, 2023 I'm Baaack! Been so busy with business, holidays, severe storms and taxes. But I did get some time to start working on molding windshield and back window. I found some picture frame inserts made of plastic at Hobby Lobby and will be seeing how that heats and molds over the templates included in the 3D kit. 1
carl63_99 Posted March 13, 2023 Author Posted March 13, 2023 Using air-dry clay and the tenplates that came with the kit, I've been experimenting with a few different kinds of plastic for the windows. Replacement photo frame glass from Hobby Lobby seems to provide the best clarity when heat molding the windows. I may make several more to get them perfect, but as far as proof of concept, I know I can make them. 2
Spex84 Posted March 14, 2023 Posted March 14, 2023 Agreed! Windows are a make-or-break aspect of building any resin or 3D-printed aftermarket kit, so I'm glad that your skills (and the provided bucks) are making it happen. Looking very good!
carl63_99 Posted March 16, 2023 Author Posted March 16, 2023 I think I see a problem. As I've done 5 windshields now, each one getting better than the last, I have to draw the line somewhere or I'll never get done. Best windshield so far is glued into the H/O and now it can go on to the next step. I also though about tail lights. I could mold them or cut down toothbrush handle or something to make nice 3D ones, or BMF the one included and put a couple coats of clear red over that. Second option shown, and they look pretty nice.
peteski Posted March 16, 2023 Posted March 16, 2023 2 hours ago, carl63_99 said: I also though about tail lights. I could mold them or cut down toothbrush handle or something to make nice 3D ones, or BMF the one included and put a couple coats of clear red over that. Second option shown, and they look pretty nice. I agree with the earlier comment that windows make or break the model's realism, I have to add that IMO same goes for other clear lenses on the model. It would be nice to have those molded out of clear/amber/red, but I can also see that one has to draw the line somewhere. I suppose a simple open mold could be made of those taillights, then cast them using clear red resin (or clear and painted with transparent red), but that would really extend and complicate this build.
ubermodel Posted March 18, 2023 Posted March 18, 2023 (edited) On 3/13/2023 at 1:15 PM, carl63_99 said: Using air-dry clay and the tenplates that came with the kit, I've been experimenting with a few different kinds of plastic for the windows. Replacement photo frame glass from Hobby Lobby seems to provide the best clarity when heat molding the windows. I may make several more to get them perfect, but as far as proof of concept, I know I can make them. What's the method you use to shape the new windows? Do you used a vacuform machine to pull the glass over the mold, or just heat it with a hot air gun and pull down by hand? Edited March 18, 2023 by ubermodel
carl63_99 Posted March 19, 2023 Author Posted March 19, 2023 17 hours ago, ubermodel said: What's the method you use to shape the new windows? Do you used a vacuform machine to pull the glass over the mold, or just heat it with a hot air gun and pull down by hand? No vacuform machine, so I did the squish method. I had the molds at the ready, heated the clear plastic over a heat gun and when it was really flimsy, pressed it down over the mold. I made between 3-5 versions of each window until I got one that was good enough to use. One problem is that the plastic got hot enough to melt the 3D printed window mold, so I had to work fast. If I do this again, I will make a clay mold of the 3D printed one and mold over that. As I am not going for contest winning, just building for my own fun, I am happy enough with the results. Building one of these perfect would cost a lot more time and money. 1
carl63_99 Posted March 20, 2023 Author Posted March 20, 2023 Doing wheelies! Seriously, filled in the front turn signals with white glue, have them sitting like this overnight so the glue dries level. I like how you can see the difference between the two cars, particularly the engines in this pic. 2
carl63_99 Posted March 23, 2023 Author Posted March 23, 2023 As I finish up the final assembly, problems start showing up. Can't find the other exhaust for the HO, had to make a new driveshaft for the Salon. Couple broken front suspension parts. I need to practice pin striping, both cars need some of that. Another week and they should be complete. 1
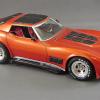
carl63_99 Posted March 24, 2023 Author Posted March 24, 2023 LAST PIC I post in the WIP for Salt and Pepper! When I finish models I take a couple days off, come back and polish/wax, final cleanup. Early next week, Under glass pics and commentary. Enjoy! And thanks for al the kind words. 2
Recommended Posts
Create an account or sign in to comment
You need to be a member in order to leave a comment
Create an account
Sign up for a new account in our community. It's easy!
Register a new accountSign in
Already have an account? Sign in here.
Sign In Now