slusher Posted January 16, 2014 Share Posted January 16, 2014 Amazing build. Excellent work.. Quote Link to comment Share on other sites More sharing options...
Chris White Posted January 16, 2014 Share Posted January 16, 2014 that paint, real nice Quote Link to comment Share on other sites More sharing options...
PappyD340 Posted January 16, 2014 Share Posted January 16, 2014 WOW!! Beautiful build Tulio, I can almost see myself in that paint through my screen it's just that shiny, I had a 64 Electra 225 once upon a time, a real land Yacht Quote Link to comment Share on other sites More sharing options...
peekay Posted January 16, 2014 Share Posted January 16, 2014 Outstanding as always, Tulio. Very fine detailing. Quote Link to comment Share on other sites More sharing options...
charlie8575 Posted January 16, 2014 Share Posted January 16, 2014 Very nice indeed. Foiling those hash-marks on the lower quarter is something I can't quite figure out how to do with it still coming out decent. The bucket seat interior was available in red, saddle and white, not blue, although I suppose a custom order might have been possible- GM would do that in the early '60s for an additional charge. Unfortunate, as it looks pretty snazzy, I think. Another great job. Charlie Larkin Quote Link to comment Share on other sites More sharing options...
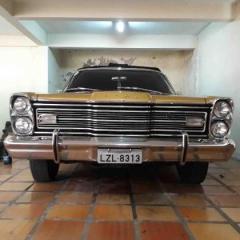
Lovefordgalaxie Posted January 17, 2014 Author Share Posted January 17, 2014 Thanks again guys!!! Very nice indeed. Foiling those hash-marks on the lower quarter is something I can't quite figure out how to do with it still coming out decent. The bucket seat interior was available in red, saddle and white, not blue, although I suppose a custom order might have been possible- GM would do that in the early '60s for an additional charge. Unfortunate, as it looks pretty snazzy, I think. Another great job. Charlie Larkin That foil job was easy. You just have to foil that BEFORE painting the car, and then polishing the paint out just where you want the chrome to show. I did that with all the lettering on the body too. That blue, well I stole it from a Cadillac catalog. I did some research to figure out the chrome on the dash, and if I had to include that ugly console, and discovered what you said Charlie. That bogged me for a minute, as I didn't want a super contrasting interior, but that didn't last as I remembered watching on a TV show (The Car Czar I think?) a Camaro, painted in a Cadillac color being restored. Then, I thought I would do the same with the Buick's interior. It looks classy in blue without too much contrasting between the interior and exterior. Very discrete, and luxurious looking. Quote Link to comment Share on other sites More sharing options...
riverart Posted January 17, 2014 Share Posted January 17, 2014 Sweet car! Quote Link to comment Share on other sites More sharing options...
kendog261 Posted January 17, 2014 Share Posted January 17, 2014 Very nice the black is outstanding Quote Link to comment Share on other sites More sharing options...
ToyLvr Posted January 17, 2014 Share Posted January 17, 2014 [quote name="Lovefordgalaxie" post="1092676" timestamp="1389876312" Not only a nice car, but also the kind of kit I find to be the absolute best: AMT 1960s tooling with metal axles!!! There is an engine to build, but there are not many parts at all to be a pain, and four little screws keep the chassis attached to the body. It can't get any better than this, in my opinion, of course. Tulip, you're not alone - I love those old screw-chassis kits! Beautiful job on this one!!! Quote Link to comment Share on other sites More sharing options...
Speedfreak Posted January 17, 2014 Share Posted January 17, 2014 Beautiful job Tulio, you bring much talent to the table! But, I think more importantly you love what you do! And it shows. Quote Link to comment Share on other sites More sharing options...
rmvw guy Posted January 17, 2014 Share Posted January 17, 2014 (edited) The paint is flawless as usual Tulio, as so with the foil work, I too love the metal axles and screws. Those cars were always fun to play with after they were built (and still are). I can't believe how bone stock this one is and I love it. May have to pick one up even though I'm not a Buick fan it looks like a fun build. I always enjoy seeing your finished work..... ( I always thought Buick was an old man's car, wait a minute, I'm an old man now! lol I did have a new Buick Opel once and after driving it a week I gave it to my Mom. She was a hip old lady with racing stripes and ralley lights) Edited January 17, 2014 by rmvw guy Quote Link to comment Share on other sites More sharing options...
David G. Posted January 17, 2014 Share Posted January 17, 2014 Excellent build! Your paint work is fantastic. David G. Quote Link to comment Share on other sites More sharing options...
mikemopar70 Posted January 17, 2014 Share Posted January 17, 2014 This Buick must be proud you picked it up at this hobby shop!! It looks real nice, the paint is smooth and the color choice is perfect! Congratualtions!! Quote Link to comment Share on other sites More sharing options...
Danno Posted January 17, 2014 Share Posted January 17, 2014 Exquisite! Quote Link to comment Share on other sites More sharing options...
om617 Posted January 17, 2014 Share Posted January 17, 2014 Lovely looking Buick and great paint and foil work Quote Link to comment Share on other sites More sharing options...
bogger44 Posted January 17, 2014 Share Posted January 17, 2014 What a beauty. That paint is simply amazing! Quote Link to comment Share on other sites More sharing options...
booboo60 Posted January 17, 2014 Share Posted January 17, 2014 Túlio Very nice Sir, I love the Ol Buicks, My first car was a Buick skylark Special, A 67, Looked like a chevelle , Say did you spray that out of a can, Or AIR? ALSO, I like how the floor pans look, how did u get the texture look? Thanks Boss,,good job Quote Link to comment Share on other sites More sharing options...
W-409 Posted January 17, 2014 Share Posted January 17, 2014 Great looking Buick! You do so nice work every time, and great to see a GM car from your bench, even though there's nothing wrong with Fords, either. Very nice BMF work and great paint job, as always. Quote Link to comment Share on other sites More sharing options...
John Goschke Posted January 17, 2014 Share Posted January 17, 2014 Nice work! Paint and foil is exceptional! Quote Link to comment Share on other sites More sharing options...
Lovefordgalaxie Posted January 17, 2014 Author Share Posted January 17, 2014 Túlio Very nice Sir, I love the Ol Buicks, My first car was a Buick skylark Special, A 67, Looked like a chevelle , Say did you spray that out of a can, Or AIR? ALSO, I like how the floor pans look, how did u get the texture look? Thanks Boss,,good job Thanks Alan!! Yes, the paint is from the Tamiya spray can. No airbrush involved on the body. No primer also. Just Tamiya TS-14 black on the bare plastic. I always do that with Tamiya paints and it always works great. I only use primer and airbrush paint with real automotive paint. After it was painted and foiled I just gave it a nice rub with Meguiar's Tech Wax 2.0 and some cotton balls. On the floor pans I airbrushed them with a Revell enamel paint that looks like red oxide primer (MAT 37) and then some semi gloss black acrylic from Testors. Next, to seal it up I airbrushed some semi gloss clear. After that I decanted some Tamiya TS-14 and airbrushed it to simulate the body color overspray on the edges, what is kind of hard to notice even with the model on hand, as the misty black overspray ends looking semi gloss like the rest of the black on the underside of the car. I didn't do any texture, at least not on purpose. What you see is just the result of the layers of paint and clear. Quote Link to comment Share on other sites More sharing options...
Monty Posted January 17, 2014 Share Posted January 17, 2014 I always look forward to reading your posts because I know I'm going to see some great detailing and incredible paint, and this one with its mirror-black paint is absolutely magnificent. You mentioned getting two cans of Tamiya gloss black for this project. Why? Are you spraying multiple coats and rubbing them out? Any other tips you can share regarding achieving this kind of finish would be appreciated. Quote Link to comment Share on other sites More sharing options...
Lovefordgalaxie Posted January 17, 2014 Author Share Posted January 17, 2014 I always look forward to reading your posts because I know I'm going to see some great detailing and incredible paint, and this one with its mirror-black paint is absolutely magnificent. You mentioned getting two cans of Tamiya gloss black for this project. Why? Are you spraying multiple coats and rubbing them out? Any other tips you can share regarding achieving this kind of finish would be appreciated. Well, when I use spray cans I only use Tamiya. They are pretty expensive, but they are the very best. That's what I think. I never got similar results with any other brand of spray paint, including Testors/Model master. I also use no primer at all. Why? Because primer will always leave a texture, even Tamiya primer. If the body is a odd color plastic, like orange, red, or even black and I'm painting it a light color, I just give it a couple of mist coats of Tamiya silver or aluminum paint until the plastic color is covered. If you have a light color plastic body, sand your mold lines, and then, just wash it very well with a good detergent to remove all mold release gent from it and let it dry by itself. Then start painting it with mist coats holding the spray can about 25 cm from the model. Usually I give the body two mist coats with about 20 minutes in between. The ideal is that at the end of the second mist coat you can not see the plastic color anymore. If you still can, then give it another mist coat. Only doing so, you will almost finish the first can. remember they are small, and you also have to mist coat other parts like the hood, splash pans, firewall and wheels eventually. At the end of the mist coats, you wait about two hours and then the fun begin. Usually I finish off the first can on the small parts, giving them heavy coats. Then I start the new one on the body. Usually one can is enough to give the model about three wet coats. By wet coats I mean painting up close, about 10 cm away, and moving the can fast, leaving no orange peel on the surface. The secret is to get to the critical point when the paint is just about to run. This requires some practice. You will be disappointed to see a lot of detail to disappear at this point, but don't worry. The important is not to let the paint run, and don't get heavy to the point the paint will accumulate at the lower parts of the body. Like I said, it takes some practicing on some old bodies. Let the paint to dry about 20 minutes and give it yet another heavy coat. wait more 20 and give it the final coat. Also have a extra can of paint, because if your second can ended during the last coat, you can't stop in the middle of a body. Let the model dry at least overnight. At this point you will see that all detail is showing again. You can now thank Mr.Tamiya for his great paint!! people say you have to wait four days to rub Tamiya paint out (it's lacquer) but I just give it 24 hours of drying time. To rub it out, I use a 2500 sanding paper and a cup of water. I just sand until the larger surfaces are all flat. Be very careful not to sand trough the paint on the corners!!! To rub the Tamiya paint out, I use Meguiar's Tech Wax 2.0 wax and some cotton balls. I'm always careful NOT to rub trough the paint on corners. I also use to do the BMF before rubbing the paint, so the wax won't affect the sticking of the foil, not to mention the foil gets very shiny with the wax. Another thing of beauty about Tamiya paint: you can do a touch up and it will not disturb the previous coat. Even after days or weeks. P.S. I do not work for Tamiya. Quote Link to comment Share on other sites More sharing options...
1959scudetto Posted January 17, 2014 Share Posted January 17, 2014 Tulio, this uick just looks fantastic - and to achieve this look within ONE week - incredible! I just wanted to ged rid of this kit (I have it in my stash and don't find it very nice, but your build makes me think about it once more...) Quote Link to comment Share on other sites More sharing options...
Joker Posted January 17, 2014 Share Posted January 17, 2014 The Fords in your collection must be giving the Buick the stink eye . . . LOL Metal axles Rule ! Quote Link to comment Share on other sites More sharing options...
Monty Posted January 17, 2014 Share Posted January 17, 2014 Túlio, thanks for the tutorial! Quote Link to comment Share on other sites More sharing options...
Recommended Posts
Join the conversation
You can post now and register later. If you have an account, sign in now to post with your account.
Note: Your post will require moderator approval before it will be visible.