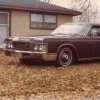
Porscheman Posted October 3, 2014 Share Posted October 3, 2014 (edited) This is a MPC reissue and it was built out of the box with the exception of the Round 2 RWL tires and the side mirrors out of my parts box. Painted Testors Inca Gold Laquer with 3 coats of Wet Look Clear. The interior was done in Tamiya Primer White with Semi Gloss Black dash and carpeting. The glass was tinted using 3 light coats of Tamiya Clear Blue. All in all not a bad kit, but the rear bumper seems to wide for the body. Let me know what you think. Thanks, Al Edited October 6, 2014 by Porscheman Quote Link to comment Share on other sites More sharing options...
Snake45 Posted October 3, 2014 Share Posted October 3, 2014 Very nice work! Quote Link to comment Share on other sites More sharing options...
chunkypeanutbutter Posted October 3, 2014 Share Posted October 3, 2014 Is that a gap over the rear bumper, as well? That bumper just looks... Odd. Quote Link to comment Share on other sites More sharing options...
unclescott58 Posted October 3, 2014 Share Posted October 3, 2014 I'd like to see some clearer pictures. As it sits now, other than the rear bumper, it looks okay. But, lighting and shadows are such, it's really though to tell. Scott Quote Link to comment Share on other sites More sharing options...
Porscheman Posted October 3, 2014 Author Share Posted October 3, 2014 (edited) I'd like to see some clearer pictures. As it sits now, other than the rear bumper, it looks okay. But, lighting and shadows are such, it's really though to tell. Scott Scott, I tried to take nice pictures like yours, but the sun was just to bright. See how the ones I added look. Al Edited October 3, 2014 by Porscheman Quote Link to comment Share on other sites More sharing options...
slusher Posted October 3, 2014 Share Posted October 3, 2014 Sharp build Al. Love the inca gold with white interior.. Quote Link to comment Share on other sites More sharing options...
Curt Posted October 3, 2014 Share Posted October 3, 2014 Very nice build, Al. Your tinted windows are subtle and look real. Quote Link to comment Share on other sites More sharing options...
Guest Posted October 4, 2014 Share Posted October 4, 2014 Very nice. Quote Link to comment Share on other sites More sharing options...
OldTimer50707 Posted October 4, 2014 Share Posted October 4, 2014 Nice build. Quote Link to comment Share on other sites More sharing options...
Bob Ellis Posted October 4, 2014 Share Posted October 4, 2014 You chose a good color Quote Link to comment Share on other sites More sharing options...
unclescott58 Posted October 4, 2014 Share Posted October 4, 2014 Very nice job on the build Al. But, boy the headlamps and rear bumper fit leave a lot to be desired. I'm disappointed. I have this kit in the soon to do pile. I wonder if there is anyway to fix those two problems? Scott Quote Link to comment Share on other sites More sharing options...
StevenGuthmiller Posted October 4, 2014 Share Posted October 4, 2014 Looks nice Al! But I agree, what's the deal with that bumper? Could it be another example of bad kit engineering? Kind of makes you wonder if these guys ever just slap one of these things together quick just to make sure things fit before they pawn them off on the public. I mean honestly, that things gotta be hanging over a good 1/4 inch on both sides! It's not even close! There's something seriously wrong with those head lights too. It's just so frustrating to put all that love & attention into a kit, & you clearly did Al, & then have things like that so far out of whack. Well, I applaud you for a job well done. Just wish the manufacturer would have put in half as much effort as you did! Steve Quote Link to comment Share on other sites More sharing options...
mangodart Posted October 4, 2014 Share Posted October 4, 2014 NIce job on a not so good kit, I like that color Quote Link to comment Share on other sites More sharing options...
deuces wild Posted October 4, 2014 Share Posted October 4, 2014 The first issue from 1972 was molded in light brown and the bottom half of the body was fogged in black from the factory and wrapped in tissue paper.. It sure brings back memories.. Nice build!!! Quote Link to comment Share on other sites More sharing options...
Snake45 Posted October 4, 2014 Share Posted October 4, 2014 Is that a gap over the rear bumper, as well? That bumper just looks... Odd. I just dug out an '80s issue glue bomb I been working on and checked the rear bumper. Yeah, there's something weird going on. Fit's not great on mine and it's definitely wider than the body but it doesn't seem to be quite this wide. I'll try to compare that bumper with a current issue one. Quote Link to comment Share on other sites More sharing options...
Snake45 Posted October 4, 2014 Share Posted October 4, 2014 NOTE: I certainly don't mean to hijack this thread on this nicely built model but the subject DID come up. If a mod wants to move this post, or wants me to start a new thread on this elsewhere and delete this one, just send me a PM and I'll be glad to do so. Okay, I just compared the bodies and rear bumpers of the current '72 GTO kit, an '80s issue of the same kit (molded in tan), and a 100% original 1970 showroom promo, and measured all relevant pieces with a dial caliber. The results are going to SHOCK you. All three bumpers are, for purposes of this discussion, identical. There are slight detail differences (especially in the license plates) but the width of all three is exactly the same at @ 2.935". So far so good. That bumper on the '70 promo fits nicely--it might have a hair too much overhang at the sides but nothing that catches your eye at all. The three bodies, however, are three different widths. Measured at the upper front corner of the bumper opening, the width of the three bodies is: 1970 Promo: 2.802". '80s issue of the 1972 kit: 2.708". Current issue of the 1972 kit: 2.650." That is a WHOPPING .150" (1/8" is .125") difference between the original '70 body, which the bumper fits nicely, and the current body! To get rid of this, you'd have to either widen the body, or chop the bumper. The former could be accomplished either by building up the quarter panel sides at the rear with putty (losing the molded-in GTO emblems), or by cutting the trunk and widening it by grafting in a piece (in which case you'd prolly have to come up with new rear glass, too. It looks to me like the rear bumper could be narrowed with a simple chop right in the middle. Done VERY carefully, you'd end up with a fine seam right in the middle, most of which could be hidden with a license plate. IMHO such a seam would be much less jarring to the eye than a bumper that's @ four scale inches too wide for its body. But everyone will have his own opinion on this, including that the kit part is fine as-is. Again, I apologize for the hijack, and in NO way mean any of this to demean the fine craftsmanship on the subject model. Quote Link to comment Share on other sites More sharing options...
blueovl150 Posted October 4, 2014 Share Posted October 4, 2014 Looks nice Al! But I agree, what's the deal with that bumper? Could it be another example of bad kit engineering? Kind of makes you wonder if these guys ever just slap one of these things together quick just to make sure things fit before they pawn them off on the public. I mean honestly, that things gotta be hanging over a good 1/4 inch on both sides! It's not even close! There's something seriously wrong with those head lights too. It's just so frustrating to put all that love & attention into a kit, & you clearly did Al, & then have things like that so far out of whack. Well, I applaud you for a job well done. Just wish the manufacturer would have put in half as much effort as you did! Steve My sentiments exactly! I have one of these in the unbuilt pile, and was really looking forward to the build, as this is, hands-down, one of my favorite GTOs of all time. After seeing a superb build on this poorly-engineered kit, I'm considering a trip back to my single-digit childhood, where I'd throw it together in an hour, and roll it down a high-slide, into a burning pile of leaves, with the interior packed with firecrackers. Quote Link to comment Share on other sites More sharing options...
Bob Ellis Posted October 4, 2014 Share Posted October 4, 2014 Something happened to this MPC GTO kit in '70s. I think it became a modified stocker or NASCAR. In any case, when it returned in 1980 or so, it was different, just like the Chevelle kit. Some of you have seen the '70 GTO with a separate nose piece that the original never had. The answer is find an old rear bumper or buy one from Modelhaus. Quote Link to comment Share on other sites More sharing options...
Porscheman Posted October 4, 2014 Author Share Posted October 4, 2014 NOTE: I certainly don't mean to hijack this thread on this nicely built model but the subject DID come up. If a mod wants to move this post, or wants me to start a new thread on this elsewhere and delete this one, just send me a PM and I'll be glad to do so. Okay, I just compared the bodies and rear bumpers of the current '72 GTO kit, an '80s issue of the same kit (molded in tan), and a 100% original 1970 showroom promo, and measured all relevant pieces with a dial caliber. The results are going to SHOCK you. All three bumpers are, for purposes of this discussion, identical. There are slight detail differences (especially in the license plates) but the width of all three is exactly the same at @ 2.935". So far so good. That bumper on the '70 promo fits nicely--it might have a hair too much overhang at the sides but nothing that catches your eye at all. The three bodies, however, are three different widths. Measured at the upper front corner of the bumper opening, the width of the three bodies is: 1970 Promo: 2.802". '80s issue of the 1972 kit: 2.708". Current issue of the 1972 kit: 2.650." That is a WHOPPING .150" (1/8" is .125") difference between the original '70 body, which the bumper fits nicely, and the current body! To get rid of this, you'd have to either widen the body, or chop the bumper. The former could be accomplished either by building up the quarter panel sides at the rear with putty (losing the molded-in GTO emblems), or by cutting the trunk and widening it by grafting in a piece (in which case you'd prolly have to come up with new rear glass, too. It looks to me like the rear bumper could be narrowed with a simple chop right in the middle. Done VERY carefully, you'd end up with a fine seam right in the middle, most of which could be hidden with a license plate. IMHO such a seam would be much less jarring to the eye than a bumper that's @ four scale inches too wide for its body. But everyone will have his own opinion on this, including that the kit part is fine as-is. Again, I apologize for the hijack, and in NO way mean any of this to demean the fine craftsmanship on the subject model. I have no problem you pointing out the errors in this kit. I built this one for a paper bag contest and will not be modifying the rear bumper. I also attached a picture of my GMP 1:24 71 GTO and the head lights on the kit are way off. I used MV lenses for the front parking lights, because the kits were unusable. Thank you all for the nice comments. Al Quote Link to comment Share on other sites More sharing options...
Snake45 Posted October 4, 2014 Share Posted October 4, 2014 The answer is find an old rear bumper or buy one from Modelhaus. No it isn't. It will be the same size as the kit part, excepting the possible mold or resin shrinkage sometimes seen in Modelhaus parts. The problem's in the body, not in the bumper. Read my long post, Bob. I think when I build this one on the bench, I'm gonna chop the bumper rather than alter the body. Quote Link to comment Share on other sites More sharing options...
StevenGuthmiller Posted October 4, 2014 Share Posted October 4, 2014 No it isn't. It will be the same size as the kit part, excepting the possible mold or resin shrinkage sometimes seen in Modelhaus parts. The problem's in the body, not in the bumper. Read my long post, Bob. I think when I build this one on the bench, I'm gonna chop the bumper rather than alter the body. Sounds like the answer to me. Better to take a sliver out of the center of the bumper than to try hacking apart the body. Steve Quote Link to comment Share on other sites More sharing options...
Stuntman Mike Posted October 4, 2014 Share Posted October 4, 2014 No it isn't. It will be the same size as the kit part, excepting the possible mold or resin shrinkage sometimes seen in Modelhaus parts. The problem's in the body, not in the bumper. Read my long post, Bob. I think when I build this one on the bench, I'm gonna chop the bumper rather than alter the body. Chopping the bumper is definately the best route to fix the issue on this kit. I did this on my build of the GTO that is being crashed in the television pilot of "The walking Dead". I´ve cut the bumper in the middle and covered the middle section with some BMF. Quote Link to comment Share on other sites More sharing options...
Porscheman Posted October 6, 2014 Author Share Posted October 6, 2014 I want to thank everyone for the suggestions on how to correct the bad rear bumper suppied with kit. I removed the bumper and cut an 1/8" out of the center of the bumper. I then glue the 2 halves to the body, added BMF over the cut and put an antique plate to cover upthe rest. It's not a hard fix, but something that could've been corrected by the manufacturer. Let me know how the fix looks. Al Quote Link to comment Share on other sites More sharing options...
StevenGuthmiller Posted October 6, 2014 Share Posted October 6, 2014 Looks immensely better Al!! Now you're talkin'! Steve Quote Link to comment Share on other sites More sharing options...
Stuntman Mike Posted October 6, 2014 Share Posted October 6, 2014 Agreed, it looks a 100% better now. I have another minor suggestion regarding the BMF on the bumper. If you use a wider piece of BMF (about twice as wide as yours) that reaches to the inner moldings around the tail lights, the BMF would probably blend in better and look a little less prominent. The edge of a piece of BMF is easier to hide along a curvature than on an even surface. It was definately good to fix the bumper as the model can now be displayed as it deserves it for being a GTO. Quote Link to comment Share on other sites More sharing options...
Recommended Posts
Join the conversation
You can post now and register later. If you have an account, sign in now to post with your account.
Note: Your post will require moderator approval before it will be visible.