purepmd
-
Posts
430 -
Joined
-
Last visited
Content Type
Profiles
Forums
Events
Gallery
Everything posted by purepmd
-
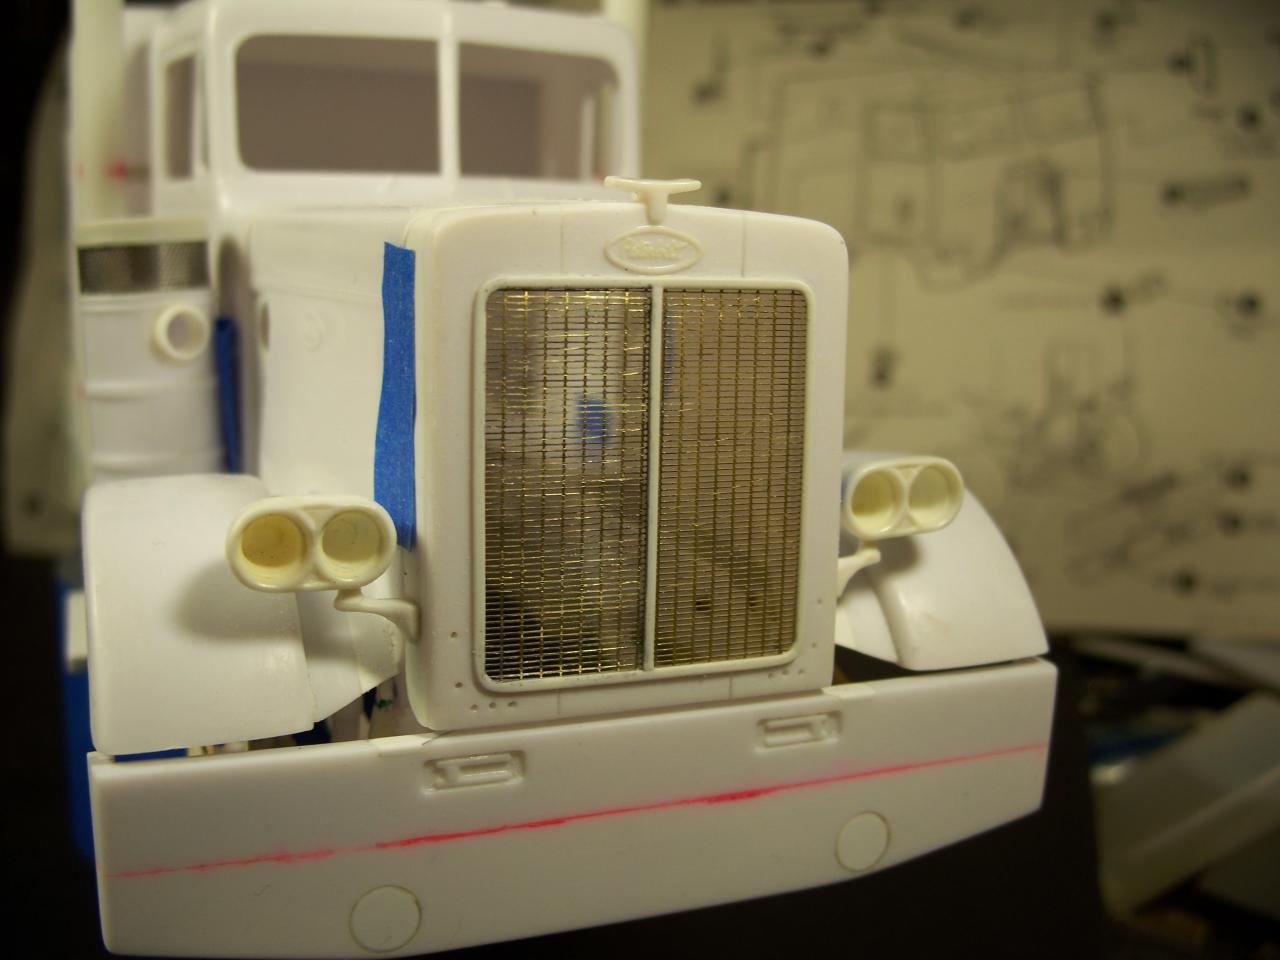
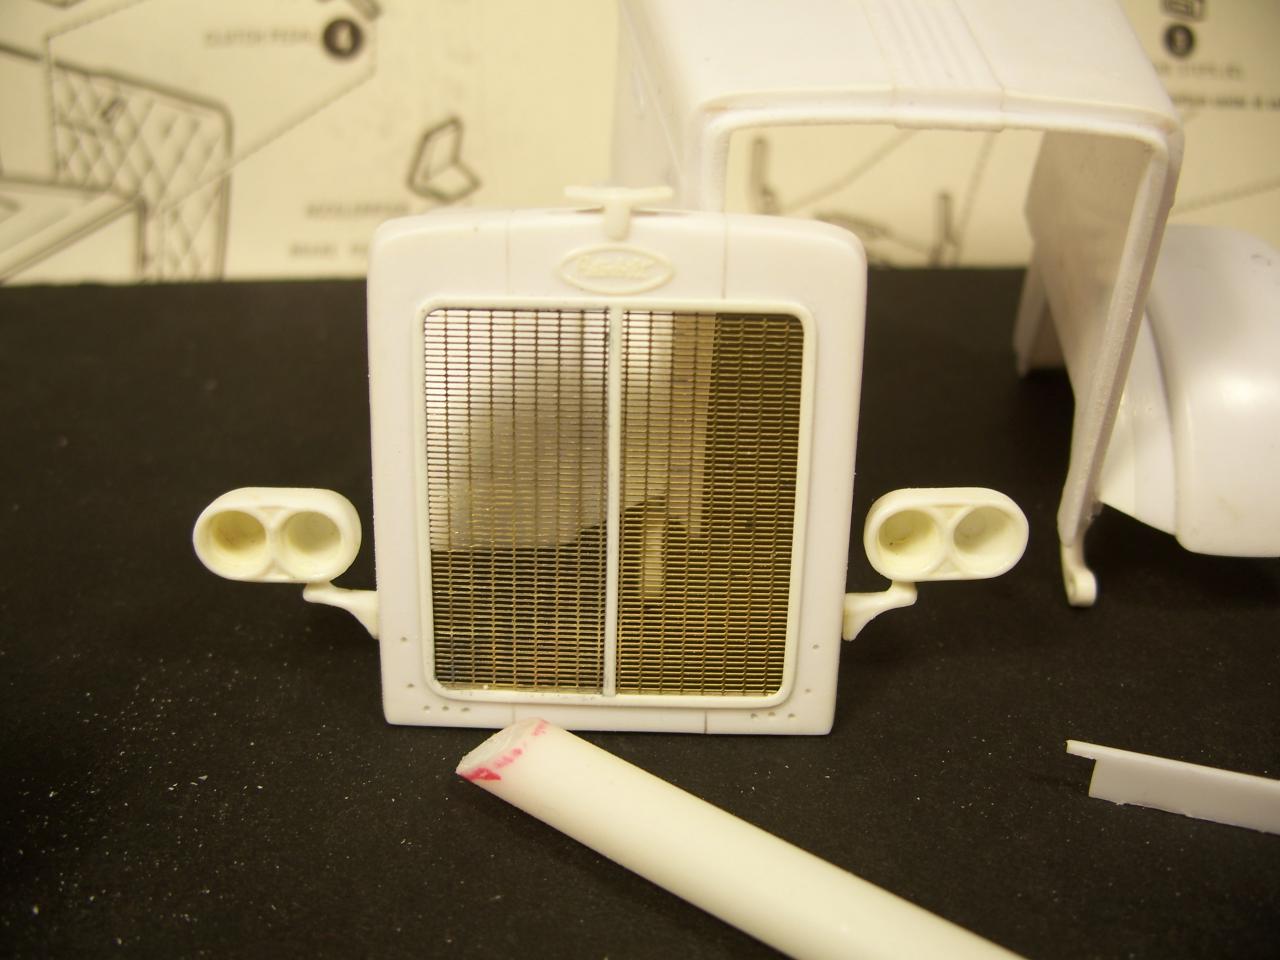
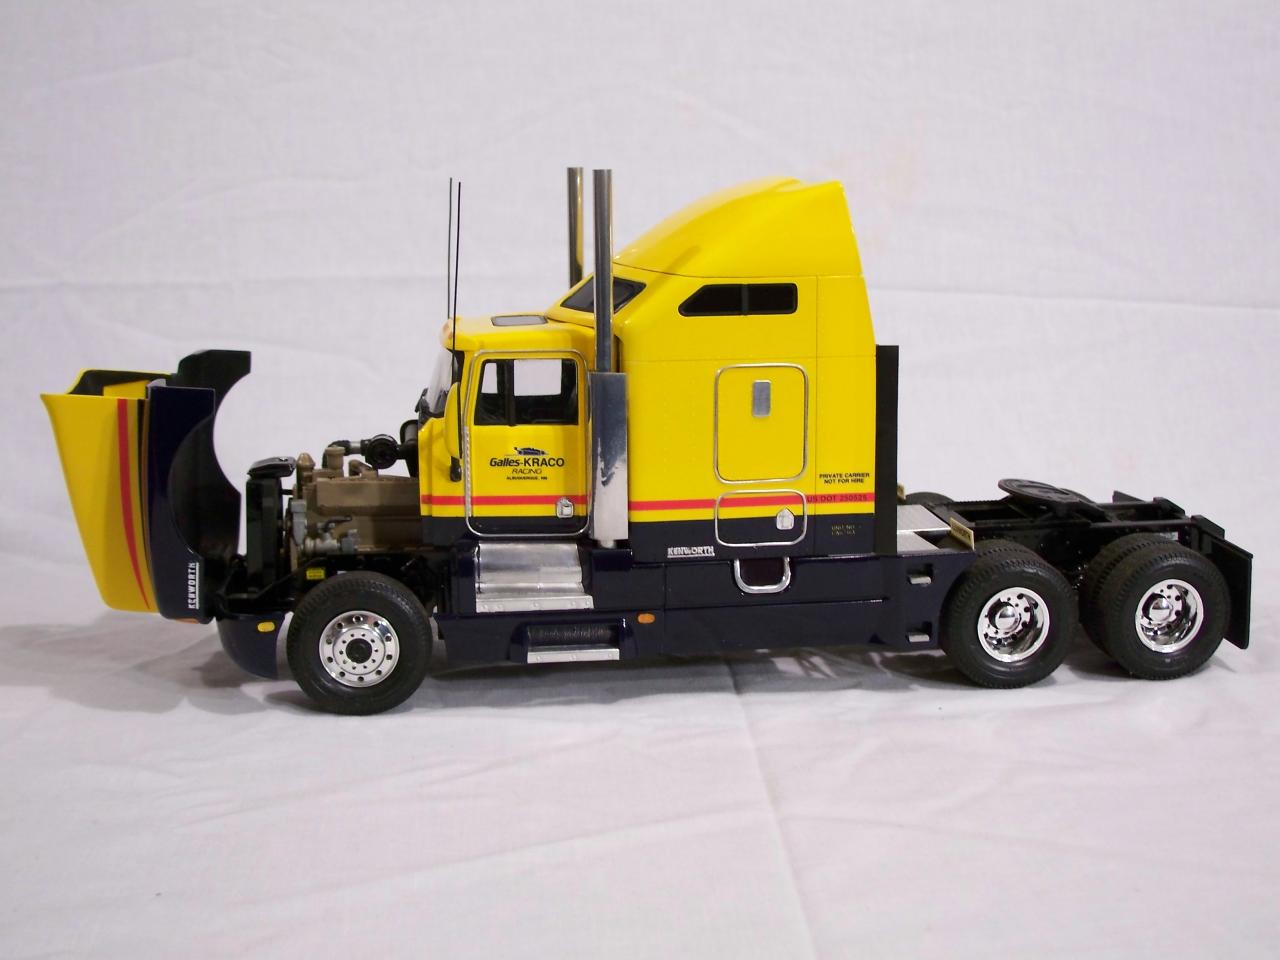
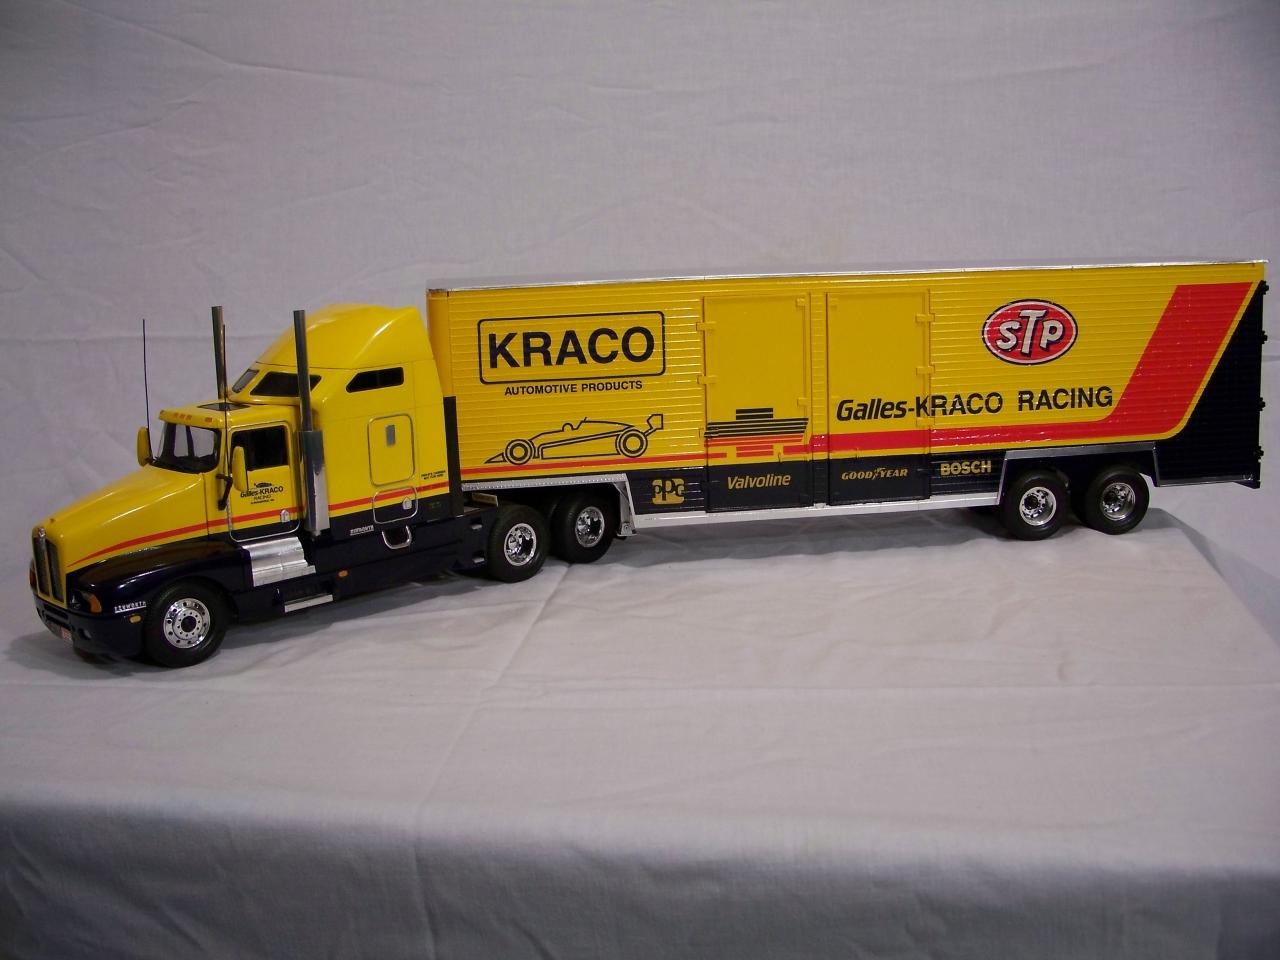
 I wanted to take a break from the rivet counting, and there is a resin 358 hood on the bench, just staring at me, (saving that for the California Hauler reissue). So, for a fast, (for me), fun project, I ripped into a snap Pete. Wanting to do it up in a different style than I usually do, so a custom 358 is the result. Here are a few pics, including a mock up so far. I narrowed the grille and hood, used AMT headlights, (still my favorites), added photo etched for the grille and air cleaners, streched it to a 285" wheelbase, with a smooth frame insert, and am going with straight pipes The smoothed the battery / storage boxes are kit parts, and the brakes are from the parts box. The resin rear fenders were so warped, I had to use a 1/16th " steel rod as part of the front and rear mounts to keep them square, even after hot water and some tweaking. Thanks for looking, Mark.
-
Moebius Lonestar on the bench
purepmd replied to weirich1's topic in WIP: Model Trucks: Big Rigs and Heavy Equipment
Great color choice! Nice work on the assembly. -
International Prostar Finished
purepmd replied to modeltruckmafia's topic in WIP: Model Trucks: Big Rigs and Heavy Equipment
A real eyecatching corn binder. Nice work. -
R.O.G. Pete 359 and AMT 352
purepmd replied to Kevin44's topic in WIP: Model Trucks: Big Rigs and Heavy Equipment
Nice work. Really liking the green. -
'53 Ford Phantom Dually
purepmd replied to Customizer's topic in Model Trucks: Pickups, Vans, SUVs, Light Commercial
This is beyond cool! Awesome work. -
The engine looks really good. It makes a convincing replica. Well done. Love the hood and headlights. Going to be A very cool model.
-
'71 Ford C-600 flatbed with crane
purepmd replied to Chuck Most's topic in WIP: Model Trucks: Big Rigs and Heavy Equipment
The crane swap is a great idea and the 3208 transplant is very cool. Can't wait to see more. -
Very cool Titan. Looks like it came off a brochure. First attempt: really? Looks so good, me thinks thou pullest our legs. lol. Well done.
-
Sean, they are functional. In a couple of the pics you can see them folded open, They are the Model Car Garage Big Rig piano hinges. Good Stuff. Thanks for the compliments.
-
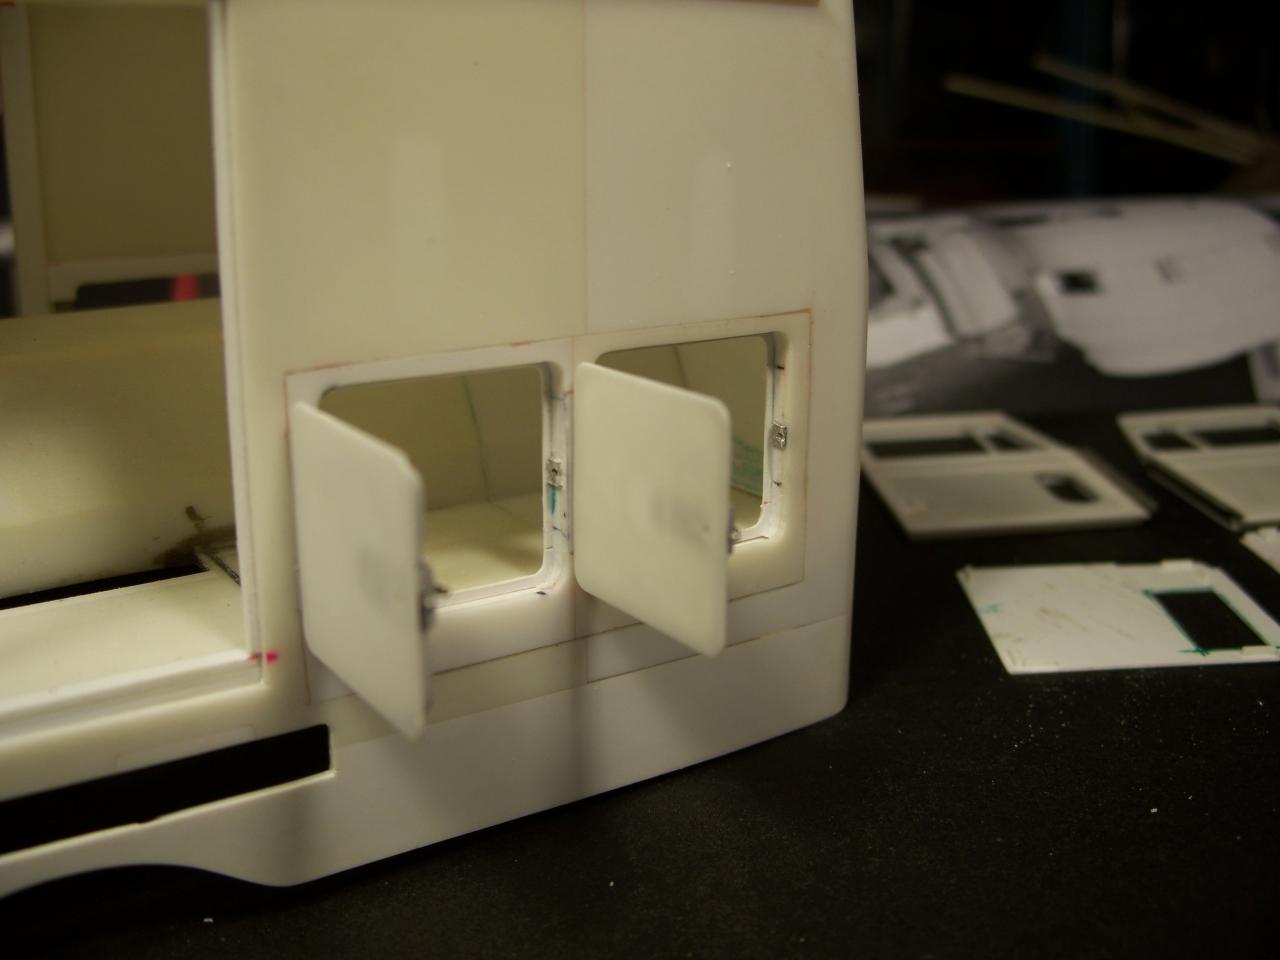
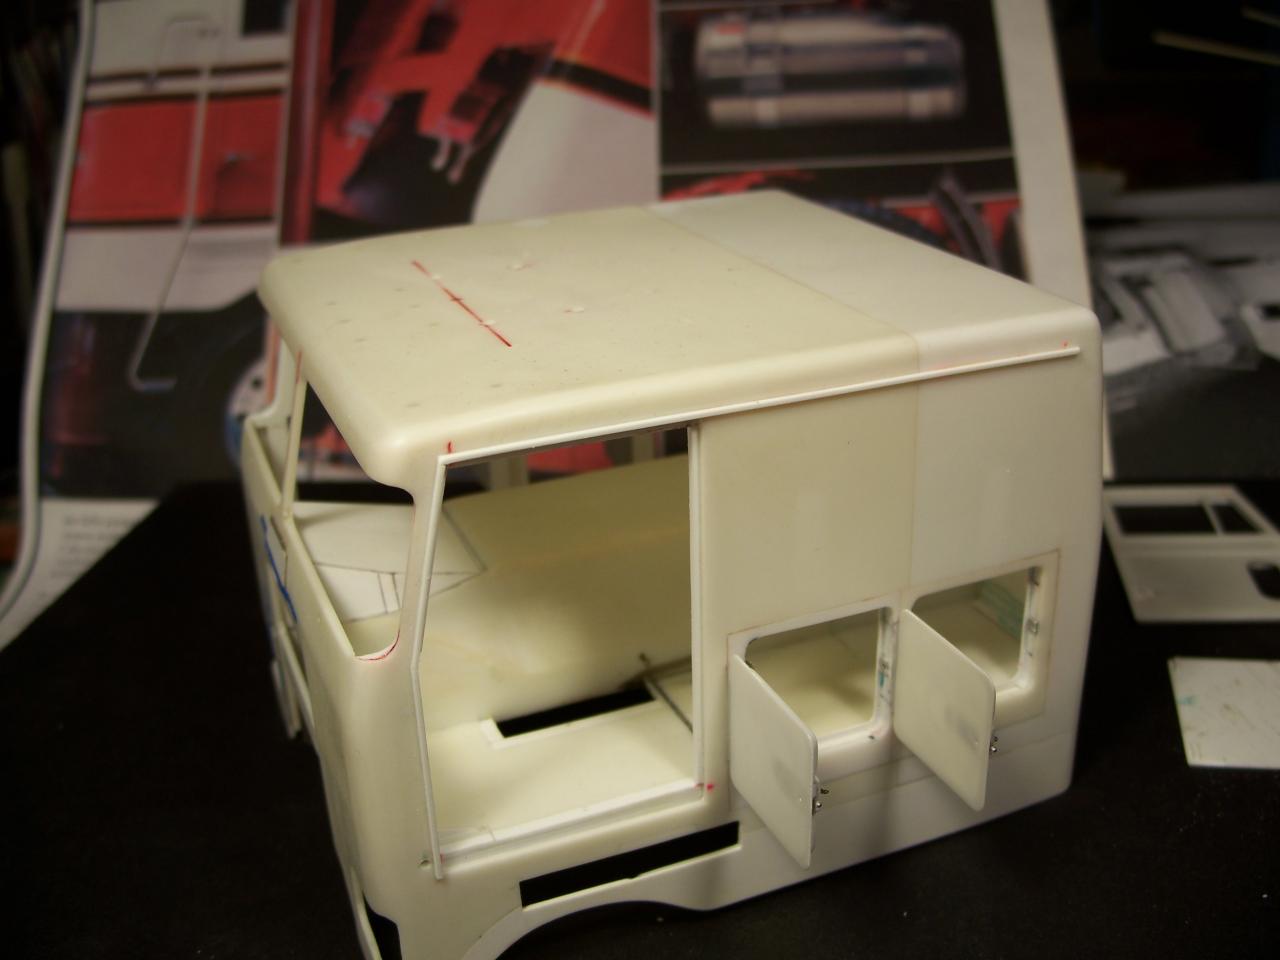
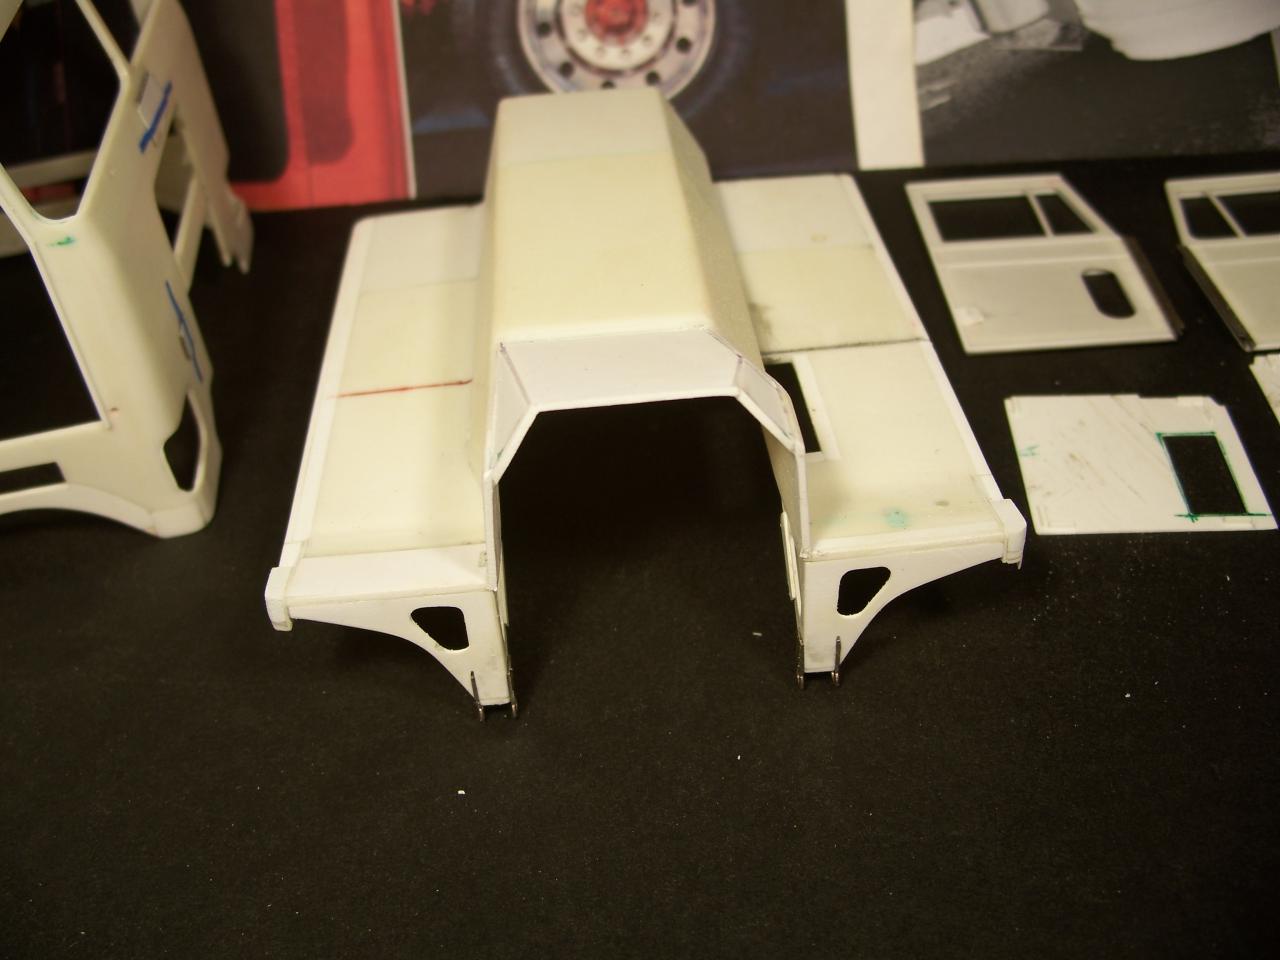
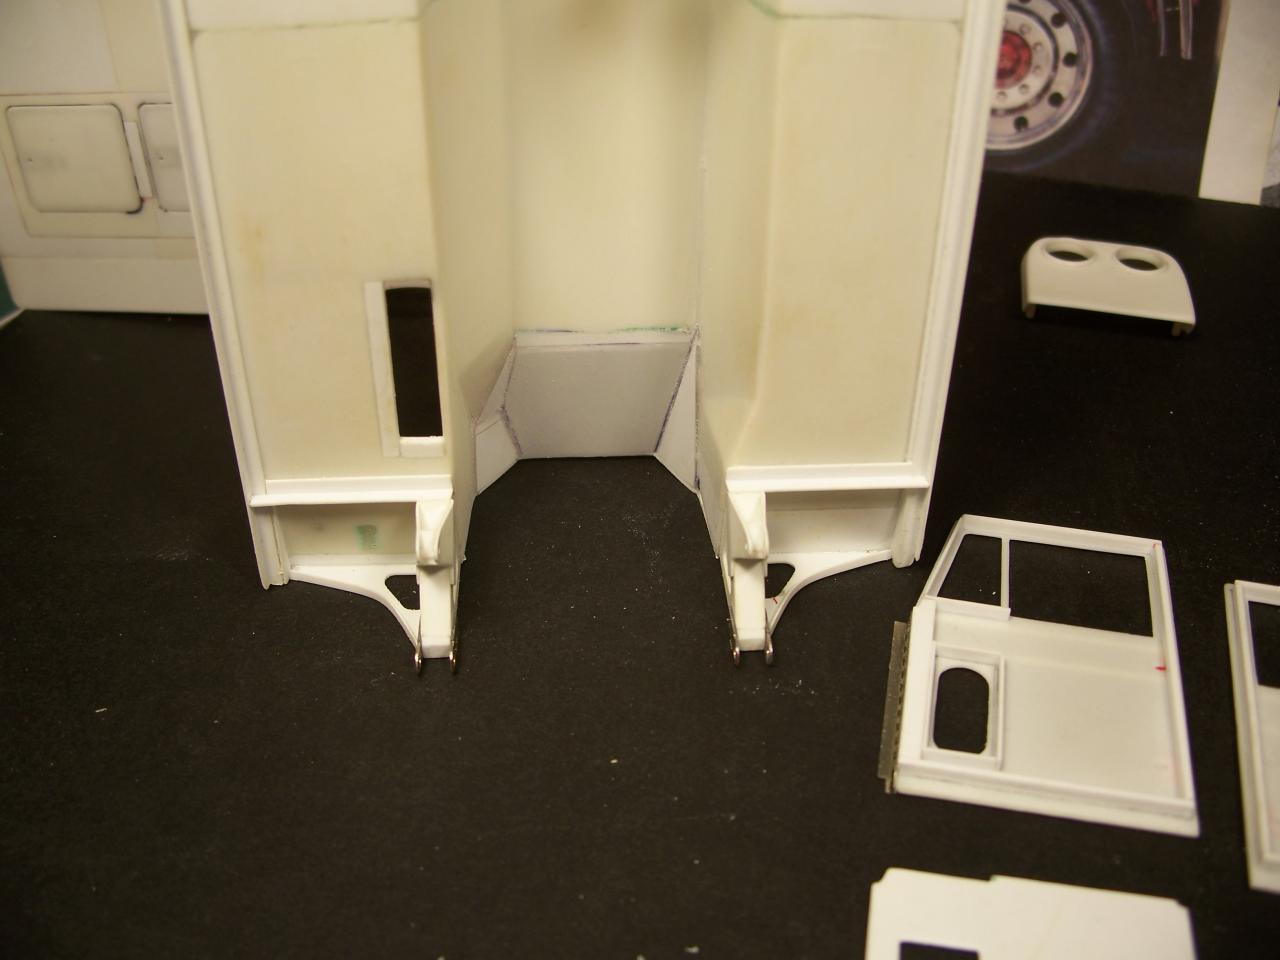
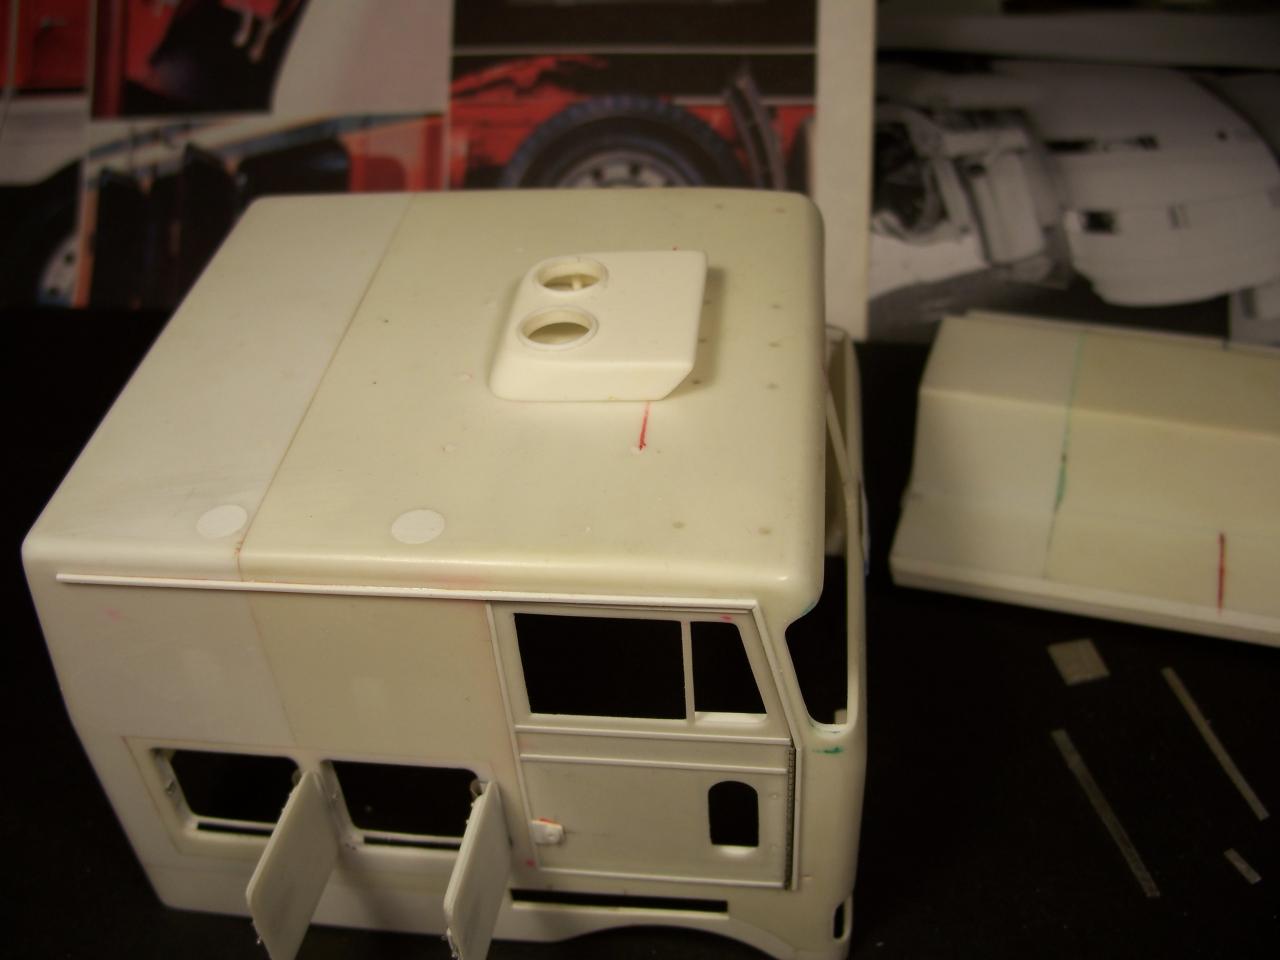
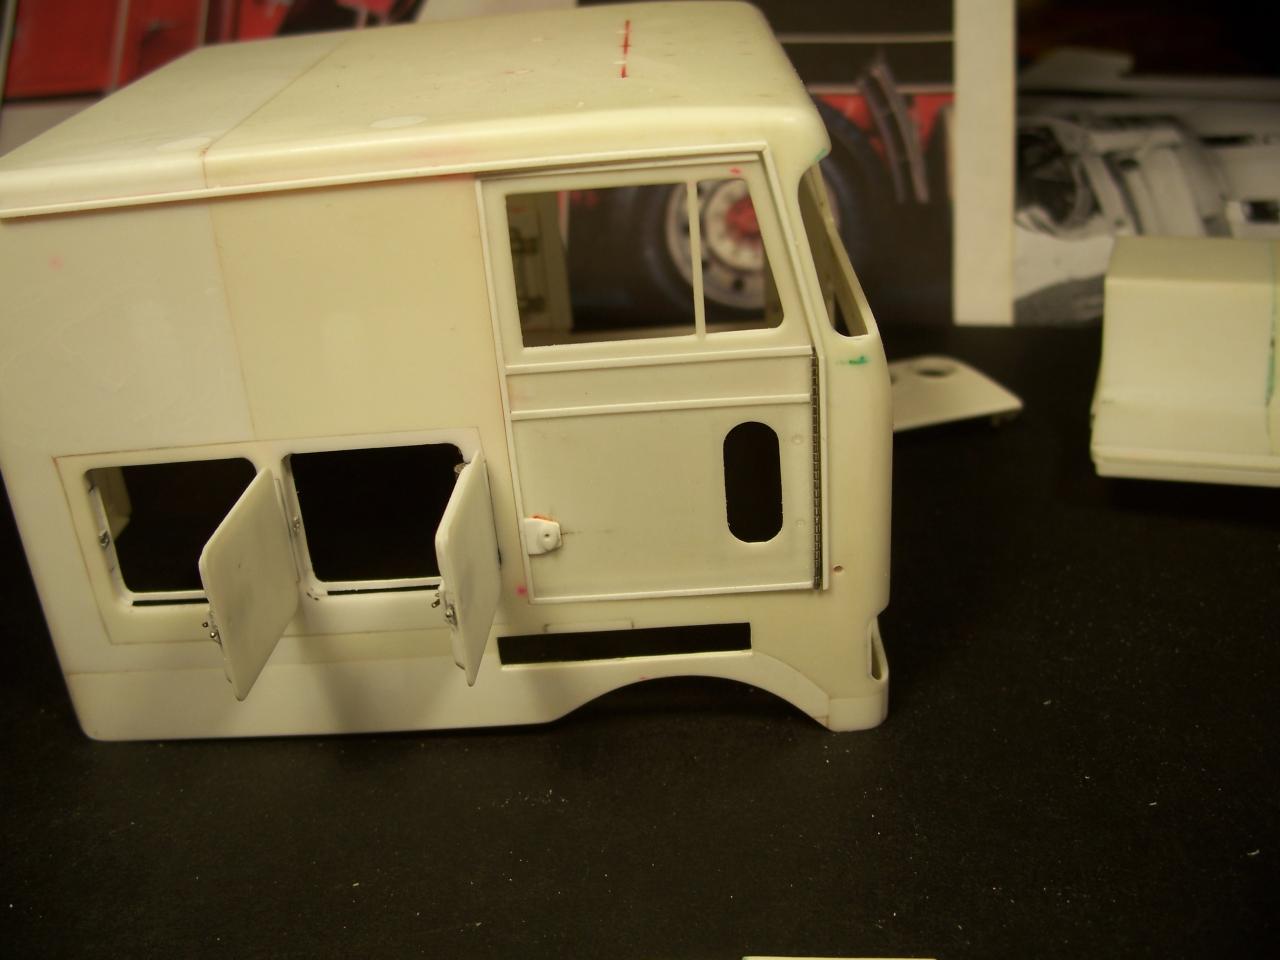
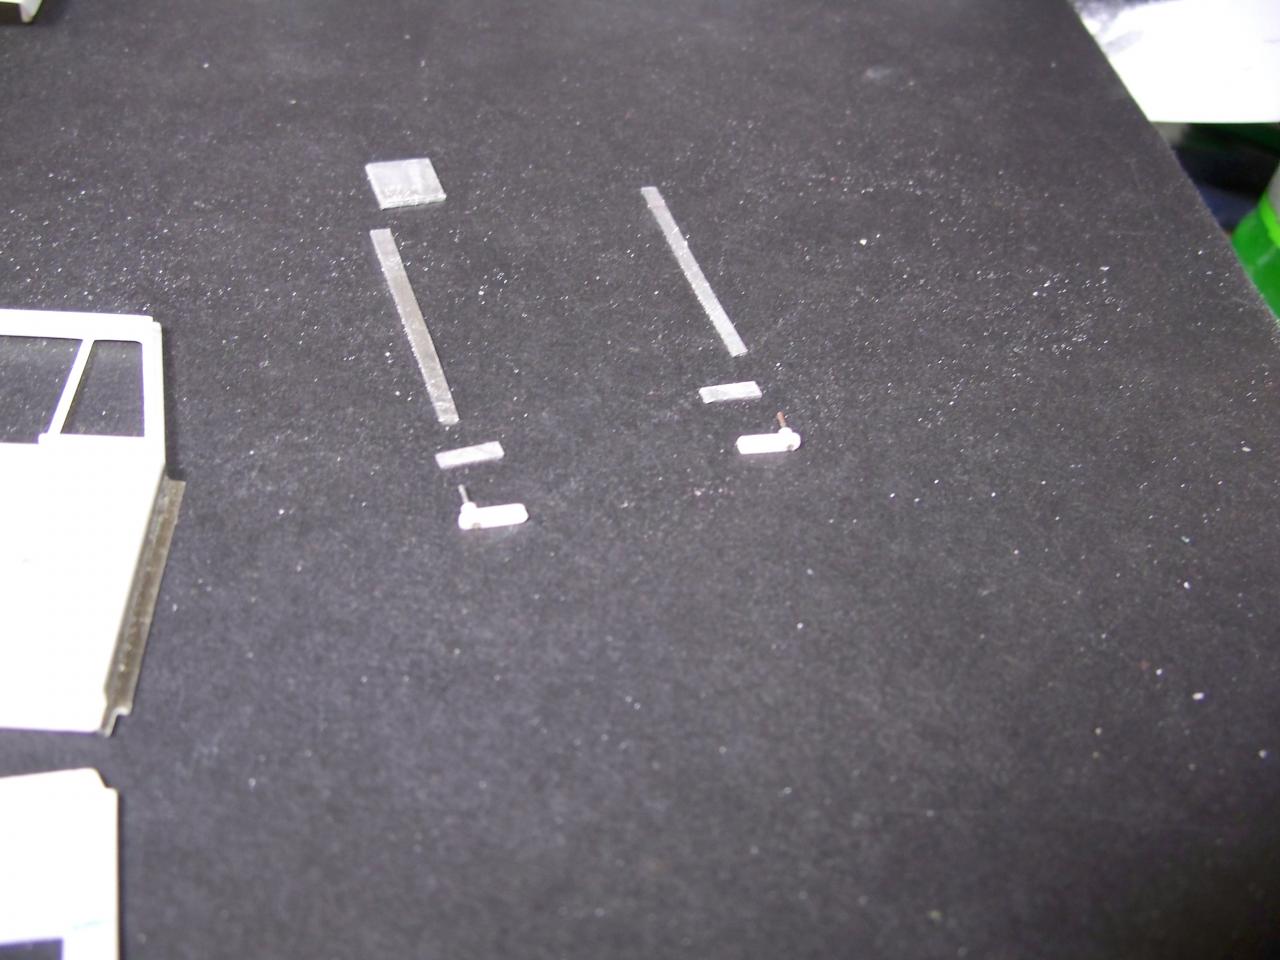
Hey Everyone, Just thought some new pictures were in order. The first pictures show the storage compartment door jams and striker plates installed. Them you'll see the main door jams are in place. Since i got the idea to open the radiator access door on the front, I had to modify the doghouse some. Found some goo reference photos of a 352 for sale to go from.The doors themselves have had the windows resized and shaped to be more accurate and I moved the door handles down for the later model. There are the begininings of the door palels, too. Preliminary work on the rooftop A/C unit, So/So results. Test fitting the doors revieled to little clearance, so the jams will have to be sanded a bit to allow for primer and paint. Lastly are the parts that will become the door latch mechanisms...turn the handles to open the doors kind of thing. Thanks for checking it out. Mark. P.S. Bowtie, I am a charter member. Some days its like a sickness. lol.
-
Peterbilt 359 R/C
purepmd replied to rcdave's topic in WIP: Model Trucks: Big Rigs and Heavy Equipment
It causes me great distress that this is not mine. lol. Way too cool. -
Moebius Great Dane Reefer
purepmd replied to KJ790's topic in WIP: Model Trucks: Big Rigs and Heavy Equipment
You have a great start on what will be a very cool trailer. Doors look very good, love the Carrier unit. -
mackd RD 600 forester repair
purepmd replied to mackd's topic in WIP: Model Trucks: Big Rigs and Heavy Equipment
Tout simplement magnifique. Amazing work. -
peterbilt cab over custom
purepmd replied to Q tip's topic in WIP: Model Trucks: Big Rigs and Heavy Equipment
Hey John, I think you might best your big sleeper 'shaker if your not careful. Very slick. If you don't mind a quick tip; Fiscars makes scissors and roller cutters, like this; They are cheap, and any Walmart craft dept has them. They roll very well against a metal straight edge, and once a little dull, make great creases in thin sheet aluminum and stainless. Way easier than a #11 blade. I have 2, one to cut plastic and one for metal work.
-
Rogers FG35D trailer (07-08-14 update)
purepmd replied to Tesla's topic in WIP: Model Trucks: Big Rigs and Heavy Equipment
Excellent, just Excellent. -
Rebuilding an International CO 4070A
purepmd replied to doogie7046's topic in WIP: Model Trucks: Big Rigs and Heavy Equipment
Great save! I like seeing someone bring something like this back to life. Good job indeed. -
Outstanding build, to say the least. Great choice of subject to model, + fantastic assembly and scratch building skills, = this truck. WELL DONE! Thank you for taking us along for the ride.
-
1972 Peterbilt 359M
purepmd replied to Old Albion's topic in Model Trucks: Big Rigs and Heavy Equipment
Another fantastic build! The whole DC fleet is outstanding. Well done. -
Canepa KW, new project
purepmd replied to tbill's topic in WIP: Model Trucks: Big Rigs and Heavy Equipment
Tom, one of the most troublesome aspects of building my first T600, was getting the hood and bumper to line up right and clear each other so you could raise the hood. Combine that with a wheel base thats a good inch to an inch and a quarter to short, and you have a challeging build. They can turn out well though. I stretched the frame and fairings, built some supports for the fairings, moved the tanks forward, and moulded the grille. Here are a couple of pics to show that it can be done.
-
Peterbilt 352 "Pacemaker" 1:25 AMT
purepmd replied to Pavel A.'s topic in Model Trucks: Big Rigs and Heavy Equipment
Pavel strikes again! Another fabtastic build! -
white freightliner double bunk
purepmd replied to Q tip's topic in Model Trucks: Big Rigs and Heavy Equipment
Absolutely crazy about the color combination, very cool. Great stretch, and awesome coversion to the stirrup steps. It just has " the Look". -
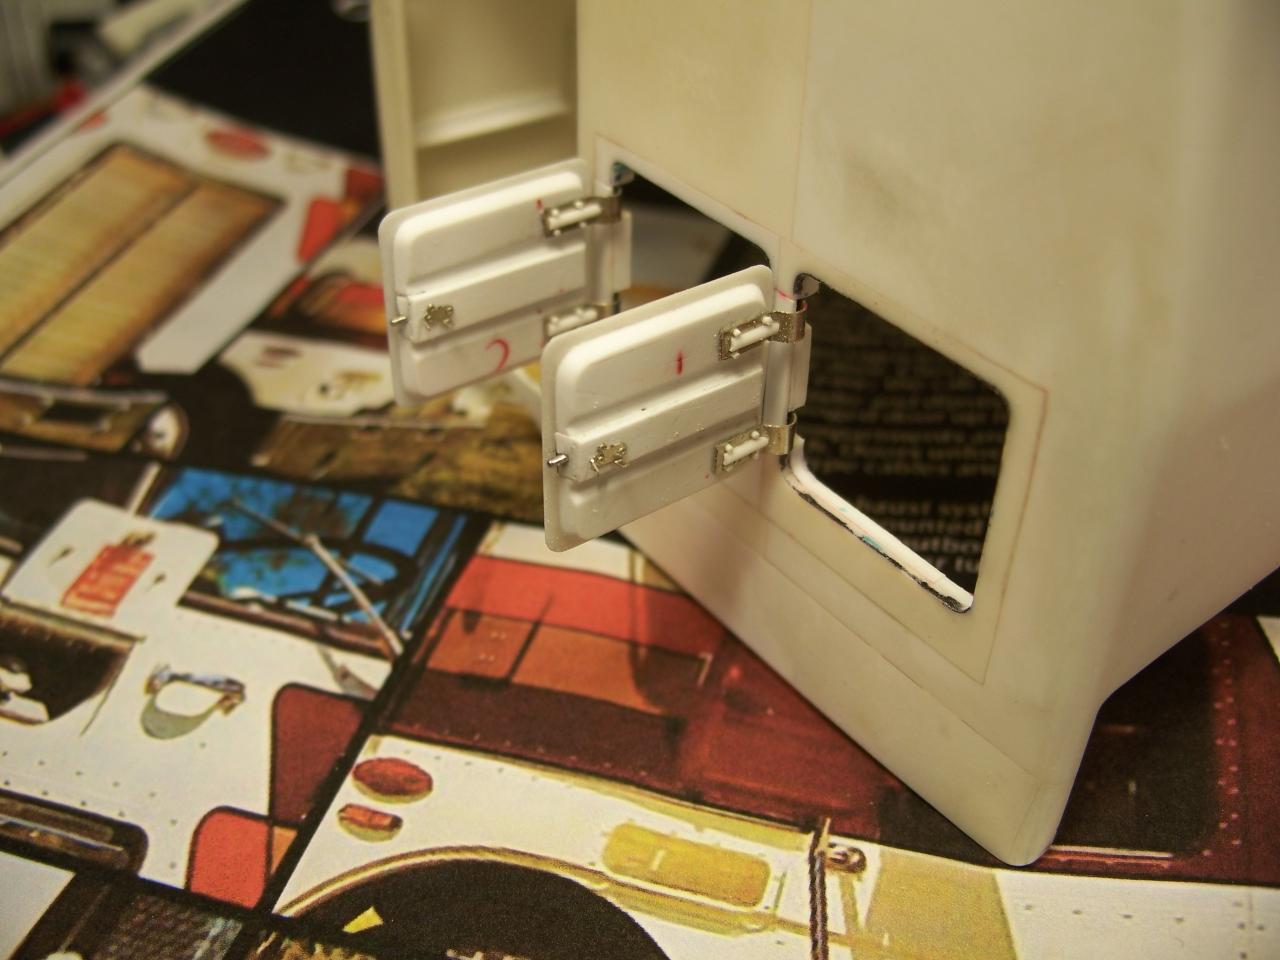
Hey Guys, Just a few pictures to show some progress. I enclosed the latches and got the doors mounted to the cab. I used some Model Car Garage throttle linkage parts and bent them up to look like the latches on the 1-1 truck. I have trued the door jams and they are the width of a single sheet of 400 auto body paper. I think that will be enough of a gap that once the primer, paint, and clear coat are applied, they will have a very close, and even spacing.
-
Freightshaker
purepmd replied to The Modeling Hermit's topic in Model Trucks: Big Rigs and Heavy Equipment
Good looking combo, very sharp. Before I saw the trailer, I thought it was going to be an International Transport rig. They had an owner - operator fleet that wore those colors. Love the sly humor in the moving company name, clever. -
Classic kenworth w900A.
purepmd replied to freightshaker's topic in WIP: Model Trucks: Big Rigs and Heavy Equipment
I am really liking the color combination you came up with. Looks sharp as a tack! Alan is right, Bare Metal Foil is your best bet after, al-clad. If you do not have any BMF, use Reymold's wrap cooking foil. You can shape it easier, without tearing, because it is thicker than BMF. You have unlimited size availability and it is cheap. I use rounded toothpicks to shape it around small details then carefully separate it from the part and coat the backside with clear enamel for the adheasive, let it tack up for a few minutes, the burnish it down like you would with BMF. These tanks and quarter fenders are done just that way. Good luck.
-
1968 Freightliner coe
purepmd replied to Old Buckaroo's topic in WIP: Model Trucks: Big Rigs and Heavy Equipment
Oh Ya, thats it! I would not worry about 1 mm. These kits never seem to have the cab sit perfectly level. Better it is a little high in the front, than look like it is not latched dowm in the back. It looks like a restoration you would see at an ATHS show. Well done.