purepmd
-
Posts
430 -
Joined
-
Last visited
Content Type
Profiles
Forums
Events
Gallery
Everything posted by purepmd
-

60 Chevy Truck C60 Serie
purepmd replied to mangodart's topic in Model Trucks: Big Rigs and Heavy Equipment
I agree, when done to this level, they are every bit as impressive as a big truck. Well done. -
Hey Clayton, Thanks for the compliments. As to the Alclad base, these parts were covered with the Alclad black base. I have done some tests with Gloss and Flat white, and gloss gray, acrylic and enamel black. I believe that, because of the extremely light coats I apply, it will stick to about anything. The big concern is that it be smooth. The gray baseworks the best for the Alclad Airframe Aluminum, while flat white gives a finish almost exactly like the JetHot coating on exhaust headers. A very cool effect. The Alclad black base is very easy to spray and covers very well in just a couple of thin coats. When they say to let it dry overnight, they are not kidding. I was in a hurry once, and tried to recoat it after only about 3 hours, and it looked like Testors silver. It would not get shiny. I also use a food dehydrator on all my paint jobs now, even Spaz Stix and Alclad. It makes a great difference in how smooth the paint flows out, and how hard it gets. With a little practice, I think you will like the results. Good luck. Mark.
-
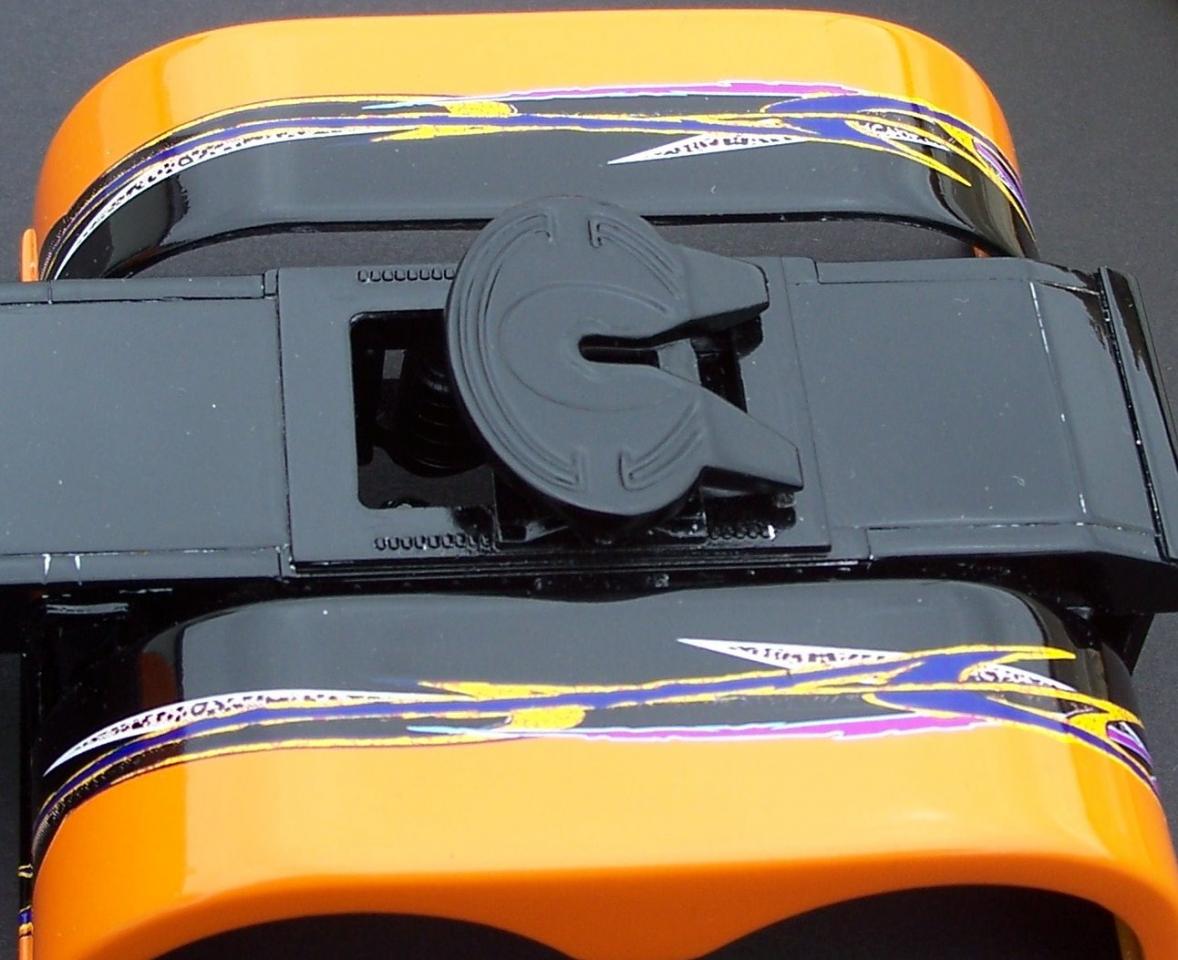
Thanks, everyone, for the kind words. Doug, I did make a custom, stainless visor for it. The decals are from Slixx. It is one of the graphic sheets they sell. Jeff, the trick to the alclad, or spaz stix, is very low pressure; 8-10 psi, and such light coats that you cannot even see the mist. You have to watch the part very closely to see the shine to appear. Then lots of coats, about 25 to 30 got this level of reflectivity. After a few hours in a food dehydrator, polish gently with a dry Q-tip. Takes lots of time. I created a Photobucket account, and you can see it in the background.
-
Hey Guys, As you all know, during summer it is hard to get all the bench time you want, but I have managed to slap some paint, decals, clear and Alclad on to this thing. The orange is Tamiya X-6, and the black is X-1. I have polished it out using Mcquire's cleaning wax, but just have not photographed it yet. The wheels are modified,and stripped Italeri outers mated to Revell snap inners, covered with Alclad Chrome. Thanks for looking.

-
MACK DM600 Builders kit
purepmd replied to Rigzndiesel's topic in WIP: Model Trucks: Big Rigs and Heavy Equipment
Hey Jeff, GREAT looking model. Very good use of that kit. The green looked good as well, but the gold just flat works. Very well done. -
Excellent work! The trailer is stunning, and the excavator is as far from toy like as you can get. Well done.
-
J.T., I think this subject was MADE for you. You certainly are doing it justice. Looking real good.
-
Way too cool! Very well done build. It just has the right "look".
-
PETE 377 CONCRETE
purepmd replied to Swamp Dog's topic in WIP: Model Trucks: Big Rigs and Heavy Equipment
Nice conversion! That's thinking outside the (model) box. Good work. -
Great color combination, looks really good on that 'Shaker. Well done.
-
VERY SHARP! Congrats on outsmarting the Docs again.
-
4200 single drive
purepmd replied to Rigzndiesel's topic in WIP: Model Trucks: Big Rigs and Heavy Equipment
Great save! Color choice is outstanding. Makes for a real eye catching model. Well done. -
359 i have been working on
purepmd replied to camaromaniak's topic in WIP: Model Trucks: Big Rigs and Heavy Equipment
Super sharp build! Very well done. Ingenious solution to a stainless sided trailer! I am burning rubber over to Auto Zone after posting this. LOL. -
Beautiful build! Great subject matter. The oil drum really does catch your eye. What brand / color red is that, if I may ask?
-
2x Mercedes Benz Black Edition
purepmd replied to Krysot's topic in Model Trucks: Big Rigs and Heavy Equipment
Great building skill, combined with a vivid imagination yeilded very cool models. I am an American truck purist, but I can't help but really like these Euro haulers. I applaud your originality. -
Great color compination. Looks like it rolled off an I-H sales brochure.
-
AMT Peterbilt 359 - Finished
purepmd replied to Old Buckaroo's topic in WIP: Model Trucks: Big Rigs and Heavy Equipment
Sharp. All your builds end up having great eye appeal. -
got my 379 pete custom in paint
purepmd replied to scale trucker's topic in WIP: Model Trucks: Big Rigs and Heavy Equipment
Really liking the color and stripes. Great looking custom. -
Diamond Reo Junkyard Dump Truck
purepmd replied to Superpeterbilt's topic in WIP: Model Trucks: Big Rigs and Heavy Equipment
Now thats pretty slick. Lots of character. -
1/16 W900 Hauler build - Update 6-8
purepmd replied to Jim3's topic in WIP: Model Trucks: Big Rigs and Heavy Equipment
Could be very interesting. What car will it be hauling? Will the paint on the hauler match the car? Pretty cool concept. -
Another Prostar Done
purepmd replied to kilrathy10's topic in Model Trucks: Big Rigs and Heavy Equipment
JT, GREAT color, very rich looking dark blue.. Stands alone very well on such a large surface area sleeper. Sharp as always. -
Jeff, you are welcome. A big part of why I like posting is to, hopefully, inspire my fellow builders. I know a lot of the work on here brings forth a lot of ideas. JT's orange fleet had a hand in setting the paint job this model will wear. I just need more time, a 32 hour day should work. Thanks to all for the kind words.
-
Thanks Doug. Don't worry, the 352 is still on the bench, just needed a little break. Starting to WANT to work on it again, so thats a good sign.
-
Thanks guys. The air cleaners are the ones from the Revell snap W900, with some spare AMT wheel backs, for the lids, filled in with Evergreen tube and rod to form a centering post over the post on the body for the snap chrome hat. The wheel backs measure a scale 15", so do the air cleaners, making for a decent representation of a 15" Vortox unit. The grille and air cleaner screens come from Plano Model Products, in Plano, Tx.
-
As always JT, very cool. Did you make the rear sleeper wall, (chrome part)?