purepmd
-
Posts
430 -
Joined
-
Last visited
Content Type
Profiles
Forums
Events
Gallery
Everything posted by purepmd
-
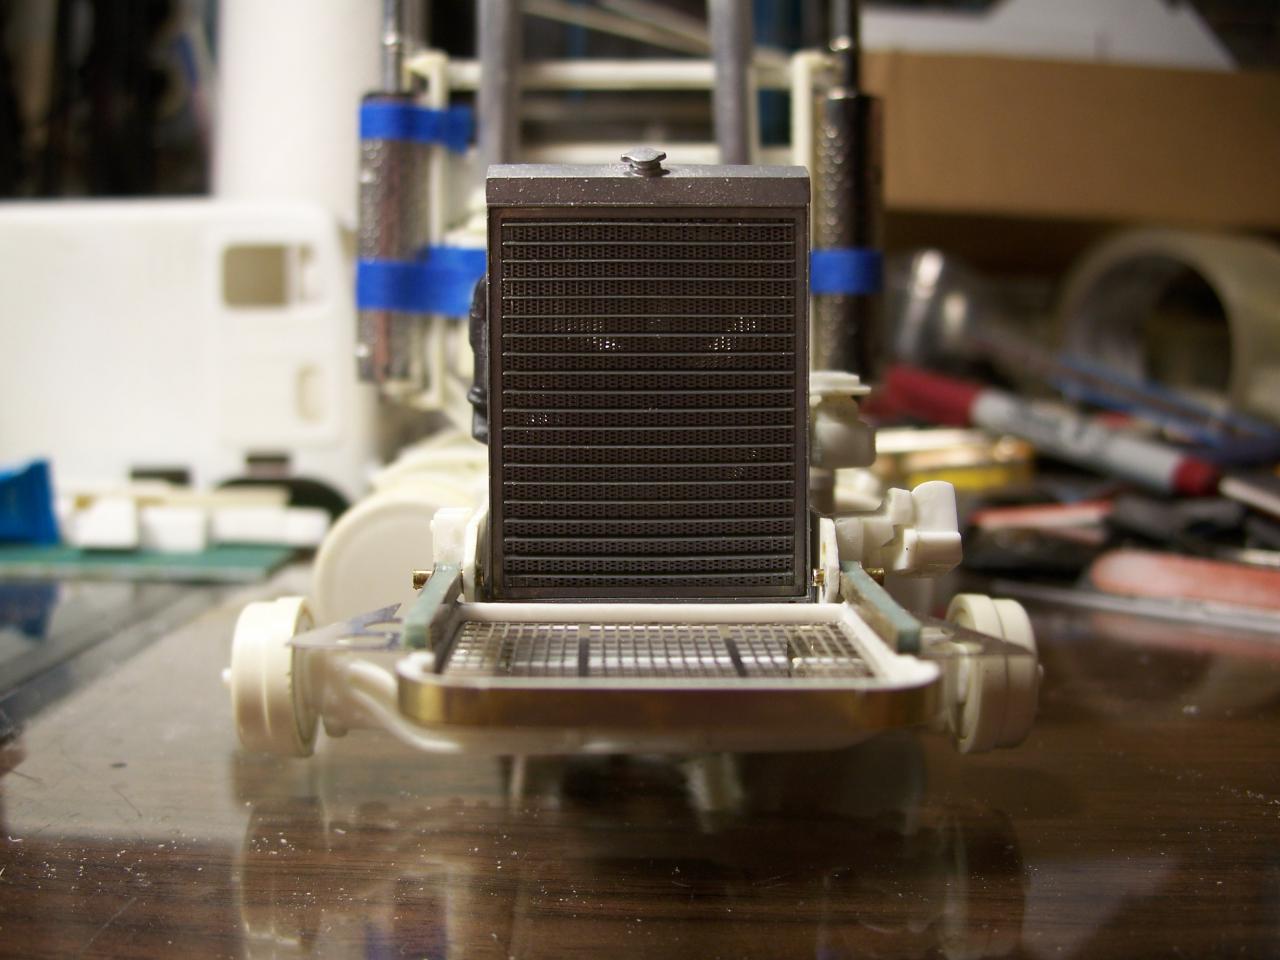
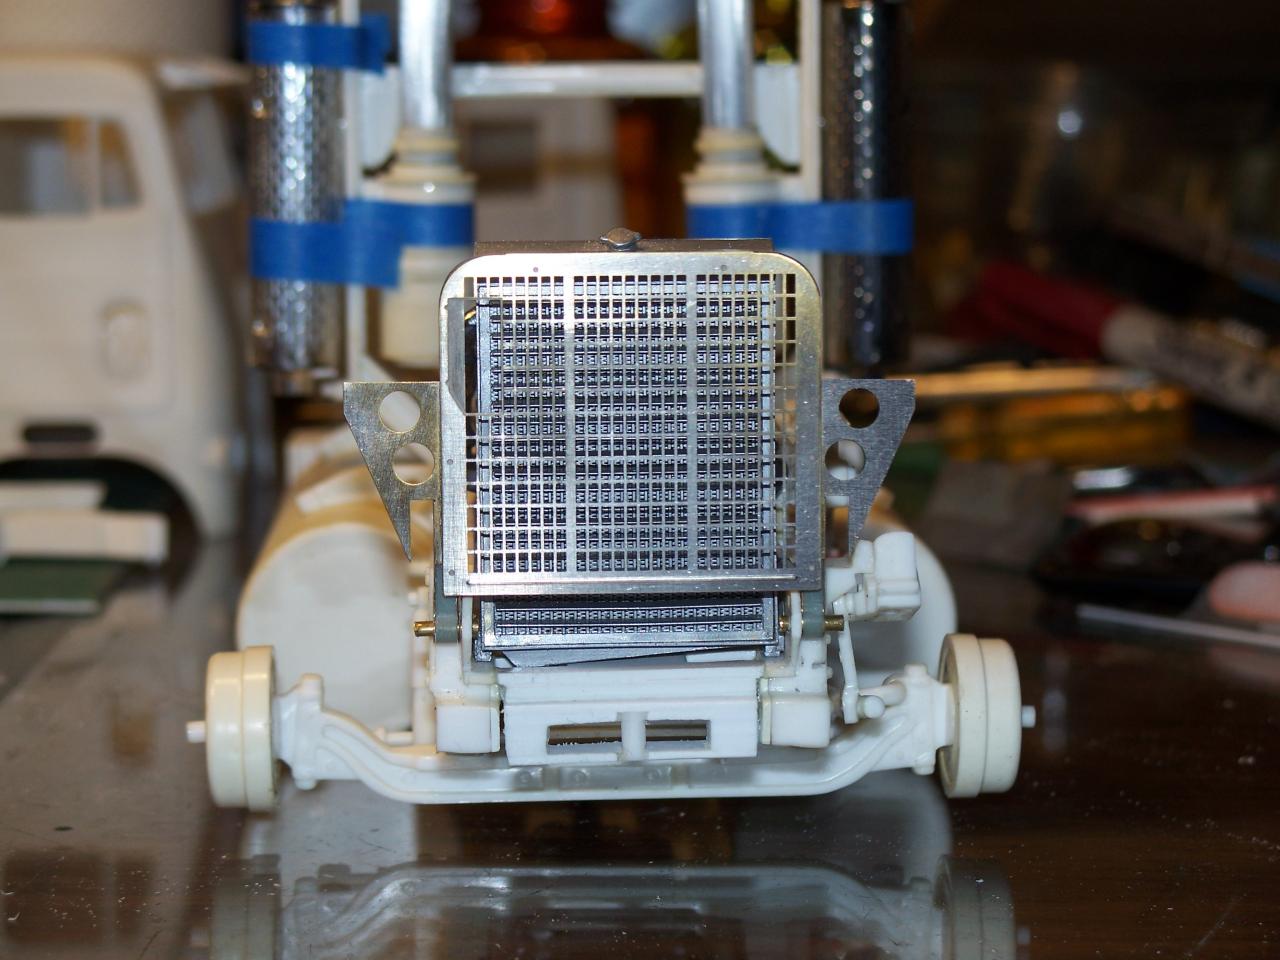
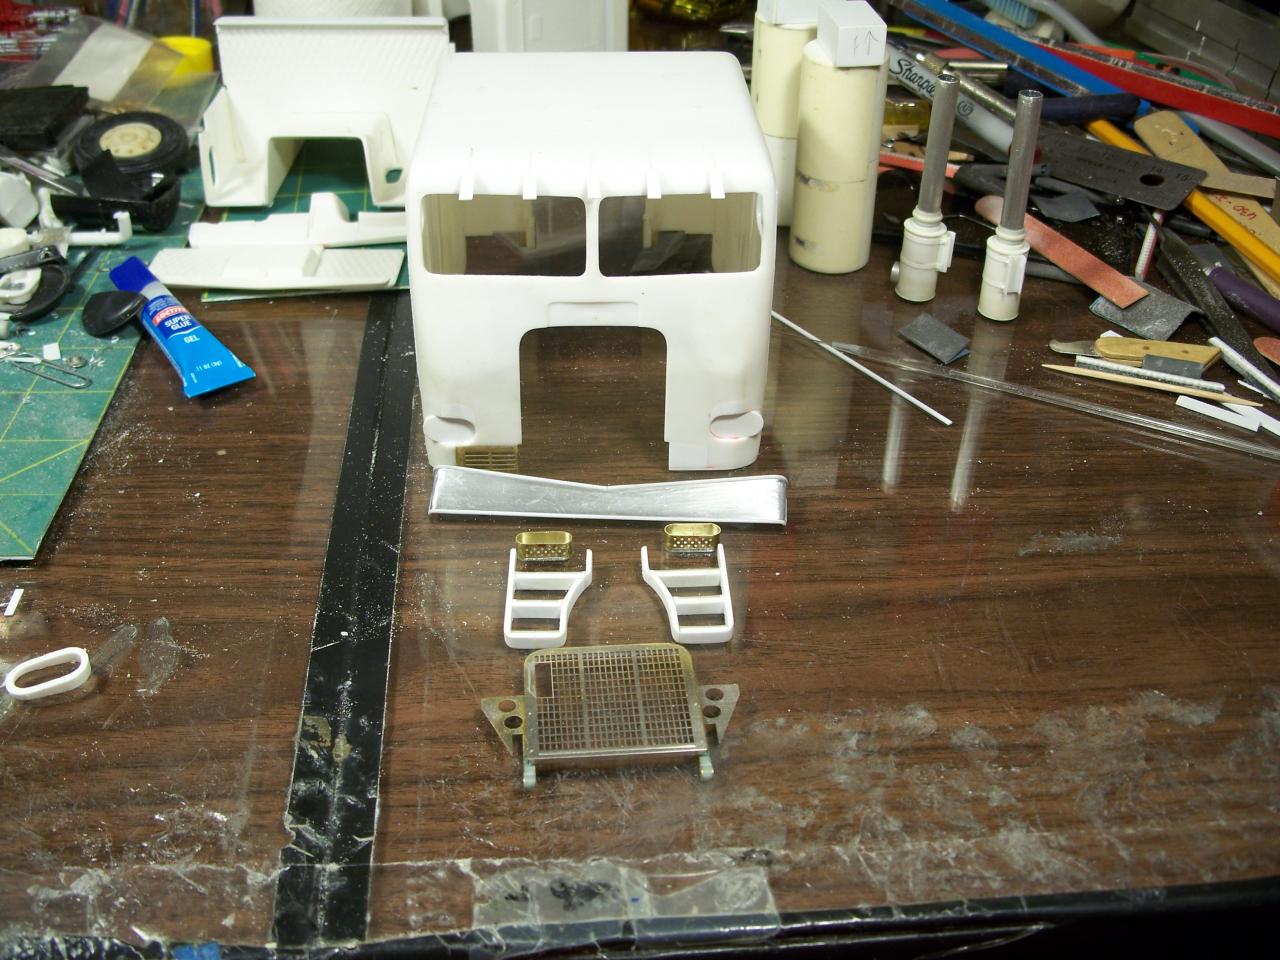
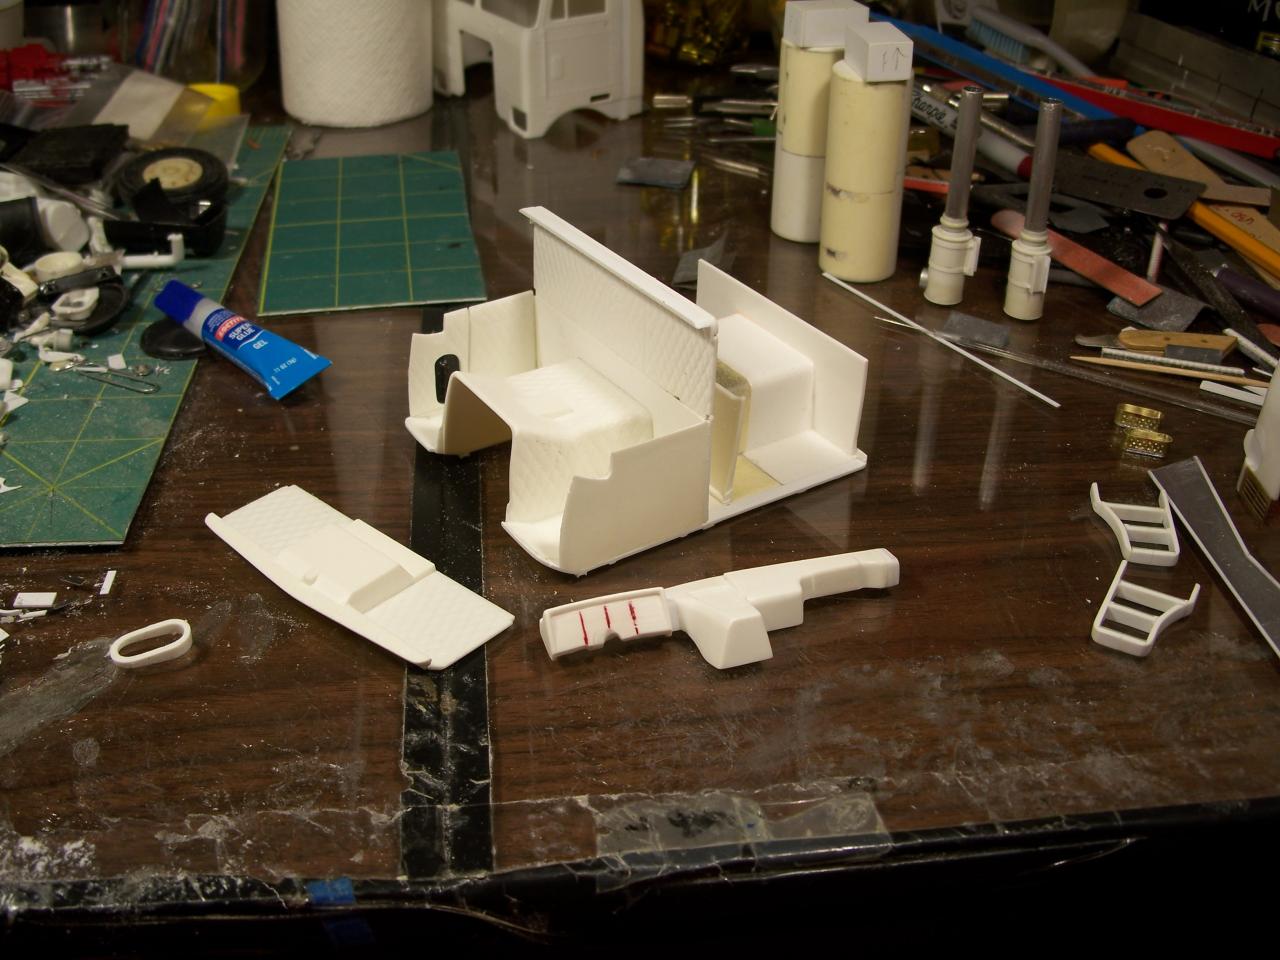
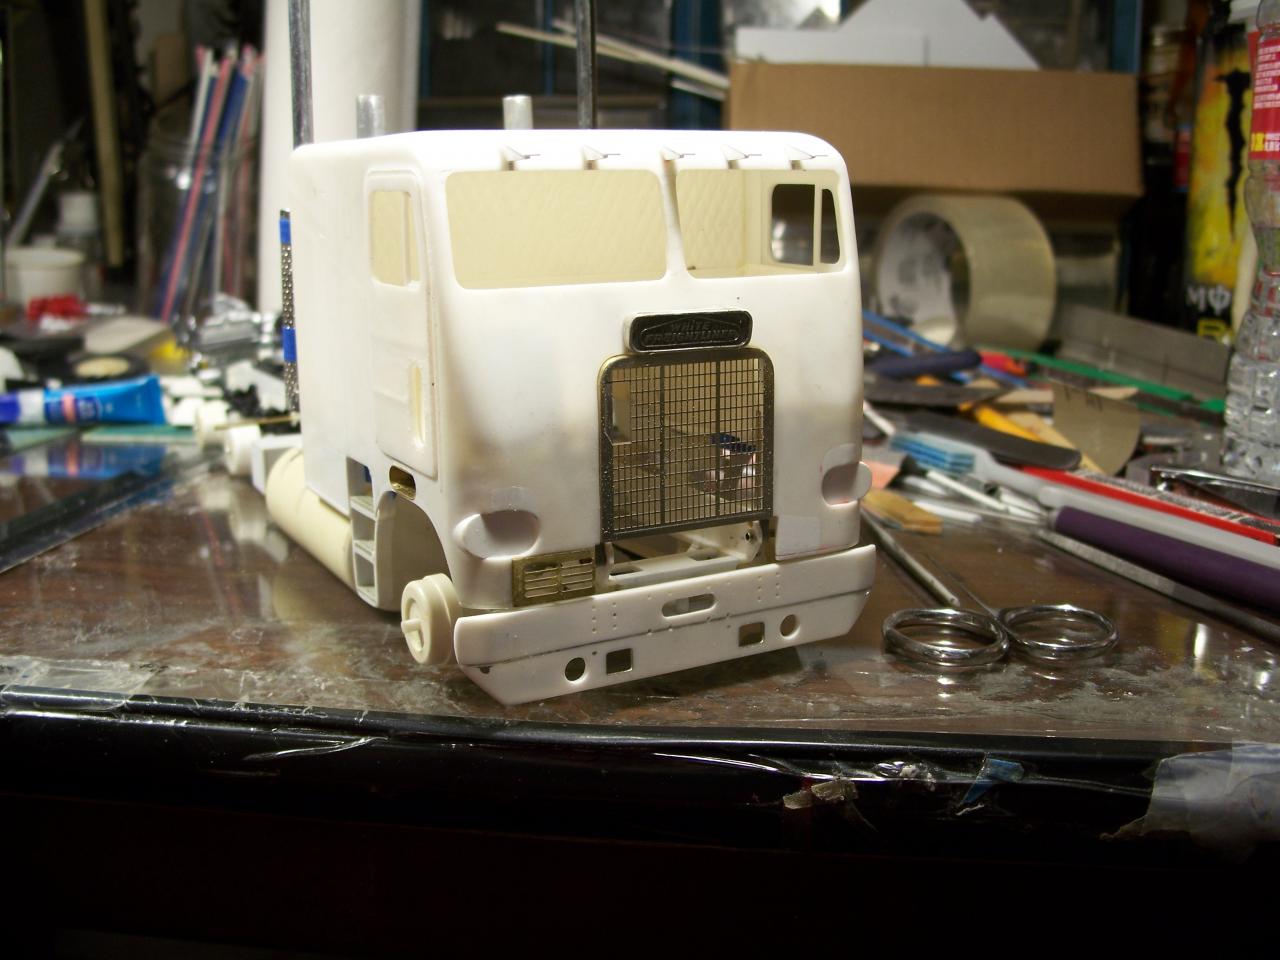
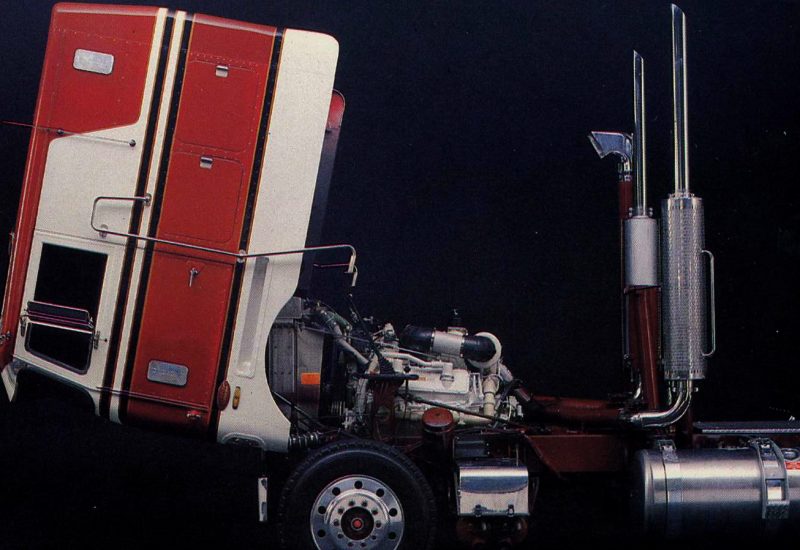
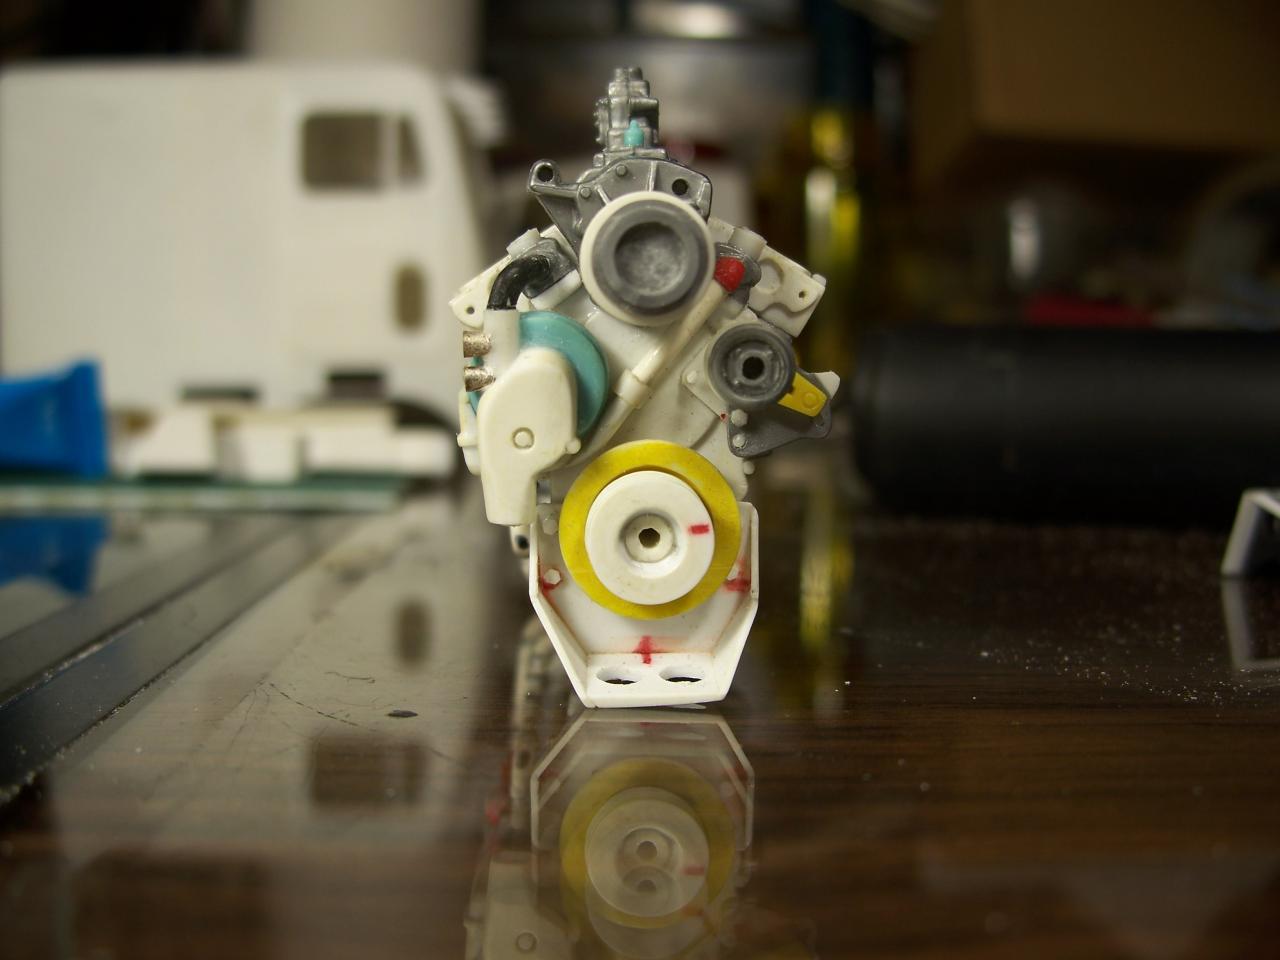
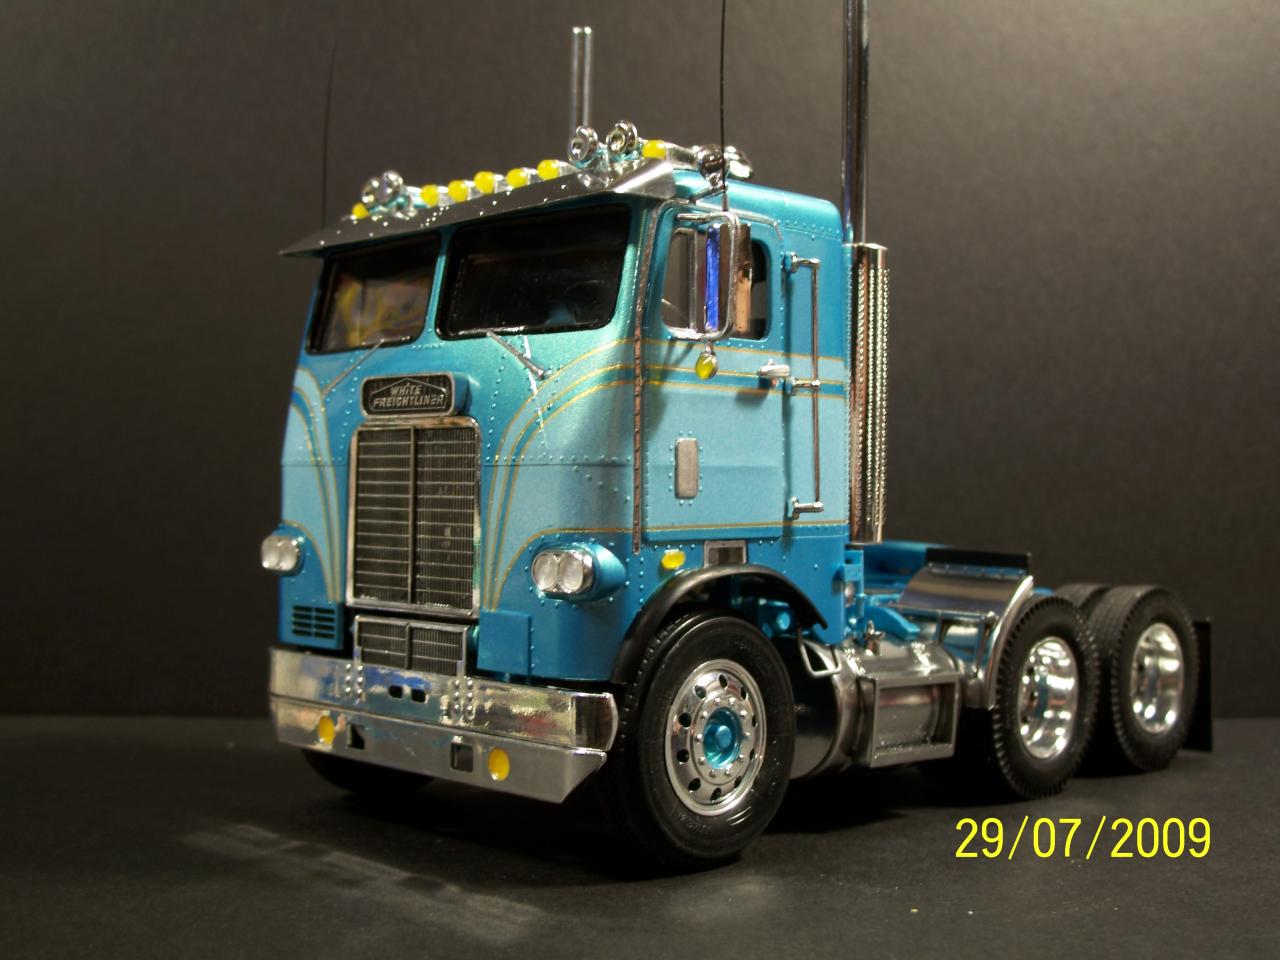
The CMT White Freightliner photo etch set sent me speeding down this path. I wanted to build something Detroit powered for a change, and what better combination that a Sliver 92 and a WFL cabover. The radiator and grille from CMT. The Stabilaire suspension from Italeri was narrowed about 2 mm to fit the 1/25th frame. Out board exhaust and dual air cleaners were added. The interior was converted to a platform style, and 150 gallon tanks were fashioned. Some srap box exhaust give a preview in the mock up photos. The headlights were lowered, the front axle was moved forward on the springs about 3 mm, the wheel arch reshaped, a front crossmember/radiator support was made, and a corrected visor and mounting bracket were added. Thank you for taking the time to look, Mark.

-
KW COE Aero / BJ McKay rig
purepmd replied to Old Buckaroo's topic in WIP: Model Trucks: Big Rigs and Heavy Equipment
Hey Buck, I think you will find that these are as infectious as the real ones. Once they are in your blood, there is no hope, your hooked. Great start. Very cool work stands. Mark. -
Hey Guys, I thought i would post some of my ongoing projects. First, the 352H is one of my all time favorite truck. I had the privilege of driving one many, many years ago. When i found this picture on the web, I was hooked. The first order of business was fixing the ROG 3408. I removed the molded in filters, filled the block, added a proper oil pan rail, corrected the water pump, timing cover, balancer and pulleys. Scratch built cylinder heads were easier than fixing the blobs in the kit. Two cabs were mated into one. With photo etched door hinges in hand, all the doors, driver access and storage, were removed. Thats when I discovered a oversight in the cab as it is from AMT. The storage doors are molded to low. The bottoms of the main doors and the storage doors should be at different heights. I cut them out, flipped them over, that way the floor of the cab can stay the same front to back. The extra ROG 359 frame from the Can-Do wrecker was smoothed and fitted for the cab. Hydraulic rams and brackets made fro the underside of the cab. It is hard to see in the oridginal picture, but the H had a different shift tower. A set of Jamie's Peterbilt resin wheels, and 150 gallon tanks, and some CMT Photo etch will follow. Thanks for checking out my post, comments and criticisms welcome. Mark.
-
Mark, great start. With the air foil on the roof, to me anyway, it screams UPS. I may have to make one of the brown clowns wiggle wagons. No offense to any UPS drivers meant. Just to many years of hearing that on the CB.
-
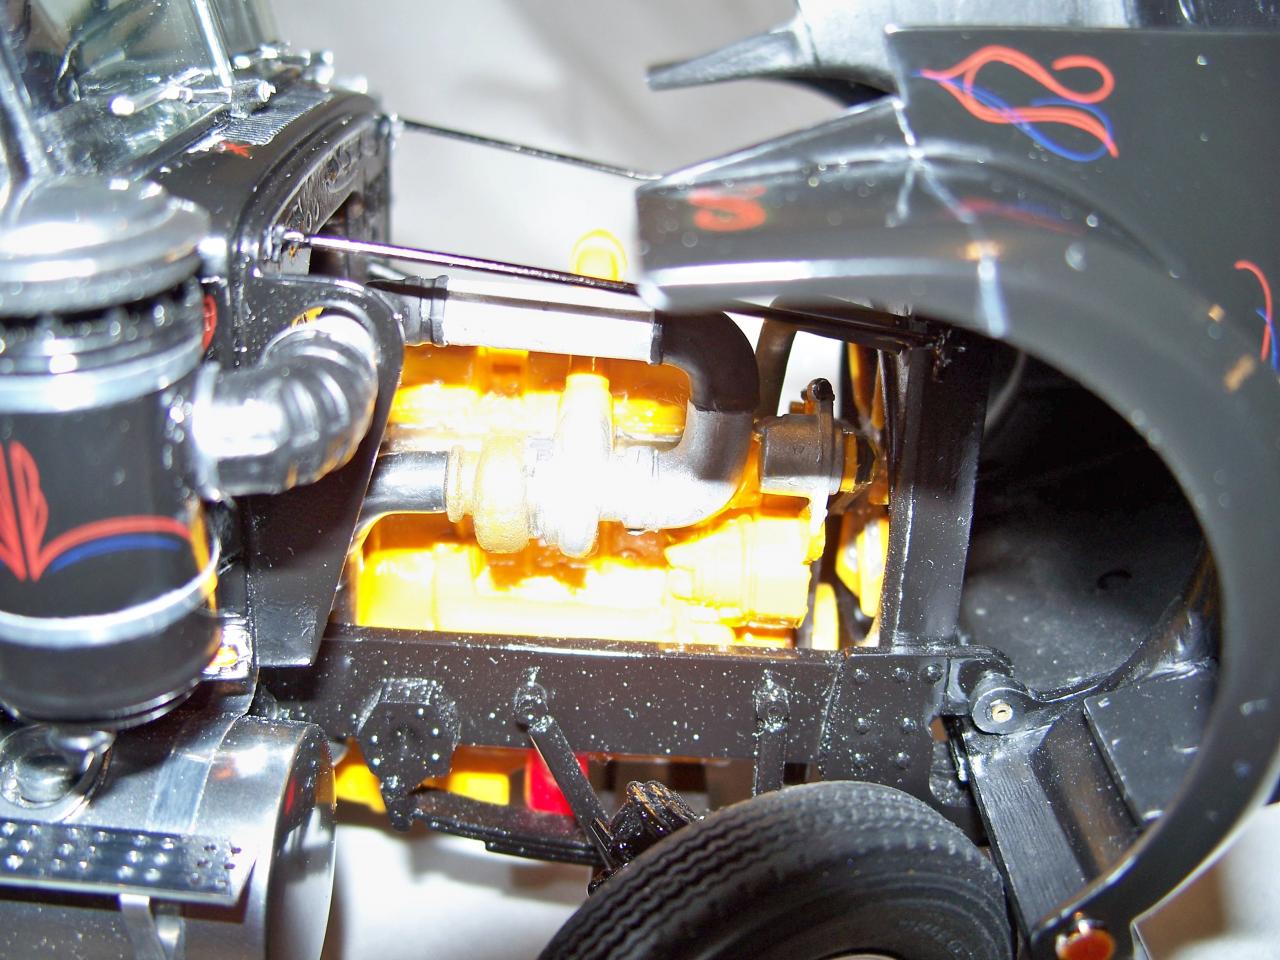
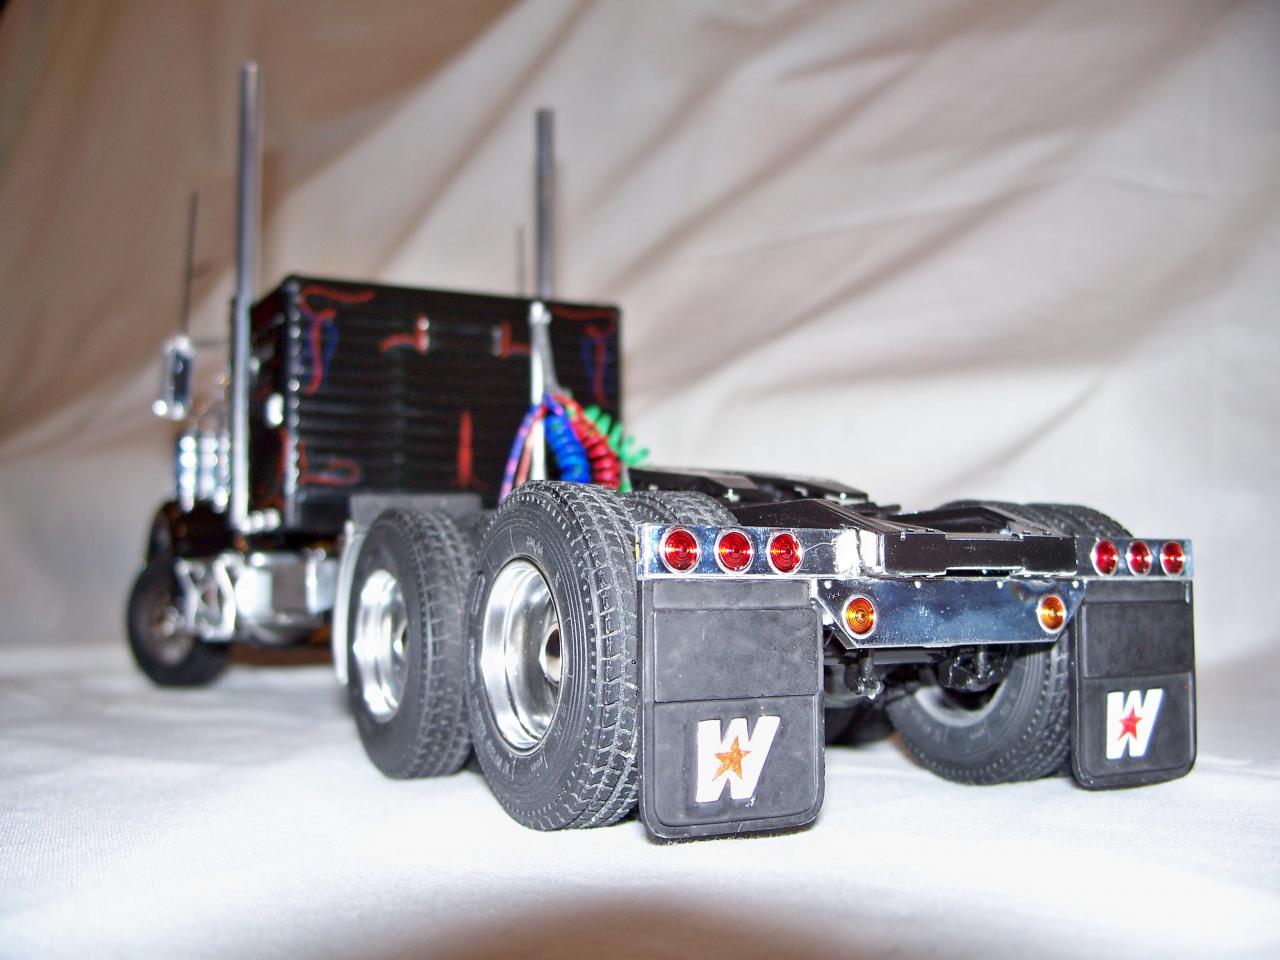
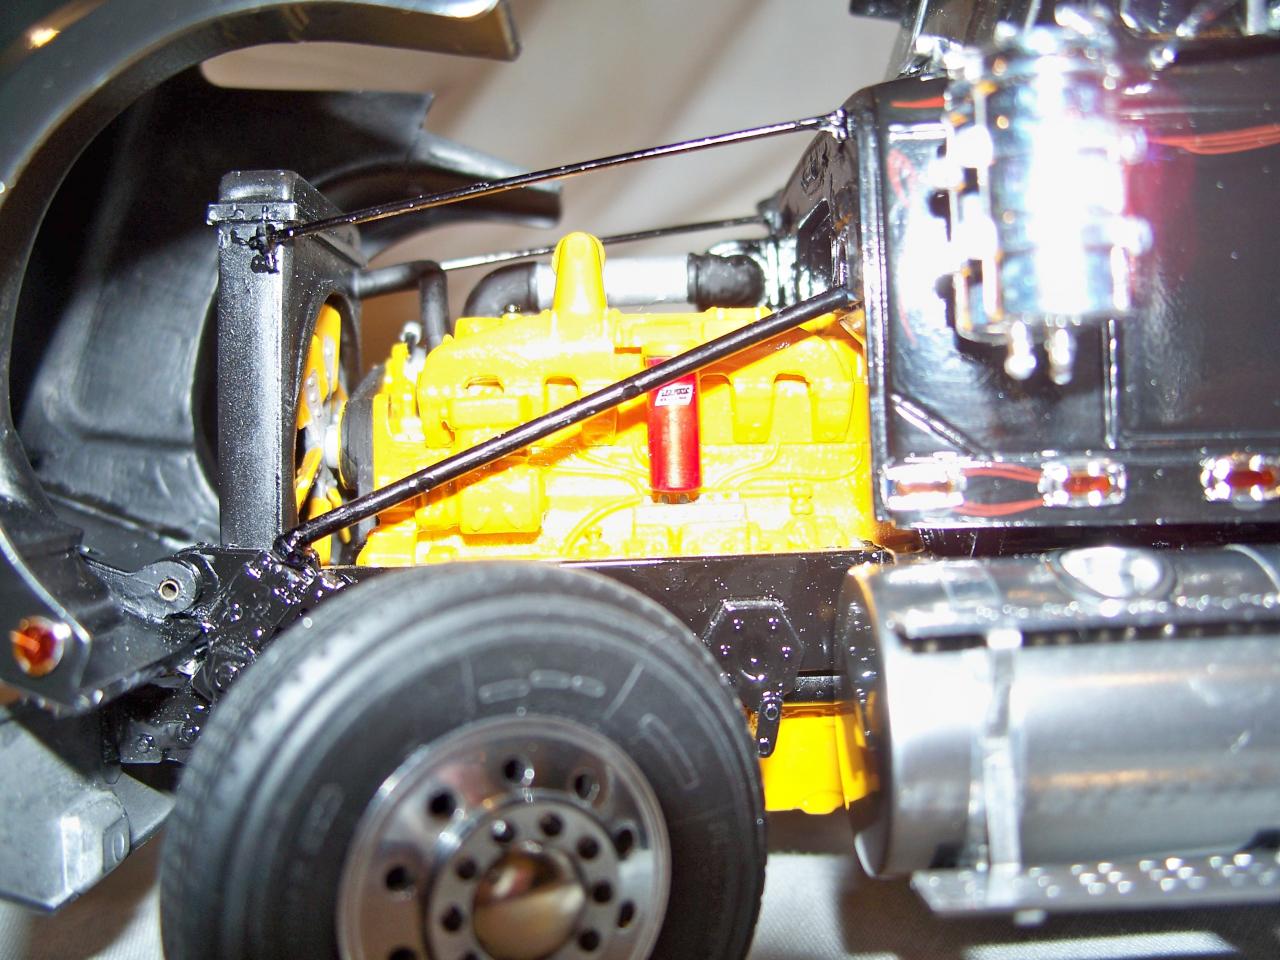
Chris, if you are asking about the exhaust on the black WS, there is not an actual Y-pipe. All the pictures I found on the internet show the exhaust is sent to stacks from a dual exit muffler under the right frame rail. The head pipe comes off the turbo and drops to just below the frame and enters a round muffler on the long end, and from 2 side outlets, goes to the stacks. In this picture, you can see the passenger side exhaust and muffler. The drivers side is a mirror image, with extra length to get to the muffler on the passenger side frame rail.
-
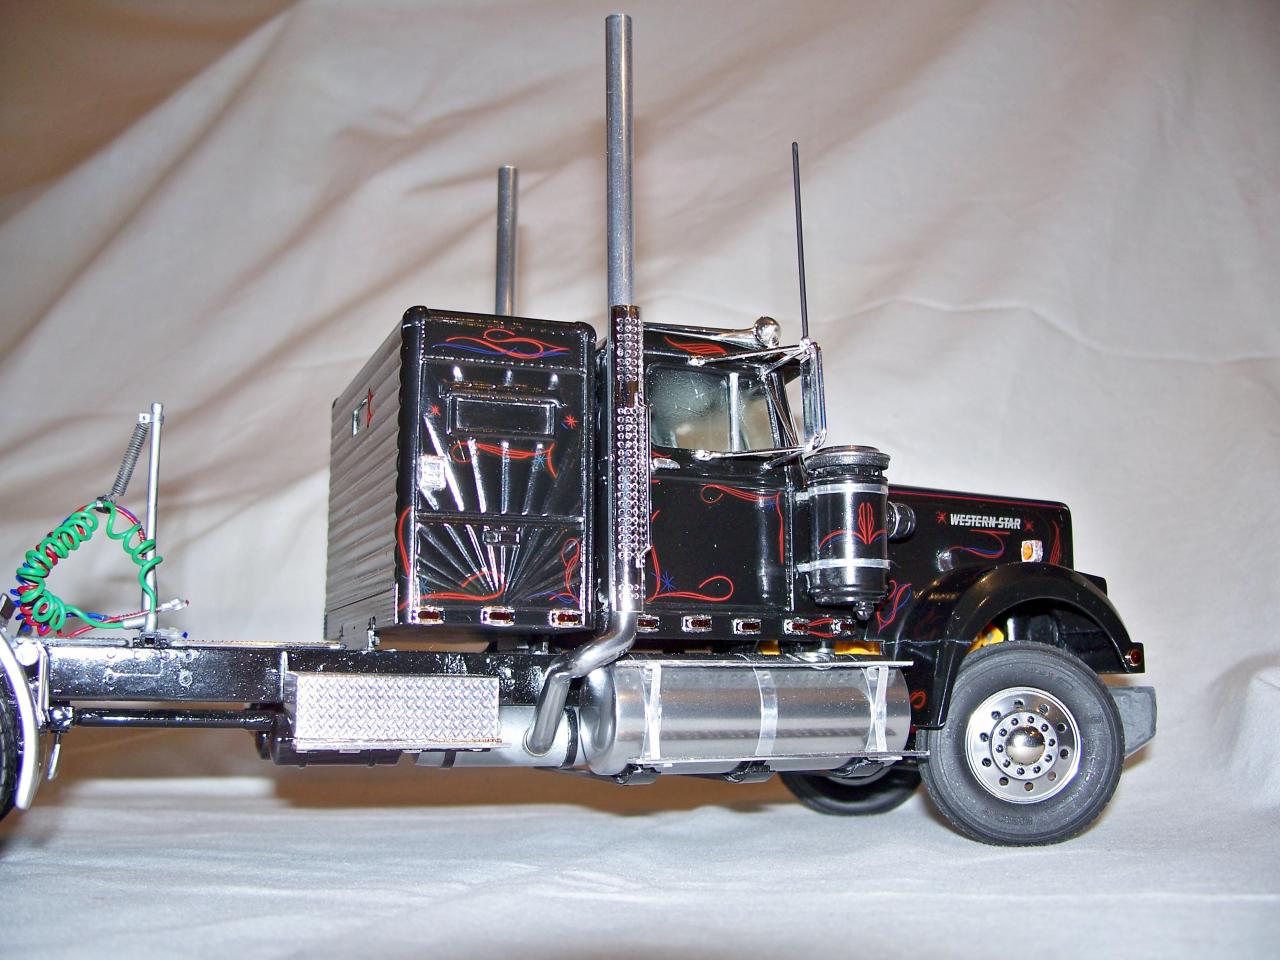
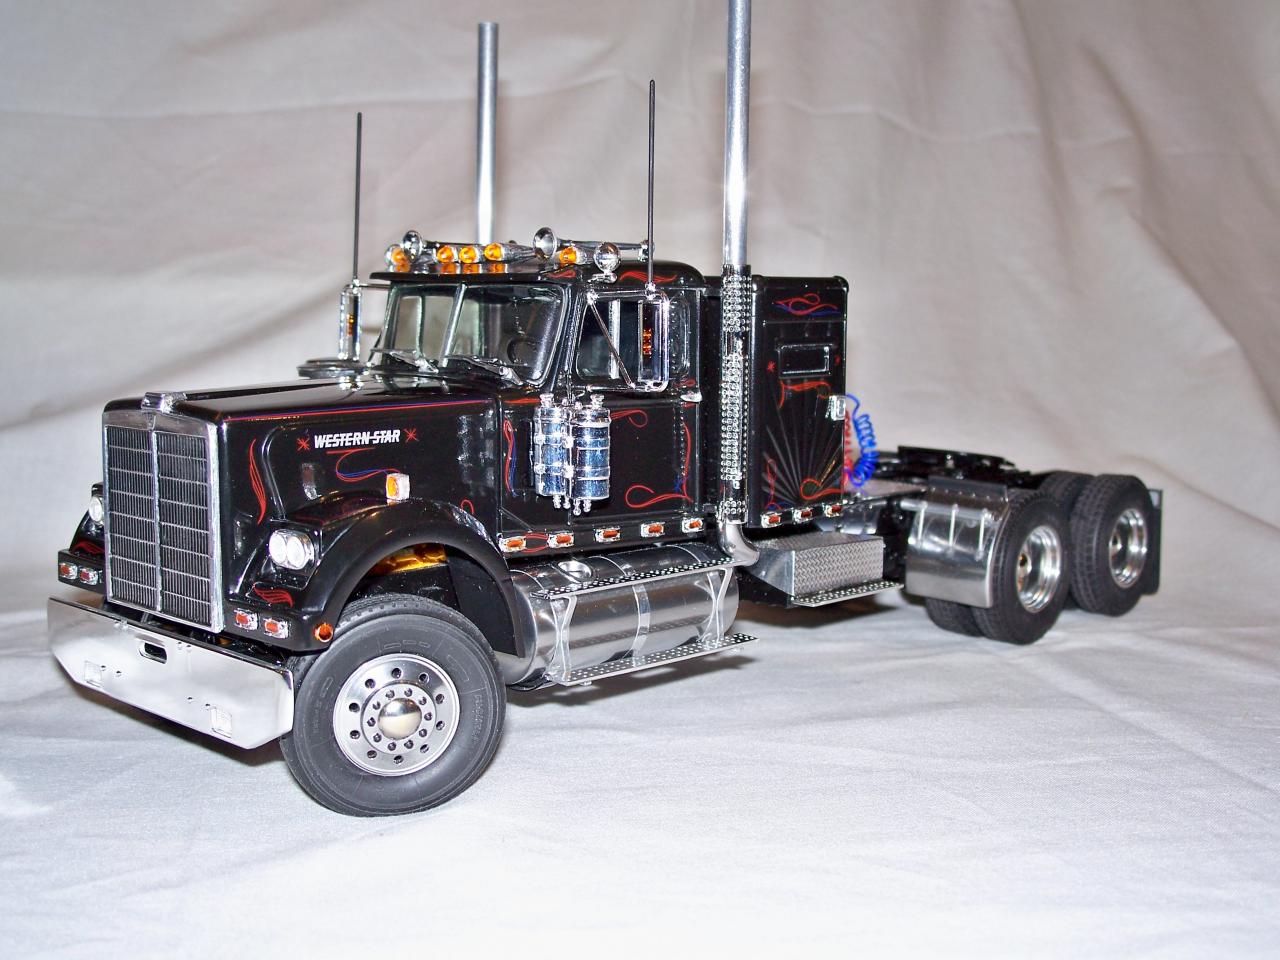
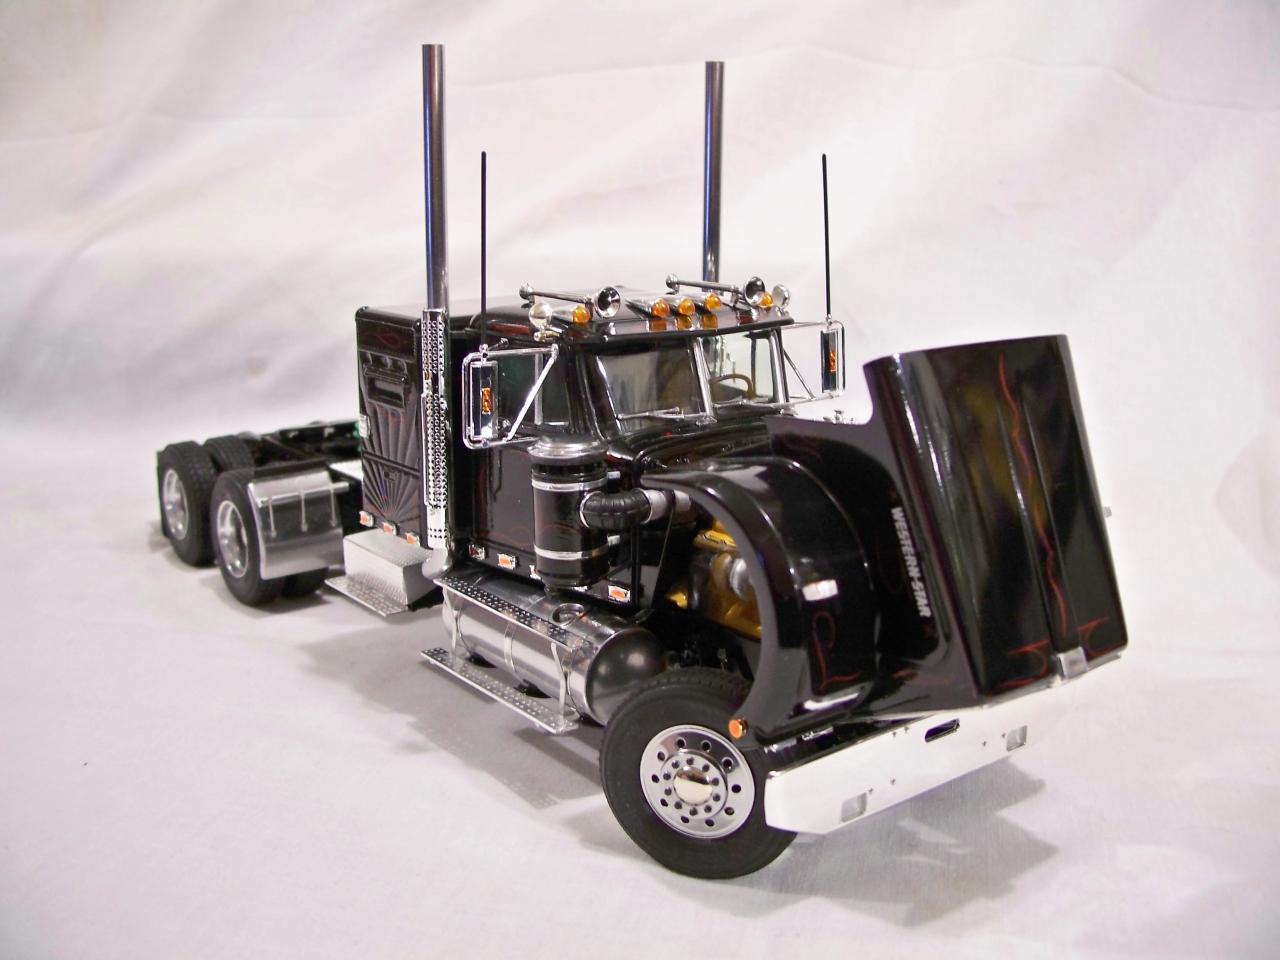
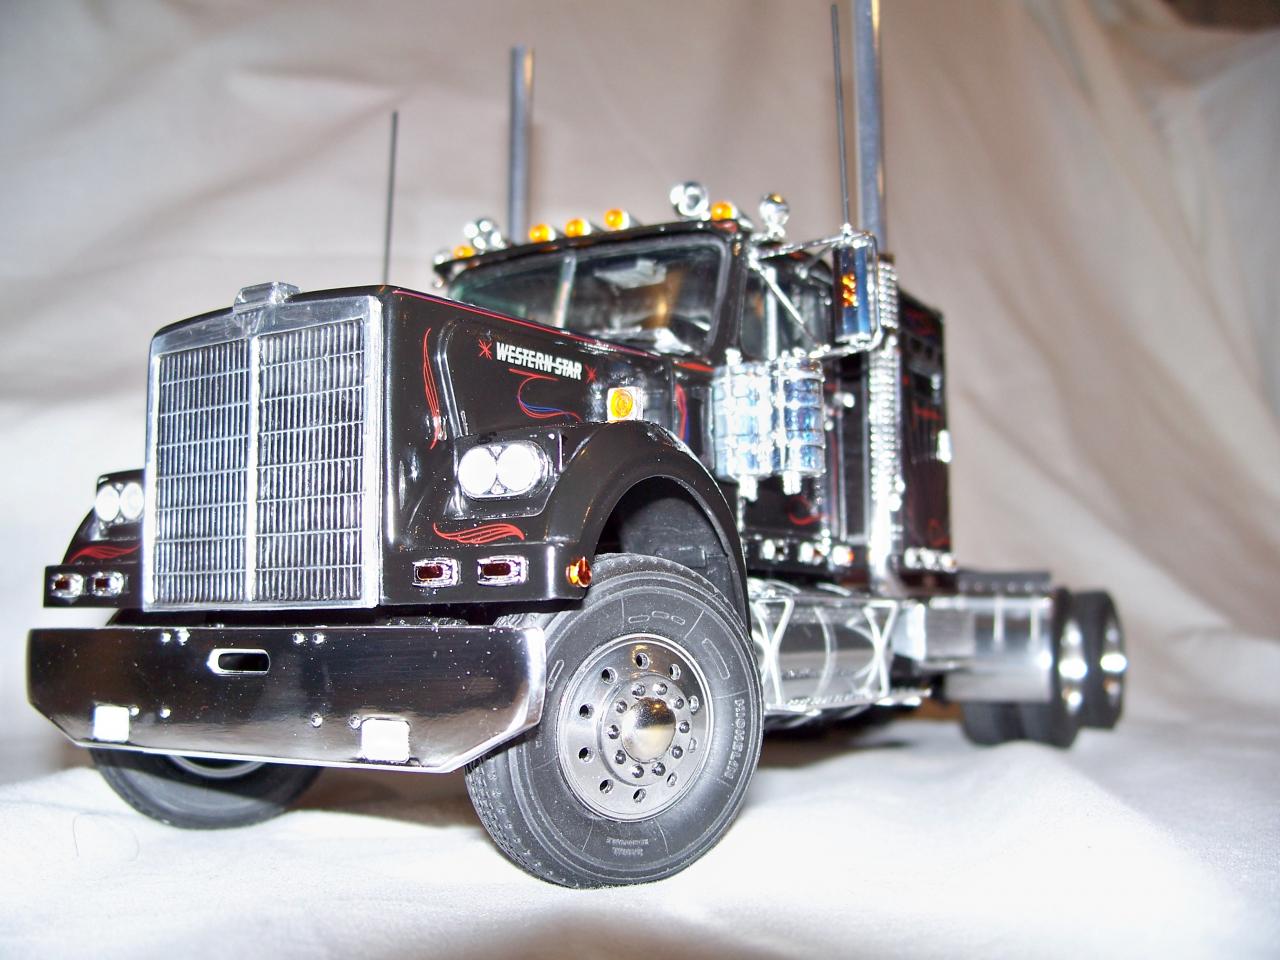
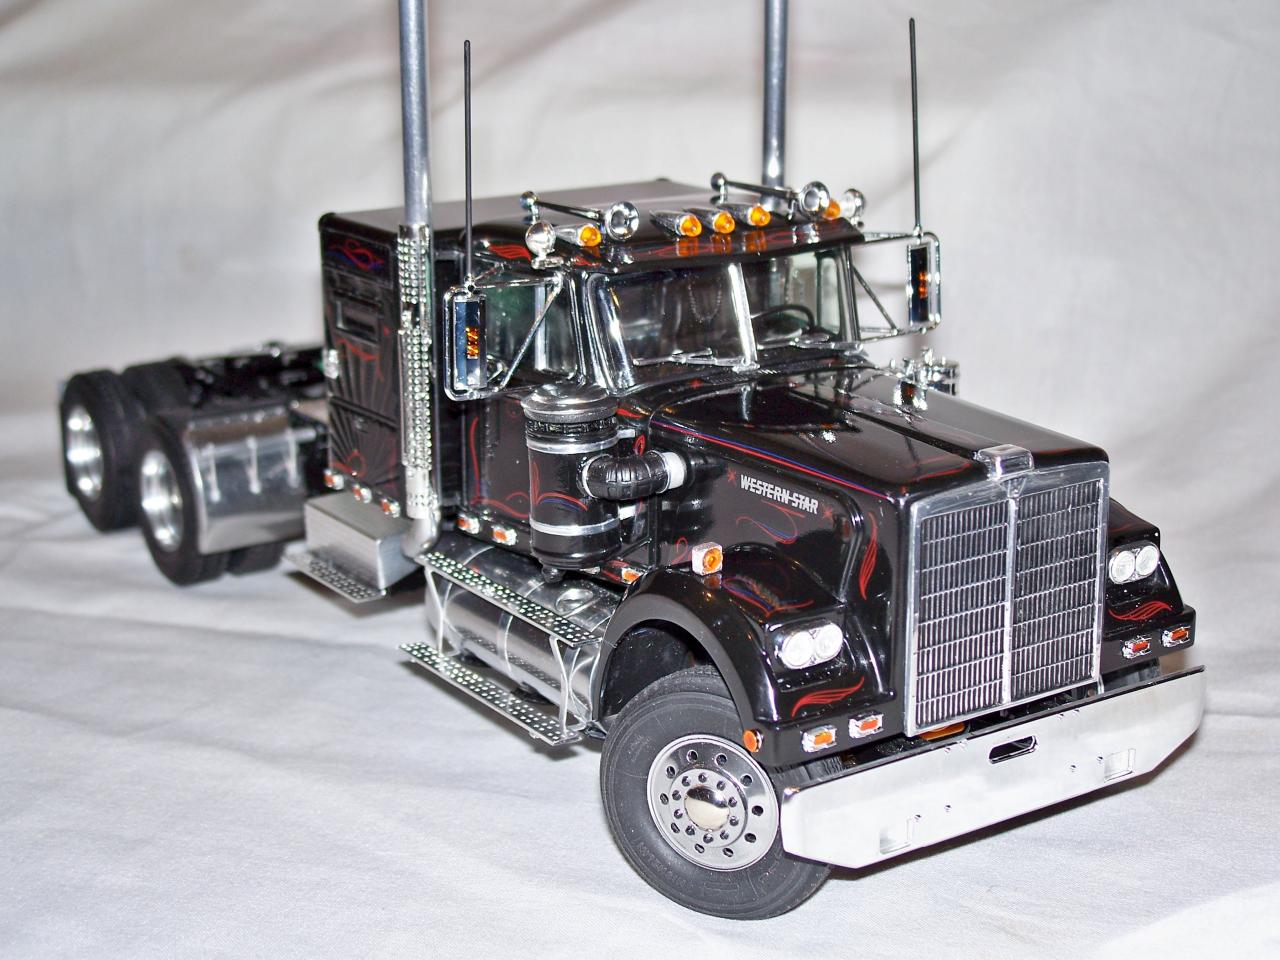
Here is a Star that I did a few years back. I swapped the Cat in, scratch built the exhaust, tanks, and boxes.
-
Another KW cabover
purepmd replied to KJ790's topic in WIP: Model Trucks: Big Rigs and Heavy Equipment
KJ, looks like you got another outstanding KW there. I think the paint job is super eye-catching and yet as replica stock as you can get. Bare with me here, this is a true compliment. As I personally believe the Alcoa Corp was put on this earth to make spoke wheels Obsolete, your KW put a BIG ding in my beloved ten hole alloys. Your spokes look GREAT. They add such character. Well Done. -
Congratulations, rattle cans can be a useful tool, but for the next level paint jobs, nothing compares to an airbrush. Steve hit the nail on the head. PRACTICE. Most important thing. Second, learn about the paint, mixing, drying times, coverage, recoating, enamels, lacquers, acrylics, and so on... Personally, I like to over mix the paint and reducer just slightly, and spray with as low of air pressure i can get away with. Overlap your strokes about half the width, use both vertical and horizontal patterns, and be PATIENT. Let the paint out gas, or flash, that is the solvents have to evaporate out of the last coat before you put the next coat on. On old rule of thumb for this is wait until you can just leave a fingerprint, on someplace you have masked off, without any paint staying on your finger. That should get you started. Find techinques that work for you. You can get results you never will with rattle cans. This Is clear Testors enamel with Pearl-Ex powder mixed in sprayed over white. I unmasked the stripes, and put 3 more coats to get the lighter blue. Good Luck and have fun, Mark
-
Think nothing of it, JT. It makes th build so much more enjoyable. I am almost ready to post some pics of a 104 BBC I am working on. Watch the on the work bench section and I will show photos of what I am describing. I think you will like this truck, CMT photo etch grille, emblems, etc... Detroit Sliver 92 with corrected valve cover, 220" streched wheelbase. Let me know what you think. Should be there next week or two. Here is a pic of a realigned and shaved WFL. Keep up the good work, Mark
-
My version of the Freightliner FLC
purepmd replied to ghoodii's topic in Model Trucks: Big Rigs and Heavy Equipment
WELL DONE! One of my favorite paint schemes executed so very well. Bravo. -
JT, Looks great with the bullrack on! I have built about 15 of these over almost 40 years of glue sniffing, finger cutting fun, and you got the ladders right. The problem with this kit is the front axle is to far to the rear. Put the alignment tab on the axle in front of the forward alignment block on the spring, and that problem is solved. To make the wheelwell correct, you need to remove 3mm of material from the front, measured at the very corner of the cab. The oldest pic i can find on the net is 1969 for the three step ladder, the newest is '71 maybe '72.
-
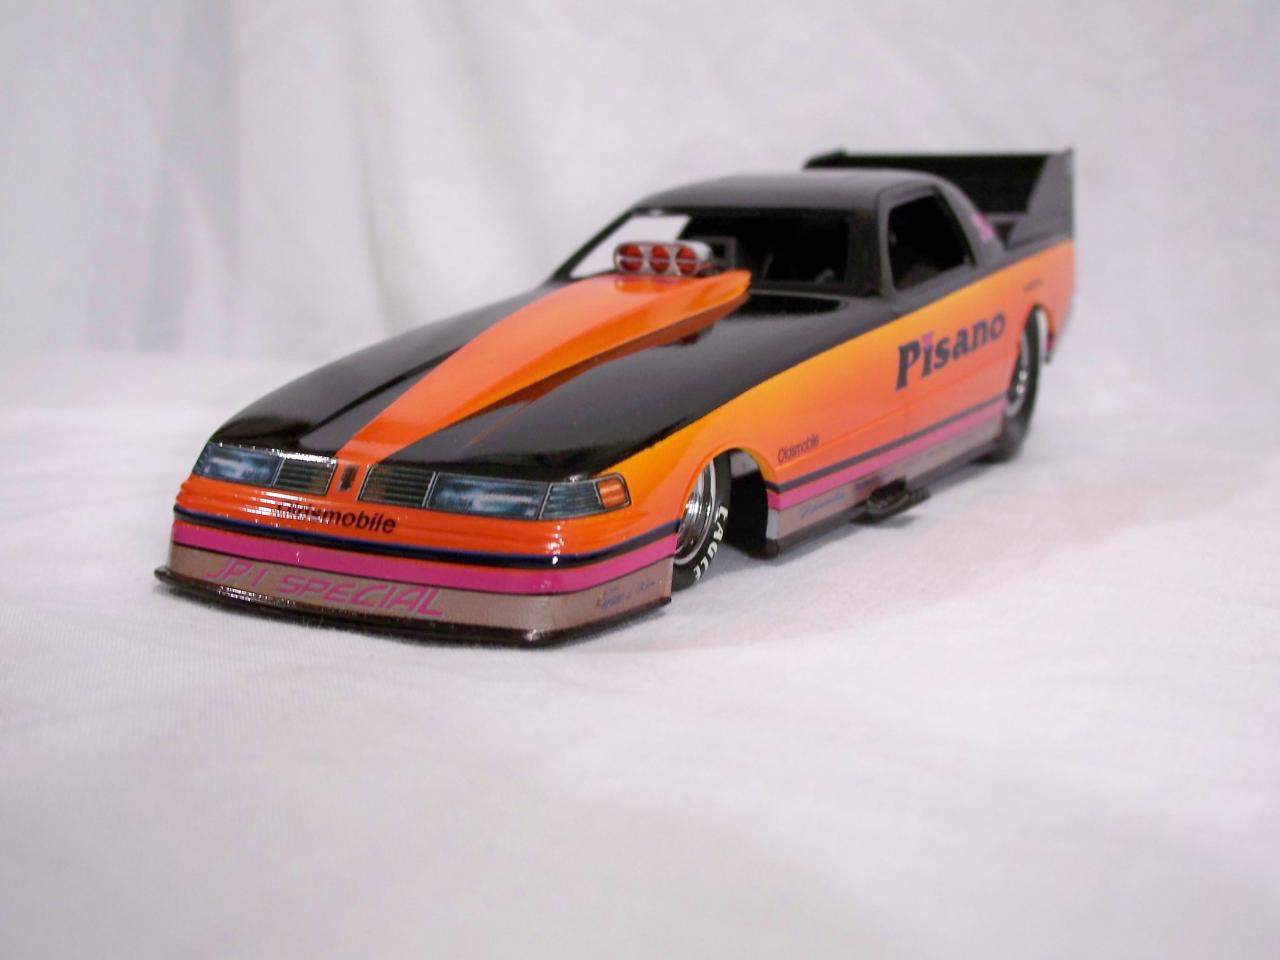
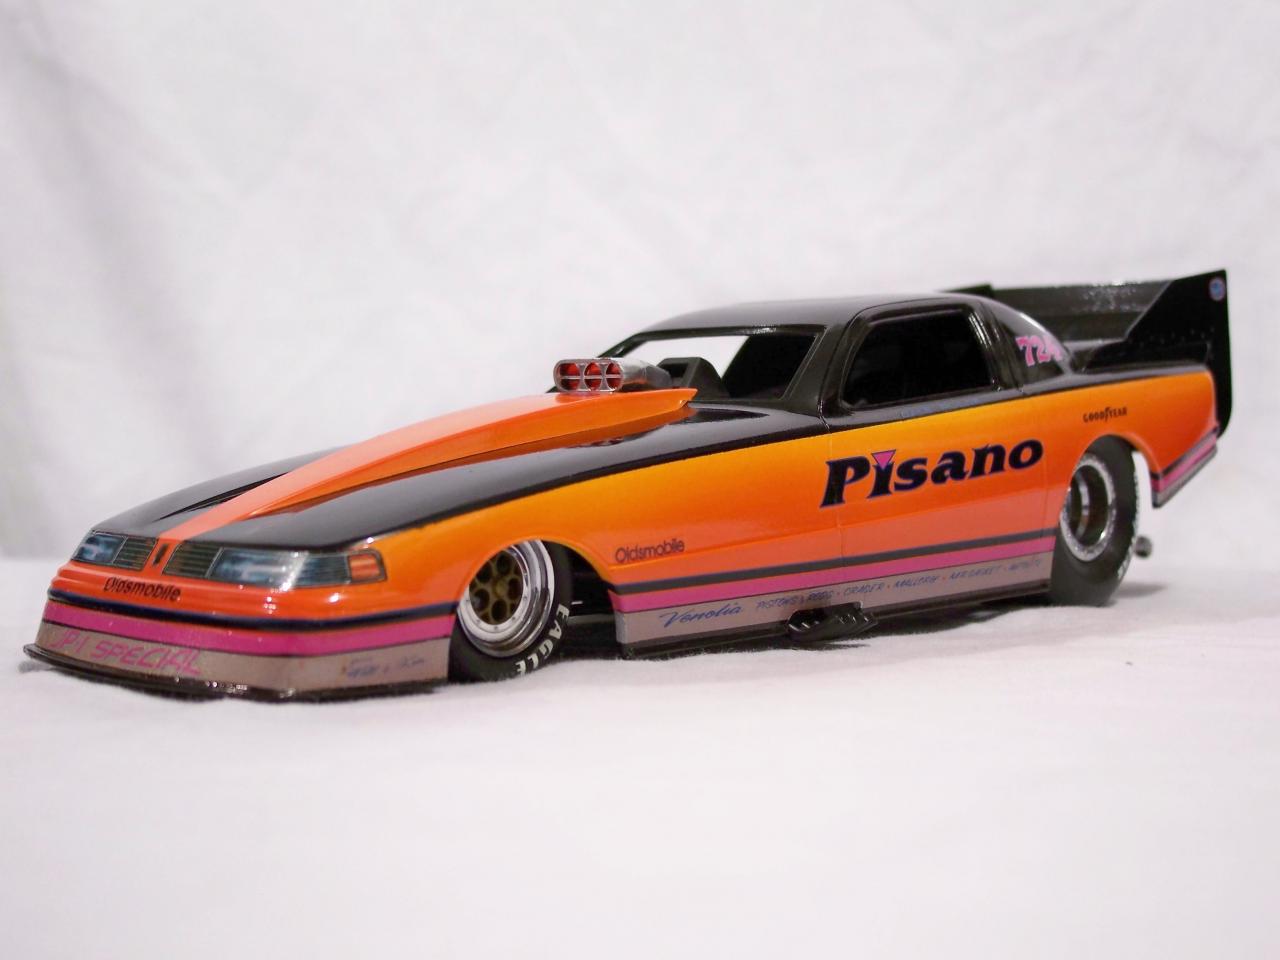
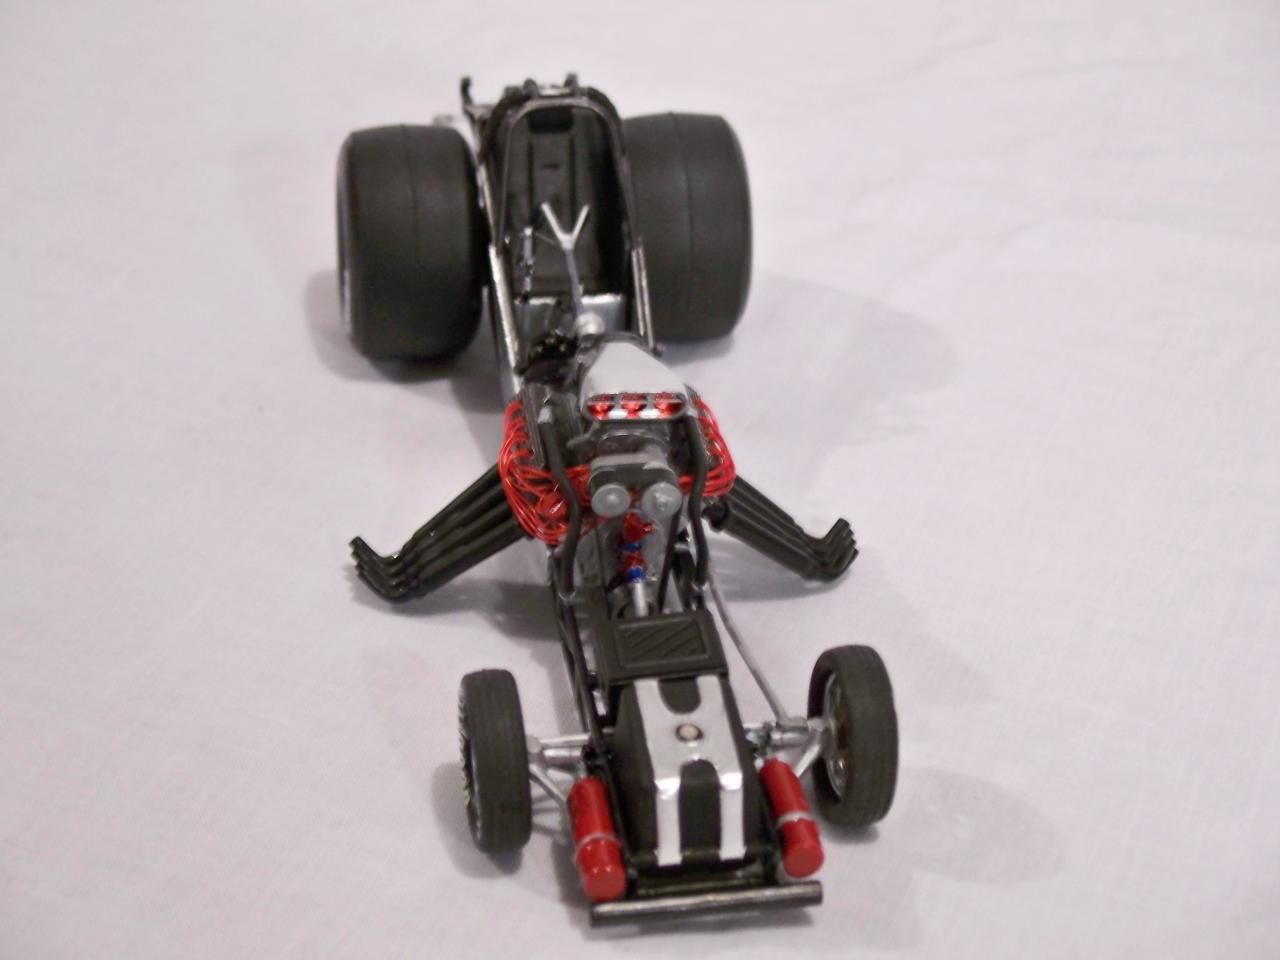
JP1 special. 1 of my favorite '90s cars
purepmd replied to purepmd's topic in WIP: Drag Racing Models
Thanks Guys for the kind words. Dragracer, Mike Dunn was one of my favorite drivers. I got to meet him at the Mile High Nationals once, very cool guy. If my memory serves me as well as I hope it does, The JP1 was the last flopper to switch to the high gear only set up and Mike Dunn was the last fuel driver to shift gears in a nitromobile. Thought I read that somewhere, could be wrong though. -
SHARP tractor. Great color compination. Well done use of aftermarket parts, well integrated into the build. Wanted to see more of the interior. Just a suggestion, Kenworth mirrors mount to the cab above the door and on the cowl. If you were to remount them, you could show off the interior better. Seeing upgraded dashes is one of my favorite aspects. Fantastic build none the less!
-
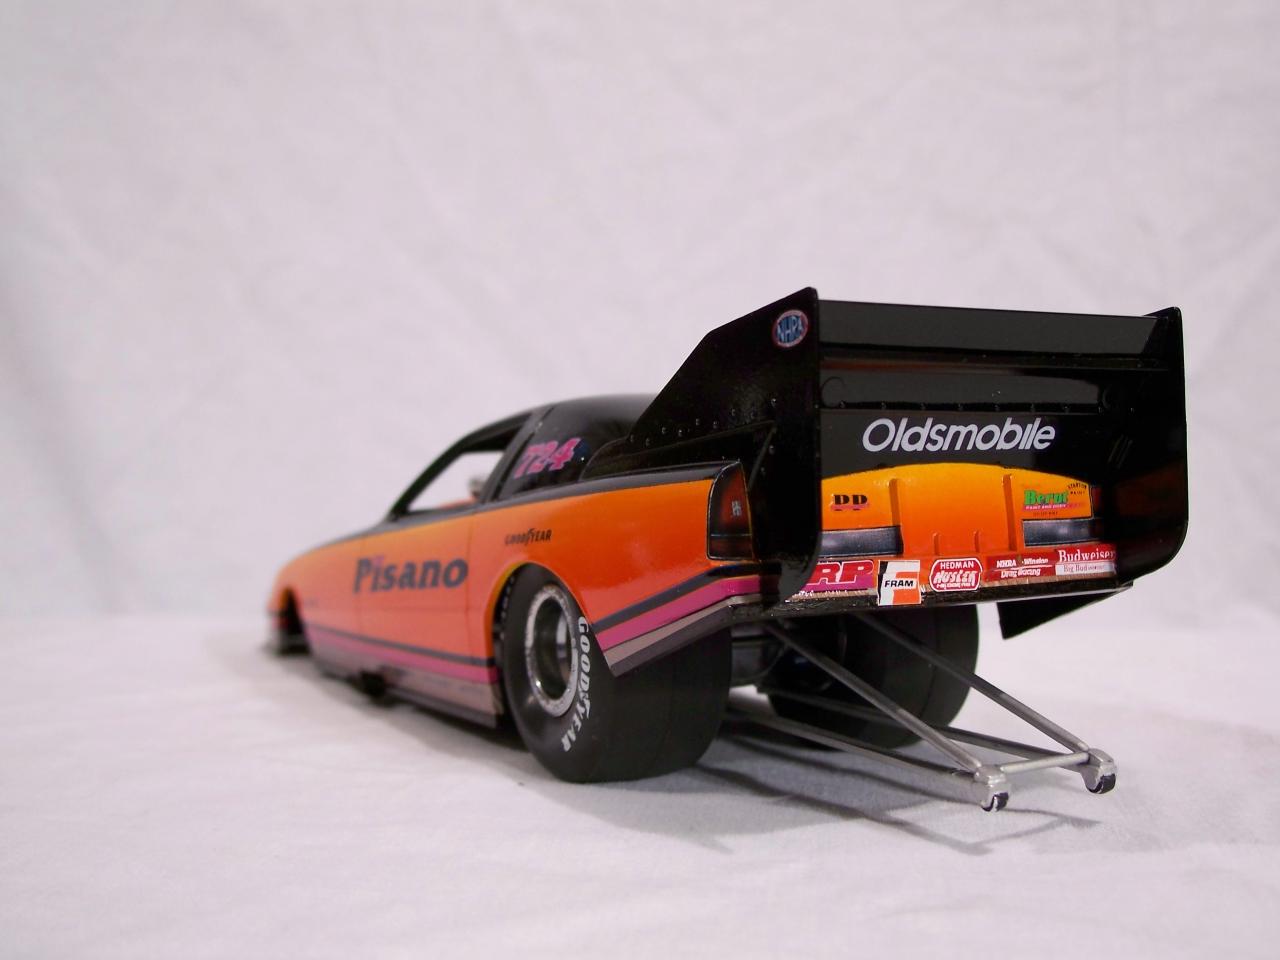
I always liked the look of the black Pisano cars, so I used the Slixx decal set, and a So Real wheel and tire pakage to throw this together as a break from the trucks I usually build. The paint is all Tamiya. Yellow faded with clear orange, black and cleared, staight out of the gun, not polished. I know the wheels are not period correct, but just had to use them. Thanks for taking time to look.
-
Peterbilt 379 with D.T.U.
purepmd replied to truckabilly's topic in Model Trucks: Big Rigs and Heavy Equipment
BRAVO! Exceptional work through out the entire model. A masterwork if ever there was one. -
KJ, Sharp as a tack! Well done. Definately an eye-catcher.
-
Way beyond cool. Awesome work.
-
amt flatbed trailer [done 10/12/13]
purepmd replied to tbill's topic in WIP: Model Trucks: Big Rigs and Heavy Equipment
Very clean build. Could never guess you had been away from the hobby at all. Well done. -
Thats pretty sweet.
-
detroit diesel help
purepmd replied to Rebal442's topic in General Automotive Talk (Trucks and Cars)
You have a couple of choices, If you want, the Tyrone Malone Super Boss and Bandag Bandit both have twin turbocharged 12V-71s. A substantially cheaper alternative is the P&P resin works resin 12v-71. It is around $25.00. I have both, and the resin one really gives up nothing as far as quality. http://ppvintagekits.com/ is their address. Good customer service to boot. -
Payhauler 350 new look
purepmd replied to mackd's topic in WIP: Model Trucks: Big Rigs and Heavy Equipment
Alain, Amazing detail, and weathering. Plumbing looks great! Well done. -
That was the plan, Les, but it was good enough for a nice builder, not to have it represent my work as a master for casting. So this one will get put together, as it was intended to be. The new cab is just for casting, using the volumes of lessons learned from the first, and ending with a better final result. I believe that if a model builder is going to spend money on something such as this, it can't be just 'good enough'.
-
The photo etch was done specifically for me by Horold Weber in Germany. The AMT kit is a series 61 cab, about 4 inches narrower, actually just under,but for all intentsnand purposes here, the cab is .240 inches wider than AMT cab. This makes the grille opening very close to 40mm, because the 1 to 1 truck has a 40" grille opening. Photo etch for the AMT kit will not work. Harold sold me the plans for the photo etch specific to this cab, so if I do get a resin version out, it can have the grille, steps and emblems that are correct. For all you that have offered encouragement about casting this beast, Ben, Tim, et al, this cab already has a full interior, Real leather diamond tuck apolstery, foil cast vent assemblies, side and center curtains, as well as the doors have been opened, so I don't think it would cast well at all. However, I do have a second cab that was started just for the express purpose of casting. Those of you who have built masters know, building a part to use as a subject for casting vs as just a replacement piece, are 2 different things. There is still the possibility of a mass produced version reaching you guys. As always, it is a question of time. Thanks for all the kind words, Mark.
-
The nuts and bolts are just 00-80 rc airplane stuff. Micromark, even some hobby shops have them. The air cleaners are the stainless sheet that K & S sells in rolls, like Renold's wrap, only very thick. I covered some old AMT Peterbilt fuel tanks, sanded smooth, with Scotch double sided tape, making sure there are no gaps or overlays, and stuck the stainles wrap to them. Thanks for the kind words and encouragement.
-
I have the cab setup as a ultra cab, and with a 90" Unibilt sleeper. Not to big, but not stock.