
MitchP
-
Posts
301 -
Joined
-
Last visited
Content Type
Profiles
Forums
Events
Gallery
Everything posted by MitchP
-
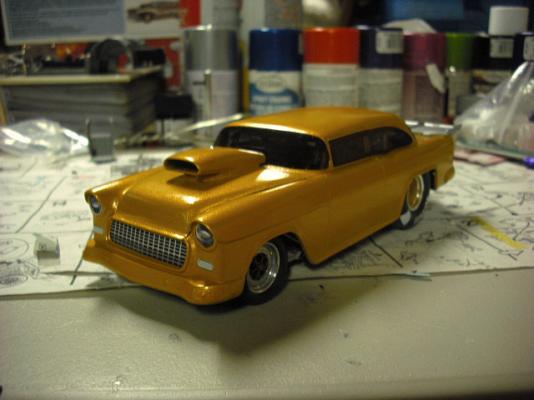
Just wanted to post how fortunate I am despite this "We don't get fooled again" economy we're stuck with (love The Who). I'm 90% done with my extremely customized AMT '66 Nova and will post pics. Despite great advice from Cruz and others, it's got some orange peel but I think I know why and will improve. It benefitted greatly from a Revell donor '55 Chevy top sportsman pro mod and some Ebay and Comp Resin parts. The amazing thing is the number of kits I was able to acquire before my wife went berserk and called a halt to my purchases. So, I'm just assigning them to future events like Christmas, birthday, Father's day, etc. The batting order will be: Revell Shoebox Ford top sportsman, Revell '55 Streetburner top sportsman (hopefully to have a Ross Gibson blown RGE605 shoehorned between the framerails), a new Chi-Town Hustler which I may build or keep boxed for a while until my skills can do it justice and a Candies & Hughes from Polar Lights I just acquired yesterday. Nothing else will be coming in as I'm sure the cost of paint and other prep items will add up, but I'm happy as a clam right now. Just to make the thread a review of sorts, I will say the AMT Nova lends itself easily to mods (I've seen one in MCM that just the body appears to have been grafted entirely onto the '55 Chevy T/S), but has a MAJOR flaw in that it's molded in a horrid shade of blue. It appears to have been designed for a novice with only glue and white/black paint from the pics on the box. The 327's breathers don't fit well into the valve covers IMO as there's little notching or room to clear off the chrome plating from the cover to ensure good adhesion. The carbs aren't a high quality molding as there are no barrels, just another tiny peg in the center to attach either the stacks or the air cleaners. I had to sand the tops and add the barrels myself with a dremel to look authentic. If you need touching up or want a different look, I used 2 Sharpies, one gold and one brass to touch up the carbs and the match is one on one with Testors paint! Anyway, I hope to have some pics posted soon; a couple of the completed chassis/tubs/motor/ wheels, some of the interior drivers compartment and then the assembled car. It's my 2nd altogether and 1st of any real consequence since seriously taking up modeling; the 1st was the JJ F/C Vega which is NOT replicated of the true original due to decal issues, my poor 1st attempt at painting and glue residue on the windshield. This required an adhoc shoe polish forgery of qualification markings LOL. Just for a laugh, it did win a 1st place blue ribbon at our county fair last week Sorry for the novel; hope it had a few laughs!
-

Paint Strippers - What to Use?
MitchP replied to pbj59's topic in Model Building Questions and Answers
I've used both the Dawn and the Purple Power with mixed results. Neither was miraculous (except for Tamiya ultra fine white primer and spray flat black). My scrubbing tool of choice was an old toothbrush and I sat two poorly painted bodies in Dawn so long the jello-like texture of the product actually evaporated entirely. This occured over a week, with daily scrubbing and nightly soaking using 2 spray bottles worth of Dawn. After less than complete results, I washed both bodies and switched to Purple Power. It started as purple coolaid texture and eventually changed to a jello-like consistency, similar to the Dawn. During the process, I actually brushed too hard and put scratches into the softened bodies! Ultimately, enough of the multi-coat paint was removed to allow me to finish the job with sandpaper and small files. I have searched subsequent threads and the conclusion is that some sort of initial sanding or similar technique would allow the paint remover under the surface of the outermost paint layers and access the layers underneath to more effective start the stripping process. Just thought this might help some other amatuers like me who've been struggling with learning to paint and may be left with orange peel on your faces... -
This great info! Shows what the search function is for! I'm new to modern modeling after 45 years and never painted before. My Jungle Jim was a body in white and I shot it blue 'flake without any body prep. I tried to be as light on the coats but it still ran in a few spots below the rear bumper. My current AMT '66 Nova (with help from Marcos Cruz) was a much more times taking event and I still screwed up the 1st body due to trying to get too fancy with under coats/over coats. I ended up with a 2nd body and had it perfect (well, except for the peel) when I attempted an hand-taped striping job. Purple Powered the body and tried again. I'd have had a great result except for I didn't know about being too far away on my wet coats. I'm going to let it dry after 5 coats of color, then apply the top clear coat and invest in a polishing kit to at least make it really shiny. Thanks for the advice and this page is bookmarked in my browser as a #1!
-
Cooltoys1: I used the One Coat and laid down 2 coats of misting and 4 coats of wet with some orange peel on the roof/trunk lid and some run where the trunk lid rolled from horizontal to vertical. I'm very new to painting so I know I'll figure it out with some research. My question is about your use of the One Coat clear coat. I am going to use it hopefully; how did you apply it? Misting coats then wet coats? How long did you wait between each spray and how long did you wait for it to cure before buffing? What technique did you use to buff? I'm not expecting perfection so early in returning to model building, but painting sure has been a pain in the tail. Thanks and Christine was a great body that was run on a Top Sportsman in the 80's.
-
Mark: to me, this top looks beautiful with none of the slight orange peel I've got on my 1st attempt with the product (I have to start researching that subject next; I'm returning to modeling after 45 years off) and it's plenty shiny. So what I'm hearing from you is that despite the name, multi-coats are mandatory as Cruz advises, but must there be a 2-3 week wait to polish it out and if so, what polishing system did you use? Did you ever apply their "one coat" clear glosscoat as well? I'm preparing to spend $30 on an aerosol propelled kit which will allow me to get to acrylic paints which I understand are more forgiving and it also contains what appears to be a variety of spray nozels for different situations or perhaps paints. I would prefer cans I suppose as they are a one piece apparatus, but I'm tired of stripping bodies (2 so far from the same kit). I realize there is a learning curve for me, but I really enjoy the build process with the innovative techniques I'm learning here (cutting a syringe for creating spark plugs, using parts from donor kits, etc) more than struggling with paints. Thanks for any info.
-
Poor man's resin prep and tutorial?
MitchP replied to MitchP's topic in Car Aftermarket / Resin / 3D Printed
You guys rock! This totally helps. Any word on which paints will adhere? -
Hey gang: Things are so tight here with me on disability supporting a wife and 14 yr old, I honestly have to scrimp and save for every model. I've actually used very thin craft hemp rope to fashion fuel line (don't laugh, the weave when painted alum looks very much like braided steel fuel line). I only need to prep and paint a twin resin 'chute pack to complete my '66 Nova Pro Street. I know Bleche White (sp?) works for removing mold residue, but is there any household product I might already have that works? I have paint thinner. I know to thoroughly wash the parts first; it's the prep and painting after that I'm unsure of. Can I use the regular Testor's bottled paints? Is there a special primer or can I use Tamiya/Model Masters thin? Thanks all. BTW, I did search and find the resin prep thread, I just want a couple of confirmations or even other ideas.
-
Ace: a few q's if you don't mind. Can you explain how you put 5 coats of "One Coat" one; did you mist a couple of coats, then wet coat the next 5? If so, how many minutes in between each coat? When you put the final primer coat on, how long did you wait before you sanded it off? Cruz and I talked and he gave me excellent instructions for painting, but I think I left out the fact I was using One Coat, which confused me. I still misted the 1st 2 coats, then shot 3 wet coats (20 mins in between each) after waiting 20 mins from the misting. I ask because just when I thought my car was ready 24 hours later, I was going to start misting gloss clear coat (One Coat type) when I discovered 2 blunders. 1st, there were some undetected brush scratches on the rear deck lid ('66 Nova) from when I had to strip the 1st attempt at painting off and I missed them and 2, since I don't have access to a dehydrator or paintbooth, it looks like a spider's web drifted down from the rafters in my garage and left a small trail on the roof. I tried to lightly sand the scratches with 4000 grit but it started to ruin the paint. I finally gave up and lightly shot a coat to cover the imperfection on the roof and the trunk lid developed a run. No matter, it's built in the same vein as yours and Cruz's, but I have a chrome promod wing to mount and twin parachutes where the run is so it'll be fine for my 2nd build in 45+ years LOL
-
Cruz: I'm not insulted in any way! I kinda attached myself to you for info because you were so informed and produced such great results. No apologies necessary. BTW, your 'Cuda is just what I'm trying to achieve with my modeling goals. In fact, my homemade roll bar looks just like yours! Your engine looks like a twin plug donor Hemi with resin hi-rise manifold and twin carbs too. Anyway, I'm always appreciative of any help here and I truly believe if I wait it out for a while and be patient, I'll shoot my dull coat to cut down on the metalflake and then start the clear coats. Cruz is a great source of info and his work is incredible!
-
I've just used the "one coat" system from Testors and it a bit confusing compared to the quite comprehensive instructions Cruz sent me for amatuer painters. His instructions were based on standard can or powered spray systems. When it came to the one coat, I was confused between the can instructions and his. Cruz gave a thumbs up to my preference of Tamiya fine white primer; for painting, it was recommended once all fine tuning of the primed surface was completed to: Mist 2 coats of the color paint with 15 - 20 minutes in between before starting wet coats. At this point it appears you apply a wet coat every 20 mins. avoiding runs until you've shot 4-5 coats. After this there are some drying recommendations and prep sanding with 3200 before washing and final clearcoats in the same manner as color. My confusion with Testors is their "One Coat" method and whether or not I should still mist two coats for adhesive purposes or not. In the end, I misted twice with 20 mins. in between and then applied 3 wet coats the same way. My failure came when I presumed "one coat" meant the paint was really dry. I tried to lightly sand a few scratches on the deck lid 24 hrs. later with 4000 and it started to pull the top coat off. I stopped, wiped with a dry cloth and shot a wet coat which created a run down the trunk lid. Luckily, I am mounting a pro wing and chutes which will cover the mess so I won't try to sand and re-shoot. I'm going to carefully try to use dull coat recommended to kill some of the extreme flake of the mystic green and then mist 2 coats of gloss with 2 coats carefully wet. Overall, I'd say One Coat paint has it's place in modeling, but for this amateur, I'll use it for shallow cover jobs and use more traditional paints for jobs needing 4-5 wet coats where perfection sanding and polishing kits are involved. I hope this makes sense from a rookie.
-
what would be best for plug wires?
MitchP replied to dale's topic in Model Building Questions and Answers
Nice Job! I also use MCM and chose the Vertex mag. I've only built two models recently since a 45+ year layoff LOL and did a JJ F/C first (authenticity be d@mned, it looked nice) and again on an AMT '66 Nova I'm just about finished with. Your gasser looks totally "gassed" and I love it. Coincidentally, I got a similar paint effect after botching the 1st Nova body. I got a spare on Ebay and stripped the 1st one so I could practice on it. My base color was gold though. Now you've given me courage to try again. I use cans though - not much room for error there. -
Jungle Jim Vega Engine?
MitchP replied to GLASS ARTS's topic in Model Building Questions and Answers
It works very well with some of the Ebay Vertex alum. magneto/ignition wires you can get if you're modifying it a bit. I also (being economically challenged) took some very small diameter hemp craft rope, painted it silver to resemble braided steel, and painted red and blue anodized fittings. I simply used a large 1:8 426 Hemi pre-built kit I bought for display and tried to match it up with JJ memoriabilia pics. It actually turned out pretty good for my 1st model in 40+ years. -
MIG Productions dark wash - substitute?
MitchP replied to MitchP's topic in Model Building Questions and Answers
Awesome. Thanks! My Nova is finally out of the Purple Power, cleaned up and ready to start Cruz's tutorial for the perfect paint job. -
Hi: I'm following an article by our own Marco Cruz concerning painting a model and he used MIG Productions dark wash to create a bold outline effect for panel lines, such as doors, trunks, etc. I'm on a severe budget and can't tax the payroll for anymore right now (e.g. I created my 1/25 fuel lines out of silver painted arts/crafts wound hemp, glued them and painted red and blue for the fittings LOL). Does anyone have an alternative, enamel, acrylic or otherwise to consider? I have quite a few paints to chose from in the dark variety (including ink and fine Sharpies); I'm supposing there's something about this wash which makes it impervious to primer and paints for it to stand out when the model is finished. Thoughts? Thanks all!
-
Wet Sand and Buffing - Need help!
MitchP replied to Didact's topic in Model Building Questions and Answers
Hey gang: The Dawn dissolved (literrally) and I scrubbed everything out with soap and water. I found a big container of that Purple stuff and that's where the parts are now. The old parts body is 75% and the newer one for the build is 80%. Should I keep on soaking another 1-2 days or pull them now? I've picked up a pack of 150, 200, 400, 600, 1000, 2000, 4000, 5000 and 6000 grit sandpapers, so would this be a good time to fight through the remaining enamel and start making some headway? BTW, call me "poor man's" modeller, but I took some of my wife's "arts & crafts" thin wound hemp, painted it silver, let it harden, then measured and cut it into lengths for my original Vega F/C I built this winter. Now both cars have wires and the Nova will get a light fuel line treatment. Boy, it's way easier to detail before installation!!!! -
Much enthusiasm, but no painting experience!
MitchP replied to MitchP's topic in Welcome! Introduce Yourself
Niko: is that a Malibu in your avatar? Those "boxes" LOL are amazing. I've seen quite a few with punched out 350's (406ci?) on NOS that really raise the roof stateside. As a teen in the '70s I had a '66 GTO punched out to 421, turbo 400 and a 12 bolt posi rear with a huge cam for a hyd. Some shop emptied my wallet building it but it was a wolf in sheeps clothing. My folks made me sell it as I was still underaged and a little crazy. Some guys from the Netherlands were stateside shopping for a car to take home for racing and they got mine for $700. I was so sick I couldn't even watch my baby slowly idle away. Now that I'm into models, I just might make a repro with the same paint, box stock looking outside and that beauty of a motor! Kiitos! -
Wet Sand and Buffing - Need help!
MitchP replied to Didact's topic in Model Building Questions and Answers
Cruz: Hey, I changed my mind - can you help me build one like this? (I hope I'm not breaking any rules posting a link here). http://www.automotiveforums.com/vbulletin/showthread.php?t=1050294 -
Much enthusiasm, but no painting experience!
MitchP replied to MitchP's topic in Welcome! Introduce Yourself
Amen to your signature line! Sometimes we as believers can only let our actions speak louder than our words, especially in an unbelieving world. John 3:16. -
Much enthusiasm, but no painting experience!
MitchP replied to MitchP's topic in Welcome! Introduce Yourself
You're right on that one! Cruz is already stepped in as my mentor for my introduction into model painting. I'm on my 2nd body from an AMT '66 Nova Pro Street kit that I've had champagne tastes when I should be having beer expectations LOL! -
Much enthusiasm, but no painting experience!
MitchP replied to MitchP's topic in Welcome! Introduce Yourself
Hi Larry! That Duster in your avatar looks suspiciously like a Vanishing Point car from E-town Q-8?! -
Wet Sand and Buffing - Need help!
MitchP replied to Didact's topic in Model Building Questions and Answers
Cruz: I checked out your link and it's well documented and photograped. I'm hesitant when it comes to the sanding (especially repeatedly) and the polishing as it removes the very thing I'm trying to apply (paint). Like you've said, I have a practice body now that I can use to develop skills on. I'll be checking on the body parts in the Dawn slurry later this morning to see how things are progressing or if I've created some kind of "toxic avenger" in the ooze... -
Wet Sand and Buffing - Need help!
MitchP replied to Didact's topic in Model Building Questions and Answers
Cruz - any idea of how caustic this product is with polystyrene bodies? I ask because I put the body, hood and two-piece hood scoop (only primed and painted flat black) into the slurry and after an hour I started scrubbing. Oddly enough, the hood scoop pieces came completely clean right down to the molded color; however, the body and hood itself didn't budge and inch. As a test after the epic fail with the enamel clear coat over the original enamel gold undercoat, I test sprayed Testors One Coat green laquer to check my spraying techniques. That green has all but completely disappeared; however, I really can't tell if the gold that's left is from the original 3-4 coats after primer or if it's the enamel clear coat I tried over the gold. Is it o.k. to leave the body in the slurry for another hour? I know this has gotten confusing, so I'll go over what I did again: Prepped (washed) and primed body & parts (no sanding, prolly a total of wet primer coats) Mist of gold enamel, then 3 coats wet Dry 12 hours, then mist and 1 wet coat of Testors MM Enamel clear coat 1 wet coat of Testors "One Coat" metallic green laquer I know I really screwed it up badly, but I want to salvage the body and start from scratch with your methodolgy. I'd really hate to buy a 3rd Nova body, hood and scoop... -
Wet Sand and Buffing - Need help!
MitchP replied to Didact's topic in Model Building Questions and Answers
Awesome! This is exactly what I was hoping for! FYI - I picked up the Dawn and will be stripping down to the beginning. Just as a note, 12 hours after shooting over the cheap gold enamel with the enamel clear coat, the surface was tacky. After reading this thread, I knew I was going to tack everything back to the beginning so I shot a quick cover of the "One Coat" Testors green laquer I intend to use as the final cover. I ran some errands for about 1.5 hours and came home to find it bone dry! Of course, since it hadn't been misted, it didn't run; however, it did completely cover the S/S and SuperSport molded text and left obscure lumps. I believe I'll leave the gold undercoat idea for some time in the future when I'm better acquainted with painting, but everything you've told me is EXACTLY what I need to get a great start on the basics. I'm so glad I joined up here. As you can tell from my avatar, I've got the "Shoebox Ford" coming up next and then the Revell Streetburner '55 Pro Mod. That one's gonna be in One Coat Inca Gold!!!! Thanks for the link also. I need a "primer" in sanding LOL! -
Hi: I'm Mitch Peoples from Berryville Va and I've been a lifelong drag racing fan. I built a couple of box stock models pre-teen: T.V. Tommy's FED and the "Tarantula" dragster. After that, I quit building but I sure wish I'd just invested in the 70's and 80's sealed kits based on current values. Instead, I bought cheap muscle cars needing work and made a buck here and there. Now, at 56, disability has robbed me of my mobility, so my wife suggested models. My 1st entry was a rather humbling Jungle Jim Revell Vega but since my eyes have been opened to Ebay miniatures like Vertex mags with wires and resin components, I'm planning to spruce it up a bit. I really hope to upgrade my minimal experience meeting folks here and will one day hopefully have some progress to show for it!
-
Wet Sand and Buffing - Need help!
MitchP replied to Didact's topic in Model Building Questions and Answers
Cruz: This is a great thread. I'm just back into modeling after a 45+ year layoff and only build two originally which required no paint. My 1st return project was a Jungle Jim F/C which turned out amusingly; I am now working on an AMT '66 Nova Street car. This is my 2nd body as I ruined the 1st one. My intentions were good, however So far, I have washed the body parts in soapy water, and applied 1 mist and two wet coats of Tamiya white fine primer. I had a crazy idea that I could apply 3-4 coats of a cheap gold spray enamel after that, then apply a Testors MM Clear Coat to preserve the gold. The final "base coat" was to be a Testors "one coat" metallic green, with the result being a green with a gold "shimmer" just underneath. I would then finish off with several coats of clear on top of that. Hopefully, you haven't choked while laughing up to this point. My understanding now is that if I'm going to use aerosol can paints (that's all I can economically handle right now), I need to stick to laquer for it's quick drying purposes, correct? As for my approach to an underlying gold finish before the green, is there any practical purpose? I also take it that applying a clear coat on the gold enamel was pretty much foolish. I'm going to use your advice and completely strip the body back down with Power Dissolver; can you give me a simple, step by step approach as to starting again with the primer, number of coats, thickness, etc. and proceed up through base coat using Testors "One Coat", then on to any sanding or finishing required prior to the final clear coat? I'm not trying to achieve a competitive level, I'd just hate to keep this foolish experimentation and wasting good model parts!!! BTW, I spent quite some time living in Frederick Md before relocating to Berryville Va. Many Thanks!