MitchP
-
Posts
301 -
Joined
-
Last visited
Content Type
Profiles
Forums
Events
Gallery
Everything posted by MitchP
-

Whats the most you would spend on a model.?
MitchP replied to slusher's topic in General Automotive Talk (Trucks and Cars)
Whatever the wife tells me... -
Whats the most you would spend on a model.?
MitchP replied to slusher's topic in General Automotive Talk (Trucks and Cars)
I reallllyyyy wanted this Revell '93 Baretta V6 twin turbo kit (think it was a '93) that was molded in black and for some reason I think ppl kit bashed it really bad for the chassis/tub/cage and various parts, not necessarily for the build. I thought the engine was pretty sweet myself. It also came in an orange mold and someone (unmentioned, who's Ebay prices for donor parts are way higher than our own resin folks) had it listed for $199 or equivalent. Others were $39 to $59 for black molded kits. It had sweet big rear meats too. -
Perfect for newbies like me, but gets me into more trouble. I was just gonna do minor detail with 2 color AN straight and 90deg fittings and the braided line for fuel and maybe some 'chute or NOS; fire bottles or oil filtering. Now I'm thinking individual lines for blown fuel injectors, 'chute lever line, etc. Will it never end?
-
.020 fuel line and resin fittings?
MitchP replied to MitchP's topic in Car Aftermarket / Resin / 3D Printed
Chris (aka MoonEyes): This is fantastic (so is your sig ), but I could fail a basic math test at age 56. I need to know what is the most popular (accepted) size for braided fuel line only and then get what I need later for fittings. I intend to use Protech for braided line and RBMotion for fittings. For a 1/24 or 1/25 scale Revell model (Shoebox Ford of a Revell '55 Chevy Streetburner top sportsman), what size braided fuel line is the appropriate? I may use a a Ross Gibson blown kit engine in the '55 for some madness, but I hope Protech/RB will have the rest of the necessary plumbing. I have a 1/8th scale Hemi display engine to work off for example. Thanks for all the help; I know you get pinged a lot for info because of your experience. Galations 3:28 NIV -
.020 fuel line and resin fittings?
MitchP replied to MitchP's topic in Car Aftermarket / Resin / 3D Printed
I use a free download called "Jing" which sits on your desktop and will allow you to select items on the screen, capture them, and save them. -
Well, being an ex-racer from the early 2000's, I ran Vortech centrifugal superchargers on my '93 Mustang hatch. I'm familiar with "Turbonetics", but not this early brand. However, the technique is still marketed with moderate success. Instead of standard turbo installs with uppipe, downpipes, etc., all crammed into the engine compartment, newer models mount up into the bottom of the chassis above the rear suspension. You lose some psi potential as the engine exhaust must travel 3/4 the length of the car in order to turn the rotor splines which pump up the returning air psi to the engine input. However, the trade off is the ease of install. I never did an after market install, but upgraded the turbo/fuel/computer and a front mounted intercooler on my stock Suby STI (300/300 at the flywheel) which got me 370/370 on the all-wheel dyno. It definitely went nuts with a 6-speed, although very smoothly. Nice Ford!
-
70.5 Z28 10.5 Outlaw (WIP....Update 7.9.13)
MitchP replied to hOLMS's topic in WIP: Drag Racing Models
Jeff: That's what I love about this site. Those with so much experience and innovation are ready to help those of us amateur to the hobby. Thanks!!! -
.020 fuel line and resin fittings?
MitchP replied to MitchP's topic in Car Aftermarket / Resin / 3D Printed
Jim: I checked your link, but didn't find any references to those beads. Do you have any pics of how they turn out? Thanks. -
.020 fuel line and resin fittings?
MitchP replied to MitchP's topic in Car Aftermarket / Resin / 3D Printed
Dale: these are awesome! I tried the RB website yesterday and got a web 404 error. Must have been a server problem. These are the best so far and exactly what I need for my Shoebox Ford build! -
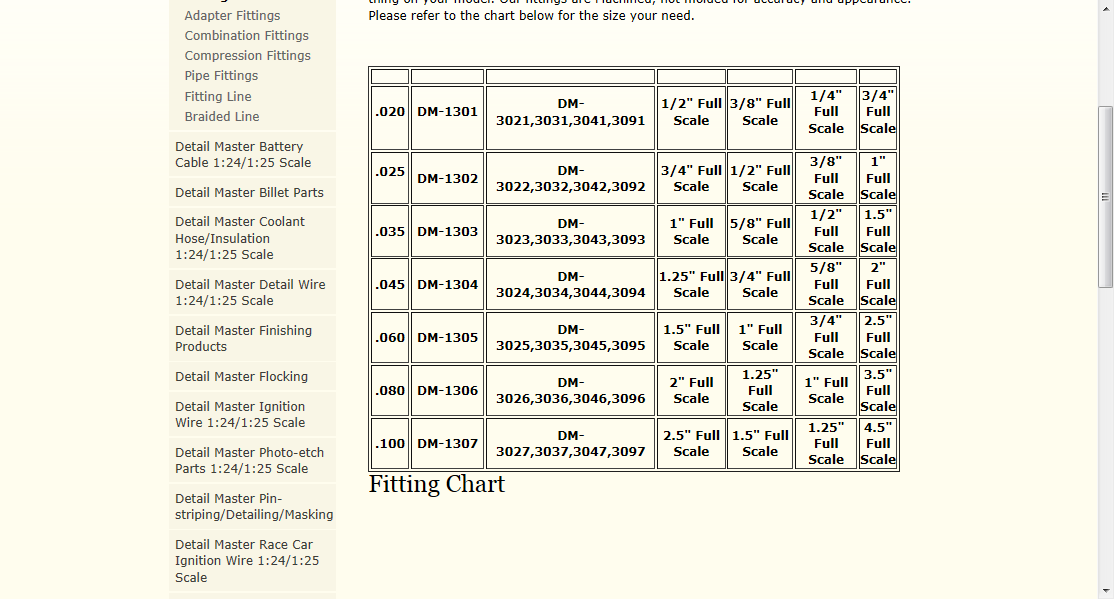
I picked up a pack of 020 fuel line from Detail Masters and they have a diagram on their site, but danged if I can figure out what to buy to make realistic fuel line connectors. I really don't want to have to assemble anything, just find something to what I saw for Tamiya models on Ebay: 3 or 4 different kind of fittings, 90 deg, 45 degree and then a straight fitting. You paint them yourself and it looks like the fuel like just fits inside the fitting; no threads, combination fittings, compression fittings, etc. Here's the auction: http://www.ebay.com/itm/RESIN-A-N-FITTINGS-HOSE-JOINTS-LARGE-40pc-for-TAMIYA/290515384458?_trksid=p2045573.m2042&_trkparms=aid%3D111000%26algo%3DREC.CURRENT%26ao%3D1%26asc%3D27%26meid%3D891821553783189145%26pid%3D100033%26prg%3D1011%26rk%3D1%26rkt%3D4%26sd%3D290515384458%26 Here's the chart from Detail Masters:

-
I too have this one coming as a Christmas present! It'll be a new experience for me as I've fashioned the fuel lines for my WIP Nova from small arts & crafts hemp line painted silver. I then hand painted the red/blue anodized fittings with Testors. Pretty stone-aged, but I could never find a 1/25 scale guide for fuel line and simple fittings. I really don't want to crimp this or that. I messed with the real fuel line when I dragged and I still got scars from putting those together on an injected Mustang! Rumors are the hood decals are a pain and most leave them off. I intend to make them work. I like your paint selection; a friend of mine just shot the car black which isn't original; I got deep burgundy red for the body and intend to research whether or not the wing was black. Depending on the slick size, I may try some wrinkle molded ones I have, but they may be a little small. SMBC (Scale Modeling by Chris) has a beautiful Vega on his site with wrinkle walls that really seem huge. Thanks to Tubbs and ScaleDale for their contributions as this will help me also. I have a Revell Streetburner '55 Chevy in the closet to build next May and I intend to stuff a Ross Gibson blown engine in it like Dragracer says. I just hope I don't have to do any heavy fab work to make it fit as I've only built 1 model and 1 WIP in the last 45 years LOL! Good luck and keep us posted!
-
70.5 Z28 10.5 Outlaw (WIP....Update 7.9.13)
MitchP replied to hOLMS's topic in WIP: Drag Racing Models
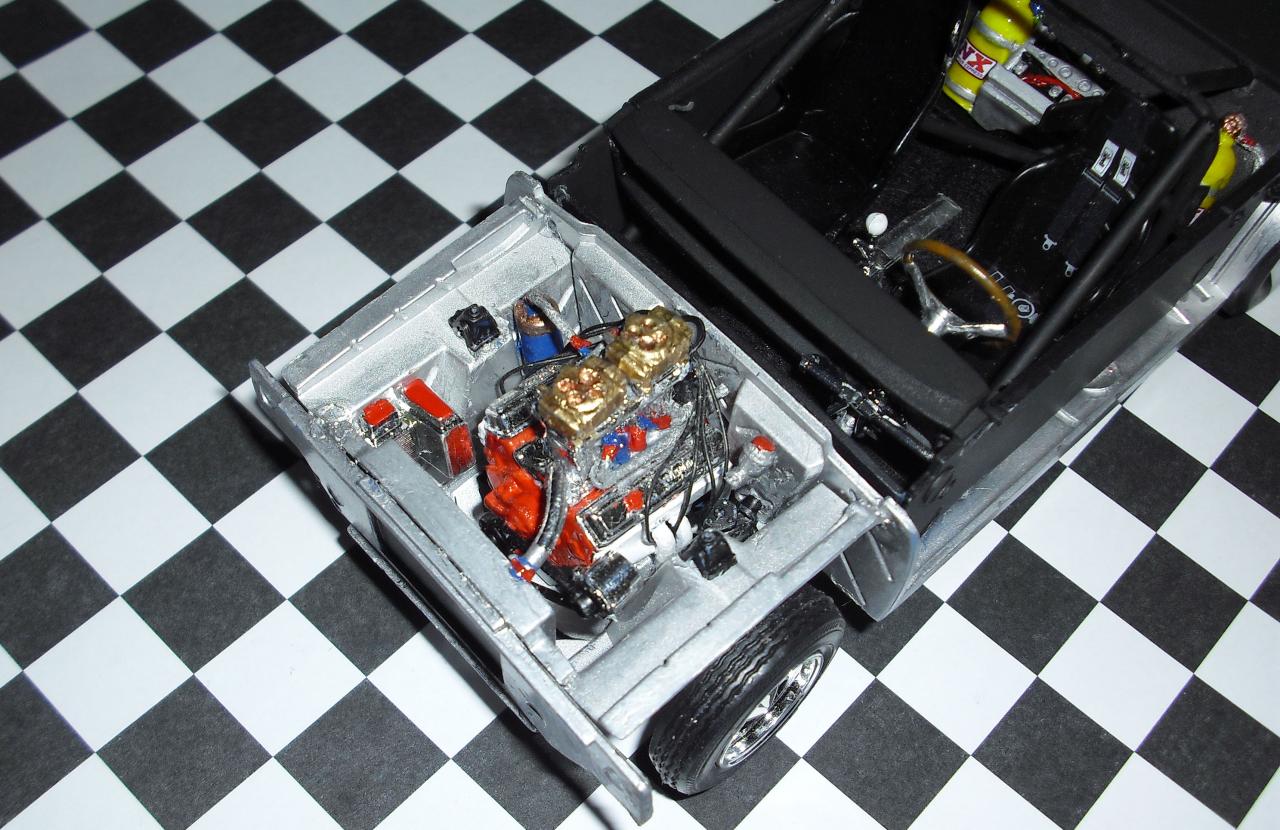
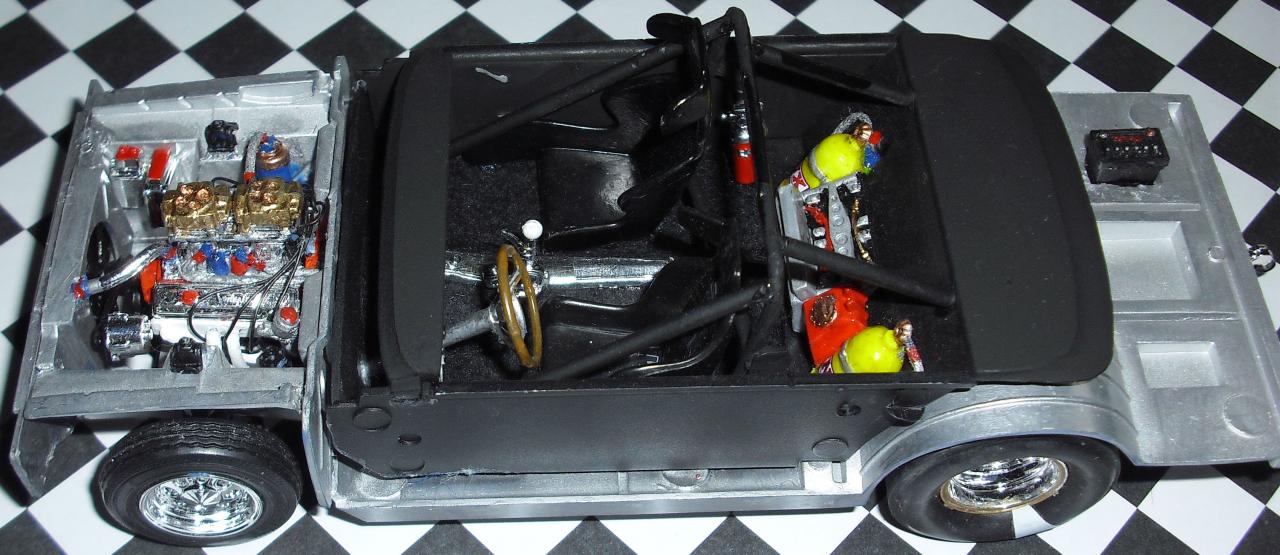
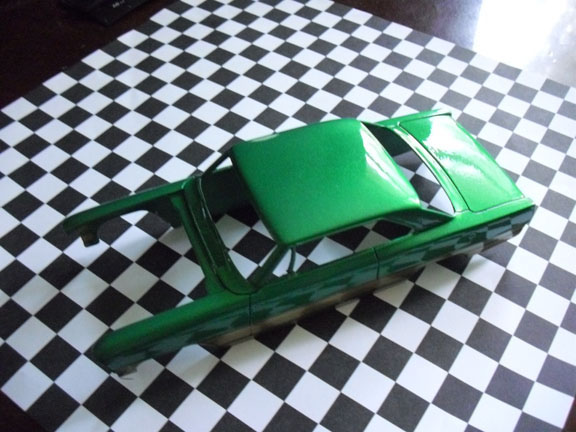
Are you looking for a chassis, cage or both? I've gotten moutain motor/pro mod parts donor kits off Ebay for less than ten bucks! I just got two, one is the chassis, extra parts, cage and a LOT of value from a Revell '55 chevy Streetburner kit, including instructions and decals! Just no motor or body. I bought the engine from the same vendor afterwards for $5! I already have the entire sealed kit to build next year; these parts were just mods for my 1st formal build in 45 years (I'm 56). Why don't you try this method before giving up? I know I'm preaching to the choir as undoubtedly got way more build time than me LOL. Anyway here are some shots of my 1st car (still WIP); please forgive the slight peel on the trunk and the overly zealous use of donor parts in the driver's area. I turned the pneumatic bottles/battery pack from the rear chassis into a dual NOS system; wish I'd known the flat molded piece on the top was a laptop for tuning, I'd have kept it!
-
70.5 Z28 10.5 Outlaw (WIP....Update 7.9.13)
MitchP replied to hOLMS's topic in WIP: Drag Racing Models
Are you looking for a chassis, a roll cage, or both? I just bought a lot from Ebay that just said "mountain motor" but it turns out it was from a '55 Chevy Revell Street Burner and even came with instructions, decals, etc. just missing the body, wing and engine. I think they sold them separately on Ebay for a profit (I bought the engine LOL). Anyway, I've seen this same chassis/roll cage used on a '66 Nova build. I'd recommend buying up a few lots like this for cheap ($8-10) on Ebay and parting it together yourself if you can. Heck, I'm 56, disabled and haven't built a model in 45 years. The upload is failing or I'd show you my WIP which is almost done. Go for it and keep trying!
-
70.5 Z28 10.5 Outlaw (WIP....Update 7.9.13)
MitchP replied to hOLMS's topic in WIP: Drag Racing Models
Jeff: Like a lot of ppl here, your slicks wheels have gathered a LOT of attention. I figured out the slick modification and did it by hand on a pair (check your PM), but the wheels are out of this world! Can you please tell us who you ordered the outside halves from, where you got the rear halves from, etc. unless you have to shoot us! It a fantastic build and the rears make it look so real. I wish there was a way to X-acto and sand a nice wrinkled wall effect, but hey, I don't have that kind of talent or extra slicks! You are getting me motivated in building my own rears, 4 links and even wheelie bars. I have this thread bookmarked for sure. You could put a quick booklet together of pics and tips from this build when complete, make copies at Staples and I'd buy one for $5 Paypal!!! -
Jason: wasn't the last car in a recent MCM insert in the Funny Car review issue? If so, I bought that Inca Gold for my next summer's '55 chevy pro mod build. The '55 is supposed to be NOS, but I'm gonna try to stuff a resin blown engine in there...
-
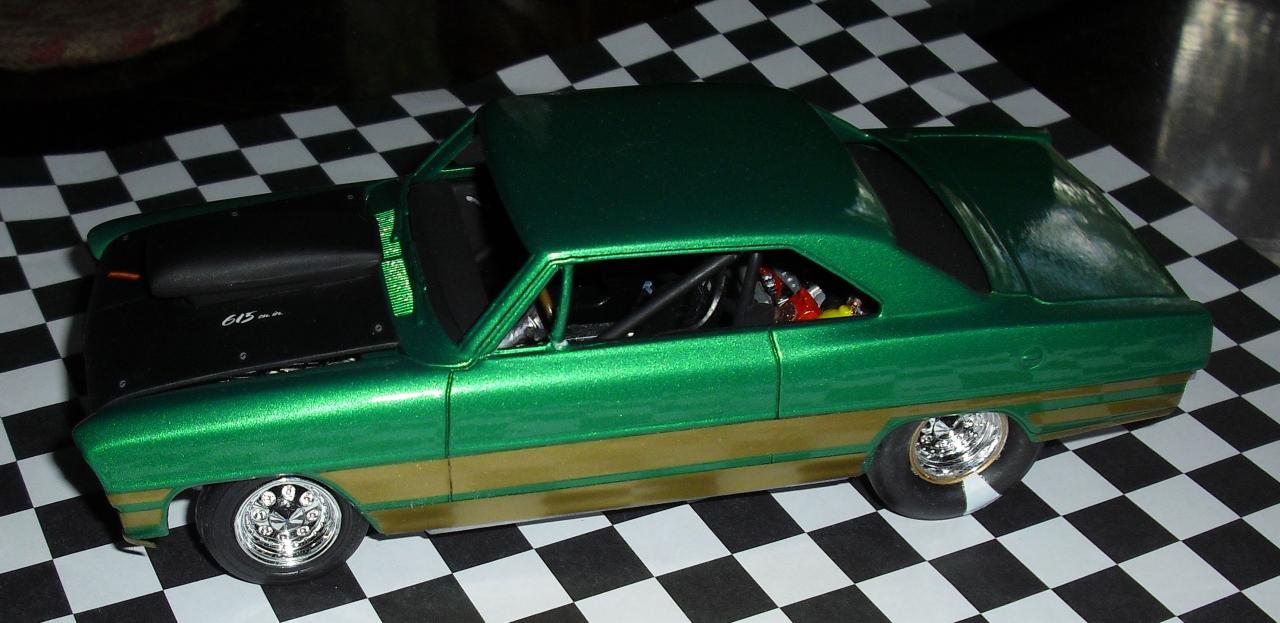
Great responses, especially Ace. I finally figured out how to attach files here. I'm going to send a couple shots which will show the result of my color and clear coats. I used "One Coat" mystic green despite a few amateur peels, it was looking good. I shot 3 clear coats with the can in warm water. On the last coat, I sprayed the clear too close and perhaps too slowly on the driver's door and produced a slight clear foam. Since the striping was already on, the clear got hung up on the striping's top edge and the foam stayed bubbled when it dried. I was too afraid to attempt any sanding or polishing at this point so I let it dry, pulled off the old striping and restriped differently to cover the mistake. I still can't envision sanding on a painted surface. I hope I can figure out how long to wait before sanding out peel from color and then from a cleared car. Luckily I have your help and a spare junk body to work on. I don't get my next project (Shoebox Ford) until Christmas, which will luckily be more of a technical build than a painting nightmare. Lot's of decals So, here's what a 56 year old can do in his 1st try:
-
Castrol and ford dumping Force
MitchP replied to Dragfreak's topic in General Automotive Talk (Trucks and Cars)
I agree, it doesn't really matter. In the 60's and 70's, nitro was ruled by Chrysler 392 and 426, regardless of whether it was Jungle Jim or Dale Pulde. It hasn't gotten any better. John had the bullocks to work towards a true brand specific body/engine combination. One might say since the other side (Shoe) runs Dodge bodies and hemi's, he's being true to tradition but we all know that's not true. Shoe would run a Camaro if he could field 4 cars. The bigger problem is not the sponsors, but having more than 1 car per owner. You can put a Mack truck body on as long as you only run one car. When you're sharing data, sacrificing a losing car to test track conditions to set up a higher ranked car, nobody really wins. I say go back to the days when sponsors shared the bottom of the body and the owner or car's nickname sat high and visible. And make them recognizable. If it kills the sport, then so be it. Personally, I walk the pits during pro stock anyway. Boring... -
Castrol and ford dumping Force
MitchP replied to Dragfreak's topic in General Automotive Talk (Trucks and Cars)
Yeah, it'll be nice to see Shoe running all those so called Dodge bodied floppers. Say, where all the ol Impala's anymore? Tped and Densham drove 'em when nobody else would let 'em have an "also ran" body Now Jim Head would rather drive a Toyota and Wilk has gone to a Ford. All Chevy has are the Nitro Coupes in the Super Chevy Show. And before you brand me blue, I owned a '68 Camaro, a '66 GTO and a 68 Road Runner. If you like one manufacturer too much, you end up getting bailed out by Uncle Sam.. -
After the struggle I went through on JerrysCherrys figuring out how to post pictures, I doubt I'll dive into Photobucket for a while. However, if you're a member there, go to the "help" forum and you finally find a thread from me with thumbnails of 4 shots of my car. If you click on them, you'll see the body, engine, driver's compartment and finally the total build shot. After following directions, I shot 3-4 coats of clear and it was on the last one the clear bubbled from shooting too close, almost like soap after washing your hands. I failed at wet sanding with 12000 as the clear wasn't set. Luckily, the thing causing the problem (pactra gold striping) which hung the clear from slowly dissolving down the side of the driver's door was stripped off and I reapplied a different pattern which covered the mess. I'm hoping for one more shot at a body offered for shipping only and I intend to drop the striping and simply paint it Purlplicious. Either way, for a 2nd build in 45 years I think the end result isn't a total loss. I'm adding coiled wire for NOS and transbrake to the steering wheel in the meantime while I wait for the new body and perhaps SMBC harnesses for both seats. Thanks for all the help and advice!
-
Very beautiful work. If anyone here is ready to try to build something so out of the ordinary as to border on impossible, check this out: Follow this link to the AEM tuning software website, watch the S2000 go 7.99 in the quarter and when the vid is through, you'll get a montage similar to what youtube does. Look for the red '69 Camaro and click on the thumbnail. I have never seen such questionable use of money to achieve an end result with no dyno results, no 1/4 mile numbers, etc. Anyone here want a building challenge??? http://www.aemelectronics.com/motorsports/?p=1237/?utm_source=digitalthrottle&utm_medium=banner&utm_campaign=s2000
-
Sweet Derrick! Now I see what you mean by the homemade scoop. It's actually the blower hat, right? Is the body a resin kit too, or is it Revell?
-
Nova Pro Sportsman WIP 9/08/13 Working on new hood
MitchP replied to outragis's topic in WIP: Drag Racing Models
Love the wheels and the rake of the body. Speaking of hoods, this reminds me of a slot body Sixx did (I think) with a late model camaro but with twin turbos popping out and a huge intercooler. Not that I'd want to take on the actual design and build of an engine to fit this setup, but if you can build like this and shoot such nice paint, you'd be a shoe-in for a turbo monster... -
Thanks! I guess I'll have to deal with the parachute packs somehow. The gold striping tape was used on the back where the 'chutes will go, so I have no problem figuring out where I'd planned to attach them. I was doing well with the clear coating this afternoon until the last coat. Folks have blamed peel on being too far away from the model, so I got 6-8" away; unfortunately on the driver's side I also slightly slowed down the speed of the pass. A bubbling type of foam developed as had happened before with previous clear coats, but this time it didn't resolve. I pulled off the striping (Clear Coat dries within 30 mins.), but there are still places on the front 1/4 panel and the 1st half of the door that have the effect on them. How long should I wait until the clear coat is cured before trying a polishing kit on it? I've heard 5-6 days. Will this kind of kit help polish/remove the imperfections on a clear coat that's had 3 coats on it? Man, I was so dang close on this one. And the rest of the clear is looking pretty good too. Not as good as yours but nice for not having been polished. Any advice would be welcome...
-
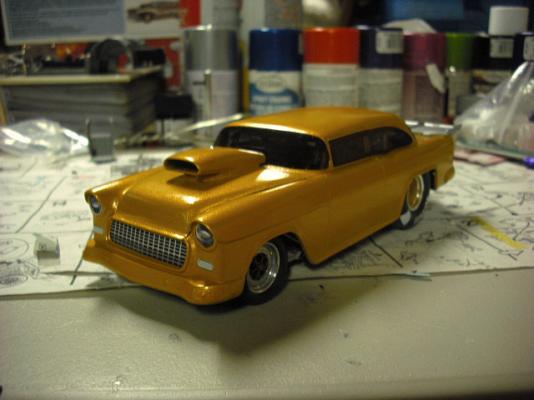
For practicing painting, it's really hard to beat painting a model car body. Spoons have a use for checking whether materials are compatible and what colors will look like, etc, but you just don't learn to paint a car body by painting spoons. Learning how you overlap coats as you rotate the body, and keeping your paint the same distance from the body at the same time, can only be learned by actually doing it. You don't have to have a lot of bodies, either. I have one Mustang body that was short-shotted in the mold, and I painted it over and over for a couple of years before I committed to doing a model I really cared about. If it's a long time between paint jobs, I'll still occasionally paint the thing just to keep in practice...timing and distance are all-important. If you are using enamels, it's no problem to strip it with oven cleaner, and if you're using lacquers, you can just sand it when it's dry, primer over it, and practice shooting your color to your heart's content. This was the first model I painted for real after getting back in the hobby after an almost 40 year lapse. The practice paid off. 5 coats of Testors "One Coat" Flaming Orange, and 3 coats of Testors "Wet Look" clear, not yet sanded or polished in this photo. Bill: I think your finish looks great. I'm so close, I'm making excuses, dull coating the finished flat black hood, even fashioning several NOS selonoids for the engine to pipe into the manifold so I can avoid attempting the 1st shiny clear coat on the finished color. Nervous isn't a strong enough word. This is the 2nd body and the 2nd attempt on it to get a good finish with the One Coat. I too have shot 5 coats with a slight orange peel (due to being too far away from the model me thinks) and one small v-shaped run on the trunk lid rear of this Nova. I have a double 'chute pack that covers the run perfectly though. What's your opinion on these questions? I used Testors decal treatment for the Pactra gold tape I'm using as trim. I'm going to shoot my clear coats over this. What about the resin 'chute packs paint semi-gloss black? should I glue them on with CA 1st before starting clear coats? I'm also assuming any chrome parts such as front/rear bumpers/flat black pro mod wing should stay off until all clear coats are done also. Should I sand or file any of the coats off where the adhesive will be applied for the finishing parts and the clear windows? Since you say enamels can be sanded, I'll be practicing on my old body with them. What about the less expensive acrylic kits with multiple spray pattern tops and aerosol cans? I've found one for $30 which contains some small paint samples 4 spray heads and the aerosol can. It seems like a good way to get into a water based paint system which would be much easier to remove in case of mistakes. Just wondering why everyone seems to chose enamel/lacquers. Sorry for the novel, but your use of the same paint as me with such good results really gives me a lot to ask. Thanks!
-
Wow! SIXX was turning me on to a blower/hat combo with that raked look all the blown pro-mods are going for, but this looks SOOOOO much like Annette "Pink" Summers' 'Vette that runs 6's at 240+ during the annual Orlando Fastest Street Car shootout it's crazy. I'm so new at this but unafraid to try anything. I've seen resin turbos for 1/25 scale and the cooler box looks pretty simple to construct. I wonder if this would also be an option for my Revell '55 Chevy Streetburner top sportsman build I'm eyeing for next spring. So many decisions...