MitchP
-
Posts
301 -
Joined
-
Last visited
Content Type
Profiles
Forums
Events
Gallery
Everything posted by MitchP
-

'86 Iaconio Motorcraft/Budweiser P/S build
MitchP replied to MitchP's topic in WIP: Drag Racing Models
Thanks for the positive feedback guys! It's a really good outlet though when you can't get around much anymore! I was going to tone it done quite a bit until: a) I saw the Pro Tech build gallery with their 1/25 and 1/16 blown engine builds which showed me every fuel line doesn't have to be braided, I realized how much creativity you can come up with using Evergreen styrene to keep from buying every fuel block needed and c) I finally found Pro Tech's instructions on how to wire up one of their fittings! Now I just opened up the HOT ROD (Kallita re-release) MPC flopper and I'm thinking of trying a few of these blower details before I get to my Candies & Hughes and re-issue Chi Town Huster waiting in the wings. You can tell I'm a drag fan. If any of you have been on Pro Tech's website, you may have seen the automotive gallery there. It has "Pro Tech" builds as well as private builds. Lots of good stuff! -
Testor's One Coat post mortem
MitchP replied to MitchP's topic in Model Building Questions and Answers
Ace has a great write-up and step by step. This is where amatuers like me get caught in the crossfire. I'm sure many of you know Marco from here who has had write-ups in MCM for his awesome work. He and I went through this product at length and I have to point out a couple of things to be fair to everyone who's posted. Everyone has opinions based on their experience with products; this experiece may be affected by their fastidious nature of work, their ability to afford different scales of equipment, etc. Marco is a stickler for mist coats, and has his own perfected methods of painting techniques which I have tried and have finally had some success with. I say that because having never painted before, I had 98-99% success in 2 different paint scenarios before I screwed it up, no Marco's instructions. Also, warming cans is good. However, I've been advised elsewhere that holding the can further back only promotes the propellent as paint and the true mixture remaining stuck at the bottom. So you see, everyone has a bellybutton, to put it nicely LOL. The best advice I have gotten is from Donn Yost, who gave me a spec sheet of items to set up a starters airbrush kit and told me to practice on glue bombs, sand, prime, shoot, sand, prime, shoot, etc. until I was comfortable. And to get his CDs LOL... -
'86 Iaconio Motorcraft/Budweiser P/S build
MitchP replied to MitchP's topic in WIP: Drag Racing Models
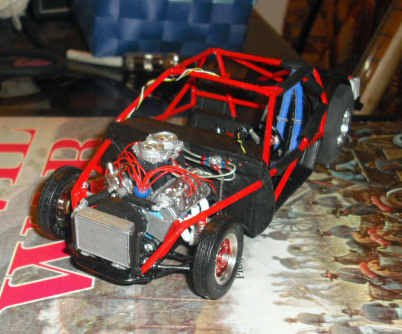
Latest set of pics - I shoulda waited until I test fit the primered body to add one more as the profile is astounding, but... Here's all the detail it will ever see. I added alternator wires, cut some rubber tubing to fit over the coolant lines, cut and sanded the slicks for 1:1, added the headers and got the rear in and touched up all the goobers. It has a fire extinguisher too. I don't think I'll go for this level of my interpretation of detail again for a while as it wiped me out and there are folks out there putting resin blower cogs and real belt material on their builds! I have a 1/8th pre-built collector's Hemi and it floors me how much MORE detail I missed: throttle linkage, springs, etc. LOLOLOL! Enjoy and have a chuckle at a rookie climbing the ladder 2 up, 1 down...
-
technical questions about T.F. dragster engines
MitchP replied to fiatboy's topic in WIP: Drag Racing Models
Hi: I can pretty much gather some good photo info to build a nitro fuel system for my HOT ROD Mustang (a.k.a. Kalitta incognito), however, I've seen some pretty nice builds with the above kind of single and twin MSD mags (distributors?). Does anyone here know where I can buy these, complete or resin build-ups? I've just burned myself out on a Iaconia P/S build with all the details I added. I just want to make a clean build out of this flopper with a few mods: an MSD box, the mags, fuel cell/pump/rear hat block and the hard alum wires to feed the injectors. Thanks and any further help or corrections in my plans are welcome! -
'86 Iaconio Motorcraft/Budweiser P/S build
MitchP replied to MitchP's topic in WIP: Drag Racing Models
Hey folks - things are running a little slow right now; I've got the rear end/wheelie bar piece assembled and it's a pretty cheaply molded piece overall. I'm trying to justify waiting and saving up some money for some of Scott's pieces from futurattraction like a 9" Ford rear and 4 link, I just don't know if they are period correct pieces in combination. I am having fun with some of Rob's spark plug fittings from RB Motion. The 429 Boss heads (Kaase?) in the kit have valve covers with built-in pins resembling spark plug heads. It takes a little time using .018 line and these tiny black rubber fittings, but the end result is really nice looking. More pictures to come when the headers are attached, the rear is in and the wheels are on! -
'86 Iaconio Motorcraft/Budweiser P/S build
MitchP replied to MitchP's topic in WIP: Drag Racing Models
I'm looking forward to "Ohana" my friends. Scott, yes, they are Rob's pre-colored annodized fittings. Pricey though albeit very realistic. My problem has been that the recommendations on his site: A/N Straight Fitting 2pc design Hex Width 0.79mm (.031") is stated to fit a .025 braided steel line. I couldn't get the line to fit in the red bore open end and so ended up using CA glue which produced less that perfect results. IMO, I think you need to order the next size up to have the .025 line fit comfortably: A/N Straight Fitting 2pc design Hex Width 0.96mm (.038"). I just got another order from Teds and test fitted his .038 I.D and .041 I.D. fittings and they work perfectly for me. There are migitatigating factors, Scott. Being disabled, I tend to tremble a bit with my hands and steadiness isn't all that good. As for the standard finish ones, they're less expensive (Yaaah!). I haven't tried this yes, but I bought Tamiya acrylic "turn signal red & blue" translucent paint. I'm going to try straight paint and then using a flat alum (testors) and then the Tamiya. I've been VERY pleased using these paints to touch up Rob's red/blue AN fittings so I'm positive I'll have good results. If you can wait a couple of hours, I'll post here or PM you with your answers. Sharpies are great for springs on coil-overs too! Peace bro! -
'86 Iaconio Motorcraft/Budweiser P/S build
MitchP replied to MitchP's topic in WIP: Drag Racing Models
C'mon Richard, you know we're are own worst critics. So what's "Ohana" stand for bro??? -
'86 Iaconio Motorcraft/Budweiser P/S build
MitchP replied to MitchP's topic in WIP: Drag Racing Models
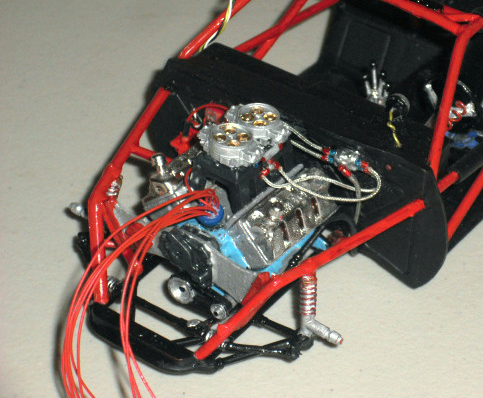
Goatguy: I owned a '66 Goat in H.S., circa 1975. Is that what you mean by your nickname? Steve - thanks man. I've been hooked on pro mods from the early days of the Soff Seal '57, the Shoebox Ford, etc. and now I'm trying some other classes. So what does Ohana stand for? Anyway, I need some feedback guys. My only other two builds came recently; 40 years after childhood attempts at T.V. Tommy Ivo's original FED, and I used craft hemp painted to look like fuel line LOL! This time I decided to really try 1:1 and like I said, it seemed too much aggravation. Well, I already had $50 invested in Robs AN fittings and decided to push on. So, here are the pics of what I just finished as I couldn't sleep. Please tell me if I should continue to pursue this level of detailing; I mean if it looks really bad, don't be shy. I'm not in it to compete or show of here on the board. I'm just really intrigued by detailing. For anyone else here who works with these fittings and line, do you just use Robs .056 fitting (fits .041 line) so you have extra room for an .035 braided fuel line? I figure most of my future pro mod builds will be .035 braided line from the cell to the distribution block, then .025 to the carbs. Not sure about my Chi-Town reissue or my Candies & Hughes. I may just use aluminum or rubber line and still buy bigger fittings. I can't believe everyone else uses CA glue like I had to?! Well enjoy and critique!!!
-
'86 Iaconio Motorcraft/Budweiser P/S build
MitchP replied to MitchP's topic in WIP: Drag Racing Models
Thanks guys. The carbs have been torn down and rebuilt, which is what you are seeing now, unfortunately. I had RB Motion pre-annodized Red and Blue fittings super glued into 1:1 locations, but trying to work with .025 wire and that resin Pro Tech fuel block was just too much for my hands. I'm 56 and on pain meds for a disabiling disc disease. I've seen styrene used like this to establish a common line between the carbs, then you can either fabricate your own slightly larger fittings (Tamiya makes a GREAT red/blue transparent paint that you use over flat alum.) out of styrene and CA glue the braided lines to them. You can also use Ted's alum wire or rubber line if you want. Whatever you try, the key is to carefully cross reference Ted's alum or rubber line recommendations for RB Motions fittings if you decide to use them. Braided line vs. the other two options requires different RB fittings since the I.D. of the fittings don't match up exactly with the O.D. of aluminum wire or rubber line! But heck, after all, that's the fun in this hobby. You can go box-stock, semi-detailed or insane like some. I am SO new to the game I just hope my compromises don't look dumb! -
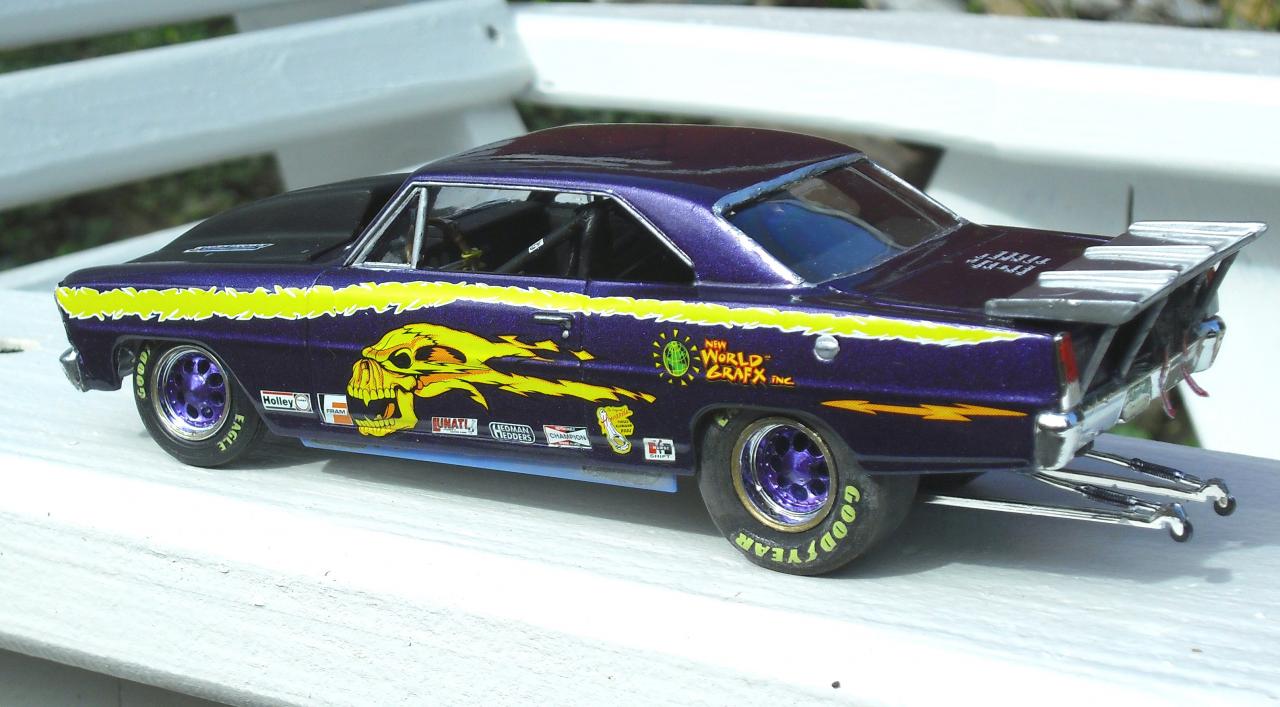
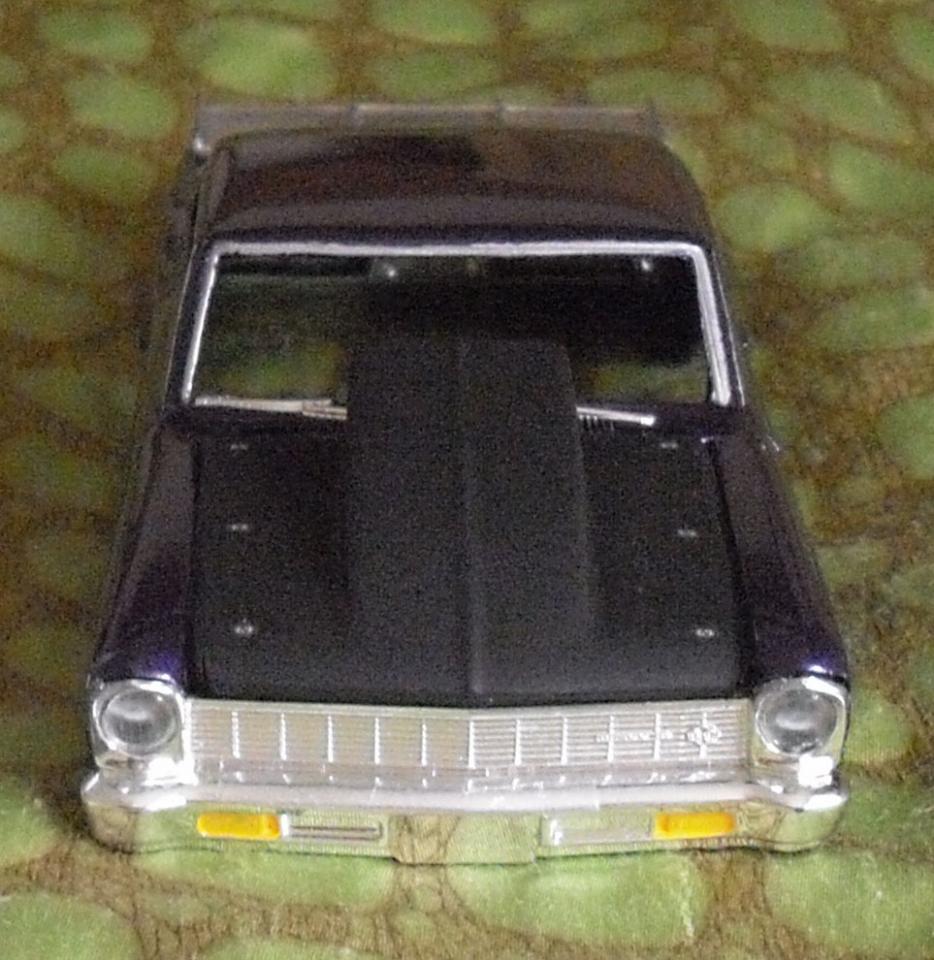
Hey folks: For those of you who've maybe seen my long winded thread of my AMT '66 Purple Nova Street Rod turned pro: I've finally finished and now started an '86 Iaconio P/S by Monogram. Enjoy my 2nd build and please add cricitism where necessary. Thanks!
-
Gonna go outside if the weather improves here in VA and finally take pics of the completed build. After looking at Tyrones work this morning and some others I've been following, I'm almost ashamed. Yea, it's my 1st in almost 45 years, but it leaves a lot to be desired. The BMF on the rear window is coming off and a Sharpie is going on before anything! I'm on another project now, an '86 Monogram Glidden Motorcraft p/s. It's going to be MUCH better and to the point, a true drag car and not a muscle car gone mad. I'll post some pics of the box, body in primer and my progress so far with the stock chassis build and some simple wiring upgrades for the MSD 6AL and the line-loc. Real fuel lines and fittings this time, along with fuel block, MSD coil box and M.A.D. detailed distributor!
-
Nice going James! Your work is progressing well. Yes, the transbrake came out super. A dremel, a piece of donor styrene and some twisted wires do the trick! If my tach is dash mounted, I do the same with the wire, unless it has a shift lite, then I look for lifesize pics or try to remember how I wired mine on my Mustang! It's all relative in the eye of the beholder. Right now I'm working on an '86 Glidden p/s and I spent time detailing the MSD 6AL, wiring it, getting the wires through the firewall, wiring the tach & line-loc and I'm finding out the front of the dash with the gauges covers up most of my work, decals, etc.! I'll make it up though as this is the 1st build (and only my 2nd real adult build) that will use real stainless line for fuel and carb fittings. Keep up the good work. And when you want to get some motivation, look at Tyrone's 1990 LX Mustang Coupe!
-
I know economics can make you give up something you love and put a lot of time into; I've had to dump a Les Paul guitar, a Kiss/Epiphone replica, tons of effects pedals, at least 3 amps, a 370/370 tq/hp (at the wheels) STI and more stuff than I can recall when I was diagnosed with degenerative disc disease. As a family we learned real quick mac & cheese and shake & bake was pretty darn good foor a meal with a salad. And in a way it was healthier than that: no more Mickey D's or Burger King where all the controvery is now happening. I hope they get the ride back together and can hit some of the NHRA/IHRA events for show & go's. Everything nowadays is 10K hp wedges trying to get into the 3's. I prefer pro mod and nostalgia now.
-
I've learned a lot from this build and I'm ready to finally clear it (the body LOL), put it together and let it go. I've been so hard on myself after seeing yours I've added decals, etc.; now it's nothing like it was originally intended to be - fun. It's time to move on the the T-bird with some fresh ideas work on technique of a clean build, not necessarily all fancy and detailed. Peace bro!
-
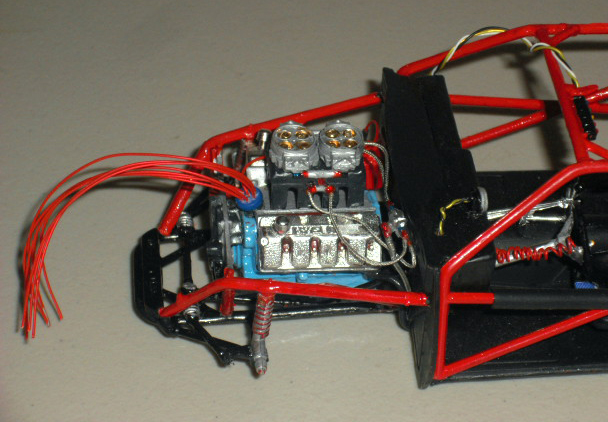
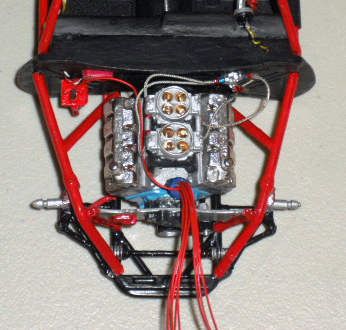
great ideas Aaron. Every little thing helps an amateur like me come a step closer to getting "similar" results with less cost. I like Ron from RB Motion, but I haven't tried any fitment yet with Teds braided wire. I want detail, but not at a cash strapping cost. My 1st two builds came from silver painted hobby twine (.025) for fuel line and I painted the fittings red/blue LOL! I haven't looked at DM's offererings yet, but it sounds like you just buy an entire combo fitting (the red/blue part), then prep if resin, cut and manuver however you need with solder or wire. I dig it. I can never go as detailed as you are with the P.E. rear brake parts, etc., but that's not my goal. I'm really just doing this for my own enjoyment and not for contests, but work like yours is like looking at a Nat'l Geographic. It's a work of beauty by blessed hands. Keep building bro. You inspire the rest of us! Don't laugh, but here's some pics of my 2nd build engine build with some additional detailing attempts, I don't know why, but even Photoshop can't compensate for my crummy Casio camera. I pray for a tax return of some kind.... Thanks for looking, Aaron!
-
How true. I checked my kit (snuck into the closet LOL) and it clearly states 2013 on the manufacturer/rights info. I'm hoping it's o.k. I looked at the picks and it shows only a burgundy red as the base color, which is why I got Model Masters in a can. No decals back there for a black wing either. I've seen people paint the entire car black with nice results. Gotta remember, the car on the box has been "professionally built" to suit their advertising needs.
-
Thanks Rich. I remember seeing Rick & Debbie's car on Ebay - people are charging and arm & a leg or parting it out for insane prices to get more than the kit would bring as a whole. Very sad...
-
May I also ask you the source of your fuel fittings? I use RB Motion preassembled blue/red, but they don't come in 45 degrees; only straight and 90 degrees.
-
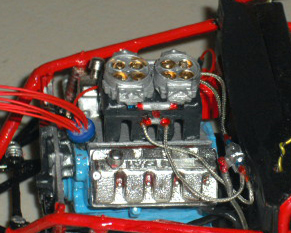
Holy moly! Do you use 1:1 research for the fuel line plumbing? I have a 1/12 preassembled model of a 426 hemi I use for reference, but it looks a little lacking compared to yours. The shine of the blower hat (chrome paint?), belt guide bolts over the top cogged pulley are so detailed. Bravo!
-
I wish I could determine which year mine is but my wife has it stashed away for a Christmas gift. I'll try to sneak a peak at the production year, etc and compare it with yours! Money is tight for us and a model kit with recommended paints is a big treat. My stocking stuffers are like wire, x-acto blades, braided line and decal sheets!
-
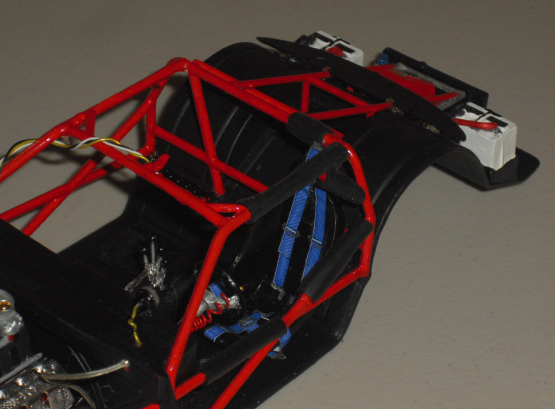
James: wow... I'm was really geeking on your build (I still am, really nice) but those front support rails/upper shock mounting frame rails are bumming me out. I can't believe this is what I have awaiting me this winter when I start my build. Luckily, my hobby shop has lots of Evergreen styrene rod, hollow tubing and just about any size and shape of plastic for model building. I'll take the rails with me to the store and pick up a bag of a couple extra hollow tubes for fabricating in case of problems. In spite of the body style, lot's of top sportsman cars from this era used BBC motors (except maybe Ronnie Sox). I'm just starting up an 86 vintage Glidden/Motorcraft pro stock and it's got a 429 engine that's a beauty with the distributor on the front. My Shoebox was bought this year so I don't seen how it could be on a list for reissue already?! Anyway I like your detailing and I'm looking forward to my build.
-
Wow, that name Dobbertin rings a bell. I agree; unless he's afraid of tuning issues anyone capable building AND obtaining help on creating such a Frankenstein should have enough faith to open it up or at least make some easy passes with it.
-
what would be best for plug wires?
MitchP replied to dale's topic in Model Building Questions and Answers
A little stale on this topic, but my brain was wandering still waiting for SLIXX mini-sheets ordered a month or more ago... While I like the idea of spark plugs and I even see where the hollow section of a hypo would assist in the oil dipstick, I don't know and don't care to know where to get "sharps" from. I was in my hobby store the other day looking at the styrene rack and they had plastic rods even smaller than this diameter and increasing. Since the spark plug wouldn't be showing, my solution would be use a small dremel to open up a spark plug hole and glue same size rod pieces as the hypo above. Then, using the smallest appropriate diameter black shrink wrap you can find, mate up the plug wire with the rod end as it exits the head hole. Use a hair dryer and presto! Instant plug insulator and connector to the plug wire. Me thinks this might also give a very 1:1 lifelike effect. For enines like my Glidden '86 prostock t-bird, the huge heads already have a small hollow plug-like tube molded coming out of the head. A little more tenuous, but same technique. There's gotta be a lot more uses for that shrink wrap the pro's know that I haven't even thought of, like padding appearance for roll cages (just make a cut down the sleeve to fit around the bar's length and turn it downwards so it can't be readily seen). Can you tell I'm burned out from working on my current AMT '66 Nova project? Technically my 1st build, I dumped so much hand-made and donor detail into it and left the body for last. Being my first shoot and using rattle cans, it took 4 bodies to get a good job. And yes, I know about the purple pond. It just never took the paint off fast or well enough. Lessons learned are like bridges burned I hope! -
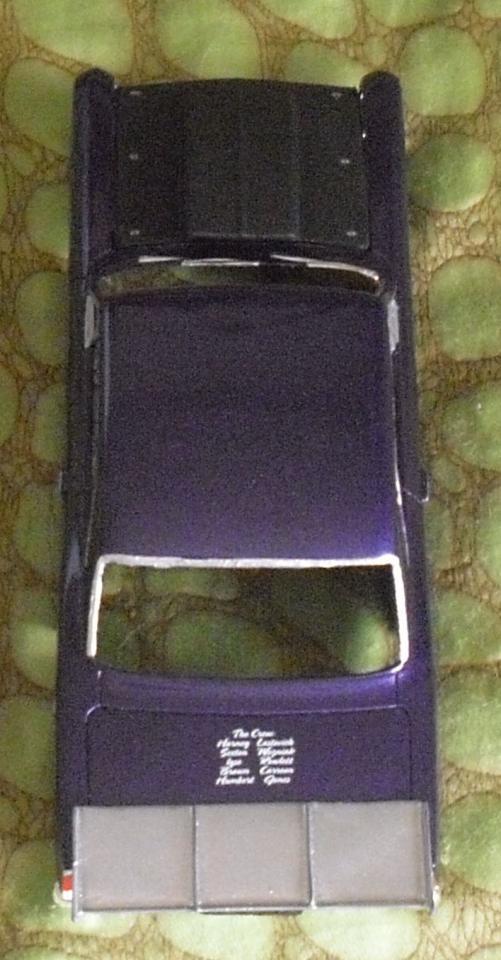
Here's a couple more pics which show the closing details. The wing bums me out as I didn't line it up very well. I do like the way the headlight decals turned out behind the clear plastic and I added some more BMF to the rear window opening on the bottom to fill it out.
-
Bill - we've got both a Hobby Lobby and Michaels nearby; The Model Car Garage searches for harness latchings come up empty. I might check out Teds or SMBC. Thanks!