MitchP
-
Posts
301 -
Joined
-
Last visited
Content Type
Profiles
Forums
Events
Gallery
Everything posted by MitchP
-
Sounds great Billy! Personally, I like your fittings. Man, like I said the cost of even the uncolored straight and 90 deg fittings aren't cheap. I carefully opened my engine to examine the parts and the castings looked pretty good. The uneveness is true; looking more closely at yours I think my 2 piece blower top is a Gibson product as well, just broken out from a kit perhaps. Even using a sanding file on both blower and hat, I still did a poor job of making the two pieces fit flat. No pinholes luckily. I've never tried striping or two colors and I'm only a shaker can painter right now. I expect you spray, so I'm curious as to what tape and taping/painting procedure you use? The best tape I've seen so far is the Tamiya type in the dispenser similar to desk tape. I have some that's 1/4" I use when mocking up engine to frame fittings. It's like painters tan tape but much thinner and flexible. Many thanks for your answers and advise!
-
Looks like a great start Brett. Makes sense that a larger scale would allow for easier working room when it comes to detail. What do you mean when you refer to metallisers? It looks like some nice Tamiya colors there, maybe gunmetal or aluminum. Are the valve covers chromed from the kit or something else? I see you used metal lines for the injector fuel plumbing; is this part of the improved detail that comes with 1/16 kits? Is that the same with the dry sump and any throttle linkage parts? I did the same type of fuel lines for my HOT ROD 1/25 Mustang (awaiting paint). I think it looks better than the run of the mill stainless steel or rubber lines. I promised myself I wouldn't buy any more kits since I've got half a dozen or more unopened ones, but your build or the Jungle Jim larger scale really look like great projects (and much easler to detail)! I've also seen some pre-built parts like MSD mags available only to 1/16th scale as well. Rock on Brett!
-
Looks great Billy! How did you like the Ross Gibson engine? I've got the Sonny Leonard pro mod I'm going to stuff into the Revell LAPD kit sometime in the future. I'm not attempting frame builds yet, just practicing my work with braided line and fittings to get a nice, clean finish. It kinda looks like you may have used beads or cut sections of hollow styrene for your fittings. I've spent too much already on RB and Pro Tech fittings (plain finish) and painting them with Tamiya clear acrylic red/blue paint. It looks good, but the costs to fit an entire engine for fuel and dry sump is getting too much for me. Despite some pretty good instructions on the Pro Tech site, I generally buy my fittings at least a size or two larger than what's recommended for the line used so I don't have to strip away the braid, etc. I'd rather let the CA/accelerator do the work for me in holding a slightly smaller line in the fitting. Anyway, nice work and if you discovered any tips or things to look out for with the RG engine, can you pls respond? I've used the Kobelco blower and 3 hole hat on a standard 1/25 plastic engine build and it was o.k. Tks.
-
BTW: Brett, you and Tyrone are my go to guys when it comes to looking or asking for tips. No disrespect to anyone else here, but the quality and patience expressed in your builds is amazing!
-

wiring diagrams for a Pro Stock car
MitchP replied to John Pol's topic in Model Building Questions and Answers
Nice work, Jedimark! Looks like someone has a Glidded or maybe an Iaconia P/S they're going for killer detail on. Hope it's 1/16th scale. My 2nd (1st real "crazy" detail) model was the Iaconia and I had no real idea how to plumb or wire it. I just did a simple dual battery wiring with the starter, tach and MSD box and of course the ignition. It may have fooled someone at a hobby store model show, but no one with real experience. The fuel lines were .025 braided line and I just guessed based on internet searches. Man, they were a pain to work with. I used RB Motion fittings and painted them myself with Tamiya clear red/blue paint. I've since learned to use toothpicks for CA and one of those little bulb suction syringes for the accelerator liquid exclusively -
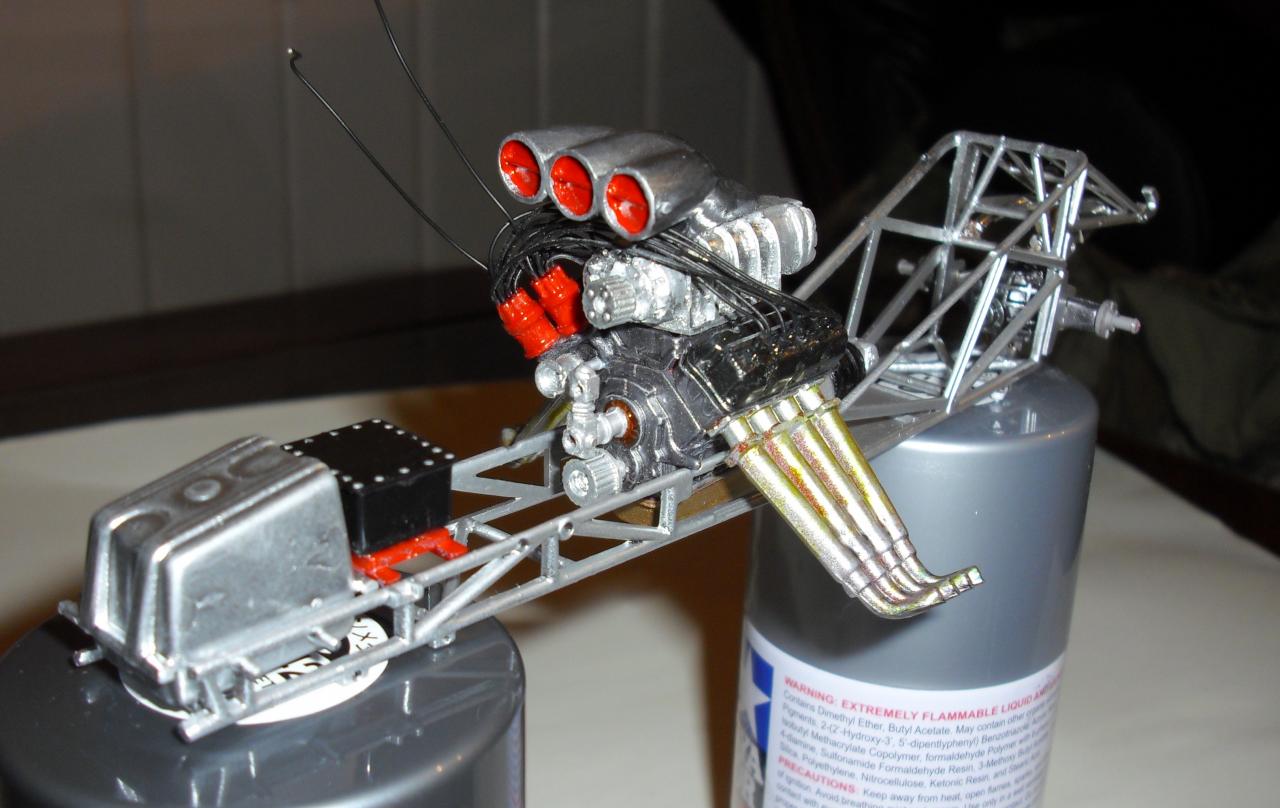
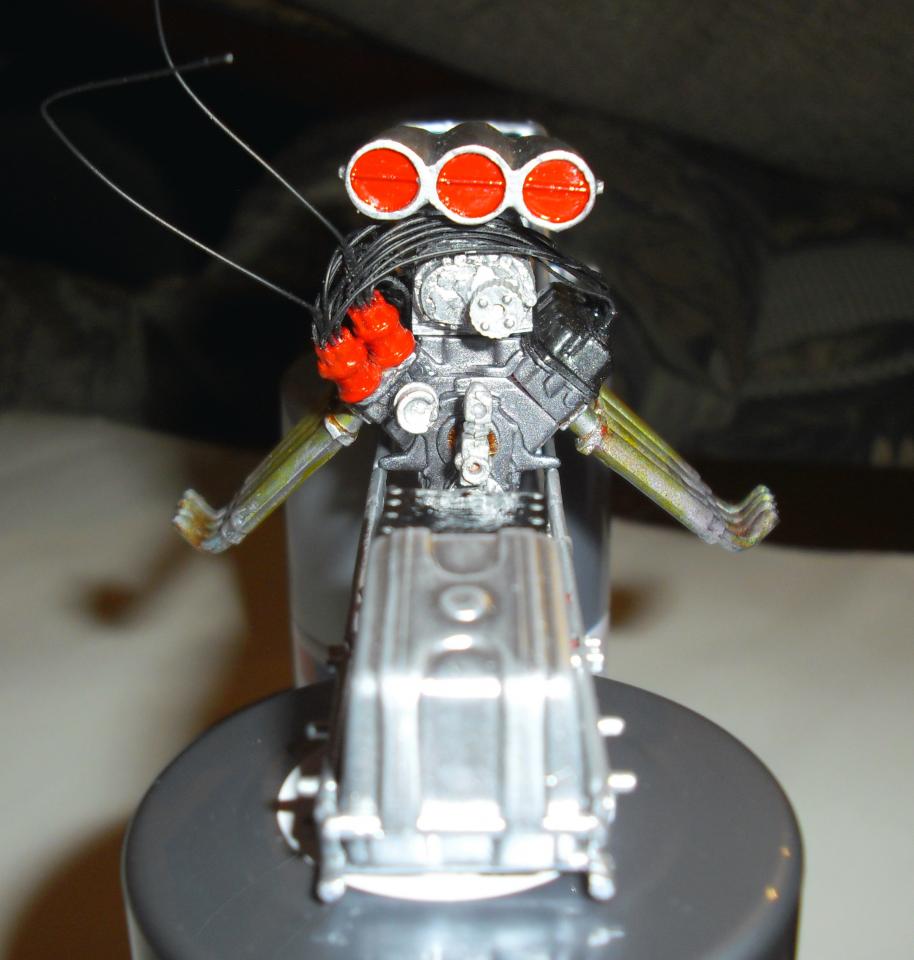
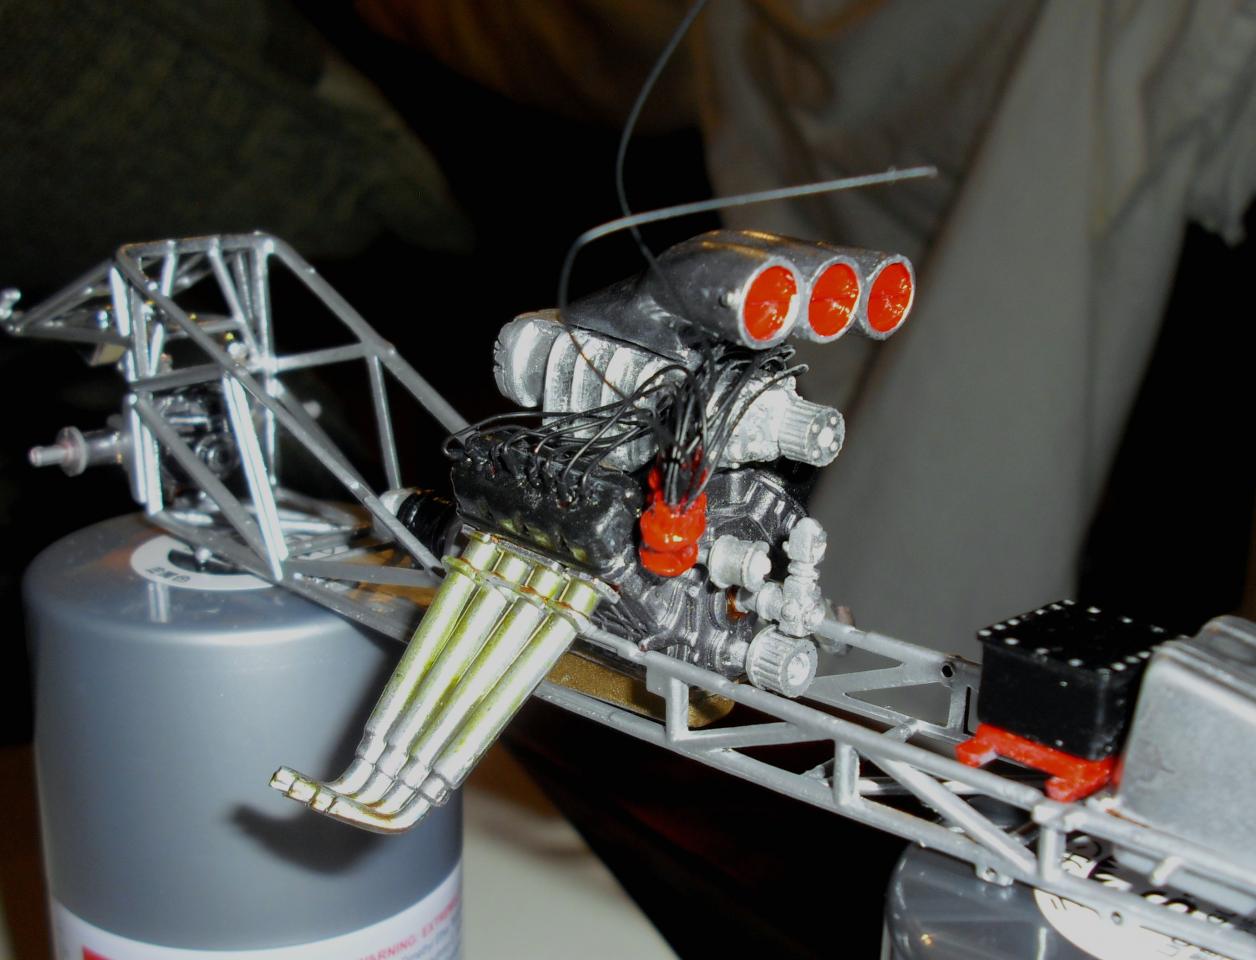
Thanks al! It means a lot to share with other hobbyists. I've learned one major lesson - I get caught up in the engine/chassis and neglect the body because I'm a paranoid painter! My wife said I should work on my detailing skills and then auction the unfinished kit on Ebay to someone with finishing skills!!! I need all the advice and direction I can get. I've been thinking I'm trying for too much detail and not enough quality. That blower hat came from Ross Gibson I'm pretty sure and yes, the wires should go under the top pulley and behind the fuel pump/belt. It was crazy enough wiring a twin plug per cyl! It's going in a McEwen Revell '57 stretched funny car and I'm dropping the electrical box out of the setup which mounts to the frame rails behind the fuel cell. There's a really nice pre-molded twin oil filter setup and I'm using the extra space for room to work and not get sloppy. I've prepared 2 MSD 6AL boxes, one for each mag, to mount on the frame. The only major mod left is figuring out how much of the inner tinwork to remove so that the back of the blower hat fits when you close the body. I won't post every little pic - the next update will be with the drive train installed, fuel and oil plumbing and wheels. I've got the stock Cragar holed rims, a couple sets of Glidden rims and some Shoebox Ford type rear rims along with P/E beadlocks for the rear. I've also got those modern F/C Pegasus rims for the front, although I might be holding them out for the LAPD build that's getting a full Sonny Leonard P/M engine. Any recommendations or favorite ideas for the wheels?
-
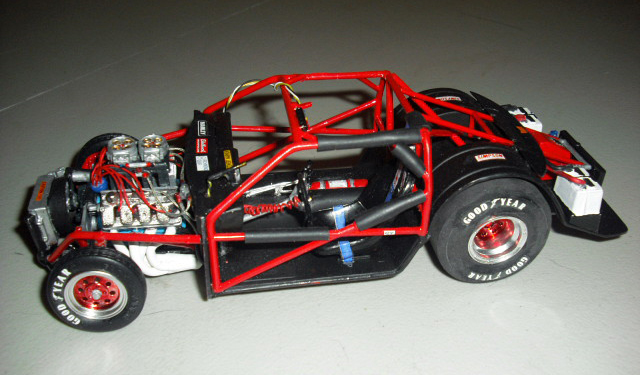
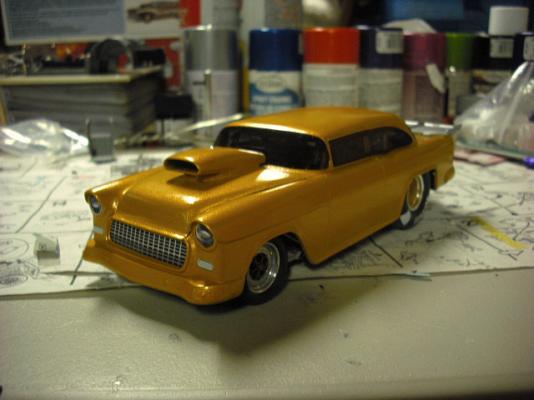
Hey folks! I've only been on here now and then, mostly learning and posting a few pics of my first builds, which are (still) unpainted due to bad weather and waiting for one of those $80 vacuum paint booths. Here's a pic of my 1st detailed build, an Iaconia pro stock: which makes four kits backed up for painting! The other 3 are basically one color jobs anyway. I'm nowhere near the level of Brett, Chris, Jeff or some other friends I've made here trying to learn from, but I'm trying to practice mixing styrene and resin parts along with detail on items like this 426 Hemi. With dual mags and twin plugs per cyl, It's hard for these tired old hands to work, especially with pain meds for my back. And camera upgrade money goes for parts LOL. Any, this engine will have a rubber cogged belt, fuel pump with rubber hoses and a mix of RB and Pro Tech fittings, some PE parts for the homemade barrel valve and fuel dist block. The blower is a Kobelco from Ted's and casting is good. I may sneak in some braided line or soft alum from the dist block to the injectors. The paints are all Tamiya spray metal variations which I really like. As you can tell, acrylics can tend to flake off (injector butterflies) before you're completely done with the painting. The finer touches are Tamiya acrylic and the attempt to create the heat tarnished on the headers is clear yellow, red and blue. I'd be interested in what you think of the header appearance and the engine in general. I know there's a long way to go, but I've got as many models as it takes to improve from flea markets!

-
Rambunctious - Funny Car - FINISHED PICS!
MitchP replied to geetee66's topic in WIP: Drag Racing Models
Thank you my friend for that clear and concise information. I have a lot of practicing to do but I can see from your efforts it's well worth it! I don't want to over use the effect on the headers, but it's great knowledge to have for future reference when the exhaust is a major viewing point, like the Chi-Town Hustler reissue. I'm currenty de-chroming the blower, hat, intake and valve covers from a 392 Hemi I need to stuff into a 1950's Ford truck build. Originally a flathead in a contest build, my detailing skills were well-meaning but very fragile on the 3x2 barrel and it self destructed waiting for me to get motivated on the chassis and bodywork. Now, I'll prolly miss the deadline, but it no biggie. I think the Alclad is just the ticket for the de-chromed engine parts. It was meant to be a fire chief's gasser style responder pickup, but even if I don't cut-out the hood for the blower I'll just leave it off; it should be fine. I'd love to shoot it in your color scheme, but I've got a couple cans of Testors "One Coat" semi-metallic red which should give it a nice fire dept color. Plus, I have gold leaf decals from the St. Louis Fire Dept., a couple of quick entry resin fire axes and a rack of extinguishers for the pickup bed. That gold leaf on yours really pops! If I might ask, the body holder you're using looks like it's only for painting the outer body and appears to have only had the red mist from the Rambunctious paint job on it. Where did you get it and do you use it often? I could really use something like that for my paint booth as we're in the middle of ANOTHER foot of snow coming down and outside painting is impossible where I live until June. Thanks for being patient and answering all my Q's! -
Sorry Larry, I'll back off here. My enthusiasm got away with me. Good evening all.
-
Dave: Perhaps I was looking at it from the wrong perspective. In any case, after burnouts there are consequeces for any type of car whether it be NA, NOS, roots blower or turbo if both cars simply procede forwards and light the 1st bulb. They can build up heat, or be timed out by the starter and sent to the back of the pack, right? Now here's where I was heading: if they're both at stage 1, the turbo car should start to spool up and prepare to go in to meet that 7 second rule. The opposition could dive in to stage 2 and if they don't have the necessity to spool up, they're ready to launch. Again, build heat unnecessarily and perhaps having to continue to purge the NOS lines to have a clean hit might be the only risk for them. I've lost track of technology to the point of where I don't know how much boost these puppies are putting out anymore or how long it takes to get to optimum launch based on converter flash point. I'd love an update on where ADRL is at now in terms of preference of setup and ease of maintenance.
-
Tyrone: you are the frame master!
-
Agreed Larry. I've seen one too many tranny explosions/fires from "games" being played at the tree with other power adders while the turbo(s) are trying to spool up. I'm afraid even the concepts are a little over my head LOL. However, I will offer that modern day Powerstroke diesel trucks with BBs and big turbos often have a smaller turbo that spins up the air to an acceptable level to fulfill the larger turbos needs. Taking a glance at Gainesville qualifying, blowers and NOS are in the top 5; I don't think a turbo appears until after that, maybe in 6th place. Maybe there needs to be some changes in the staging rules so if a car goes in and lights both bulbs, the amount of time allowed for a burn-down is reduced and the 1st in is at less risk for a tranny boomer.
-
Darren: I used to use Testor's and Model Masters (almost entirely enamel) and I've been slowly switching to Tamiya due to the fact it's acrylic and cleans up with water if you don't let it sit too long (makes easy brush cleanup). I generally build pro stock or pro mod, as opposed to my 2nd most radically build car which was the 2006 STI. I'll wash the parts out of the box with warm water and soap, using a toothbrush for the parts on the parts trees that I treat gently. For the body, fenders, etc, I'll scrub a littler harder with soap & water to remove mold release. Very importand step to avoid paint problems later! Alot of kits like Aoshima I would assume contain little English if any and I'm not sure about how much detail is in text on the instructions in any language. The pictures are fairly self-explanatory and I'm guessing you can find Revell kits for F1 or sports cars too. Glue: Testors or similar "styrene" (plastic) glue, to be applied with a tootpick for best and cleanest results. CA or "resin" glue, used with a separate "accelerator" spray. CA glue is used to adhere rubber fuel lines, metal fuel fittings to plastic. The accelerator will speed up the CA glue's drying from 1-2 minutes to 10 seconds! Be sure you are ready to glue before you mix those two. You add a small drop of CA to one side and the spray to the other side of an object and secure them together. They will hold tight. Again, Tamiya small detail paint bottles contain acrylic paint which is water soluble, enamel and laquer are not and will need paint thinner to clean up brushes with. Painting: I paint larger pieces (non-body) like the chassis with spray flat black or aluminum, etc. Using a brush on large areas creates a poor appearance. Brushes: I usually buy red sable (horse hair I guess) and buy very small detailing tips. I will have a few larger ones, but like I said, if painting all the pieces of a roll cage, I'll paint them with a can spray so they look even. Using brush and paint to touch up glue mistakes will show. There are as many opinions on body preparation and painting as fish in the sea! If you are just starting, stick with rattle cans (shaker style). Depending on your goals, Model Masters, a group from Testors has great spray paints in many colors. The most important thing is the body preparation in cleanliness: use latex gloves, wash thoroughly many times during priming steps, try to remove mold imperfections and lines. This will ensure a good base color spray. As far as DIY, depending on the kit(s) you are choosing, there are many builds here and at www.autoforums.com, which seems to lean towards foreign builds of performance cars. Good luck!
-
Rambunctious - Funny Car - FINISHED PICS!
MitchP replied to geetee66's topic in WIP: Drag Racing Models
Again, wonderful work and the decals came out beautiful. The mistakes we make in life and the punishment doesn't dull the accomplishments IMO. However, society doesn't normally see it that way. Case in point: politicians commiting adultery (although it didn't hurt Bill Clinton) If I might address two more questions about the painting discussion: I use rattle cans and if I attempt a 2 color candy coat effect, it'll be when the weather warms up. Otherwise, I'll stick to Testors custom One Coat colors. Once I've misted and sprayed a reasonable number of gold coats, how long must I wait before attempting the same process using the red? How do you know if you're overcoating the gold and reducing it's original purpose? The other question is I really like the color of the blower and hat. Is that the new sprayable Alclad line of paint? I also see what appears to be a slightly yellowish tone at the top of the exhaust pipes and flange. Is that also an Alclad paint designed to appear like heated chrome color? I've gotten some advise from ClayK who did the awesome 1/24 handbuilt "Blackbeard's Revenge" pro mod and he gave me a combination of 3 colors to use, although he was painting on alum I think. Thanks! -
Clay: many thanks for this tip! I'm definitely going to try it out; I hope the new Alcald spray cans I've heard about have those tones included. It may be difficult to master the right application, but I'll try on parts tree or Evergreen rods first. Glad to find out your the builder (artist) of the Blackbeard car. The work is quite superb, especially the milling on the block and other engine parts! Mitch
-
Clay: Hi, my name is Mitch. Your work is crazy good, so you can check into a hospital and leave the rest to me J/K! I have't read every page yet, but Chris Sobach will vouch for my sanity. I only build lowly P/S and P/M kits with ignition and fuel system upgrades and little bits and pieces as my ability will allow. I have a question for you if you would kindly answer. On the Blackbeard's Revenge build, if you're familiar with it, I believe the the pipes are chromed at the top and then change tint to a brownish/blue hue just like a real exhaust zoomie would when it has heat applied to it. Do you know of any way to create with kind of effect with a plastic exhaust pipe? Some combination of paints/colors or application technique you've discovered during your experience in modeling? I just figured anyone with this amazing level of creativity and innovation in building might know. Chris, Comp, Tyrone, feel free to chime in if you might know! Thanks all!
-
Just my type bro! I'm not ready to try the hand-built frames and resin bodies with machined engines/trans & stuff. I've done the Iaconia P/S t-bird in the same manner. I've got the Soff Seal '57, the LAPD Camaro, the Jukebox Ford & a brand new Glidden Champ car in the queue. I saved up a little $$$ and got the Sonny Leonard pro mod engine and a couple of Kobelco blower/3 hole hats from Teds along with a couple of 3 pulley/belt kits. I need a break from carbs and I'm going to mod a couple to blowers! That build is awesome. I wish I had more room than my little paint booth or lived in FL right now. Va where I live goes from 55 to 30 in a day. Now it's 61 and they're calling for a foot of snow Monday. How's a guy supposed to paint under these conditions?
-
Larry & Dave: I can't get enough of this thread and similar ones. I've got quite a few DVDs I might have told Dave about - Powerhouse Orlando Street Car October events (until the DVD quality went downhill) and some from Hillbilly Productions showing 1/8 mile stuff. Although Funny Car builds and P/S are great, P/Ms are where it's at for me. Rock on!
-
Bill: Did you make the zoomies yourself? If so, I thought about the process I'd use and just give me a hint if my parts list sounds right: 1 styrene hollow rod of the largest size tubing, 1 of the next size down and finally one of the smallest (I'd use solid rod and dremel out the tips to appear hollow). The sections would fit together like Russian nesting dolls and the zoomies would be bent using a template, a low heat source and some gentle bending tool. Am I going in the right direction?
-
Oops... Did I leave you out Brett? Another source of great info, tips & tricks, and paying attention to detail. Not only that, like a lot of foks here, he'll give you a pat on the back if you get down 'cause of a stupid mistake and work with you to find a solution! Ron: you don't happen be the blessed owner of that eye-popping Caddy P/M in your avatar pic, do ya? That's got NMCA pro class written all over it!
-
Larry: No disrepect, but I gotta go with Henry on this one. I could almost swear (sorry, shouldn't swear on heaven or earth) that it's a 1:25 which is what made it so crazy. When I get some time, I'll read the lengthy links.
-
Hey Darren, welcome! Don't worry, there's a section in here that'll cure the tuner car blues quickly - it's called the "drag racing" section. j/k! I went through my Detroit muscle car days in the 70's when I was younger and those collections were MUCH cheaper than now! I too was a big STI fan during the 2005s-2008s before my back went out and I sold every thing to stay afloat, including a 400hp awd 2006 STI. Anyway, are you completely new to modeling? I'm asking because there a lot places to start in modeling, from the simplest tips on washing everything plastic (short of the model's "glass" and decals) in soapy water to using toothpicks to apply glue, a reasonable set of fine tipped brushes, studying up on enamel, acrylic and laquer paints to determine what's best for your particular application. I could go on for days and miss something. Give us an idea of your experience level and people will join in with more assistance!
-
Tyrone: I'm not on your level to have many ques. other than figuring out how to figure out how to build a chassis I'm just not sure what I want or how aggresive to go. It's just one of those things like driving by an accident. You don't want to look or know, but... Comp1839 - check your PM about the above info! I'm thinking when I've fullfilled my desire to shoehorn this creation of Ross' into the '57 Chevy and catch up on the three bodies that need painted for my kits already built, I want to start by purchasing a resin body I really like and taking it from there. Following your build pics here (and maybe a few PM's without annoying you), I'd like the basics for laying out the frame, how intricate to make a cage, designing the rear cage and how to install a 4 link using say, one of Scott Popham's Futurattraction 9" rear & related parts. Maybe that's chewing off too much and just keeping my yap shut and my eyes open with do! I will have a long term project like yours in the works one day and when I do I'll post it here step by step as much as possible to help somebody out (as long as you help me correct my mistakes first!) Peace out bro!
-
Hey Larry, Cameron: Sorry, I'm a bit absent minded when it comes to topics dear to my heart LOL. I'm a big 70-80's big hair rock band fan also and my wife, although a die-hard Heart fan, avoids talking to me because I seem to have a black-hole mind. I can go on for hours about the guitars and rigs Eddie Van Halen, Yngvie Malmsteen, or the late Randy Rhoads used ad naseum, but will forget what I had for lunch yesterday! I got so psyched sharing the links with you I forgot to include them. This Camaro I'm linking to could be built by the same guy for the way they mirror each other in detail and use of metal. http://www.automotiveforums.com/t1056212-complete_blackbeard_s_revenge_70_5_camaro_pro_mod.html I hope you all enjoy. I think this might have been 1:25 scale, although I'm not sure. My pain meds for my back make it so I can only do basic kit builds, although I do buy distributors, mags, and other resin items for ignition and I really love use of braided steel (maybe too much) and Pro Tech/RB Motion fittings for either carb'd or blown applications. I just paint them myself to save a few dollars. BTW, I also picked up a resin Kobelco blower, 3 hole modern P/M hat & cog to put on a blown kit instead of the included pieces. I don't know which kit yet, but I do have a Revell '55 Pro Sportsman BBC setup for twin carbs and with a little searching, I bet I could find a Hemi unassembled from a blower kit for a reasonable price. Never hurts to have an NOS BBC setup in the parts bin!
-
Thanks all! I still posed some crummy (blurry) pics of the interior on the 2nd post. I usually use SLIXX mini-sheets for tach & gauge faces, along with fire extinguisher pressure by rotating a decal so the needle looks full LOL. I use SMBC multi-use wire for the tach hookup and any MSD boxes or resin coil. That was my 1st attempt with braided line and there are many ways to hook-up a fuel feeds to a twin carb setup. I learned that although the distribution block feeding 4 braided lines (one to each carb) looks really awesome, if you don't use CA glue and an accellerator, the CA glue will get brittle and those artfully lines will come loose. BTW, to save a few bucks, I buy Pro Tech fittings and RB Motion plain aluminum fittings (they do come pre-anodized) and I use Tamiya clear red and clear blue to paint the fuel fittings. They come out really well, but too much CA glue will dull the anodized shine. Although it was my 1st attempt with braided line and fittings, I owe a great deal to John Perry, Rob at RB Motion, Charlie at Pro Tech and Teds Modeling for the hardware, advice and examples in the gallery sections. If you don't like braided line, rubber line and aluminum line are also popular in modern drag racing and are easier to use than braided line. Sorry for the novel!