John Goschke
-
Posts
1,919 -
Joined
-
Last visited
Content Type
Profiles
Forums
Events
Gallery
Everything posted by John Goschke
-
Revell Ed Roth 57 Bel Air - Suddenly It's 1963!
John Goschke replied to Karl LaFong's topic in Car Kit News & Reviews
Yep. I get that. Fortunately, in most cases the re-issued product has some redeeming value and, if we're lucky, someone will realize they need to add more value than new decals. Round 2's recent re-issue of the '36 Ford being a case in point where they included long-lost parts from previous issues, though they still couldn't see their way to fixing longstanding problems with the original product. In the case of the re-release of this notorious '57 Chevy kit the cynicism behind the "business" decision seems clearly evident and, from here, seems inexplicable given the existence of a much better kit of the same car in their portfolio of molds. Of course, looked at with the widespread corporate vision that values profits over quality and a desire to give the customer an enjoyable experience, I'm sure it makes sense. -
Revell Ed Roth 57 Bel Air - Suddenly It's 1963!
John Goschke replied to Karl LaFong's topic in Car Kit News & Reviews
... that's a business decision any cynical marketing exec. with little notion of the value of releasing a quality product, or long range vision, at all would make. -
Revell Ed Roth 57 Bel Air - Suddenly It's 1963!
John Goschke replied to Karl LaFong's topic in Car Kit News & Reviews
I'm not sure whether to shake my head at, or give Revell credit for, the testicular fortitude necessary to re-release this old dog instead of the snap kit. Admittedly they did get me to buy the Roth '56 pickup because they'd added a set of Olds Fiesta wheelcovers. However, I'm pretty certain I won't be buying this kit for the decals, especially since it doesn't look like they exactly match the paint on the real car. Maybe if they had included a set of '57 Imperial wheelcovers like Ed had on his BelAir, I'd take the bait... -
Great work as always, Steven! Those colors really pop in natural light.
-
Janis Joplin's Porsche 356C and Janis figure...
John Goschke replied to Brizio's topic in WIP: Model Cars
Fabrizio. Dude. U. have. blown. my. mind.... -
'58 Bonneville Hardtop Back on the Bench! 3/20/18
John Goschke replied to John Goschke's topic in WIP: Model Cars
Thanks for the encouraging words, gentlemen! Bill (aka Mr. Obsessive): The top from the Revell '58 Impala did occur to me, after I'd started the swap, of course. I don't have that kit in the stash, though. The Trophy Impala roof is a bit too wide, so the best way to swap it into the Bonneville would be to use the entire thing, including windshield and rear frames from cowl to tulip panel. I just didn't want to cut up the convertible that much. The work and time saved using the Bonneville roof made up for the fact that I paid more that it would've been worth if I was buying the whole body to restore. Curt (aka 62Rebel): The rear window from the AMT Trophy Impala has a different curvature, leaving large gaps at the lower molding. Bob Ellis: Yes it does seem that convertibles, particularly all the AMT and SMP '58s, seem to be more common than hardtops. I think the hardtops may have been released later, perhaps after the initial kit releases proved successful - but that's just a theory. Maybe a more knowledgeable kit historian can tell us. -
'58 Bonneville Hardtop Back on the Bench! 3/20/18
John Goschke replied to John Goschke's topic in WIP: Model Cars
There's plenty left to do, including making a new rear window and adding weather seal and window channel detail to the side window openings. The windshield header will need to be reshaped once the top is glued on, then yadda, yadda, yadda... but I'm pretty happy with the result so far! -
'58 Bonneville Hardtop Back on the Bench! 3/20/18
John Goschke replied to John Goschke's topic in WIP: Model Cars
The convertible interior is the same as that used for the hardtop kit except that it has holes at the back for locating the boot cover. I used telescoping plastic tubing and rod cemented in with liquid cement and a little cyano for good measure to fill the holes. These were then cut almost flush, then shaved down with a #11 a bit more before being filed and wet sanded smooth on the top side. -
'58 Bonneville Hardtop Back on the Bench! 3/20/18
John Goschke replied to John Goschke's topic in WIP: Model Cars
After the roof was cut free I made a light knife cut at the back edge of the vent window, then carefully shaved the remnants of the vent and windshield posts off. Then I highlighted the knife cut by rubbing a little pencil lead into it. This gave me a reference point for locating the roof on the convertible. I also carefully shaved the extra bit of plastic from the hardtop quarter panel off the base of the roof, right up to the beltline molding and the base of the C pillar and no more. Moving to the convertible body, I gingerly cut away the sun visors from the windshield frame. Then I held roof to body, and noting the reference marks at the vent windows, marked the location of the cuts on the beltline and rear window molding, and using the #11 blade, bit by bit, cut out the notches in the body for the base of the roof. Test fitting at frequent intervals prevented cutting away too much plastic. I also trimmed off the upper windshield molding from the hardtop roof since the convertible frame would take its place. At one point during the testfitting it appeared that some additional needed to be removed from the front edge of the roof and I did go too far, having to add a bit styrene strip along that edge to fix it. -
'58 Bonneville Hardtop Back on the Bench! 3/20/18
John Goschke replied to John Goschke's topic in WIP: Model Cars
While the roof wasn't perfect the rest of the hardtop body was pretty trashed, looking like someone had attempted to strip the paint with a wire brush and a utility knife! I wetsanded some scratches out of the forward section of the roof and did some other cleanup to make sure it was salvageable before marking the beltline and lower rear windows moldings for cutting with a razor saw. After those cuts were made I repeatedly scribed a cut with a #11 blade high on the quarter panel about a 16th inch from the base of the C pillar from saw cut to saw cut, freeing the back of the roof. The vent window and windshield posts were already cracked through so no cutting was needed there. -
Now She's a Hardtop! A while back I was fortunate to be able to pick up this really clean built-up '58 Bonneville ragtop. Stripped what little paint there was and gave her an attitude adjustment and new rolling stock... Problem was the car I really wanted to build was a hardtop, plus, without a roof it's real obvious that the interior in this old kit is kinda shallow and not very detailed. Wish it was a hardtop but, unfortunately, AMT's Trophy Series '58 Impala won't fit without more work than I care to do... Then a pretty horrendous hardtop body turns up on ebay that looks like it has a salvageable roof... Sold! After several hours under the scalpel (and other sharp implements) the main surgery's complete...
-
Interesting project! Looking forward to more.
-
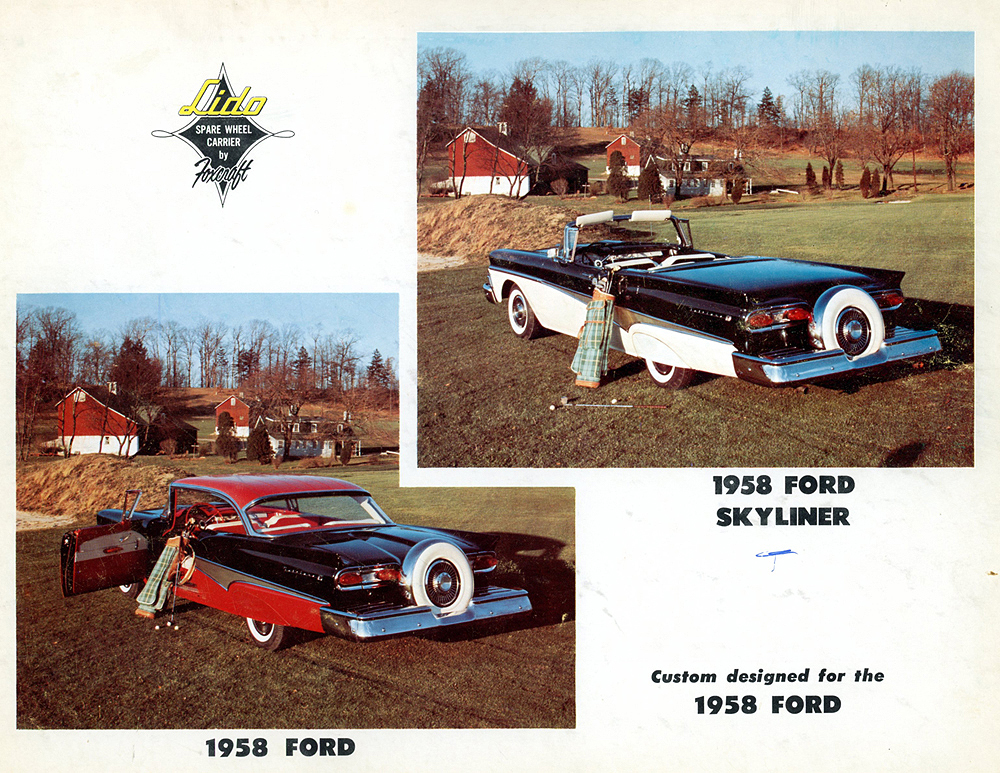
Looking forward to following this build, Steven. Having owned two 1/1 '58 Fords, they're among my favorite cars, in fact the Fairlane 500 Town Sedan (aka 4-door) I had was Silvertone Blue (upper body) and Colonial White (roof and lower body), along with a fair amount of rust. I've worked on this kit several times and finished a hardtop with a lot of little accuracy modifications ages ago. On my current stalled projects shelf is a mild custom convertible with a couple changes you might find helpful if you haven't already thought of them. AMT chose to leave out the cowl vent on their '58, but the one from the later Trophy Series kit can be notched in pretty easily... They also left out the cove in the rear panel for the license plate (which in the 1/1 concealed the gas cap.) I just cut a piece out and backed it with some sheet styrene after smoothing the edges of the opening. It's also a good idea to scribe the deck lid panel line through the taillights before sending them out for plating. AMT's somewhat more detailed '59 Ford chassis fits well with a little edge trimming. It even has the correct convertible center bracing!... There's a bunch of other nitpicky things large and small that can stand to be fixed on the AMT body, but I'm not sure whether they're worth going into here without driving folks crazy. So I'll just leave you with a couple vintage sales promo sheets for the Foxcraft and Stylecraft continental kits...

-
Thanks, Steve. I'll give that paint a try. I've tried a similar technique with other paints but getting it rub off with a clean edge was a problem.
-
Great work on that grill, Steve. What technique did you use?
-
Outstanding build! The little touches of the weathering really increase the realism.
-
Really sharp!
-
Beautiful color: love the iridiscence! Looks terrific on the '55! Too bad about the Alclad. It's worth noting that even a great Alclad job on bumpers will appear too dull and dark, especially when photographed. Alclad is OK for smaller parts, but, perhaps because of the size and reflectivity of the complex curves of the typical bumper, is not a really satisfactory finish on those larger pieces. There is a no real substitute for well-done plating.
-
Beautiful job, Tulio! Superb work getting the top to fit on this kit.
-
Great job of one of my favorite Buicks, Steve! Nice work detailing this kit's Spartan engine compartment! The silver works beautifully to highlight the deeply sculpturing body. One thing about this kit that is worth taking the time to fix, and would bring yours even closer to rep. stock perfection, is fixing the wheelbase, which AMT made too long, putting the front wheels too far forward and the rear too far back. Ironically, it's almost the same length too long as SMP made the '60 El Camino too short! Anyway, here're some illustrations of the problem from a previous online discussion of adjusting wheelbases and ride height in early kits... Uncorrected restorable ragtop with axles in the lowered position.... Adjusted ragtop. For this one that was going to be built rep. stock I redrilled the axle holes, enlarged the hole in the engine, and had to grind the inside of the chassis to allow the axles to slide all the way through. A number of years ago I did one by sectioning the chassis, which may have been the easier way... The real deal. Hope you won't mind this little nitpick. I love your work: it's some of the best I've ever seen on here!...
-
Another beautiful job! The little caps are a nice touch.
-
Beautiful! The perfect color combo for this car! The detail painting really brings the interior to life!
-
Very sharp! Your work is outstanding and I love the subject matter!
-
That kit number (232) indicates it's the original issue of the AMT five-window coupe. Should also have the price ($1.49) printed in black on the end panel.
-
Very nice! Like that little forward rake it has – just a little touch of hot rod! Love the color combo, usually when one sees these colors it's in the reverse scheme, with beige on the roof and trunk – cool to see it flipped like this.