jwrass
-
Posts
848 -
Joined
-
Last visited
Content Type
Profiles
Forums
Events
Gallery
Everything posted by jwrass
-
 John, It was my pleasure............Lil would be very proud of such a fine tribute Brother........ I know John is shining down on this one! Peace, Jimmy "RASS"
 -
Lil John Buttera Before I get into this post I want it to be known that this is not a HIGHJACK on this most awesome build and thread. John Teresi and I have exchanged numerous emails on Lil John Buttera and the wedge. I told John T that I had first hand knowledge of the 1:1 car and my association with Lil John as a customer that developed into a friendship. I sent John T a email about my knowledge of the car as it came from the man himself who built the car. I suggested it would be interesting that a bit of history on Lil John and the car would be a nice Touch to the thread. After John T read what I sent him he thought it was awesome and he said he would love to have the information on the thread, however he asked me if I would write it to which I agreed. Thank You John T for allowing me to share some inside information on what I feel is a car that will go down as one of the most unique cars in the history of drag racings run what you brung era. Out of respect for this thread and John Teresi. I WILL NOT answer any additional questions on the 1:1 car here! If you have any additional questions you can P.M. me. I dedicate this entry to the late Lil John Buttera. Lil Johns Roots in the Mid-West When most people hear the name Lil John Buttera they think of Southern California Master Race Car Builder, The Father of Bullet, Street Rod Builder, Motorcycle Builder Johns roots are actually in a Mid Sized town in Kenosha, WI. Where he and Dennis Roland formed R&B Race Cars in the Mid 60s. As a team they built many popular Drag Race Cars from the Midwest John and Dennis also had a F.E.T.F car that they used as a test bed and often ran the car at their home town track Great Lakes Dragway in Union Grove, WI. With Lil dong the driving on many occasions John was actually a very good shoe. THE WEDGE A little unknown fact about lil John was his love for the INDY 500 and Indy Cars themselves. His dream was to always field a car in the INDY 500 and in 1982 his dream came true in a highly modified Stock Block Buttera/ Dan Gurney Eagle with Dennis Firestone as the driver. That same year I was part of a rag tag crew from my home town trying to make the show in a four year old Lightning Chassis (we didn't have a chance but we had a lot of fun) I hadn't seen John in years, his garage stall was a few down from ours and one day after practice I walked down to Johns garage to get reacquainted, he invited me into their garage and offered me a beverage (we had more than one) we sat down and did a bit of bench racing. At some point the conversation it turned to the WEDGE as I was fascinated with the car as it got alot of ink back when it was unveiled. The car was a stealth product of John and a partner and the concept was that of a INDY CAR Monocoque Chassis. At The time John had built a whole fleet of cars for a very wealthy business man Barry Setzer and Barry wanted a piece of the action as this car looked like it was going be legendary with it's unconventional design. Unfortunately the car was never a success on the track, as Lil put it, the car was to short or not long enough, the Mono design proved to be to stiff for drag racing. At the hit of the loud pedal the car typically would strike the tires as the chassis was to stiff resulting in lack of grip off the line. Lil said the car had some very impressive trap speeds because of the wedge shape and the stiffness of the Mono design ( (Ying and Yang) the problem was getting a clean pass from point A to point B. The car vanished from the scene it short order as Setzer pulled the plug on the project as he thought it was going to give his race efforts a bad name. I have seen the 1:1 car at Big Daddy's Museum in Ocala, Fla. I don't know what the wheel base is however the car looks much smaller in person than in photos. I can only imagine what that car would run today with the slipper clutches, advancement in tire technology and track preparation.......... My Guess............ FAST RIP Lii John Buttera Respectfully Submitted, Jimmy Rasmussen "RASS"
-
Alternative to BMF/ Imitation Silver Leaf
jwrass replied to jwrass's topic in Tips, Tricks, and Tutorials
Bill, If you look close at the trim, I picked a body who's trim had Concave, Convex and Compound Curves, the body is a 1959 El Camino. The leaf sucks up so nice and pretty. A practice in having static working for me not against me! You are going to like this.............. -
Alternative to BMF/ Imitation Silver Leaf
jwrass replied to jwrass's topic in Tips, Tricks, and Tutorials
-
JJ update #1 Sorry for the delay gents I was having some problems posting........ I think we pretty much have it figured out now! Id like to give a BIG shout out to Joe Goss, AKA Nytrozilla. Thanks Joe for all your help As I stated in my original post the stance of the car in the rear sits way to high as it pertains to the 1:1 With the help of a article of a 1/16 build of the Hawaiian by Clay Kemp (S.A. April 2015) I performed the relocation of the Rear End Mounting points on the down bar of the chassis to lower the stance. However in doing so I opened up a can of worms which is a test for me and my styrene skills which I welcome. With the relocation of the mounting points the seat now sat on the torque tube and the body sat on top of the injector hat....Not what I had planed on! These are the original mounting points on the down bar. Relocation of the mounts on the down bar.....these were glued as a unit with the upper most rear end bracket attached just below the porch of the chassis that the body mounts to. Buy gluing it as a assembly I was able to keep it square without any hassle. Stance before modification...... pretty lame! Stance after modification............. Much better! To confirm accuracy I took a side view photo I had in my research folder and scanned the image into my sign making software. I vectorized the image and made a silhouette to scale. I projected the image on the wall with a overhead projector and tweaked the image on the wall to scale. I then placed the model within that image (like a piece of a puzzle) and it was spot on. I did it more out of curiosity to see if it would work other than to have a spot on stance. This will definitely be a slow ride for me mates as I approach one of the busiest times of the year for me, I will be working on JJ as time permits as I find this whole process relaxing and fun after a very long hiatus. Thanks for looking mates Jimmy "RASS"

-
Alternative to BMF/ Imitation Silver Leaf
jwrass replied to jwrass's topic in Tips, Tricks, and Tutorials
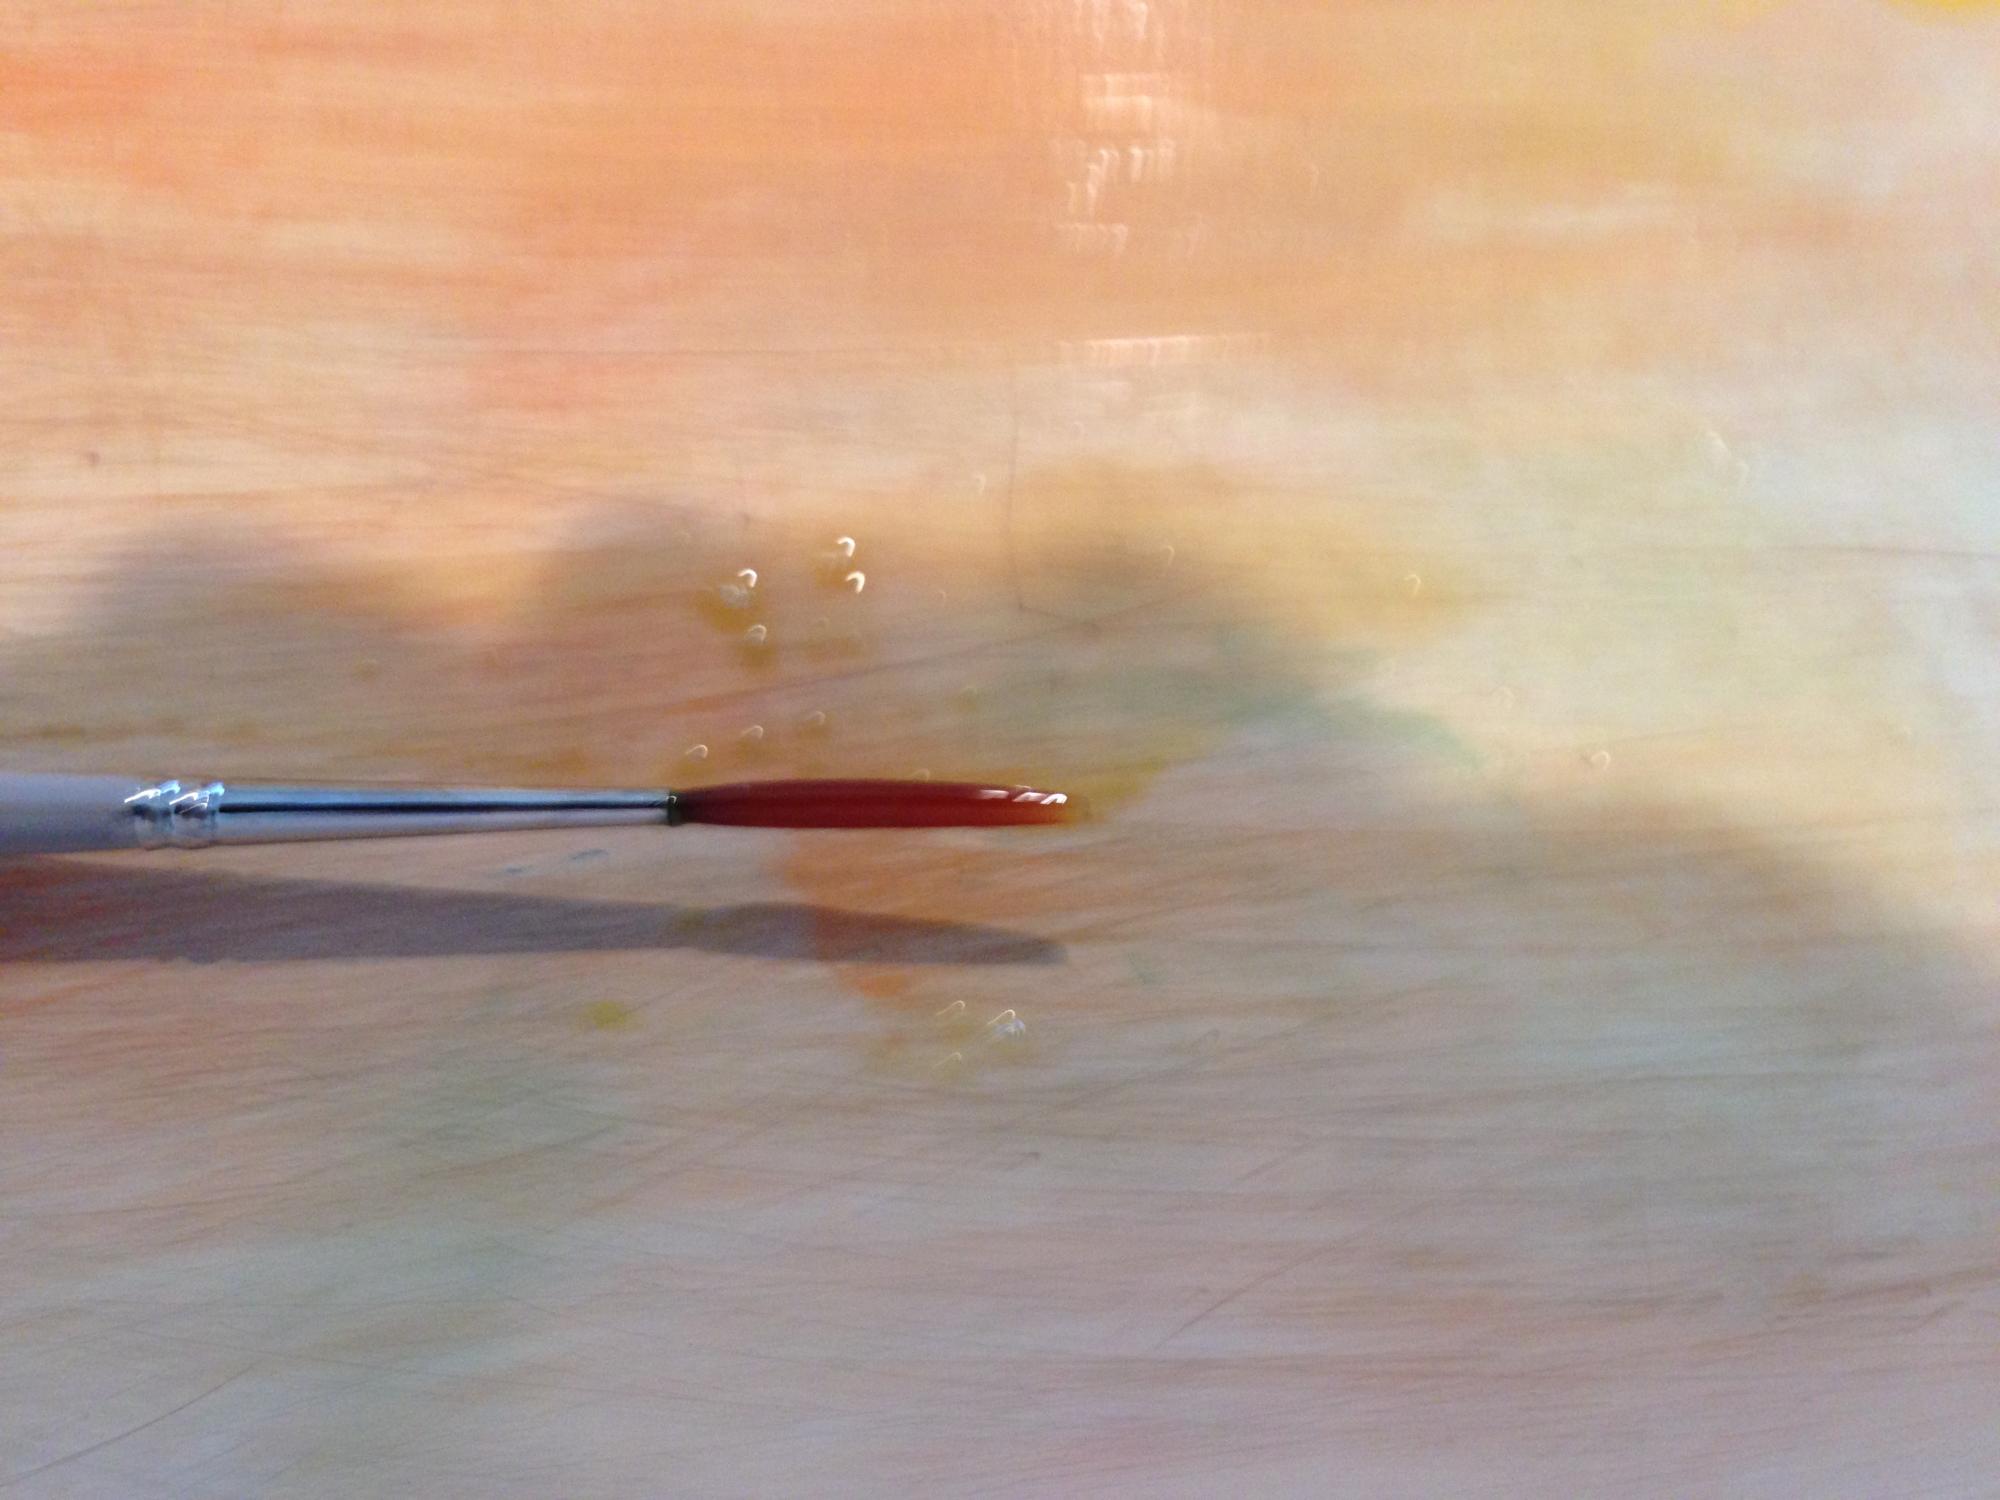
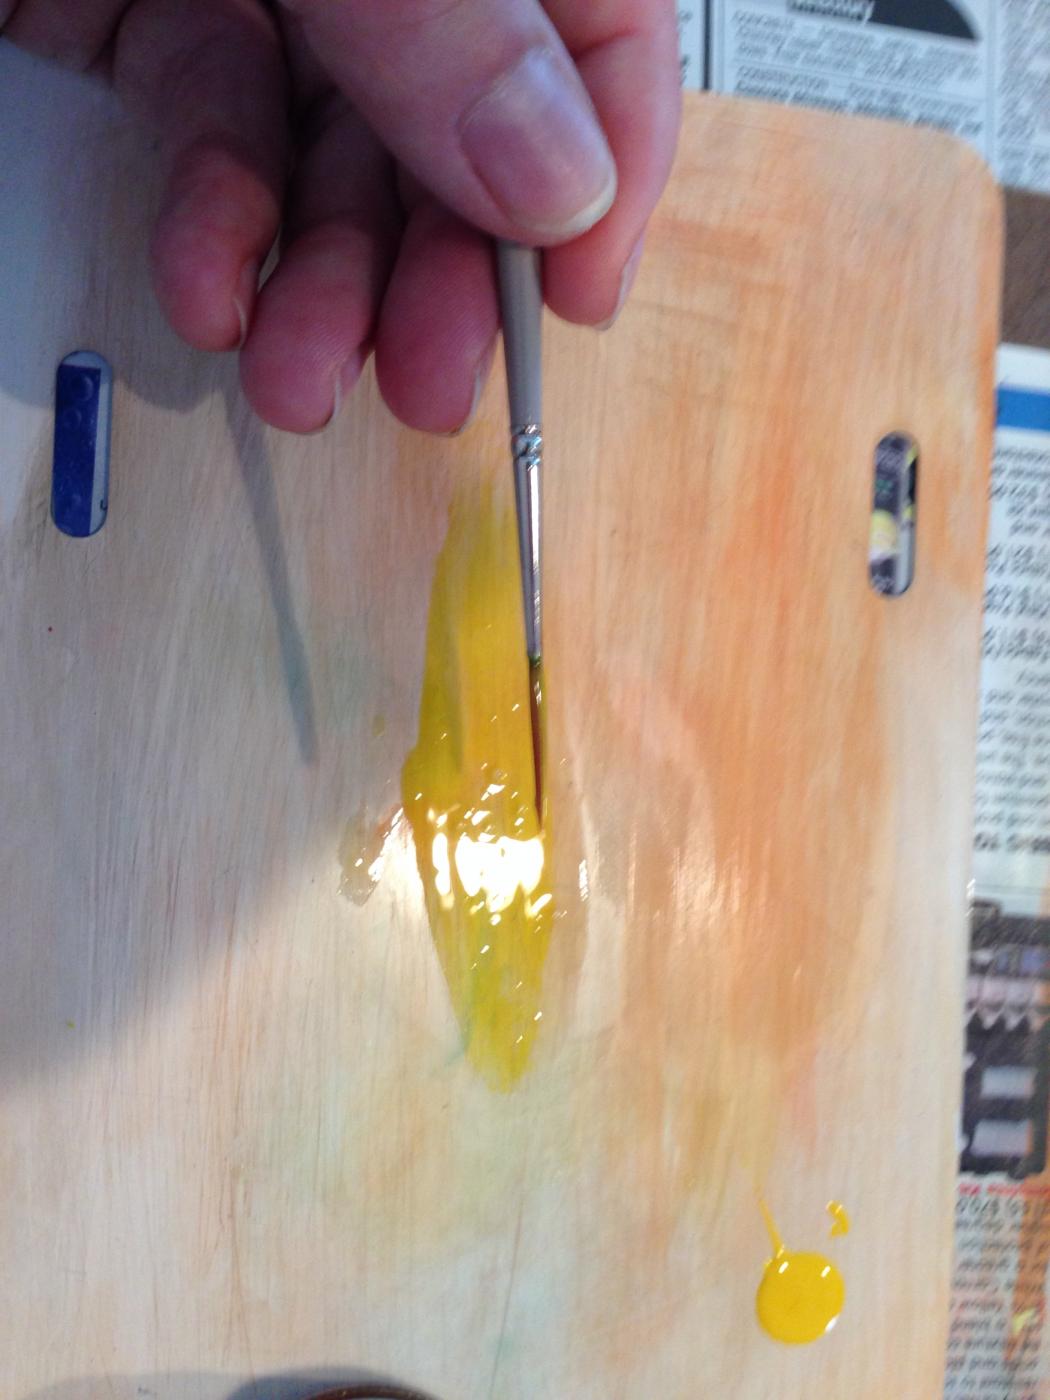
BMF Update #1) In the last installment we left off here............. lets continue and get the brush wet! Along with the size and the lemon yellow we will need a small container of fresh Mineral Spirts (I use a shallow tuna can) fill the can say 1/4 with spirits. Before we load the brush wash it in mineral spirts, wipe the brush clean and dip it back into the mineral spirts and wipe the excess spirits off, we want the brush to be just damp with spirts. My palette is a aluminum sign blank, however a shinny paged magazine works just as well. Because we won't need much size for the leaf I'm just going to mix it on the palette. With a popsicle stick I stir the size (never shake it as it induces bubbles) I make a puddle of size on the palette about as large as a Quarter and just a drop of lemon yellow on the side to tint the size The key to great paint work with a brush no matter what the subject matter is loading or charging the brush properly. We will be loading our brush with the paletting procedure. Dip the brush in the size and work the paint into the bristles on the surface of the palette in and back an forth motion like that of a pendulum, when the brush is close to having a full charge dip just the tip in the lemon yellow and work that into the size to get a semi transparent look like in the photo above. the yellow is used merely as a tint so we can see where we are laying the size down. A properly loaded brush should look like the one in the photo, notice how the size is fully loaded all the way to the Ferrell. Size comes in three drying ranges Fast, Medium and Slow. For this tutorial we will be using a fast size. When you are ready to commit to applying the size, on the palette or a piece of scrap styrene paint a square of size say 1"x1" in a uniform fashion and record the time. This is Critical!! now proceed to applying the size where you want your shinny bits. Apply the size to the areas that you want the leaf. I am doing this freehand.... Notice how nice the brush is tracking, that is the direct result of a properly loaded brush..... Now I know not many are going to be able to do this freehand. I have been making part of my living custom painting on 1:1 for some forty years. Do not fear.. mask the areas adjacent to the areas you want to have leaf applied to with a plastic fine line tape and burnish the edges down tight. Now brush the size on in those areas, However do not flood those area with size, make like the tape is not there and carefully brush the size on paying close attention to not getting a build up of size at the tape edge. As soon as you have the size brushed down immediately remove the tape, the size will be wet enough that any small edge that my have occurred will melt back into the size for a razor straight line. Now lets prepare some leaf for application This is a bit tricky.... you need patience and a gentle hand! I normally have a dedicated cutting matt however the file folder will work just fine. I peal one of the leafs back from the booklet and start to carefully cut strips of leaf for application It is imperative that you use new blades when you cut this material as it is oh so thin!!!! Notice how I have a firm but gentle grip on the booklet and leaf that I am cutting. If I were to take my fingers off of this and sneeze I would have pieces of leaf floating every where it truly is that thin. Here is one strip that is ready to be applied to the size. Notice how delicate it looks, at this stage this material is very fragile. You are probably thinking well that looks all full of wrinkles and you are right! However when this is applied to the size and burnished it will look like a freshly ironed shirt. TO BE CONTINUED!!!!!!!!!!!!!!!! Next up..... GETTING LAID...... Ahhhh I mean laying the leaf! Peace Jimmy "RASS" .
-
I'm on fire/ Springsteen
-
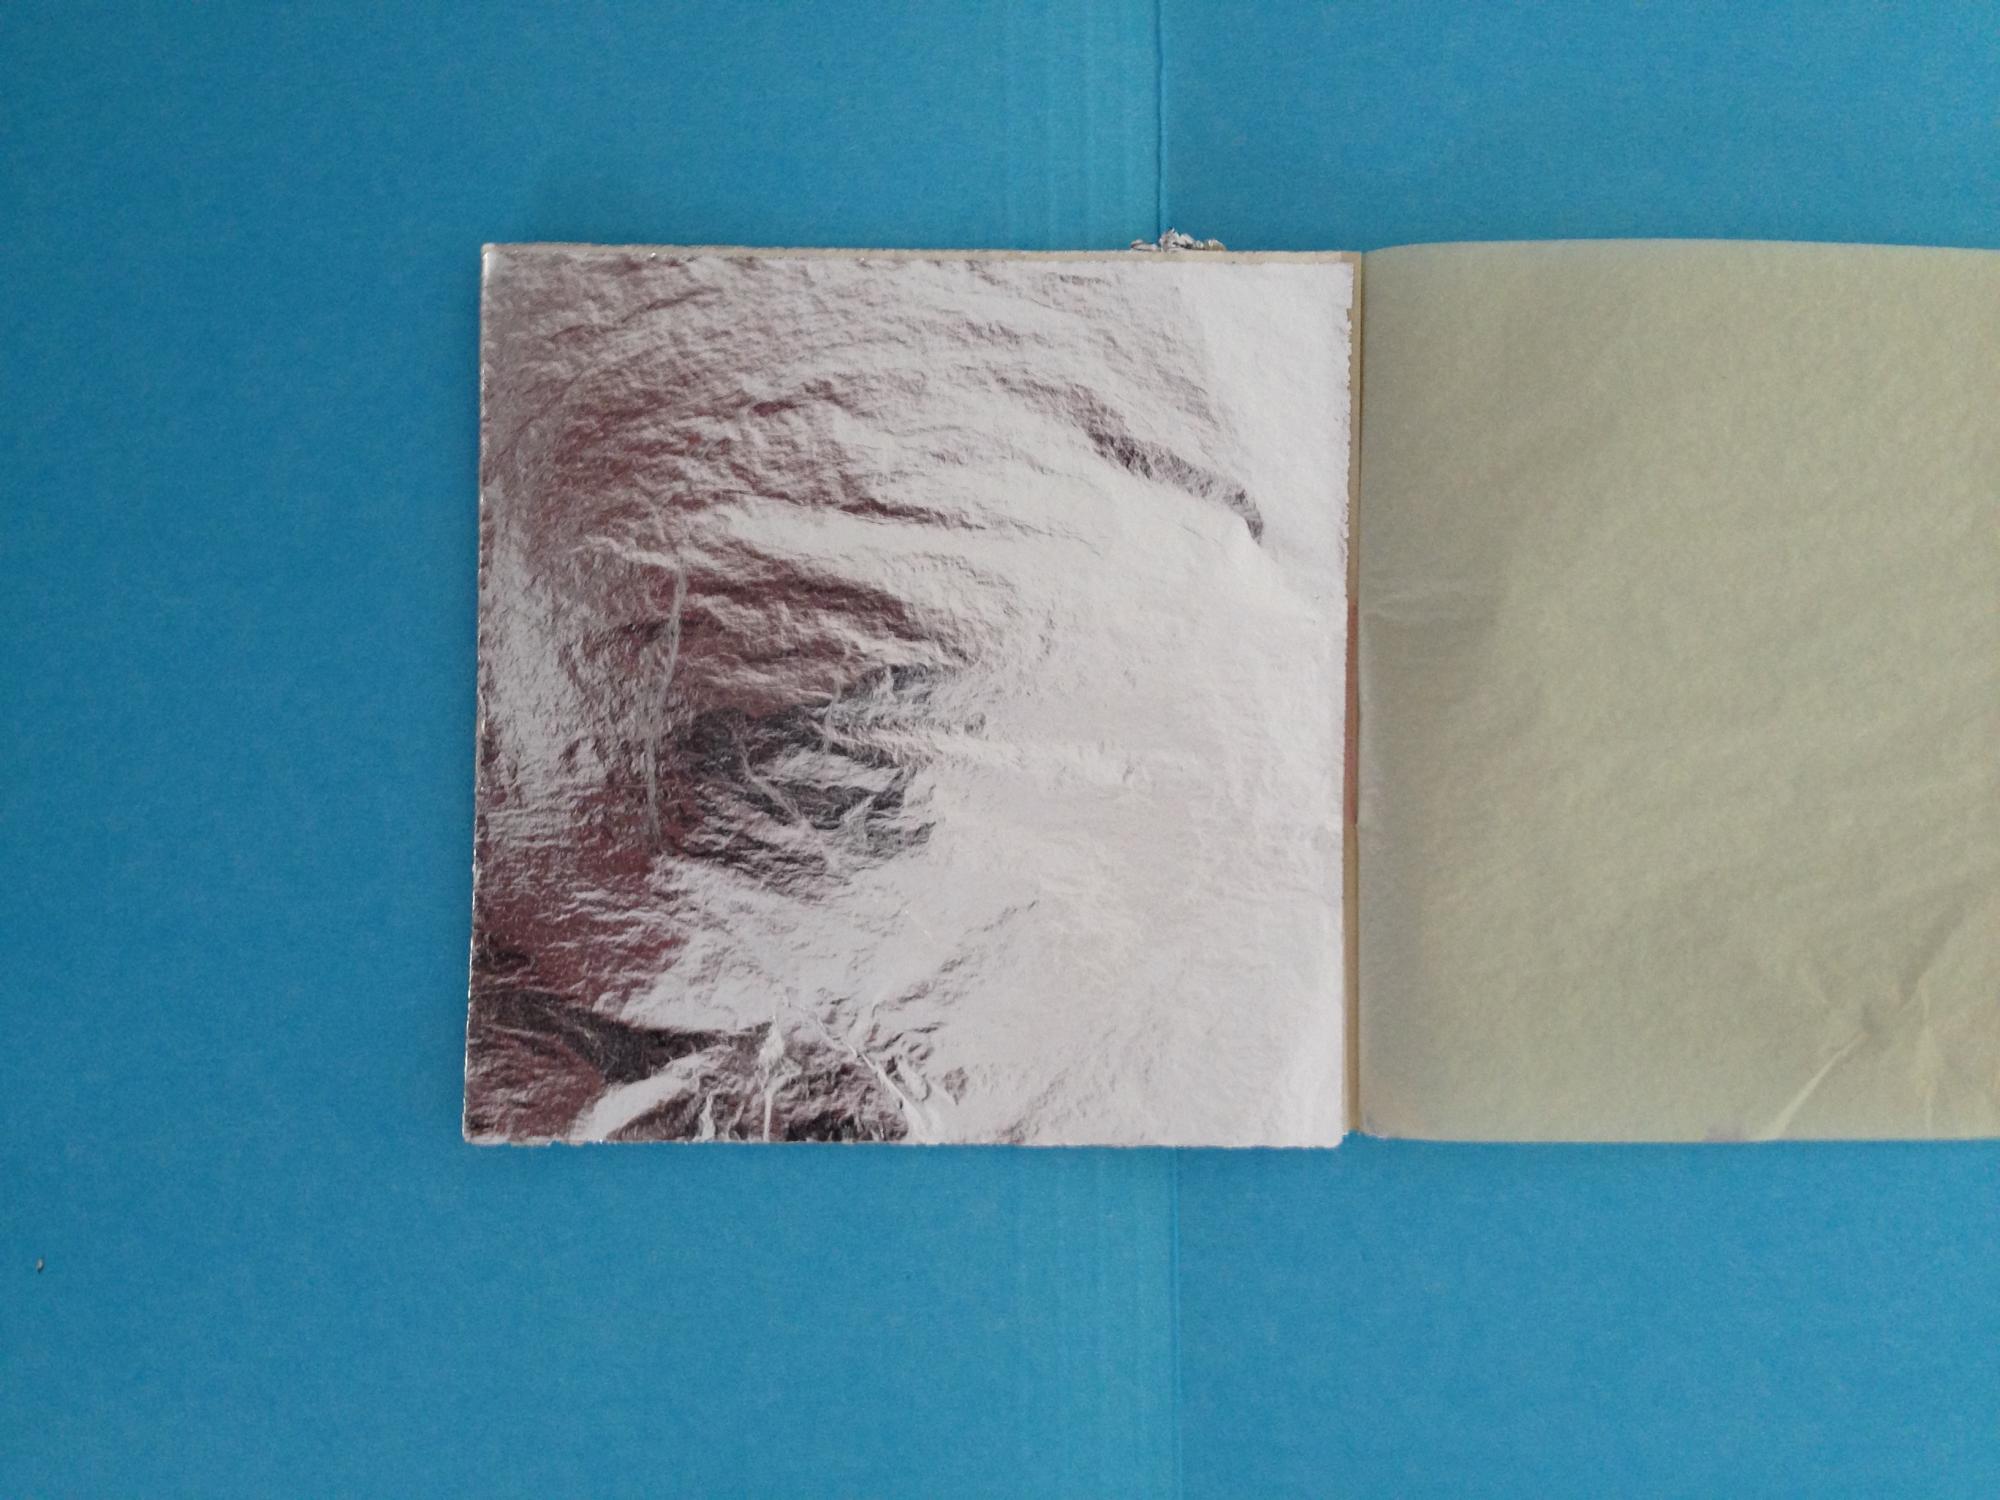
Are you are frustrated with BMF and looking for a alternative method to do your shinny bits? You may want to try this technique. With Imitation Silver Leaf you can vary the sheen with different burnishing techniques as I will cover as we proceed. Leafing or Guilding is the age old art of applying a very thin film or real 23 Carot Gold or Silver Leaf Leaf in it's purest form is real Gold or Silver that has been hand pounded into what is termed leaves For this Tutorial we will be using a Man Made Synthetic or Imitation Leaf The medium that holds the leaf to the subject is called size, Think of size as a glue. On the left and middle are oil based size, to the right is water based size. For this project we will be using oil based size. Size can be sprayed or brushed, for this project we will use a brush. A soft natural bristle or synthetic brush such as a golden taklon should be used for the application of the size. The brush pictured is a golden taklon. Leaf comes in booklets or rolls in various sizes, pictured here are 3"x3" leafs, each individual leaf is separated by a thin tissue to keep them from sticking to each other, the leaf itself is very thin and cannot be handled by hand. It is applied with a guilders tip....... More on that when we apply the leaf In it's raw form oil size is the color of honey and difficult to see when applying to the surface. Above is fully loaded brush with oil size. To make the size easier to see when applying we will tint the size with a bit of lemon yellow. For larger projects I mix a batch of size and tint it to my liking, on a small project I just put a drop of lemon yellow off to the side and work the color into the brush through the paletting procedure. To be continued !!!!! The best is yet to come..................
-
Bruno, Always loved this car.........Outstanding rendition Jimmy "RASS"
-
I think you are really good at this game...........Good job mate
-
Hey Bill, Tooth Paste and models....... We are showing our age! My honestly you don't want to know story... I did a crotch rocket Pearl White paneled graphics Himsil/Jefferires fades ready for clear. Sprayed the rails of the overhead door with garage door lube, used a straw and buffered it with a rag. Stuff is like drywall dust... Couldn't save it, I got in some extra special practice and a lighter wallet
-
Ed...... You Are On Fire..... yes, yes. yes and yes
-
Way Back Wednesday !!!!!! 1960s #1) If you wear red tonight Remember what I said tonight #2) You take Sally and I'll take Sue And were gonna rock away all of our blues #3) You got a thing about you I just can't live without you #4) I see people turn their heads and quickly turn away Like a new born baby it just happens every day #5) Must be those strangers that come every night Those saucer shaped lights put people uptight
-
As the Father of a Daughter who was into the 90s Music scene IMO the 90s music is light years away from the 60s and 70s. Just the shear numbers of bands, groups whatever you want to call them was off the charts. From across the pond to the Motown Sound, East Coast, West Coast, Deep South, Chi Town and everywhere in between it truly was a era that never will be duplicated, it was a time when you could look at the top 40 list and you knew 90% of the songs and artists. I think the last decade that will have any staying power would be the 80s, Rush, ToTo, Journey, Cheap Trick, Police, Cars yada yada I'm not trying to be argumentative as I like and had much of that music playing in my home at that period of time.............. it just doesn't pass the smell test for me.
-
My experience with cleanser comes strictly from the 1:1 world that transferred over to model building. I too think it is one of the best products to scuff plastic or any painted surface for that matter to get some tooth. Does anyone remember polishing your models with tooth paste before the Government deemed some tooth paste was to abrasive for teeth?
-
Tom.........Any mention or site of Armor-All or anything with silicone in it makes me shutter.......... You will never see any sight of those products in my shop............Honesty..........you don't want to know!
-
Dennis..........Bummer hopefully you saved it before you put it in the pond.... I do alot of artwork with various mediums that are always on the fresh side. If you were able to save the paint without the pond. Mix your iso/water at a ratio of 20% iso to 80% water with some mediums a strong solution of iso may harm the surface. Let us know how this works for you! Good Luck!
-
Cake/Ole Blue Eyes The only reason I got this one is I'm a fan T.J. This is your thread.............I have a bunch of titles from months ago that were ever answered. from this point forward this is what I would like to do with my posts. If they ae not answered within 24hrs I will give a hint. after 48hrs I'll post the answer. Are you cool with that? Man when came back to the site after a few month hiatus I was surprised to see that there was no activity for almost to months..........What Happened? Jimmy "RASs"
-
Brown Eyed Girl/ Van the Man
-
Paperback Writer/Beatles
-
Yes Sir............. I'm hoping I can see a reply of JJ. Always liked his music....
-
Anyone who has followed any of my posts know that my music tastes go from head bagging to bubble gum. If you are musically inclined or have a artistic inclination like most here ( lets face it modeling is a art-form) Music is a big part of what you are! Love them or not so much.............. The Beatles are by far the most Iconic group that may ever be, at least in my lifetime! I was 10 years old when they first went on the Ed Sullivan show, I had a older sister who was in her mid teens and I had a front row seat to Beatle Mania...........Right time and Right place in musical history.......... Maybe............. Pure Genius................... Absolutely!!!!!
-
Yousa!!!!!!!!!!!!
-
I was going to do a follow up on post...............Ace is spot on with the isopropyl / water mix. (iso/water by % Vol ) My ratio is a bit different than Aces due to the nature of the work I do, his is a great ratio for a overall pre paint wash! Not only is it a great wax, grease, silicone remover. It kills the static charge that builds up when you rub plastic and a rag together when prepping that body for that ultimate clean paint job. You just set yourself up for failure if you didn't kill the static, The charge will actually pull dirt into your body. I have actually used static to my advantage on helmets and snowmobile cowling anything of plastic type nature. The static charge will actually pull every bit of paint from a fully loaded Pinstriping or Lettering brush with a incredible random pattern. If static charge has that much ability to pull heavy bodies paint from a brush how much dust to you think that highly charged body is attracting???. Kill the static before you paint and you will be amazed at how clean your paint work will be! Peace..............jimmy "RASS"
-
C.E. DING DING!!! IMO not a bad tune on Masons LIF "RASS"


.JPG.134baefd82c5c26fccd49fd5ec4f1809.JPG)