Pete J.
-
Posts
3,982 -
Joined
-
Last visited
Content Type
Profiles
Forums
Events
Gallery
Everything posted by Pete J.
-
 Future has had a number of different names but the formula is pretty consistent with each iteration. I believe it is currently Pledge Multi-Surface Floor Finish You can still find a bottle of the original on the internet but they are expensive.
 -
One - Off Build Quiz #27 - Finished
Pete J. replied to carsntrucks4you's topic in Real or Model? / Auto ID Quiz
. -
Building a model from SPARE PARTS ONLY!
Pete J. replied to steveracer's topic in Model Building Questions and Answers
Years ago, when we had a club that met at the Tamiya USA HQ, once a year Tamiya would clean out it's spare parts room. It was open kits that were cannibalized to send parts to customers. The boxes may have a sprue missing or it could be a random bunch of parts. They would bring them out at the club and everyone at the meeting drew a number from a hat. Then we went in order . We could select a box. No peeking inside the box. You got what you got. Then we got to cycle through until all the boxes were gone. The next meeting we all had to build something that was from parts in the boxs. It was always fun to build and see what others built. -
Autoquiz #563 - Finished
Pete J. replied to carsntrucks4you's topic in Real or Model? / Auto ID Quiz
. -
Just a thought on the areas you mention. When sanding around sharp lines the that, use some good masking tape and apply it so it just overlaps the top. This way you are less likely to burn through the high spots. I also do this on the edge of body lines. Nobody is going to notice the edge is not as smooth as the larger panels. At least not as much as a burn through.
-
3D printing a part for a 240Z
Pete J. replied to Pete J.'s topic in Model Building Questions and Answers
Thanks for the response. I would really have no idea were to begin looking. As I said, I am not really into 3D printing, I was just hoping some like you would come along to do the job. I am here whenever you get ready to do one. -
3D printing a part for a 240Z
Pete J. replied to Pete J.'s topic in Model Building Questions and Answers
That is spot on! Are you interested in printing a 1/12 and 1/24 scale version? The ZG 1:12 if I recall is the fairlady with clear headlight covers and a JDM front clip. I bought the west africa safari kit to get the correct front end for the US version. I bought them to try and replicate my 1972 240Z. The one car I wished I had kept and not sold though by now I am sure it would have been a rusted hulk. I spent 5 years in northern Michigan. The winters are absolutely hell on cars. -
I am certainly not an expert at 3D printing. In fact I am not even a novice. Having said that, one of the biggest knocks on every 240Z/fairlady model I have ever seen is that they are all right hand drive! Would it be so difficult to scan an original part convert it as a mirror image for left hand drive and print that?? I have multiple kits in both 1/12 scale(Tamiya) and 1/24th scale(several manufatures) and would be interested in such pieces. I have no idea if anyone else would be interested in such a part. I can only speak for me. I would love to have one in both scales and would be willing to send a part for scanning if someone were interested.
-
This perfectly explains the post office situation!
-
Well, that is certainly not stock on a GTO.?
-
This is the first time in my 72 years that it has become a workers market and not the employers. Although there are other factors, no one wants to work at a BLAH_BLAH_BLAH_BLAH job in a BLAH_BLAH_BLAH_BLAH place for BLAH_BLAH_BLAH_BLAH wages. Employers should be looking inward as to what they can improve to attract and hire good people. Workers now have plenty of choices and they will not take a job just because it is offered when there are plenty of others to choose from.
-
Psss't! Here is a secret. Don't tell anyone. You can get micro mesh directly from the manufacture for less than a local or online hobby store. You can order the exact grit you want instead of buying a "polishing" kit. https://micro-surface.com/product/micro-mesh-soft-touch-pads-individual/
-
Mark, it took an incredible amount of work to get to this. Something you can definitely be proud off. Please tell me what shows you are taking it to. I just won't enter a model in them! Flat out a true masterpiece!
-
"Favorite obscure or discovered music Album" -Started 8 years ago. "Once upon a time" -Started 6 years ago. "What irked you today"- Started 9 years ago. "What did you get today" -Started 14 years ago. Just to mention a few. I am sure there are others. Stuff that I made one post in years ago and it pops up all the time when I select "unread" and "Content I have posted in". I am sure that there are people who enjoy the topics so I don't suggest deleting the posts in general. I would just like to remove myself from that group of posters.
-
Dave, tried that, doesn't help. If I have posted in something it comes up. I would be nice if we could limit that somehow.
-
Paint Strippers - What to Use?
Pete J. replied to pbj59's topic in Model Building Questions and Answers
At 72 I understand. ? -
Paint Strippers - What to Use?
Pete J. replied to pbj59's topic in Model Building Questions and Answers
As many have said in the preceding 26 pages, nothing is guaranteed. Because there is not just one "putty" and you probably don't know the brand, it is a matter of experimentation. Since it is filling in panel lines , you might want to try a panel scriber first. Often times that old putty gets brittle with age and will just pop out. -
Send me a PM with your email and I will send you a JPEG that I did on sketchup.
-
Dave, is there any way or would it be possible to add an option to "unsubscribe" to a given thread. Some of the thread I have posted in are getting a little long of tooth. It was fun when it started but 9 years and 14,000 posts later it is getting a little old to see it popup every time I search "things I posted in". Just a thought.
-
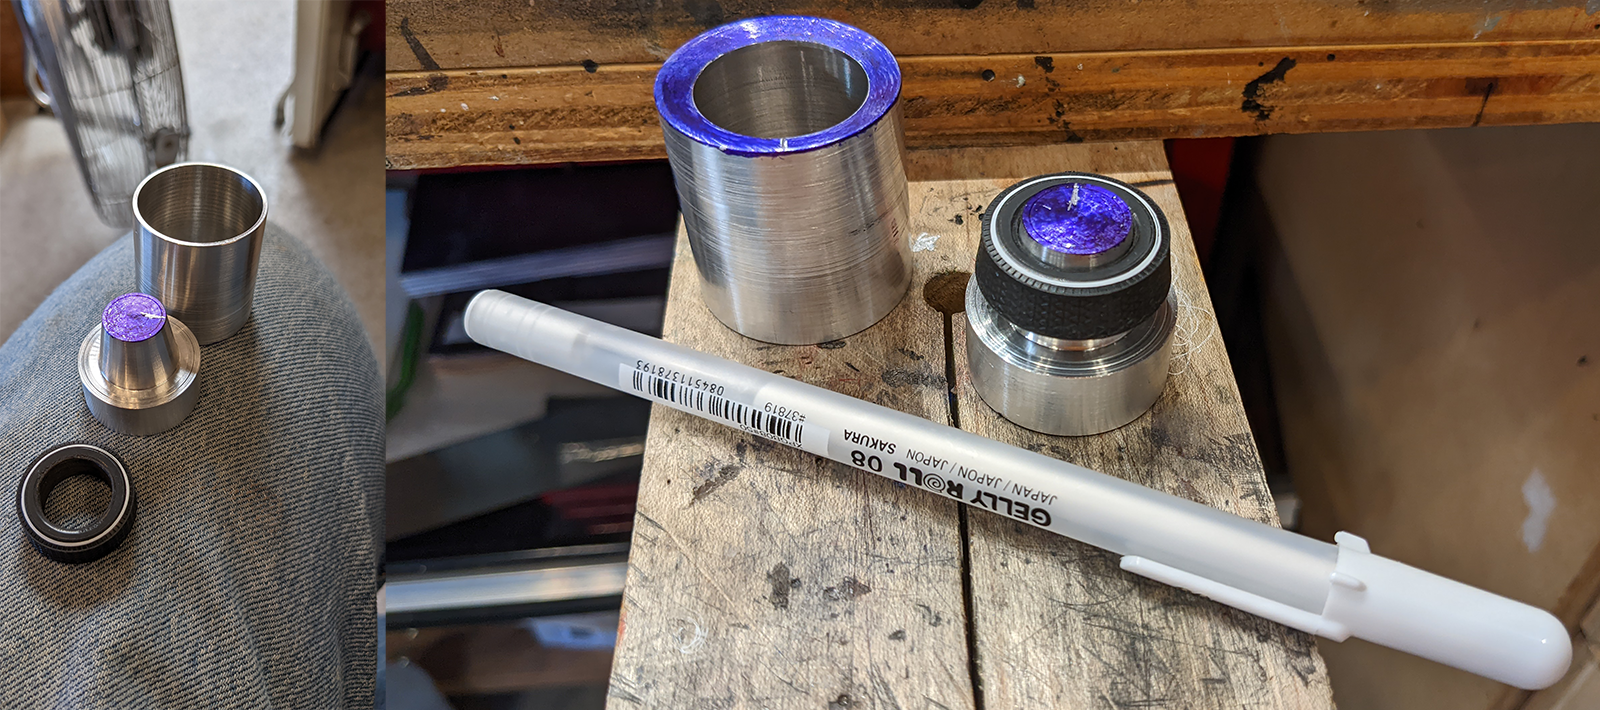
This was made to accommodate a number of tires with different radii. I mostly use 1:20 F 1 rain tires for my hotrods. They have a larger diameter than the tire pictured(AMT 69 GTO kit). You are right, there is probably a way to do that such as tape on the inside of the jig or around the tip of the pen. I think I would use a small section of brass tubing over the tip of the pen to give that smaller size. I think I could make inserts to fit in the top. As I said, I have no intentions of making any more, so it works for me. The scratch marks are there to allow me to remove the tire to let it dry and then put it back in to put a color stipe over the top of the white. I have found that the inside and outside edges of many tires are not concentric. This way when it goes back in, the jig is aligned as it was previously.
-
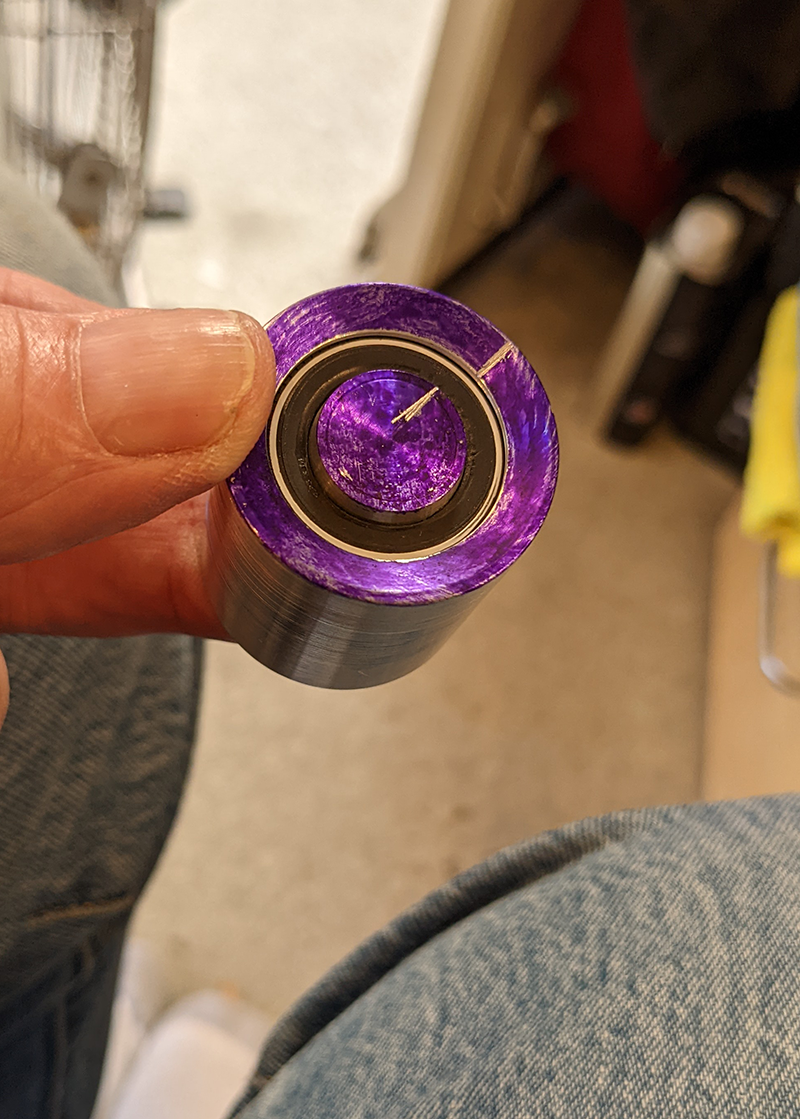
Peter, here is a shot of it at the end of the process. The concept with pushing it in, is that the central shaft has a taper to it to accommodate different tires by different makers. The two halves go together with a tolerance of .003". Pushing it up does two things. First it centers the tire by sliding it down the taper. Second, when it reaches the top, pushing it a little more brings it flush with the lip. It should be tight enough to level the tire and make it meet the upper lip snuggly. I don't think I could hold jig, pen and snap a photo?. Not enough hands. As to the Gelly rolls, yes they to take a while to dry. Is it hard when dry? Well it won't take a lot of handling but it is firm enough that you can touch it. I can't speak to all tires,because different model companies use different formulas for their rubber. Regardless, I top coat most of my tires with either flat orsemigloss clear and that seems to protect them. Here is a photo. Perhaps this will clarify it. I put the scratch in the top, so if I want to make a blue or red stripe, I know the tire is aligned the same way. I have found that some tires are not perfectly concentric inside and out.

-
That's were this all started. I could never get them centered using a template, so I built a better mouse trap. This is V 2.2. I love a good challenge!
-
I know it doesn't come up often, but I though some of you would like to see a jig I turned to put narrow whitewall on just about any tire. It is really simple. The center plug is conical so when you put a tire on it, it is automatically centered. The sleeve goes over the tire and center piece and you push the center piece up with a fair amount of pressure until it is about as far as it will go. Then you take a white gel pen(I like the Japanese Gelly Roll pens I get at Office depot) and draw a circle using the inside of the sleeve as a guide. I find that 3 or 4 passes with light pressure gives you a clean line. You can vary the width with the pen choice. Gelly Roll has 3 or 5 different widths. For red or blue lines, you need to put a white down first, let it dry thoroughly and then go over the top with a red or blue pen. The red or blue are rather transparent and are very faint without the white pen underneath. Now, these are not for sale. It took my way to long to make one and if I just charged for my time, they would cost $75 to $100 each. Not worth it to any modeler. However, if you have a lathe or know someone who does and would do the work, I will gladly send you a copy of the plans I drew up and you can make it yourself.
-
-
Autoquiz #558 - Finished
Pete J. replied to carsntrucks4you's topic in Real or Model? / Auto ID Quiz
.