
landman
-
Posts
7,921 -
Joined
-
Last visited
Content Type
Profiles
Forums
Events
Gallery
Everything posted by landman
-
I don't know if I'll get chastised for posting this here but it is about a scale model and it is relevant to the current topic. This guy builds these masterpieces using junk and "household items". http://www.woodworkingtalk.com/f13/2-3-scale-cars-motorcycles-55257/
-
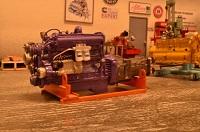
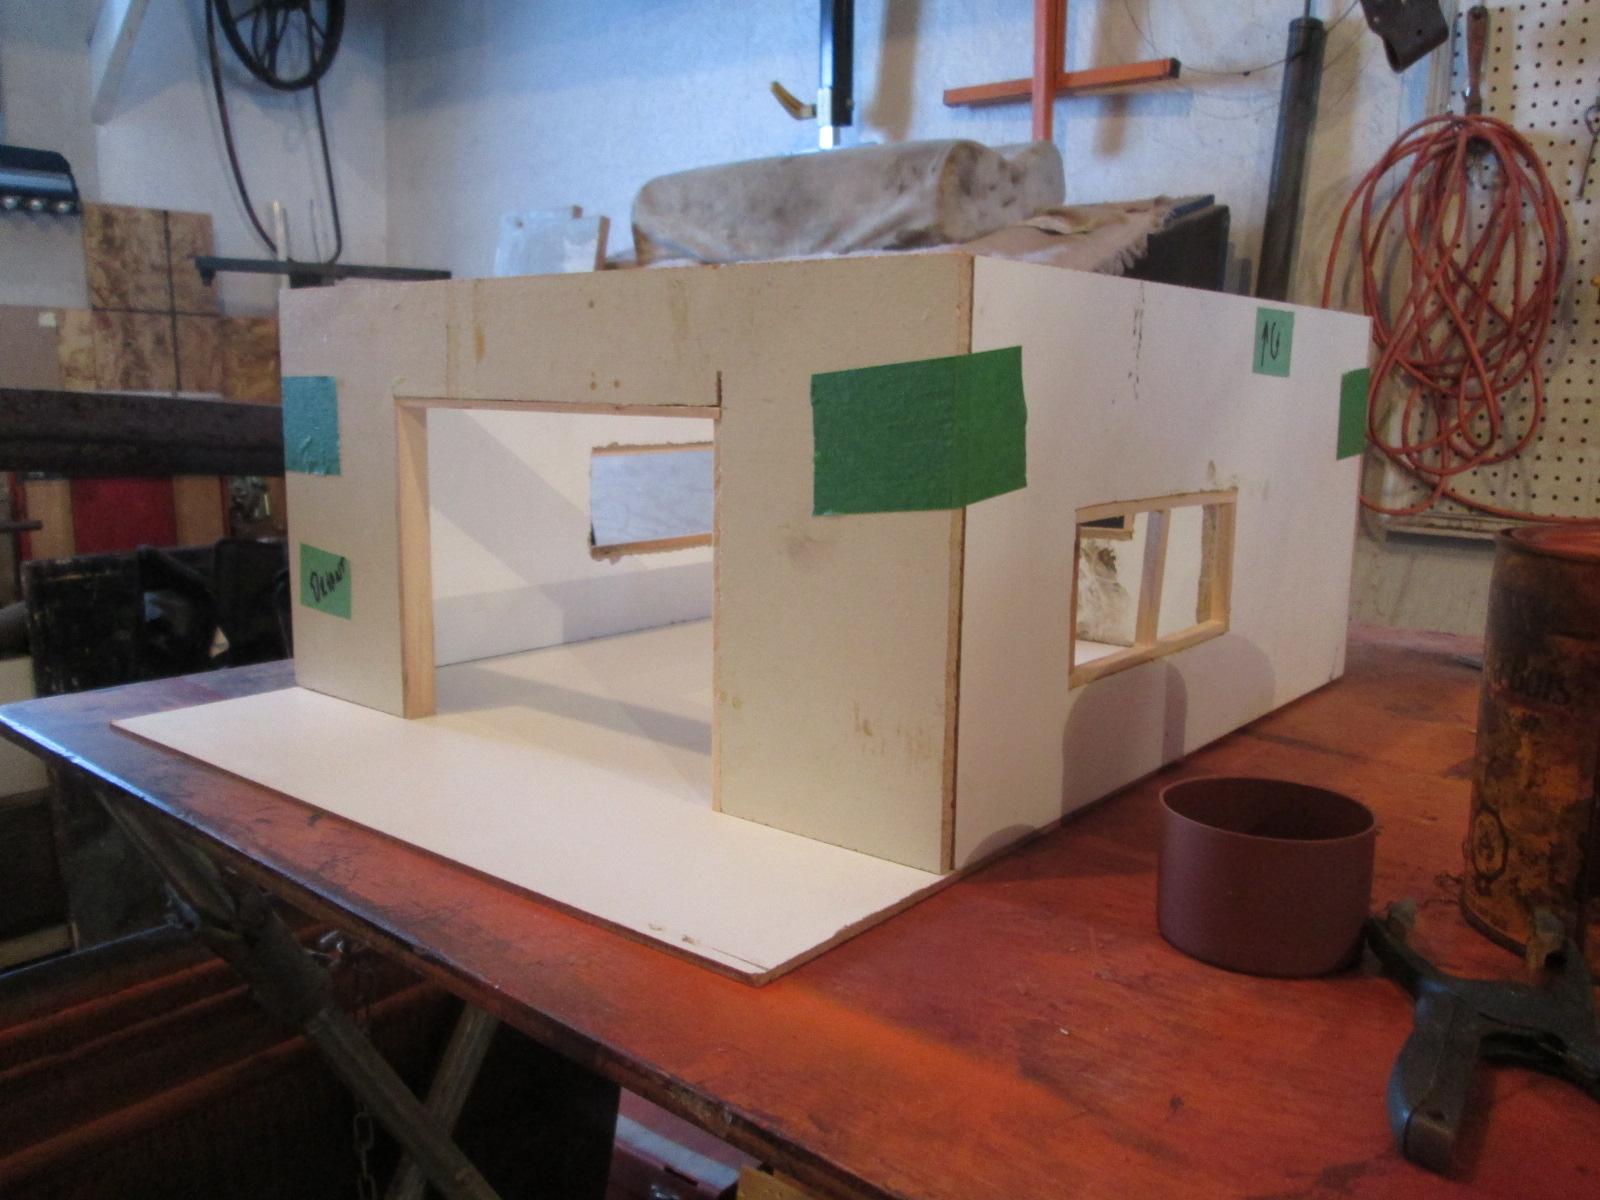
Well... it is Dec 18 and I haven't finished my Christmas gift projects so the models will be on the back burner for a bit. As for the gifts, one is a garage for my grandson and the others are jewelry cabinets for my granddaughters. Here's where they're at: Meanwhile I got a bunch of stuff over the past few days: another '34 Ford to do a better roof on my '34 Chevy, the C-4 tranny for the Mustang, new needle & nozzle for the airbrush, supplies including acetates, paints, furniture for my grandson's garage, rods & sheets, and the can of touch up paint that was in the trunk of my Mustang. We'll see if it is useable. It looks like I'll nave to cut the bell housing off the engine. That'll be fun.

-
Thanks Rex & Bill, so paint it is. As far as the carb, I think this one will do fine as nobody will look under the air cleaner. One thing I might do though, is add an oil filter like Bill did.
-
Started painting stuff. Man my eyes are old!!! I need two different pairs of glasses and for the real tiny stuff, no glasses at all but the part has to be 2" from my face. Good for inhaling fumes. Painted the recesses and the "holes" in the wheels. I'm not entirely happy with them. This is the Keith Marks decal sheet I got. I'm debating whether to use his wheel center decals or paint the ones on the wheels. This is where I need you experts' help. To use the decals, I suppose I have to smooth out the hub, remove the embossed emblem in there, correct? And then, the images look like they have to be cut out individually. How does one cut out an image that is about 3/32 in diameter?
-
Excellent! I am both in admiration and jealous. Your paint is incredible and the photography professional, like everything else .
-
Looking good. What is the blue one? A diecast?
-
Rex, I can go to the storage and take a photo of the quarter panels if you want. Their configuration will be very visible with the top up.
-

Monogram 1970 Challenger T/A Rebuild-Under Glass 03-13
landman replied to mustang1989's topic in WIP: Model Cars
I don't know Joe. I know I wasn't 14 but it is in the 90's at the latest. -
ATTENTION: Regarding Lost Topics and Posts
landman replied to Harry P.'s topic in General Automotive Talk (Trucks and Cars)
OK. Correction is done. Thank you Mustang 1989. -
Monogram 1970 Challenger T/A Rebuild-Under Glass 03-13
landman replied to mustang1989's topic in WIP: Model Cars
I've been following this for a while Joe. Love it. I have the same kit which I may redo. I'll keep looking for tips and techniques to steal, pardon plagiarize. -
ATTENTION: Regarding Lost Topics and Posts
landman replied to Harry P.'s topic in General Automotive Talk (Trucks and Cars)
I reposted mine but the old dyslexia took over in the title. How do I correct that? -
Last night, I painted some details on the engine accessories. I noticed that the kit offers plain or Cobra valve covers. My car has the Cobra ones but they are black. So I painted them and wiped off the surface.
-
Earlier this week I had started to fool around with ignition wires. I read somewhere (Mr.Obsessive , I think) that AWG 30 wire casing was about right for spark plug wire boots. I used the casing of some telephone wire but it looked somewhat big. Then I tried the casing from another phone cable and it was better.
-
This is to pick up on a thread that disappeared in the migration to the new server. It is about making a replica of my 1:1 1967 Mustang. I had started with this thread to gather info:http://www.modelcarsmag.com/forums/index.php?showtopic=90131&hl= I then went on to purchase the resin coupe body and a couple of fastbacks for the guts. I have also ordered a C4 transmission, a set of BF Goodrich Radial T/A tires , a convertible top boot, a set of decals which have the GT/A stripes ,and a set of photo etched details . This will end up being a rather expensive model. In the first few postings I had cut the roof off the coupe and toyed with the idea of modifying the rear seat area or not.
-
...Sharing some pain...(Lost Parts)
landman replied to DR JAY's topic in General Automotive Talk (Trucks and Cars)
That is my preferred method. I lose one almost evrey session.... a part, not the flashlight. -
If you look closely, the cab is very similar to the '65 Chevy pickup's. Using that and the hood of a Ford N 600 I'm sure I can cobble a good semblance of a B 7000.
-
Update: the jewelry boxes are nearing completion. After they're done, more time for models. I have the Mustang started and the '34 Chevy coupe. Those are the priorities. Then the Hawk.
-
Are there any kits made of the early 60's GMC B-7000?
-
Ford Racing Team
landman replied to Beeg Juanito's topic in Model Trucks: Big Rigs and Heavy Equipment
Is that display case still available somewhere? It's got my attention too! -
'67 Mustang conversion kit
landman replied to landman's topic in Car Aftermarket / Resin / 3D Printed
You are correct, I think the deluxe seats had a little chrome thing in the backrest. -
'67 Mustang conversion kit
landman replied to landman's topic in Car Aftermarket / Resin / 3D Printed
This was supposed to be in the quote above. We're on it David. I think I have all bases covered. Thanks. -
'67 Mustang conversion kit
landman replied to landman's topic in Car Aftermarket / Resin / 3D Printed
-
'67 Mustang conversion kit
landman replied to landman's topic in Car Aftermarket / Resin / 3D Printed
Thanks Steve. I found a link to decals I had forgotten about. Turns out it is Keith's. As far as the interior, mine is partial deluxe, for some reason it doesn't have the door panels. -
'67 Mustang conversion kit
landman replied to landman's topic in Car Aftermarket / Resin / 3D Printed
I imagine that would have to be reduced. how do get it right? -
'67 Mustang conversion kit
landman replied to landman's topic in Car Aftermarket / Resin / 3D Printed
Thanks Dan & Steve. Yes I have decal paper, so I could print some. As far as the C6 vs C4 that would be the lest of my worries.
.JPG.6d29c23271afcd9f181b9f7183d66b73.JPG)
.JPG.e88611d15302dd7a0e738eb50c1a68da.JPG)
.JPG.a34568d01dbfa93fc8993f3ebce75956.JPG)
.JPG.fad0cc5af3b6434486d1181f420bd991.JPG)
.JPG.6e2a2a77cc55cb908120267db3311412.JPG)
.JPG.33ebf031d57feb66bc086cf280f5cf4b.JPG)
.JPG.bd6fbd028f56270d46c6dc5e89d42366.JPG)
.JPG.1a4ac7dddc0a123472f3b185a933893a.JPG)
.JPG.b69605f37f5d055ccd5b03e4b8349f9e.JPG)
.JPG.c66fddf87c91f27a2763d57eef363ae0.JPG)
.JPG.dc566a056775c868fc63b19e1a512e51.JPG)
.JPG.468a164091a3b5e20c7bb07e789916d4.JPG)