

peteski
-
Posts
8,908 -
Joined
-
Last visited
Content Type
Profiles
Forums
Events
Gallery
Posts posted by peteski
-
-
I doubt that Shapeways puts any RTV inhibitors on their printouts. They are simply a printing company. They don't know or care about how the printed items will be used. Plus, what if the designers themselves wanted to use their printout as a master for castings? Out of curiosity, with what type of material was the figure printed?
More likely the bad chemical reaction was due to either the material used for the printed object or maybe the wax or rinsing agent residue remaining on the object.
-
"Same Stuff" from Micro Mark works on acrylic...I just did a test and it's very strong.
I'm in the process of making a display case for a large (36" long) model of a battleship. I had some scrap acrylic 1/8" plexiglas and payed with it; nice firm bond, and easy to work with.
Like Bill said, Pro Weld and Tenax are methylene chloride based. Why buy the stuff from Micro-Mark for extremely inflated price per 1oz. bottle when the similar stuff is available from any well-stocked hardware store. I use Weld-On 3 (which now seems to be the stuff Bill pointed to). It will bond Polystyrene, ABS, and Acrylic.
-
I'm always surprised by the Ebay horror stories. In now well over 2000 transactions, I have never lost a cent, and have had only a handful turn unpleasant.
Paying through PayPal gives you a money-back protection scheme, and using the "pay after delivery" option allows you to inspect the merchandise PRIOR to forking out any money. PayPal fronts the bucks for the purchase, and then if everything is satisfactory, they deduct the money from YOU after 2 full weeks.
Same here - on eBay since 1999 (1,164 transactions) and have bought and sold mostly problem-free. Same with PayPal.
-
If I didn't say it before here, that Lindberg/Life-Like/Pyro Auburn 851 Speedster is a very good example of just how primitive model car kits (and the design/tooling process that brought them to market) was in 1954 when that kit was designed and tooled up (first introduced in 1055).
Art
1055? That is really ancient Art!
")
I do understand that it is a primitive kit. I wouldn't mind sanding off and re-scribing the raised door lines if that was all that is wrong. But this kit has so many major inaccuracies that to me it is not worth the effort.
-
You guys are losing me on this purchasing designs or getting free pre-made files and just printing them on your own printer. How is that different than buying a plastic model kit, some resin model, or detail parts? You can buy those without spending money on your own 3D printer and having the hassle of maintaining it. To me the reason to own a 3D printer is so I could design and print my own unique items not available elsewhere.
-
I smile every time I see this type of info being posted. Even if the 3D printer is given to you free, it is useless unless you know how to design objects in a 3D CAD program. Sure, some simple shapes can be fairly easy to learn but if you want to do anything more complex there is a steep and long learning curve.
-
I permanently borrowed this thing from my dad in the early- mid-1980s, it's formal name is the "JC Penny Microworkshop", and I have the whole thing just like what is seen in this recent auction page. It finally needed a bit of oil in the bearings a few years ago to get rid of the increasing vibration, but otherwise still works like a charm. What I like about it is the rheostat motor rpm dial which allow me to choose any speed above 10k rpm to I guess some annoyingly high speed. Wish I could slow it down further, though.
That looks identical to my Weller unit (even the Styrofoam insert and the case). Looks like the unit was sold under multiple brands. I even added variable speed controller to mine. I upgraded to a variable-speed Dremel tool when they started using ball bearings in them (that eliminates the longitudinal play on the motor shaft). But I did use my Weller tool for many years. I still have stashed deep in my basement.
-
That tweezer block is a nice idea .
Thanks! I got tired of looking for all of them on my workbench.
-
-
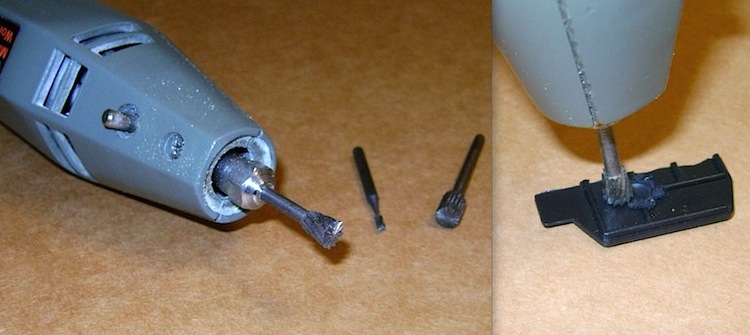
Never knew what these bits were officially called, I just used 'em. Assuming you have a motor tool of some description, you simply use the bottom edge of the cutting tool to grind whatever you need into plastic dust, as in what I just did to the ribs of this unfortunate plastic piece.
Wow! That looks like a Weller motor-tool! I had one many years ago (before buying a Dremel). Is this an old one or do they still make them?
-
-
Nice equipment!
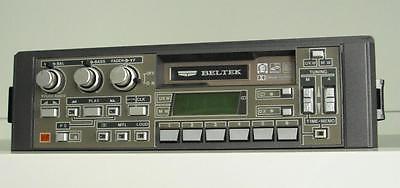
As far as car stereos go, I still have my Vector Research car stereo (bought in the '80s in a Tech HiFi store). It was a re-branded BELTEK unit. It is mounted in a BENSI box (anybody remember those). You needed one of those living in a thickly settled urban area.
-
Nice tip (pun intended)!
I put either a piece of thin wire insulation or heat-shrink over the tip of some of my tweezers. In this photo I used red insulation on one of them.
-
You've built some nice replicas Alan!
I'm involved in a carnival project, but on much smaller scale.
Friend of mine and I modeled the Royal American Shows Carnival as it appeared in the '60s in 1:160 scale (N-Scale). He does all the kit and scratch building and I do the animation and lighting. The carnival is part of a set of NTRAK modules (model railroad) which we display at many train shows. My friend also modeled the entire Royal American Shows train.This thread shows how I made the bumper cars (and gives you an idea of the size of those models) and also links to couple of videos of the carnival.
-
I can easily see a well-weathered beater beat out a nice shiny paint job. Maybe people think that weathering is easy, but good realistic weathering takes time and skill, and I would say that it is as difficult or even more difficult than a good glossy paint job.
I also don't polish my paint jobs and yet I have won some pretty prestigious awards for my models. If I had to spend hours sanding and buffing my models I would quit the hobby - that is not for me. To me my paint jobs are good enough without polishing, but I know that everybody's different.
-
I just saw some info on the Spotlight Hobbies board (posted by Tom, the proprietor there). I figured I would re-post it here:
Don Holthaus called to bring me up to date on their progress, and asked me to pass the info on to you. They received so many orders when they reopened their site for 7 weeks early last summer that it took from October to January just to do the orders for May 15th, and they’re now finishing up orders from the 16th. Orders placed just before the site closed, in July of 2016, are well more than a year out, possibly spring to summer of 2018.
Please just be patient, they’re working their fingers to the bone, and when your order comes up it will be shipped. If you have to talk to them they’d rather you call than email, but keep in mind that every time you write or call them you’re just causing orders to be delayed further. Thanks.
Actually, the first thing he said when he called was that he heard I bought the Modelhaus and wanted to know when I’ll be by to pick it up. I’ve heard that too, so just for the record, the rumor is absolutely not true.
-
That would be my opinion too. The main reason modelers use spray-cans is to minimize cleanup after the painting is done (or so they say). The Preval sprayer seems to need a cleanup similar to what an airbrush would need. So why not just get an airbrush? It will allow much finer spray and full control of the air pressure and paint volume.
-
All putties and fillers are junk! I only use kit parts filed to perfection. No gaps or sinkholes in my models!
-
I used to love the really detailed kits, but I've grown to appreciate simple fun builds over the years. I found that it was getting to be too much like work..
That was true many years ago, but now thanks to inexpensive digital photography, you can take close-up photos of all the parts of the model which will become hidden and then create an album which you can place next to the model and which will show all those photos of the hidden items. Just like the restorers of 1:1 cars do when they display their cars.
-
Glossiness of the model's paint is not the main deciding factor when the model has so many layers of paint that they almost hide the door lines or other details. It might be polished and shiny, but it doesn't look good or realistic.
As far as judging goes, when my the judges judge models at our club's model contest, we use the pont system. The model gets certain amount of points for overall paint finish. That includes body, interior, undercarriage and engine compartment. Pretty much all the painted surfaces. If the body has a superb paint job but the interior or engine is poorly painted, that model will get fewer points than a model which has quality paint jobs on all of its components.
-
The frame is strong and supports the bike quite well. No sag at all.
https://dangervideo.smugmug.com/Models/Bikes/
Danger
Good to know - thanks Danger!
-
Looks good, but I like more chrome on my Hogs! But I also know that's not the "in thing" right now (and that is how the kit depicts that bike).
I have that kit (unbuilt). How stiff is the bike's plastic frame while supporting the weight of the model? Does it flex or sag?
I've built the previous 1:6 Fat Boy bike Tamiya produced over a decade ago (for a very short time, only available outside US). It was an older Harley. That one had a diecast frame which was really sturdy. These are fairly heavy models and that is why I'm worried that a plastic frame might not be up to the task of supporting all the weight.
-
-
If you think that the kit you are building has too many parts you should see some of the 1:35 scale military vehicle kits - many of those have between 2,000-4,000 parts! More modeling time for your buck!
Many of those parts are for the track which is built one-link-at-a-time. But seriously, some of those are a bit of an overkill.
")

 Friend of mine and I modeled the Royal American Shows Carnival as it appeared in the '60s in 1:160 scale (N-Scale). He does all the kit and scratch building and I do the animation and lighting. The carnival is part of a set of NTRAK modules (model railroad) which we display at many train shows. My friend also modeled the entire Royal American Shows train.
Auto ID #316 Finished
in Real or Model? / Auto ID Quiz
Posted
Interesting parking location for the wiper blades - spread them wide!