Goodwrench3
-
Posts
804 -
Joined
-
Last visited
Content Type
Profiles
Forums
Events
Gallery
Everything posted by Goodwrench3
-
 Amen. I build my "shelf queens" and they look darn good sitting there in the family room to me. I get far more enjoyment out of seeing more of them built and displayed on my shelf than having "perfect" builds. They look much better than sitting in their shrink-wrapped boxes on the shelves in the basement!
 -
Yeah this is the double-edge sword that the internet has created. Now we see all of these "perfect" builds and we become afraid to build anything because we are afraid it won't be as good as those we see posted on facebook, etc. As soon as we are worried about whether it will look as good as so-and-so's build, we're building for the wrong reason (in my opinion). If you are building for someone else's approval, it's not going to be much fun -- at least it's not for me. Doing that "forced" 30-day build broke me out of the rut. I still struggle with it, but I just finish whatever I start and learn from the build. I can improve on the next one -- but at least I *finished* one. We won't get better with our skills unless we build. And if we don't build, we can't expect to get better.
-
Cummins NTA 370 question - AMT K-123 kit
Goodwrench3 replied to Goodwrench3's topic in Model Building Questions and Answers
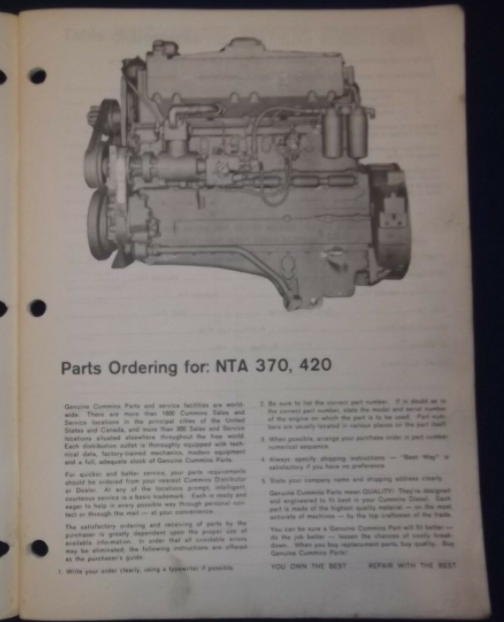
Here is a picture of a KW cabover that I took at the ATHS show in Des Moines IA a few years ago. Yeah -- that area of the block below the aftercooler is pretty busy. You can see in this photo the fuel filters aren't there -- in this particular case.
-
Cummins NTA 370 question - AMT K-123 kit
Goodwrench3 replied to Goodwrench3's topic in Model Building Questions and Answers
Thanks for the info. Yeah I haven't had much luck in finding pictures of 1:1 KW cabovers where you could see the left side of the engine clearly. From everything I've been told, the one place the fuel filters would NOT be mounted is on the side of the aftercooler (as the AMT instructions show). Thanks -
Cummins NTA 370 question - AMT K-123 kit
Goodwrench3 replied to Goodwrench3's topic in Model Building Questions and Answers
That's an interesting article -- it's yet another different arrangement for the fuel filters. The article references a NTA 855 vs. a NTA 370. It does look like the 370 and 855 engines have different fuel filter locations -- here's an 855.
-
Cummins NTA 370 question - AMT K-123 kit
Goodwrench3 replied to Goodwrench3's topic in Model Building Questions and Answers
Thanks for that -- it's actually from a Cummins service manual. This is for the K-123 cabover, so I'm not sure what it may interfere with -- but yes, definitely something to check before moving it. I was hoping someone who had built this kit could share what they had done. I'll keep looking as well to see if I can locate a KW service manual.
-
I'm working on the AMT KW K-123 with the Cummins NTA 370. From the picture in this service manual, it doesn't look like the fuel filters are really supposed to attach to the side of the aftercooler like the instructions show ?
-
Were you able to find the Absaroka county sheriff's badge decal for the doors ?
-
LOL... yes.. but he "puts down" Rainier ?
-
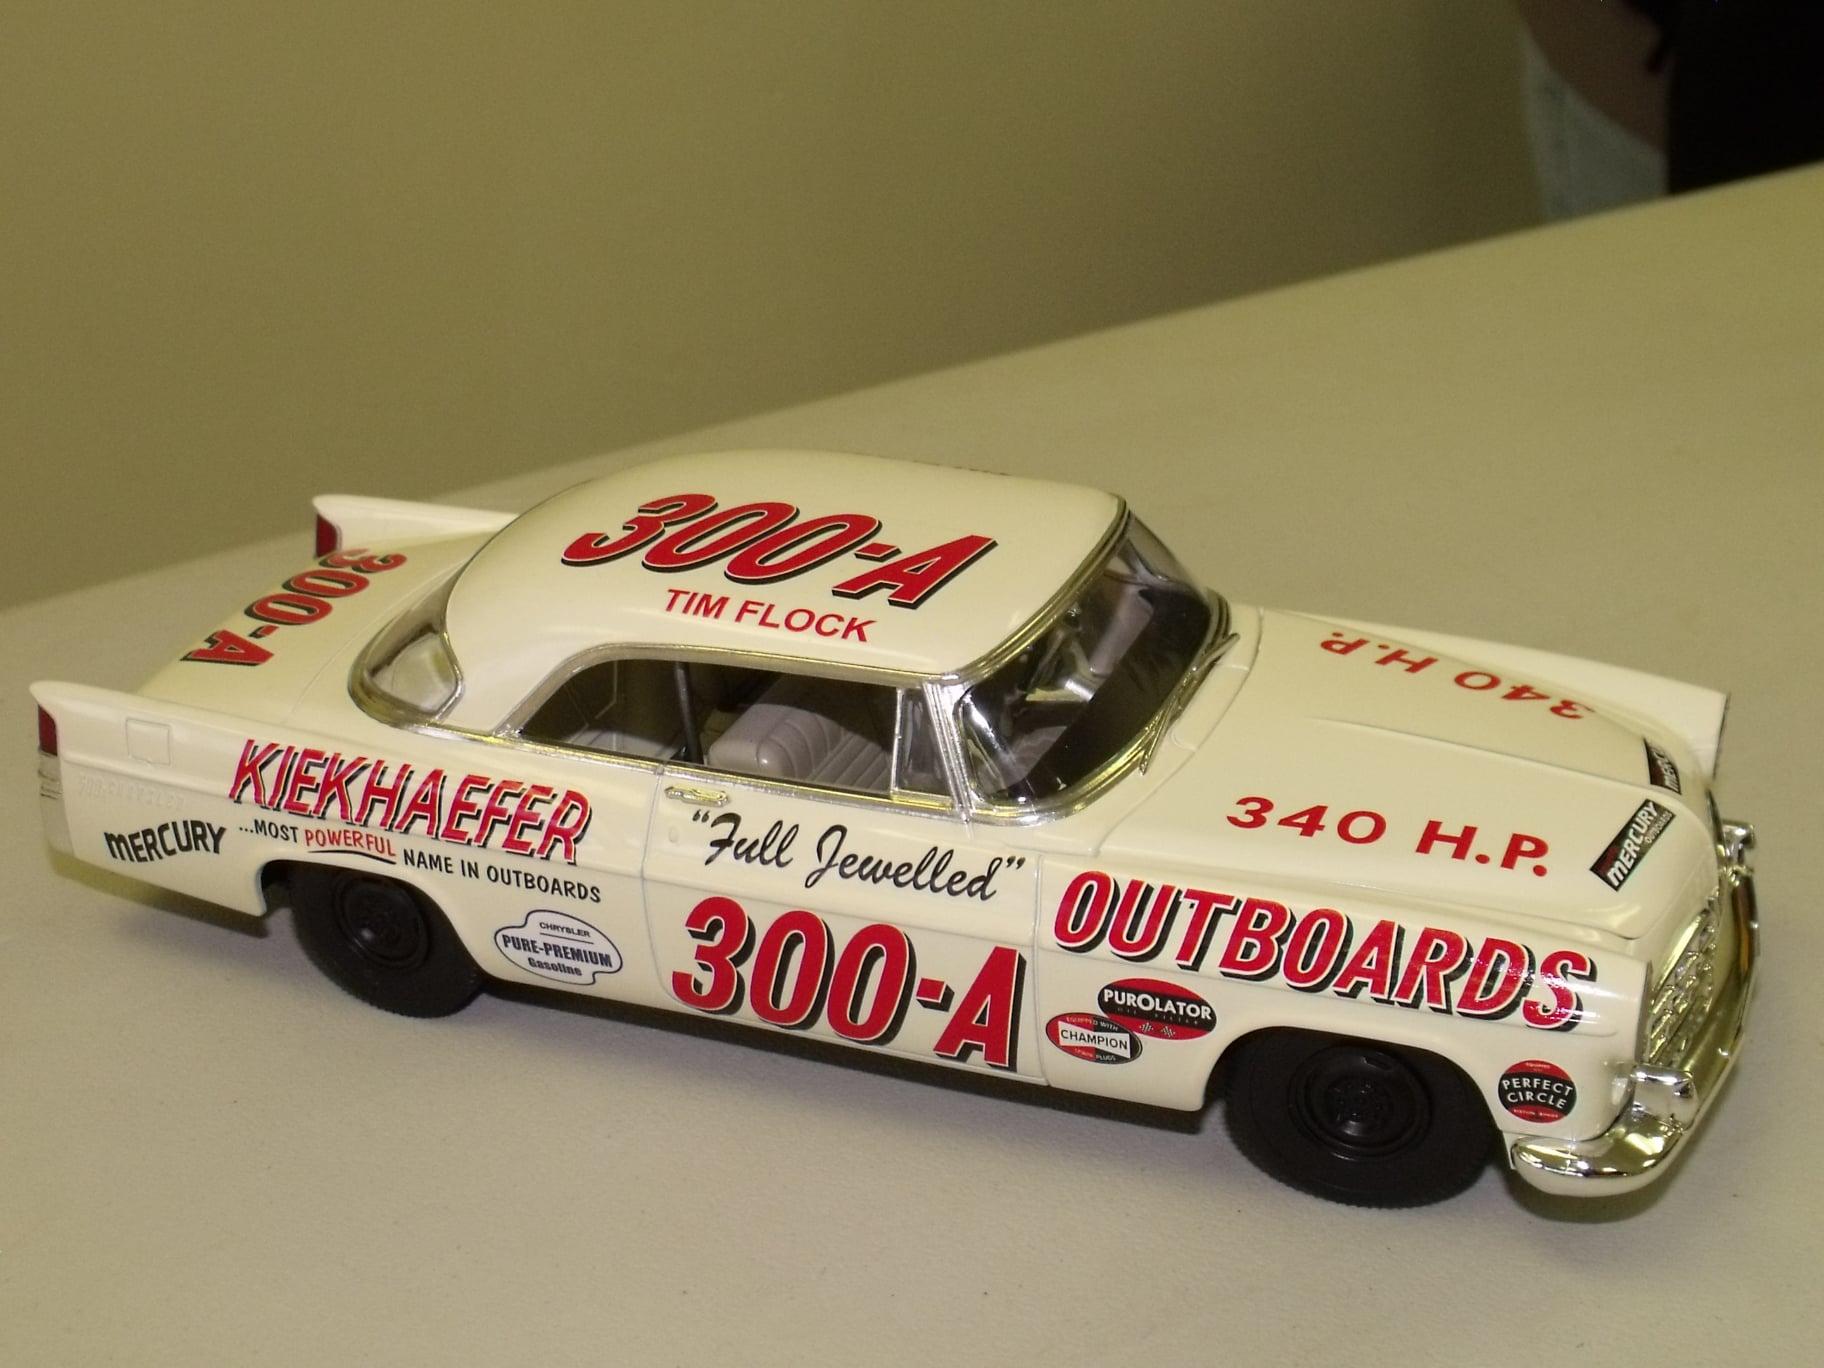
Tim Flock 1956 Chrysler
Goodwrench3 replied to Goodwrench3's topic in Stock Cars (NASCAR, Super Stock, Late Model, etc.)
Thank you !! but in all honesty -- it's not "perfect". LOL. There are mistakes, but luckily it looks pretty good in the pictures. -
I didn't think they were in shops yet ? Our local hobby shop hasn't gotten any yet I know.
-
Mark Martin Folgers Thunderbird
Goodwrench3 replied to randman's topic in Stock Cars (NASCAR, Super Stock, Late Model, etc.)
Super nice !! I did have a question -- for the chassis and roll cage -- did you spray the Krylon Pewter Gray directly on bare plastic ? Or did you spray some primer coat first ? Thanks ! -
Bring out the Transtar II Eagle cabover next... please !!!!!!!
-
Blue and black plastic in the F-4270 kit !
-
Awesome! Credit card is hot and ready. I'll be cleaning out my local hobby shop as soon as they hit the shelf !! Love it !! I'm building a F-4270 right now. Looks like exactly the same rear suspension.
-
I've heard from others that his decals need to be layered to have an opaque color. I ordered the same decals for mine, but in red as I plan to paint it white. I was wondering -- I'm in the middle of my 4270 kit. I had to move the front axle forward so that the front wheels would be centered in the fender. Did you find that the out-of-box assembled front axle and wheels were the correct width ?? I've heard with the 4300 the front axle is too wide and the front tires stick outside the front fenders. I haven't snapped the front wheels on my front axle yet to see, since once snapped on they won't come back off easily I'm guessing. Just curious if that's another thing I'll have to deal with ? Thanks !
-
Tim Flock 1956 Chrysler
Goodwrench3 replied to Goodwrench3's topic in Stock Cars (NASCAR, Super Stock, Late Model, etc.)
Thanks. It's far from "flawless" LOL (I know where the skeletons are buried). But I was happy with how it turned out for me (i.e. it looks pretty good on the shelf in my family room). It's the first Moebius kit I've built. The one thing I learned is you have to be critical of the Moebius instructions -- there are problems with them. The paint for the body is supposed to be a "Cloud White". The instructions call out a Testors color (Testors Auto Lacquer Wimbledon White), but those have "vaporized" from existence and I couldn't find any. I used Tamiya (rattle can) white primer and then Tamiya TS-7 Racing White. The seats and interior panels were painted with Krylon 2423 Satin River Rock. This looked like a close match to the 1:1 car upholstery that I found in a photo of a '56 Chrysler. Decals were straight from the kit. No real problems putting them down -- some Micro Set needed to get them around some curves. Thanks for the nice comments. -
Finished this one last weekend for our club build-off.
-
Yep -- understood 100%. It was just amazing what the Allison family had to deal with in those times... Bobby's wreck at Pocono that ended his career. Davey's death in the helicopter crash. Clifford's crash at Michigan that took his life. Wow.
-
It's a Salvinos JR kit -- and those are just the old Monogram molds -- with the exception of the tires and glass. The Salvinos JR chrome is fantastic. However, for this model I needed the 5-hole wheels, so luckily I have a pretty good "stash" of the old Monogram Ford kits to rob them from. I like the Salvinos JR tires -- they seem to fill the wheel openings a bit nicer. The glass I do have concerns with. This is the second Salvinos JR kit I've built and the front and rear glass just does not have the curvature to match the body opening. I had to clamp the front windshield against the roof line overnight while the glue dried and hope it wouldn't pop back in the morning. On my last kit (Bobby Allison Buick), I tried to bend the rear windshield a bit more to get it to conform to the curvature of the body. Well, I snapped it and had to rob one out of a Monogram kit -- which fit absolutely perfectly. But all in all, nice kits -- plus they are all molded in WHITE !! My only other disappointment was that while the kit does include "Powerslide" decals, they are Powerside *art* but they are printed in California -- not by Cartograf in Italy. You can tell the difference.
-
Nice ! And even better -- no Coke decals !!! ?
-
It was Tamiya grey primer, then Tamiya TS-8 (Italian Red). Thanks!
-
Thanks for posting that ! There was some concern that spraying it might end up putting too much on, so it was recommended to brush it. Did you spray from a rattle can ?
-
Thanks all ! I tried Tamiya "smoke" brushed on these kit wheels (straight from the bottle). I think the effect is pretty good. At least I tried something new.
-
Amen to that ... "real NASCAR". Once Earnhardt died at Daytona -- it was over for me. I couldn't watch any more and I haven't watched a single race after that day. I enjoy building the '80's cars and I always have an '80's race on YouTube on my iPad while building. Thanks for the post.