440 6BBL
-
Posts
28 -
Joined
-
Last visited
Content Type
Profiles
Forums
Events
Gallery
Everything posted by 440 6BBL
-
Loving this build already. I´d like to point something out regarding conversions of 2-doors into 4-doors. I´ve been working on a ´71 Valiant for a couple of years now and I posted this pic to ask for advice because I felt something was out of proportion. The result of the discussion was that I had built a sedan with a coupe roof height. The roof came out too low, like a very gentle top-chop. I ended up cutting the pillars and raising the roof 1.5 millimeters or so. I used a Duster front clip with a Dart body to get the correct style a-pillars and a simple body to work with for the conversion. Someone mentioned that the windshield of a Dart Hardtop wouldn´t fit a Valiant Sedan in 1:1. The picture of your modified body´s rear end with the 1:1 pic next to it. Compare the rear windows with each other. I could imagine that it´s not only Mopars to have different roof heights on sedans and hardtops. In the case of my Valiant it was pretty obvious, that the roof had some sort of issue. Easiest way to find out would probably be calling a glass guy and asking if 2-door and 4-door Novas use the same size windshields. Looking forward to seeing this evolve, digging the subject.

-
Thanks for the comments guys. If there´s just one of you starting to see more than a pile of poo in this kit, then I´m a happy bloke. To me the General kit is now on the cool stuff list. I´ve never expected to say this, but I kinda start to dig this kit. Of course the details lack all around in comparison to Revell´s Charger family, but there is a sexiness in the proportions of the MPC Charger. You´re in big trouble when you want to build a car with wheel arch trim...but for everything else it´s a actually an awesome kit. Last update post...the finished thing will appear in the showroom. That scratchbuilt aircleaner has found its way onto the carb. I modified a 440 Magnum air cleaner as a base. Still need some touch-ups in the engine bay and a couple of wires. The chassis has a nice looking K-frame member and with the scratchbuilt front suspension parts there´s not much missing that a Revell Charger has. I find modifying and upgrading this kit is easier than making a Revell Charger look awesome. There are more MPC Chargers coming from me in the future. The white 500 is a little bit more dedidcated than the green Charger and will get a red tail stripe. A Daytona will be next, body preparations are already in the advanced stages...and finally I´ll tackle my ´70 restoration and I hope ya´ll wanna watch it. RC2 just needs a newly designed sprue with one stock and one deep Mopar steelie. Two sprues in each kit along with 2 F60 and 2 L60 pad-printed tires...these kits would be winners again. See you in the showroom
-
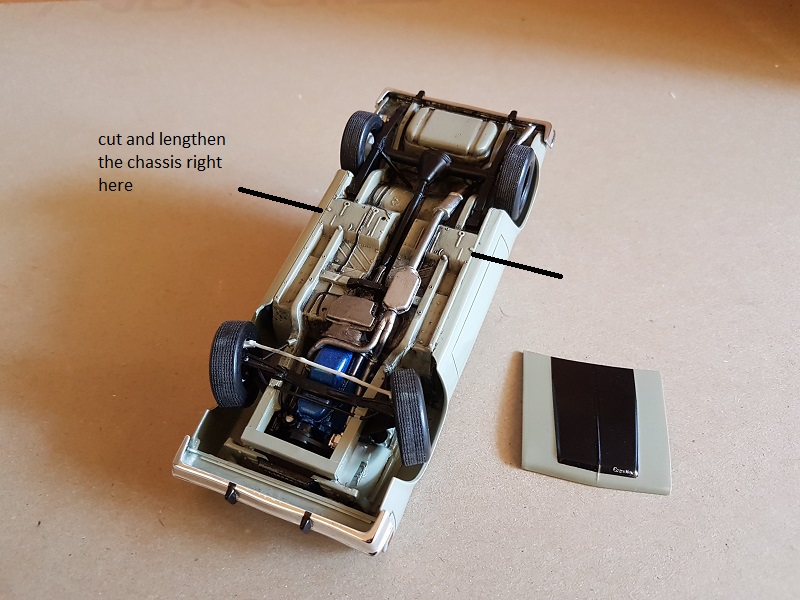
Still in the stages of gathering parts? The Gremlin is basically a Hornet that was rear-ended by King Kong´s fist. The two cars have a lot in common underneath. I have built AMT´s ´76 Gremlin about two years ago and that kit has quite the ton of upgrade potential as I have experienced. I did put some work in it, but that would the case with your build anyways if you want to swap parts. I´ll search for my built Gremlin if interested...it´s stored in a box somewhere. It now has steerable front wheels and a scratchbuilt engine bay. The Gremlin kit could be a starting point...bringing the chassis to the correct length or maybe combining chassis sections of the Gremlin and the Hornet. EDIT: ...found it... Inner body structure in front of the firewall is either scratchbuilt or from the parts box. Can someone identify the inner fender wells? I don´t remember where they came from. Maybe from a ´66 Nova Pro Stock kit!?! Looking at the pic of your promo-chassis...I´d say the Gremlin parts could do the job for your Hornet. I´d totally try it myself if I had a Hornet promo.
-
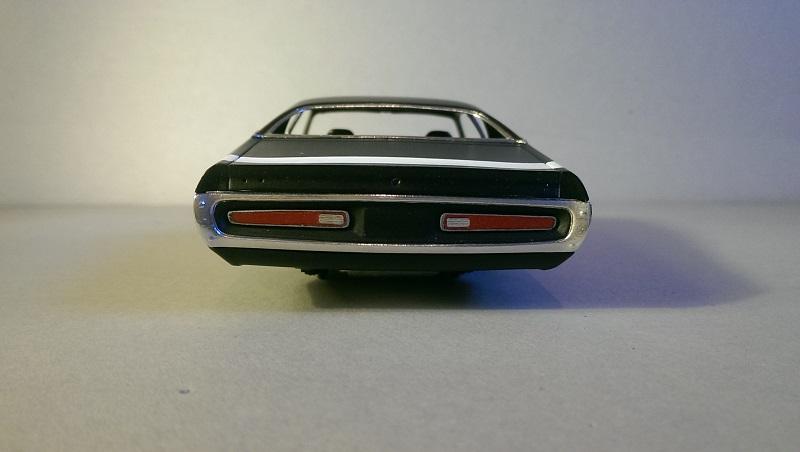
The Charger is now on its wheels after the final stance has been figured out. The front end is steerable and all wheels are glued to the axles as I hate wheels wobbling all over the place. BMF is also done. Just some final tweaks and I´m calling this thing done. Currently scratchbuilding an air cleaner and completing some incomplete spots here and there. The build should be done in no time from here.
-
Great stuff Spencer, looking forward to see this progressing. This kit has its reputation, but it remains my personal first choice when it comes to building a Chevy Nova. You can end up with a very nice body if you take good care of the fender assembly and maybe even replace the side window framing. It is possible to remove the SS badge from the grille and rescribe it to downgrade it into a base model grille. And you can carefully cut off the top part from the grille to glue it to the hood. This is a progress pic of my AMT Nova. The rocker panel trim was removed after the fenders had been installed. This way everything will end up being super straight. The side window framing was redone with sheet. I actually glued in full sheets into the body, then marked the posts and cut out the three window areas on each side. Now they are nice and thin and not so terribly bowed outwards. It was quick and easy work and a big improvement on the look of the body. I´m also using Revell Nova axles with the the AMT chassis plate on this build. Front end modified to be steerable aswell. There is tons of potential in this kit. Great job on the engine so far, I´m sure this is going to be a very neat build.
-
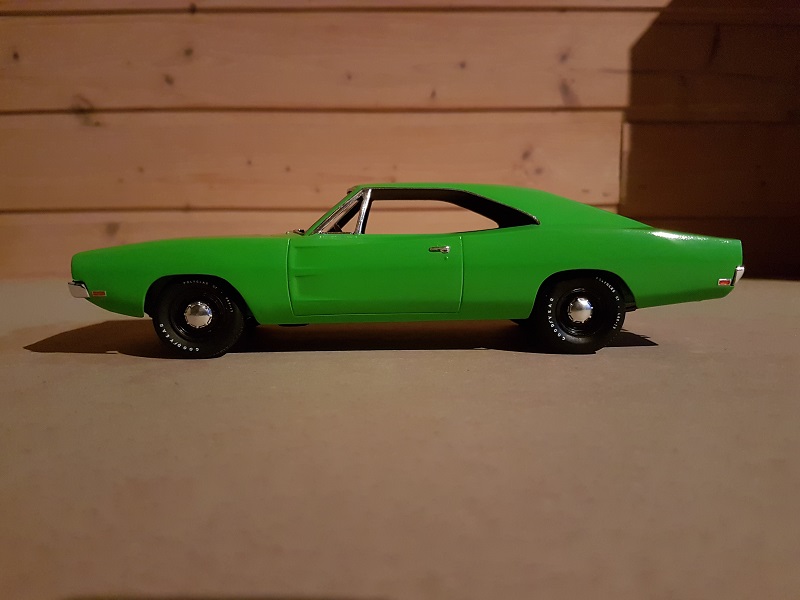
Foiling work is in progress on my Charger. I tried some rims from a broken Gotham City Police cruiser. Gonna keep it like this, it´s just the look I was after.
-
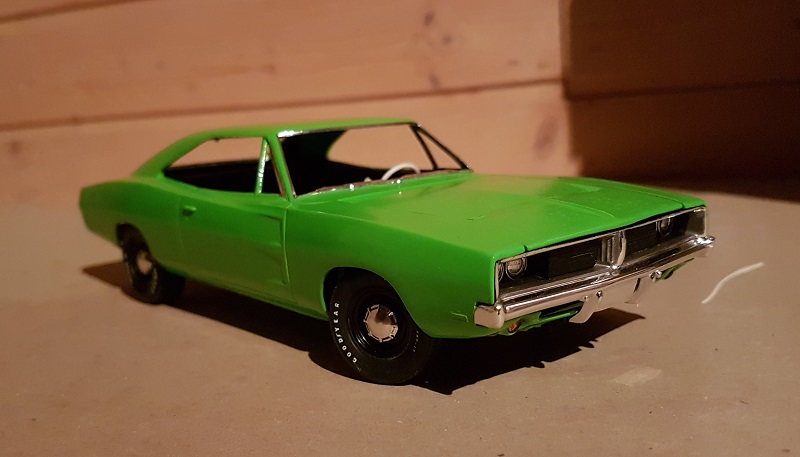
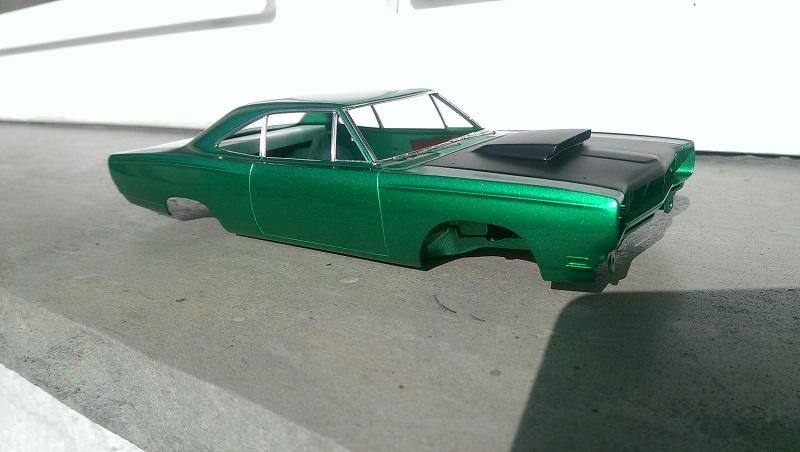
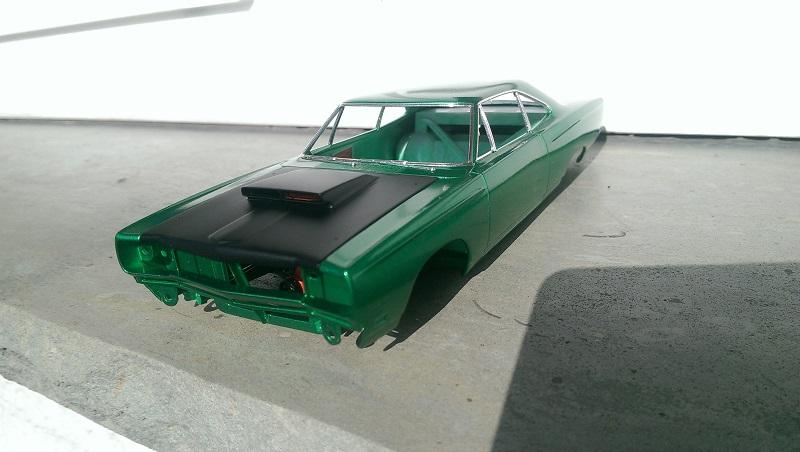
Faster than expected...first coat of green already on the re-primered body. Since this is a no-care-hackjob-build I wanted to try something. I always thought Chargers look quite mean when the headlights are visible, so I removed the outer parts of the grille inserts...which are wrong anyways. I cut the grille open and glued ´68 Roadrunner headlights to the back of it. The grille is definitely the weakest spot on this kit and this is actually a good option. Half of the wrong grille insert is gone and the remains are a bit overshadowed by the presence of the headlights. I like how the front came out with the modified grille and scratchbuilt core support detail.
-
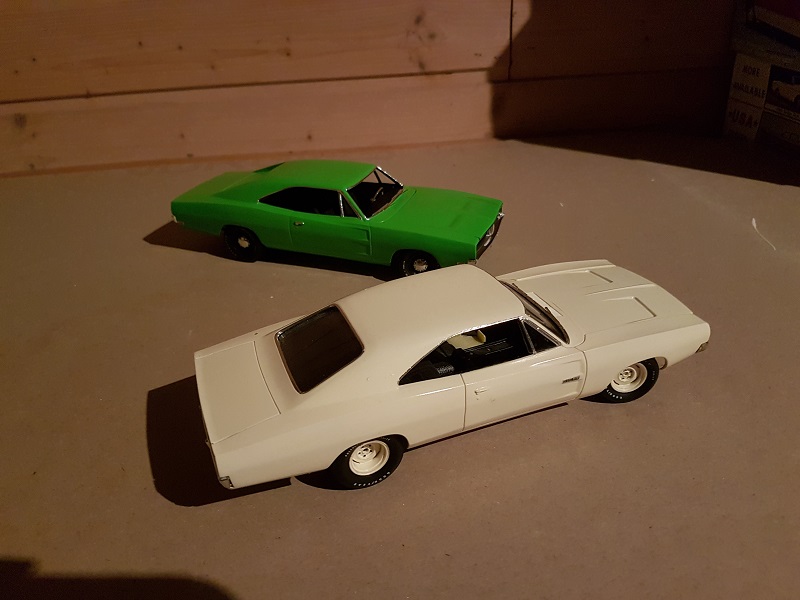
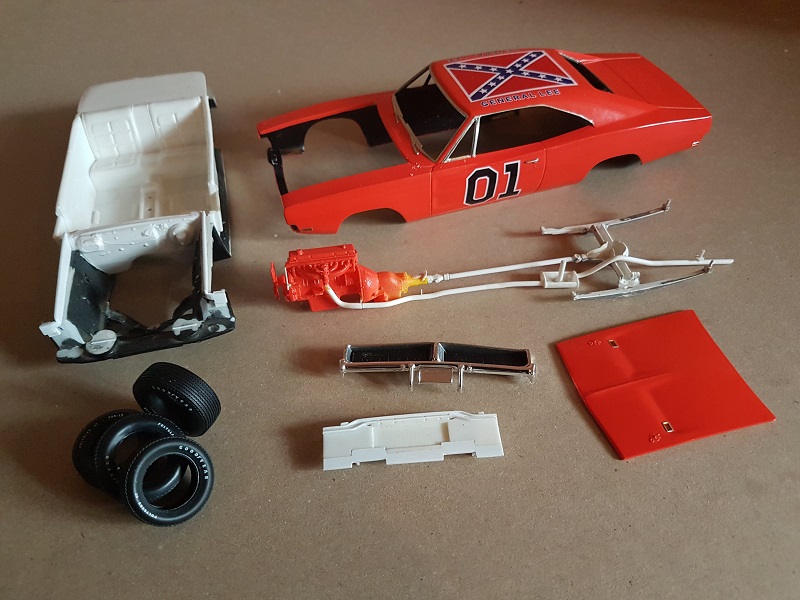
My first Cannonball entry ever is a retired General Lee from MPC. Let´s see how much we can get out of one of the world´s most hated kits. It started out as an ugly pile of parts from an unfinished build. The Slant-6 engine is from a Deora kit, there´s a scratchbuilt exhaust, some sheet to fill holes in the engine bay sheet metal, a modified radiator core support and a set of Polyglas tyres. Tamiya bright orange spray paint is annoyingly tough to strip...I had to go the brake fluid route with it. While the body is slowly losing its paintjob, everything else has seen quick and dirty progress so far. The engine remains in stock condition and the car will pretty much be a plain Jane. It shall look like a fast car at first glance, but with very reliable daily driver internals. I went with high impact light green from Tamiya to keep the ridiculousness of this car on a high level. It´s no V8, but it still kinda has Mopar written all over it. I´m having lots of fun with this build. Scratchbuilt goodies on the front end in progress to make it steerable. Other than that...it just takes some detail painting. There are definitely much worse chassis out there in many kits. It´s actually quite easy to make these simple Mopar chassis neat. Not done with detail painting yet...just the current state of what´s going on. Hope to get this thing done quick so I can throw in another inliner-build for the Cannonball Race.
-
@mademan I used stuff from my favorite decal-dude Keith Marks. I just dig his homegrown decals. I ordered two different sheets...one for Roadrunners and one for GTX´s or so. I think the 6BBL decals were on both sheets, but you can just say what you need when dealing with him. You`ll get a Charles Bronson style reaction. He just grabs your cash and soon after there are decals for you that can turn whatever you are working on into a little jewel. Pricey, but worth the investment if you keep his stuff for your more graily builds. It was a no-brainer for example to grab decals for a Johan Rebel Machine and I´m soon ordering stuff for my MPC Charger Family. ´68 Charger, ´69 Charger, ´69 Charger 500, ´69 Charger Daytona and ´70 Charger. Still need to get me unbuilt and complete annuals from ´68 and ´69, though.
-
Some progress on my end with the ex-General. A week in oven-cleaner and the orange Tamiya spray paint was still totally unimpressed. I upgraded to brake-fluid...it is doing its thing now. A Slant-6 in a Charger...that alone is already hilarious. To make the model even more hilarious, I went with Tamiya TS22 light green. It´s more of a Kawasaki green, but close enough for my taste to act as a high impact color from the Mopar factory. I think the orange Slant in stock configuration looks preety neat in that green environment. And the slightly modified engine bay has been a huge improvement. In addition to the engine bay, some simple work on the front end works wonders on MPC Mopar kits. This model will have steerable wheels and a nicer stance than an OOB built Revell Charger. Would folks buy corrected radiator core supports and firewalls to make chassis swaps on their MPC-Mopars pretty much unneccessary? These two other builds have gotten the same treatment and that white 500 in particular has stolen my heart...that thing is just sexy and the little improvements had a huge impact. If a resin caster is interested...I´ll make a nice set of masters anytime. Huge number of MPC and AMT Mopar kits out there that could benefit from the availability of a core support and a firewall. I´m just racing through this build, maybe I´ll do another inline build when the Charger gets done quickly. One question to the Deora experts. The Deora is the source of my engine, got a yellow molded unbuilt kit without instructions in a different box someday. I´m unable to find an air cleaner for the Slant in that kit. Since I have no instructions, I can´t tell if there is an air cleaner even included or what part is supposed to be it. Can someone shed some light?
-
I started working on my A12 Roadrunner three years ago and when I was searching for hood stuff back then I didn´t like what was offered. I ended up modifying the stock hood from my Johan Roadrunner with a reshaped scoop from Revell´s ´68 Charger Special Edition. Since the Johan hood is flat on the bottom, all details on the top can be easily sanded down without fear of destroying the hood. I added the center molding with sheet and finally blended in the scoop. The bottom side of the hood was also modified to make it look as accurate as possible. Some may notice the chassis swap. Revell´s ´68 Charger donated its chassis and the engine bay. It had to be shortened 2 millimeters or so, but otherwise fits like a glove. I still wouldn´t do it again...this conversion is pushing me to my limits. I´m faced with a very difficult final assembly situation as everything is supertight due to me going nuts on this thing...
-
My starting point is MPC´s General Lee with a Slant-6 from MPC´s Dodge Deora kit and some tampoo-printed Polyglas tires from AMT´s Parts Pack. Removed the dual exhausts from the rear axle and scratchbuilt a new single exhaust and also made a new driveshaft for lenght correction from the engine swap. Right now I´m in progress of fitting tiny bits of sheet to the crater between the front fenders to make the whole mess look like a Mopar engine bay. This build is a test-bed for me. I´m gonna start working on my holy grail MPC ´70 Charger restoration soon and I´m using this build to figure out some possibilities. A dirty quick-build without putty and I´m staying very close to stock condition. Just something I´d love as a daily driver.
-
Count me in with a Slant-6-powered ´69 Dodge Charger.
-
Opel Blitz "DAK" style
440 6BBL replied to Agent G's topic in Model Trucks: Pickups, Vans, SUVs, Light Commercial
Beautifully done and the boxes look great, too. I've found a little typo on the big box that you may want to correct for accuracy. "Nicht offen" means "not open" or "closed". "Nicht öffnen" would be the correct labeling for "do not open". Apart from this minor glitch, it's a top notch Blitz. -
1972 Dodge Charger?
440 6BBL replied to buildnething's topic in General Automotive Talk (Trucks and Cars)
Here it is. I bought this Charger as a chassis donor for MPC´s ´71 Roadrunner. This build is made from the left over parts from the Roadrunner build. A friend owns the 1:1 Charger and I´m doing this model for him. Since he is no rivet counter, I didn´t go for maximum accuracy. Just looking forward to getting it finished quickly while ending up with a solid model for a guy with big fingers who doesn´t know how to carefully handle a model. The bulge in the hood was cut out and replaced with a piece of hood from AMT´s ´70 Monte Carlo. Front and rear bumper units were stripped, modified, painted black and wrapped in BMF. Side markers were puttied and sanded and will be redone with just BMF and clear red and clear orange. Vents in the doors were deleted with putty and I added vinyl roof trim to the body because my friend´s Charger once had a vinyl top. Only the trim remained on his car, it´s quite a beater with dents on all four corners and a pretty lousy paint job. But it has a solid body and runs strong with a refurbished 383. I just cut away what was not needed on the bumper units. Added some sheet and putty and sanded them parts into shape. Hope this helped a bit.
-
1972 Dodge Charger?
440 6BBL replied to buildnething's topic in General Automotive Talk (Trucks and Cars)
I'm in progress of doing the same, but without the hide away headlights. You need to fill in the simulated vents in the doors and modify the side markers. I've read that the grille inserts from the dukes of hazzard kit can be used for a '72, but I can't confirm that. The tail lights are fairly easy to modify and you can cut them from the clear red part that is included in the 71 kit. I can post a few pics when I'm back home from work. -
I'm surprised that Greg Wann is still selling this resin transkit. It's a known fact that it's a pirated copy of Scaleproduction's Eleanor transkit. How much did you pay for it?
-
Some Rubber Duck questions
440 6BBL replied to Stuntman Mike's topic in General Automotive Talk (Trucks and Cars)
Yes, it´s very nice. I have it in my stash aswell -
Very nicely done, the color suits the car very well. I just got my Johan 442 in the mail today. Funny to see you build pop up at the same day. Love those factory stock top of the line muscle cars. There should be a F.A.S.T. class CBP for cars like this
-
I think the AMT Challenger still is the best choice. Blending the separate roof into the body is not too much of a big deal and reshaping the side window openings is just a matter of drawing a line with a pencil and cutting along with an x-acto. The rear edge of the roof has enough thickness to add the distinctive kink above the rear window. The front pan/fender issue is another thing that can be corrected fairly easy. I have been working on AMT´s Challenger body from time to time to have the body ready when I actually get into the build. I didn´t invest more than two hours of work until now and the body is almost there. And it´s actually fun to work on the body and to watch it evolve.
-
Great job, Nick. I really dig what you would´ve ordered in fall of ´67. I would have ordered a Roadrunner aswell. But it would have been in spring of ´69. Also have a build in progress on my bench. I like your taste and the model looks like something you wouldn´t wanna mess with. I has written "bad to the bone" all over it.
-
Correct. The ´68 RR, ´69 GTX and ´70 Coronet from AMT all have the same chassis parts included, but these kits have a very simple/inaccurate core support. The "best" donor kit for a Charger would have been the ´68 or ´69 Charger from Revell as it includes parts that are exclusively used on a Charger. Especially the part that is located between the grille and the core support.
-
Great looking Mopar, Pat. I love the color combination and the wheels. It looks very nice and a Charger 500 is on my list aswell...very inspiring. Also kudos for your clean work on the chassis and engine bay swap. And that Hemi is gorgeous. I recognized the parts from AMT´s ´71 Charger immediately as it is one of my favorite parts donors for older Mopar kits. Currently have a petty-blue ´71 Roadrunner in the works. However...there´s an issue with accuracy when using ´71 Charger parts on a ´68 - ´70 Charger. The sheet metal in the engine bay is different. I´m pretty sure that the engine bay design of your Charger 500 came in 1:1 with the introduction of the ´70 Challenger and Cuda. The core support and the firewall are also slightly different. Of course I don´t want to decrease the modeling result as you have delivered some very nice workmanship. It´s just offering criticism in the most positive way. Looking forward to your next Mopar build.
-
TS-86 Pure Red on the Pinto and TS-8 Italian Red on the Chevelle. I really love working with Tamiya spray paints. My favorite choice for painting a body.
-
Connecting rod carb/transmission 440+6 ?
440 6BBL replied to 440 6BBL's topic in Model Building Questions and Answers
No, it´s a wannabe Rallye Green. The first picture is misleading as there was only one very thin layer of green on the body. It´s quite a bit darker now and looks pretty close to the factory color. I used TS-20 Metallic Green from Tamiya. I used the engine from AMT´s ´69 GTX and since this is a 440+6 I didn´t think about the valve covers until it was too late. And I´m a big fan of the Tarantino flicks aswell.