
gino
-
Posts
1,152 -
Joined
-
Last visited
Content Type
Profiles
Forums
Events
Gallery
Everything posted by gino
-
Peterbilt 379 Build
gino replied to RocketJockey87's topic in WIP: Model Trucks: Big Rigs and Heavy Equipment
very nice ! -
The elusive GMC B-7000
gino replied to landman's topic in Model Trucks: Big Rigs and Heavy Equipment
that came out great ! outstanding workmanship ! -
nice work !
-
White 7400 & Detroit 6V71 project
gino replied to Old Buckaroo's topic in WIP: Model Trucks: Big Rigs and Heavy Equipment
great idea on the cab mounts sean ! I too use the same method to be able to remove the cab for assembly so this will come in handy for me . thanks ! -
thanks for the kind comments guys ! thanks for the tip on the battery boxes clayton !
-
very nice !
-
Mack DM800 concrete truck
gino replied to PlowKing's topic in Model Trucks: Big Rigs and Heavy Equipment
wow ! very nice work ! -
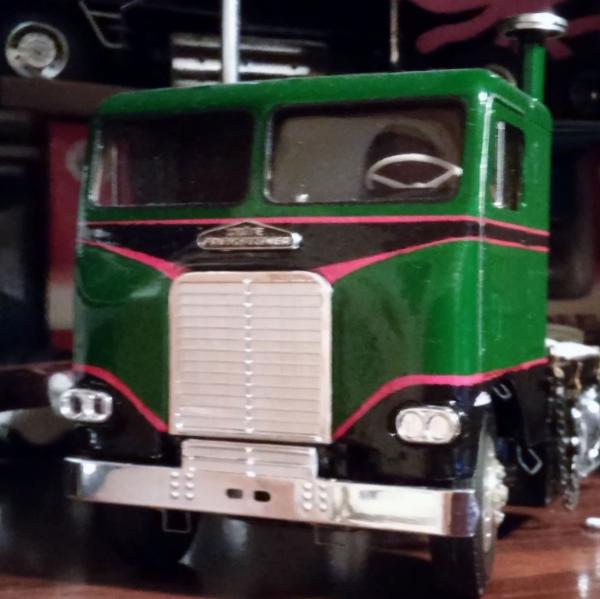
thanks for the reply's guys ! thanks sean for the chicken light tip I will definitely use it. while checking out w9 pics on the web to study battery box/fuel tank configurations I came across some of the custom trucks seen nowadays. the inspiration hit and I decided to try one. (so much for a relax build ). I cut the headlight pieces from the fenders, filled in the holes, and installed snap pete headlight brackets , and 32 ford lights from the American graffiti kit. the whole time I was sawing away at the hood, I had the song stuck in my head : "she's real fine my 409", but changed the words to "she's real fine my w9" !. I must be inhaling too many glue fumes ! as stated above, the possibility's are endless with these kits. here is what came out. [
-
my pete coe project is on hold due to the fact I ran out of primer. I need to stock up on supply's. this is a snap kit I 've had in the stash for a long time. it is nearly complete except for the front steer axle which I used on another build. I had cut off the aerodyne bunk to make the big bunk for my k/w coe build (posted earlier) , and had originally planned to do a flat top double bunk but never got around to doing it. looking at the kit I thought I would do a relax build of a work truck day cab, spoke wheels, short wheelbase, etc. I used a piece of sheet styrene heated up with a hair dryer, bent over a screwdriver handle to make the missing rear roof section. the rear cab wall is from the back of the original sleeper wall. I flipped it and used the slot that was at the bottom to cut out the rear window. for the rear of the interior tub I cut out a section from the sleeper interior and fitted it to the rear of the tub.
-
kenworth conventional
gino replied to Ken Gilkeson's topic in WIP: Model Trucks: Big Rigs and Heavy Equipment
very nice ! -
Scratchbuilt Welder
gino replied to SlotDaddy1963's topic in WIP: Model Trucks: Pickups, Vans, SUVs, Light Commercial
great work ! -
'38 GMC cabover car hauler
gino replied to Sixties Sam's topic in WIP: Model Trucks: Pickups, Vans, SUVs, Light Commercial
wow ! that's going to be nice ! will be watching ! -
post just your conventionals here
gino replied to Ken Gilkeson's topic in Model Trucks: Big Rigs and Heavy Equipment
wow ! great builds ! I agree with clayton, seeing these gives motivation and inspiration to keep building. -
White 7400 & Detroit 6V71 project
gino replied to Old Buckaroo's topic in WIP: Model Trucks: Big Rigs and Heavy Equipment
nice work ! great job on the exhaust, I like this build -
Peterbilt Devil's Cut Whiskey Hauler
gino replied to gotnitro?'s topic in WIP: Model Trucks: Big Rigs and Heavy Equipment
wow ! awesome work ! -
I always paint the inside first if I spray. if I brush paint then I will paint the inside last.
-
wow ! awesome work !
-
Kenworth W900 Day Cab
gino replied to Chuck Most's topic in Model Trucks: Big Rigs and Heavy Equipment
nice job ! looks like a good old workhorse ! -
International Transtar 4300 "Hidden Agenda"
gino replied to Chuck Most's topic in Model Trucks: Big Rigs and Heavy Equipment
wow that looks great ! another nice one chuck ! -
1973 Republic CTC-8500 Prototype
gino replied to Chuck Most's topic in Model Trucks: Big Rigs and Heavy Equipment
great work chuck ! that is a great idea, I really like it ! -
Dodge L-700 with stake body and crane.
gino replied to landman's topic in WIP: Model Trucks: Big Rigs and Heavy Equipment
very nice ! -
Cat C15 twin turbo
gino replied to LineDigger87's topic in WIP: Model Trucks: Big Rigs and Heavy Equipment
nice work ! -
Snowman's Kenworth finished.
gino replied to towman1271's topic in Model Trucks: Big Rigs and Heavy Equipment
that looks great dave ! excellent work ! -
White 7400 & Detroit 6V71 project
gino replied to Old Buckaroo's topic in WIP: Model Trucks: Big Rigs and Heavy Equipment
looks good sean ! -
post just your conventionals here
gino replied to Ken Gilkeson's topic in Model Trucks: Big Rigs and Heavy Equipment
wow nice builds ! will have to finish my two macks.