AJM
-
Posts
201 -
Joined
-
Last visited
Content Type
Profiles
Forums
Events
Gallery
Everything posted by AJM
-
Looks great! Every build is a new experience and pushes you to improve upon your skills; enjoy the build process! I have a C7R on the bench now and hoping to get to the finish line soon!
-
Looks great! Nice black paint finish!
-
Great job so far --will be following!
-
Repurposing daily wear contact lens containers for paint mixing
AJM replied to SDC's topic in Tips, Tricks, and Tutorials
I agree, I've been using the contact lens containers for the same applications, paints, glue etc -- great way to repurpose something that you may just discard! Glad you posted this. -
Ismael -- Great job as usual!
-
Urs, great job on this, I'll be following!
-
Garage 56 Camaro - Le Mans 2023
AJM replied to Phildaupho's topic in Other Racing: Road Racing, Salt Flat Racers
Phil -- Great job on this -- just an FYI to everyone, STS decals has a set of this livery, you'll have to airbrush the sliver fade over the Blue on the sides, but all the other graphics are there. I think they also have a set of decals for the 'prototype' car. Contact Terry at STS Decals. Hope this helps, -
Len-- That looks great loved the look of the '78 Pace Car -- I plan on doing that in 1/24 as well. Your Silver Anniversary looks great!
-
Jeremy/Len -- Will be following this, looks like you have a great start on the Vette! Not to hi -jack the thread, but a number of years ago I had a '79 L-82 four speed, Corvette Yellow with a saddle interior -- I build a 1/8 scale model of it from the '78 Monogram kit --modified to look like the '79. Here are a few pics -- Jeremy if you need any additional info let me know --I plan to do one in 1/24 scale as well! Good luck with your build!

-
Ford GT40 1966 Le Mans winner
AJM replied to Pierre Rivard's topic in Other Racing: Road Racing, Salt Flat Racers
Pierre -- Ford GT looks great! -
2012 Corvette C6R ZR1 Le Mans #73
AJM replied to AJM's topic in Other Racing: Road Racing, Salt Flat Racers
Anton -- Thank you for the compliments -- this was a very difficult build, it was on the bench for over a year -- the body needed a lot of work to get everything to fit right and the decals were a 'bear' to layout on the car. Eventually it all came together and I got the 'stance' of the car to look correct! Noe onto to a C7R build! Every build like this teaches you new skills, that's what is so good about this hobby -stay with it! -
2012 Corvette C6R ZR1 Le Mans #73
AJM replied to AJM's topic in WIP: Other Racing: Road Racing, Land Speed Racers
Atin -- Thx for the compliments! -
2012 Corvette C6R ZR1 Le Mans #73
AJM replied to AJM's topic in WIP: Other Racing: Road Racing, Land Speed Racers
Len -- Thx for your advice on the decals and the hood -- I had to really trim the underside of the air intake on the hood to have it sit flush with the front fenders. The decals were a 'bear' to work with and get to fit correctly! -
2012 Corvette C6R ZR1 Le Mans #73
AJM replied to AJM's topic in Other Racing: Road Racing, Salt Flat Racers
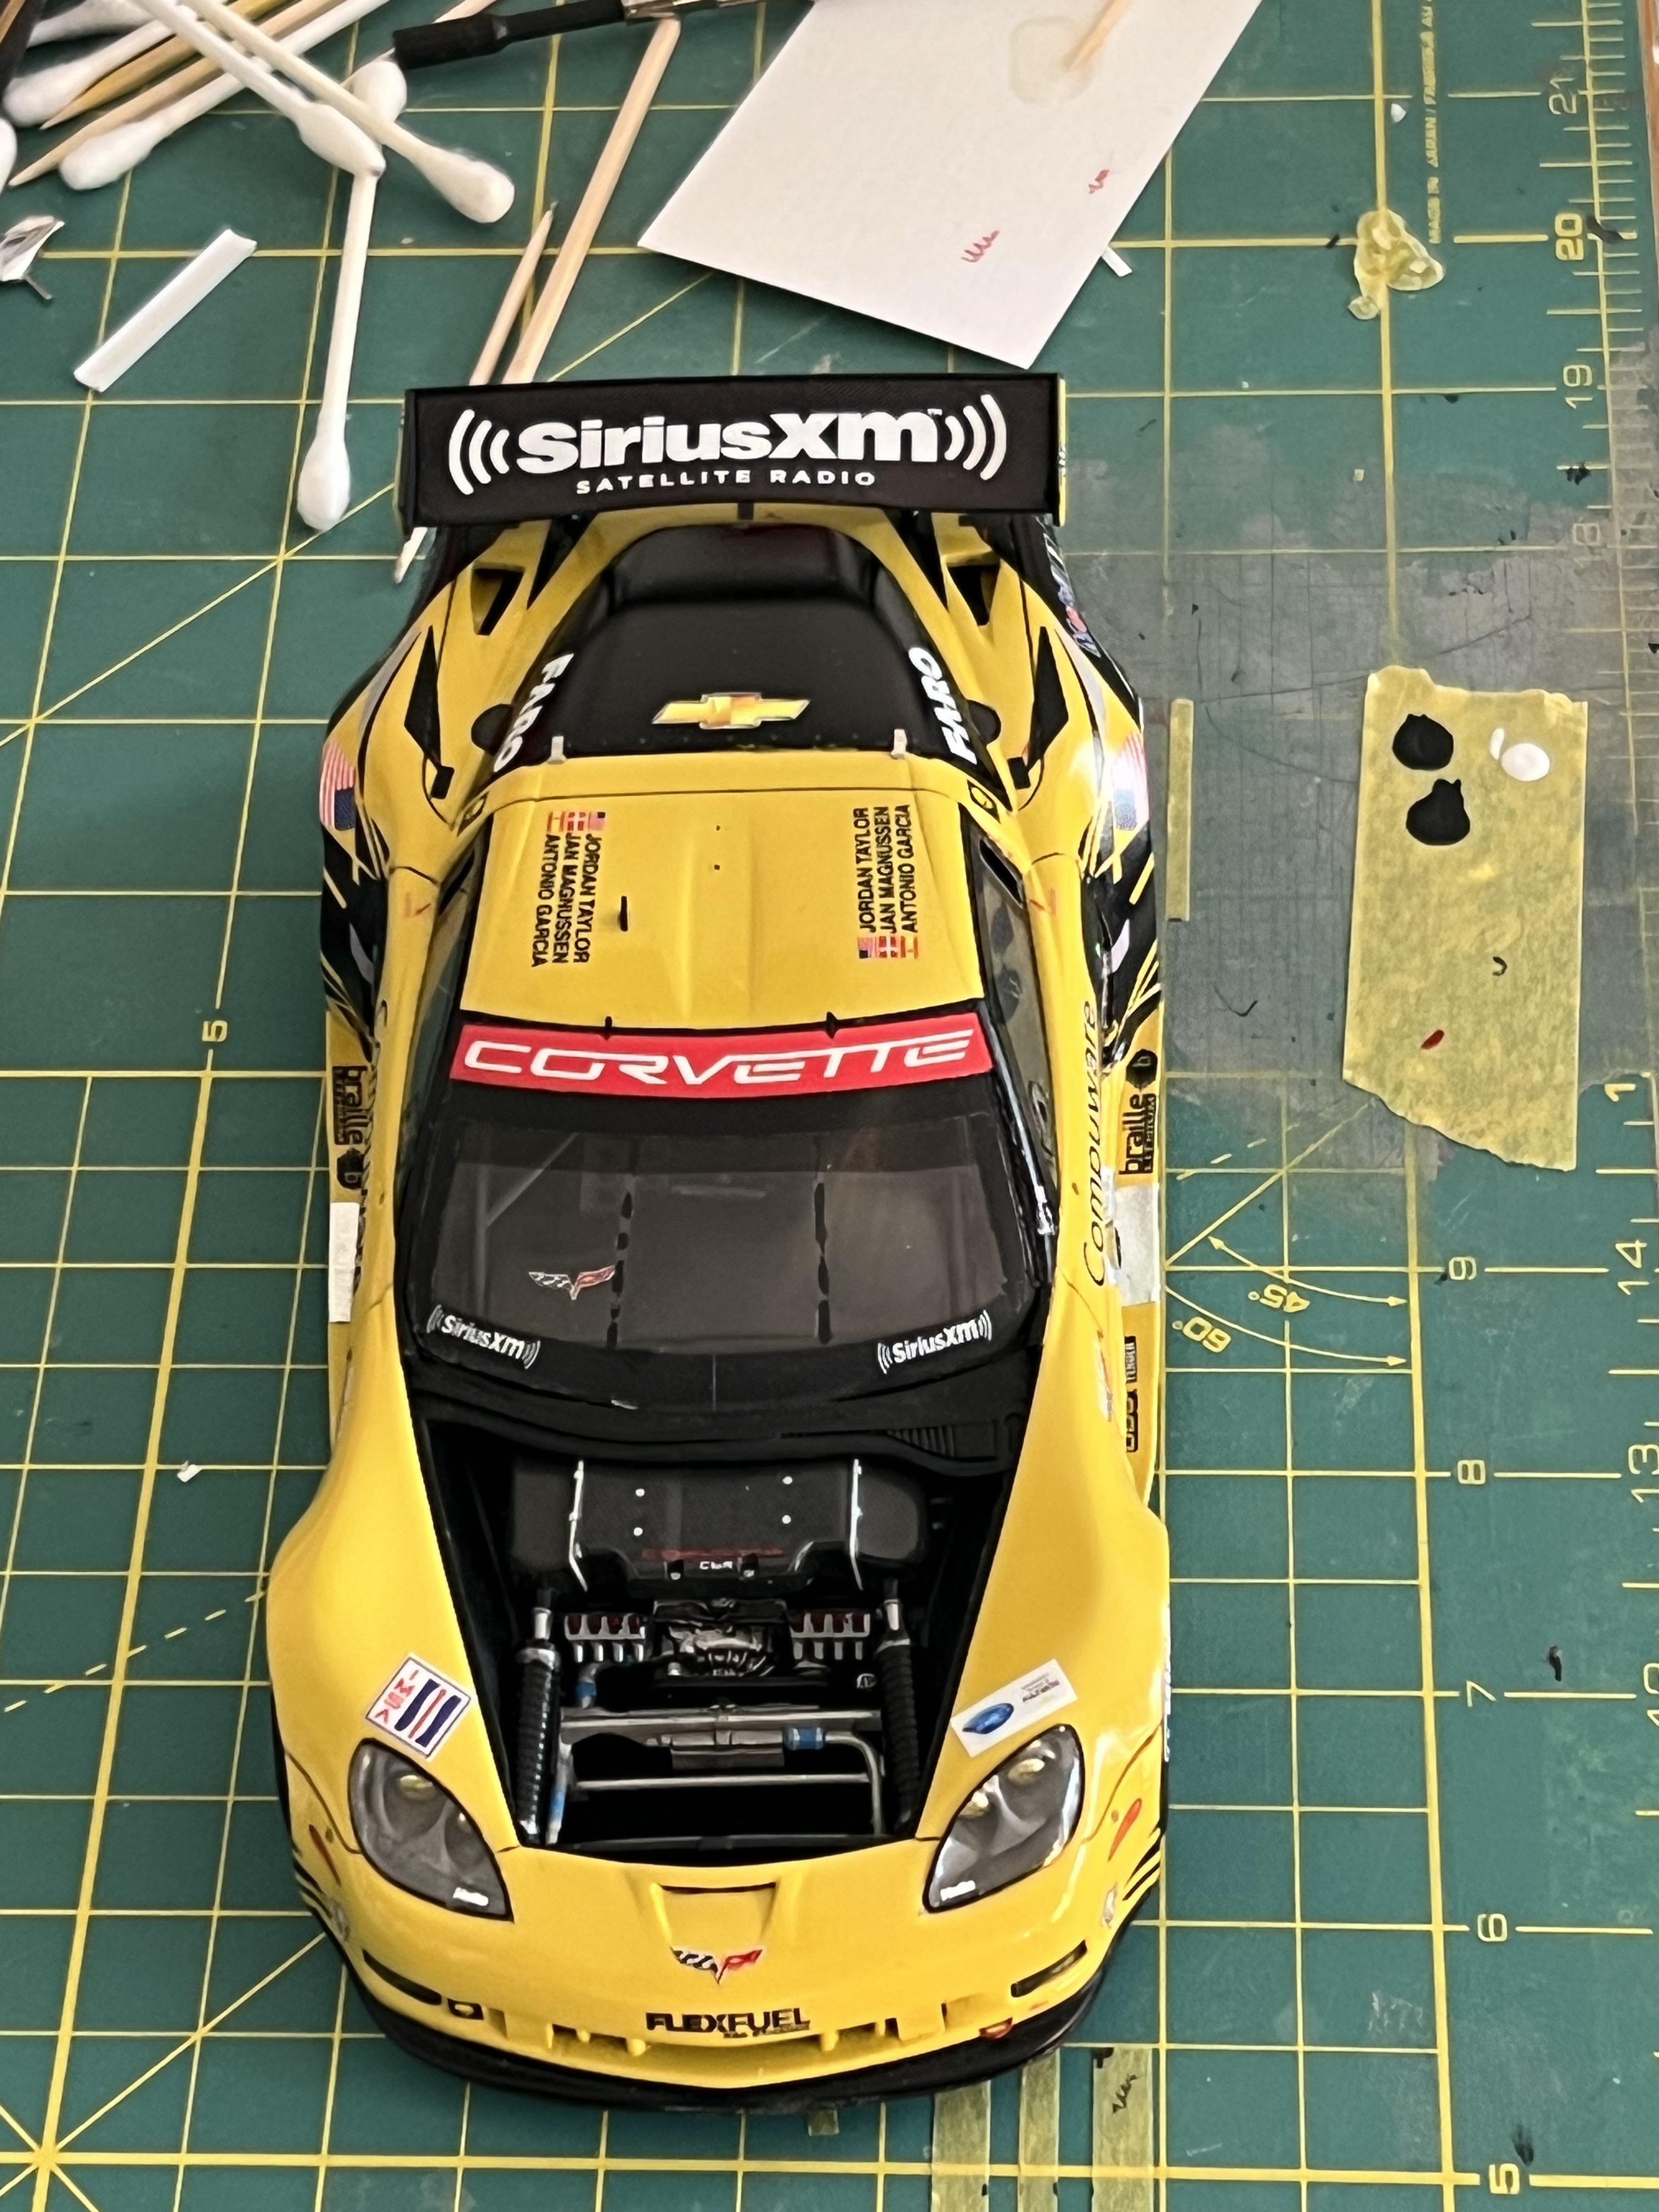
Ray/Jim - -Thx for the compliments, it's much appreciated. Tony/Tony -- The decal application was extremely challenging. I had some advice from a forum member who did a build of this car, which helped me put a strategy in place to best layout the decals. I resorted to photocopying the Pattos decal sheet and cutting this up into various pieces and placed on the model to minimize gaps in the decals -- the gaps were painted with Vallejo 'Black' which was an almost exact match to the black on the decals. When i cleared the decals with Tamiya 'Clear', it was almost impossible to see where the gaps were. It's not perfect, but came pretty close to replicating the 1:1. You learn with every build, that's what is so much fun about this hobby. -
Great job, love the details!
-
2012 Corvette C6R ZR1 Le Mans #73
AJM replied to AJM's topic in Other Racing: Road Racing, Salt Flat Racers
Jim -- Thx, I have the C7r build on the list as well -- good luck with yours, hope to see it on the forum. -
2012 Corvette C6R ZR1 Le Mans #73
AJM replied to AJM's topic in Other Racing: Road Racing, Salt Flat Racers
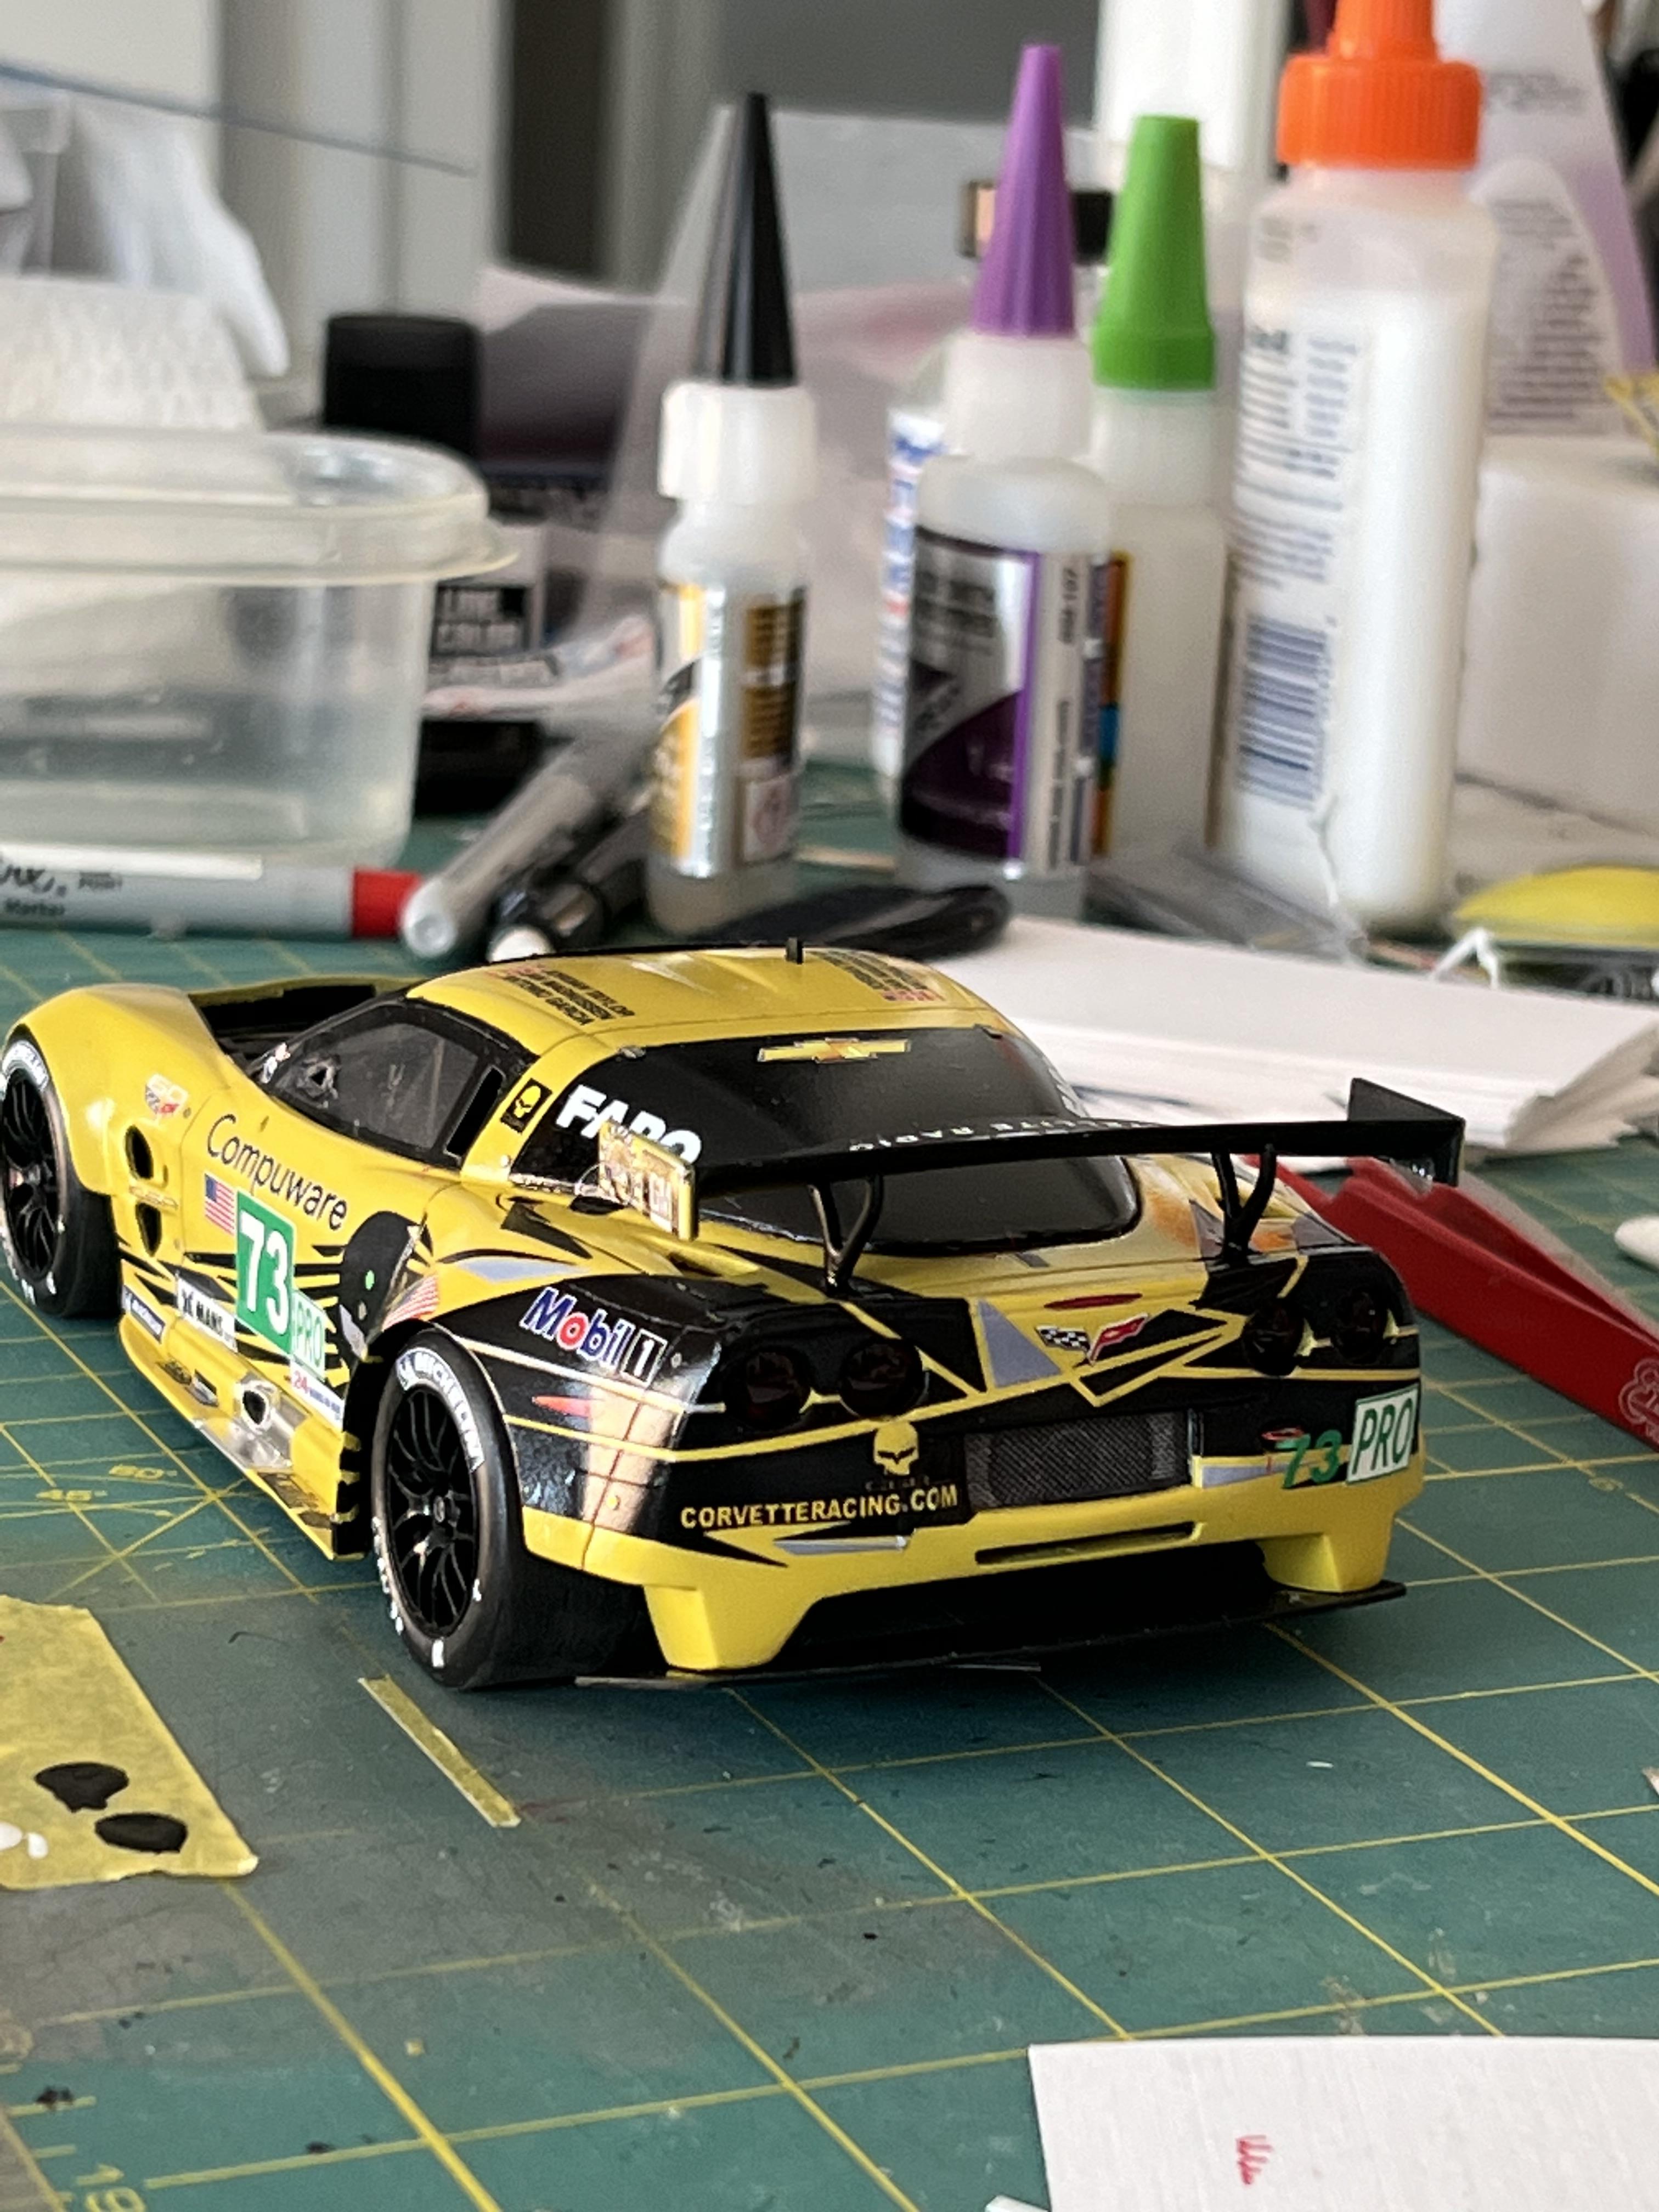
Pierre -- Thx, yea the 'stance' was an important part of replicating the 'look' of the C6R -- I had to resort to independently attaching each wheel with 5 min epoxy, while using a stack of business cards for the correct height. I know you struggled with this on the beautiful Grand Sport build that you completed --so you know the drill! I hope to build that car sometime --I'll certainly be looking back at your build process, thx for the comments. Al -
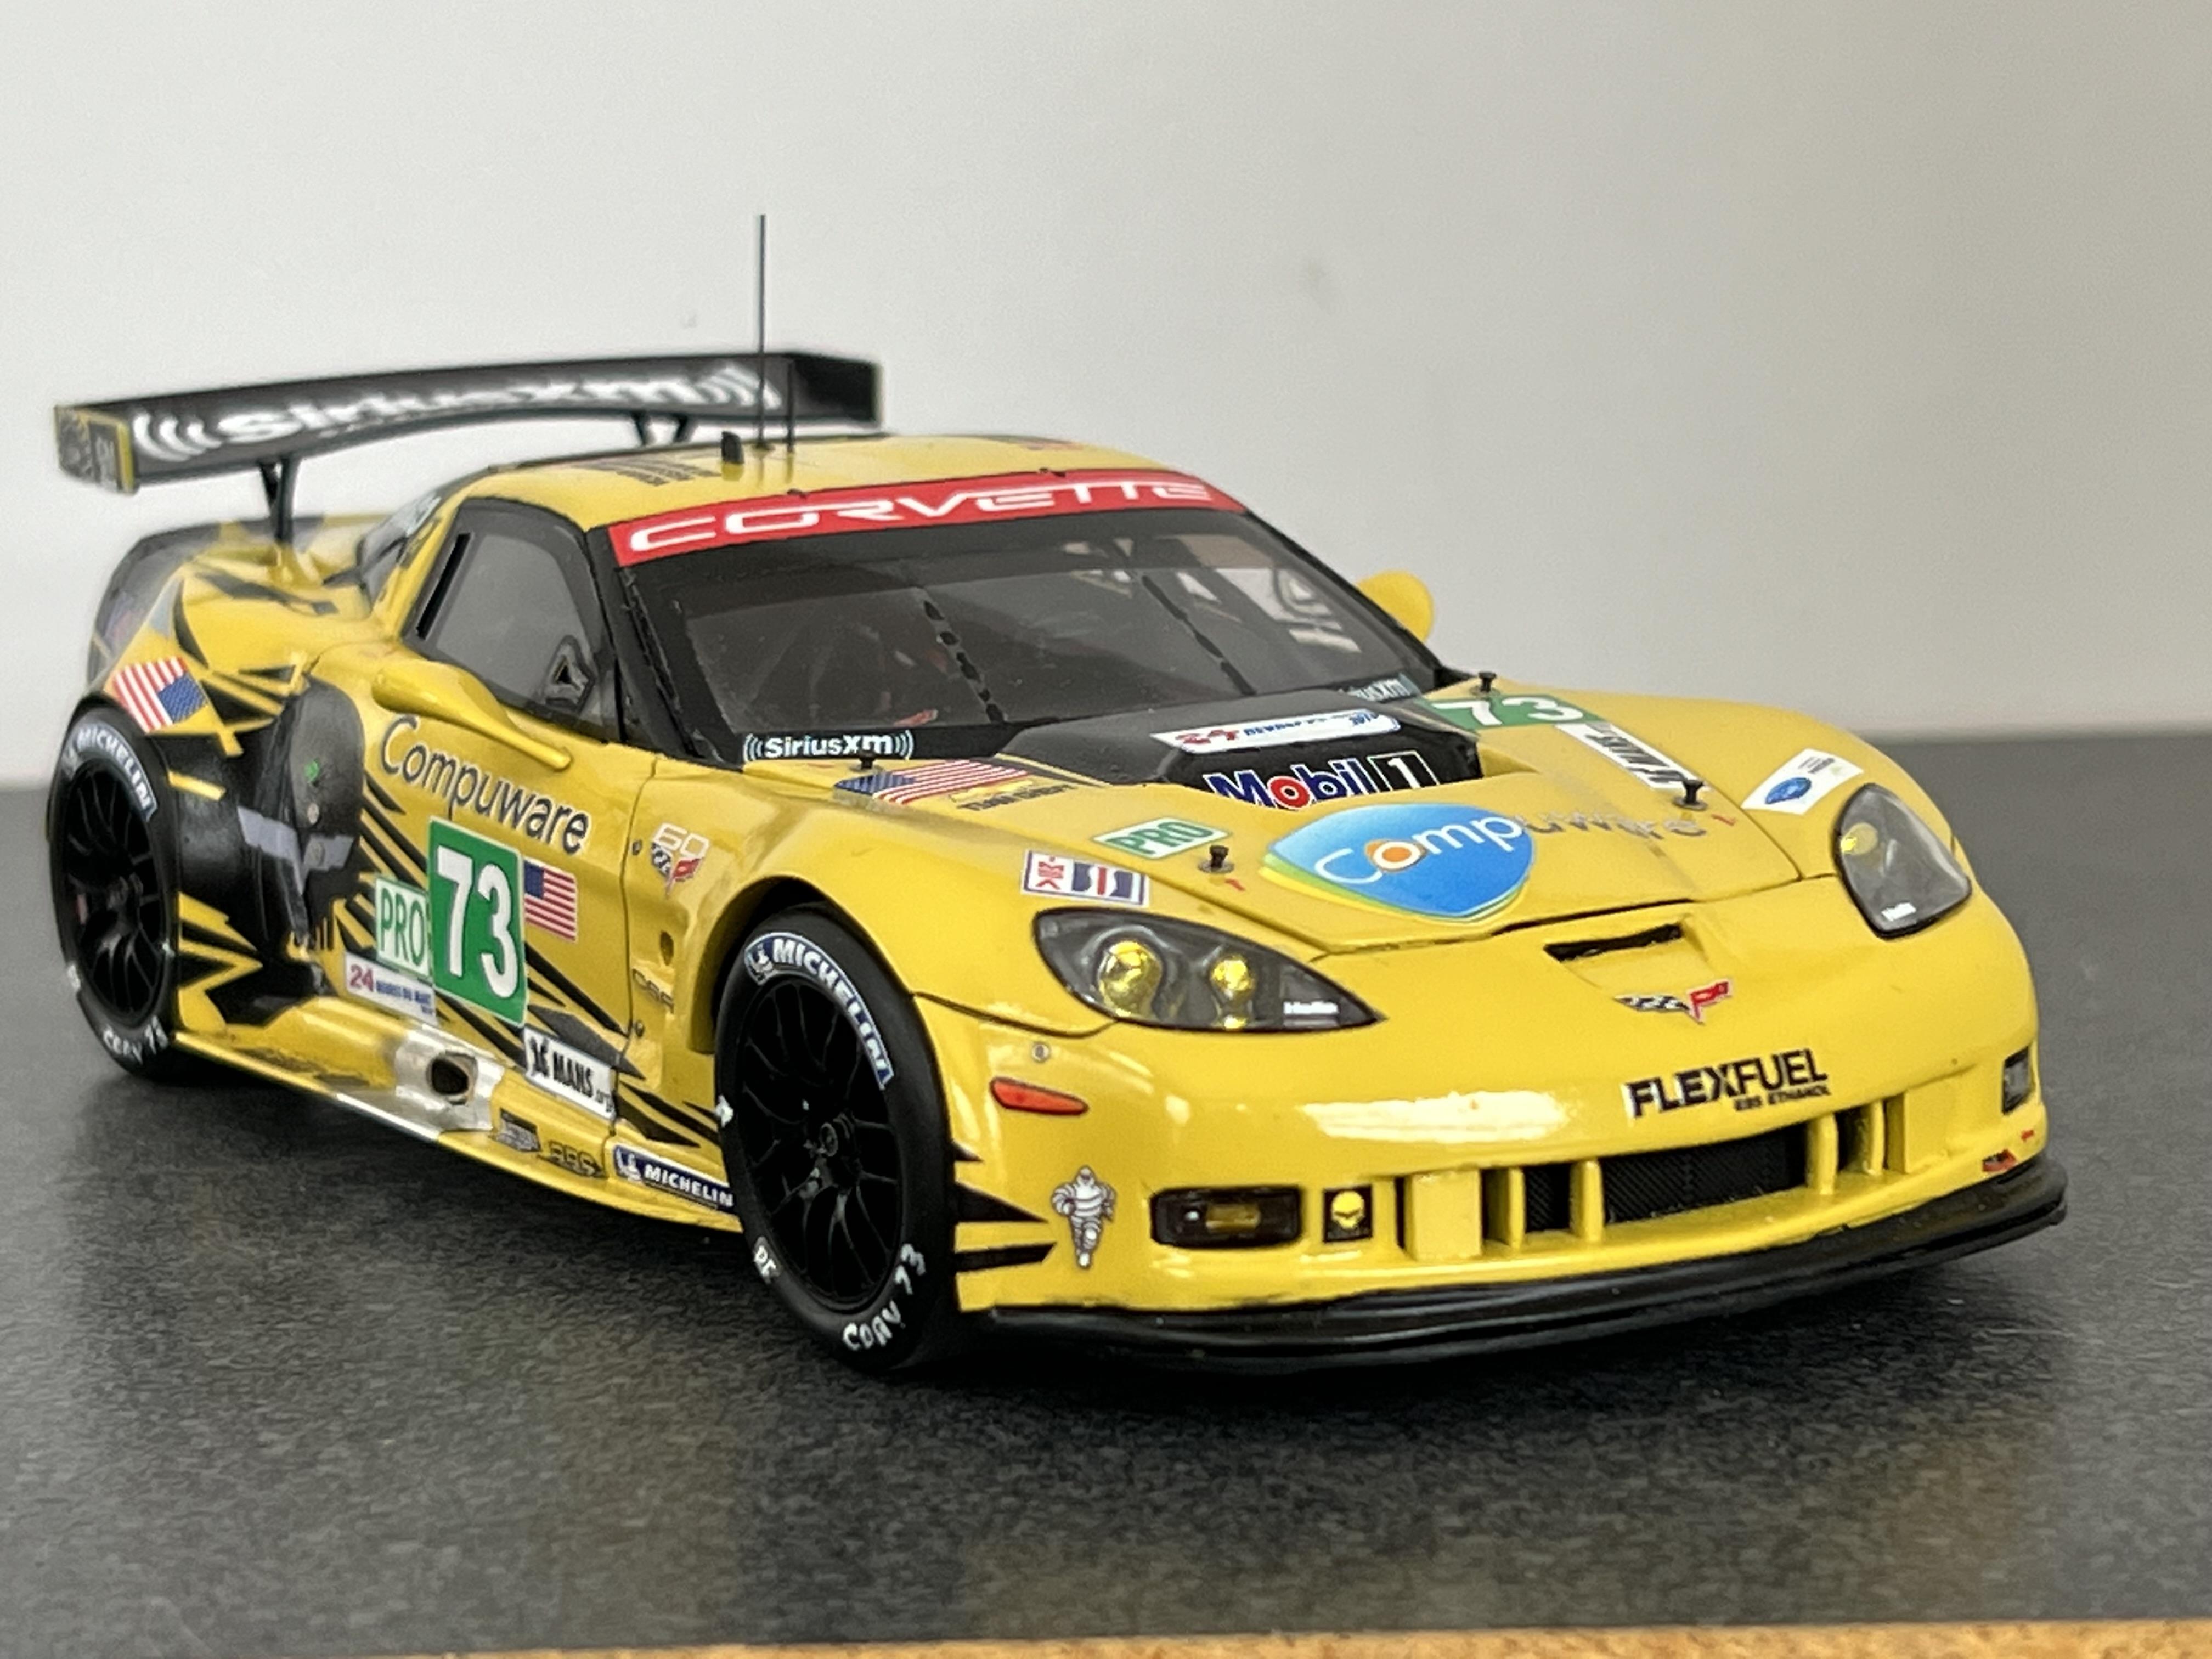
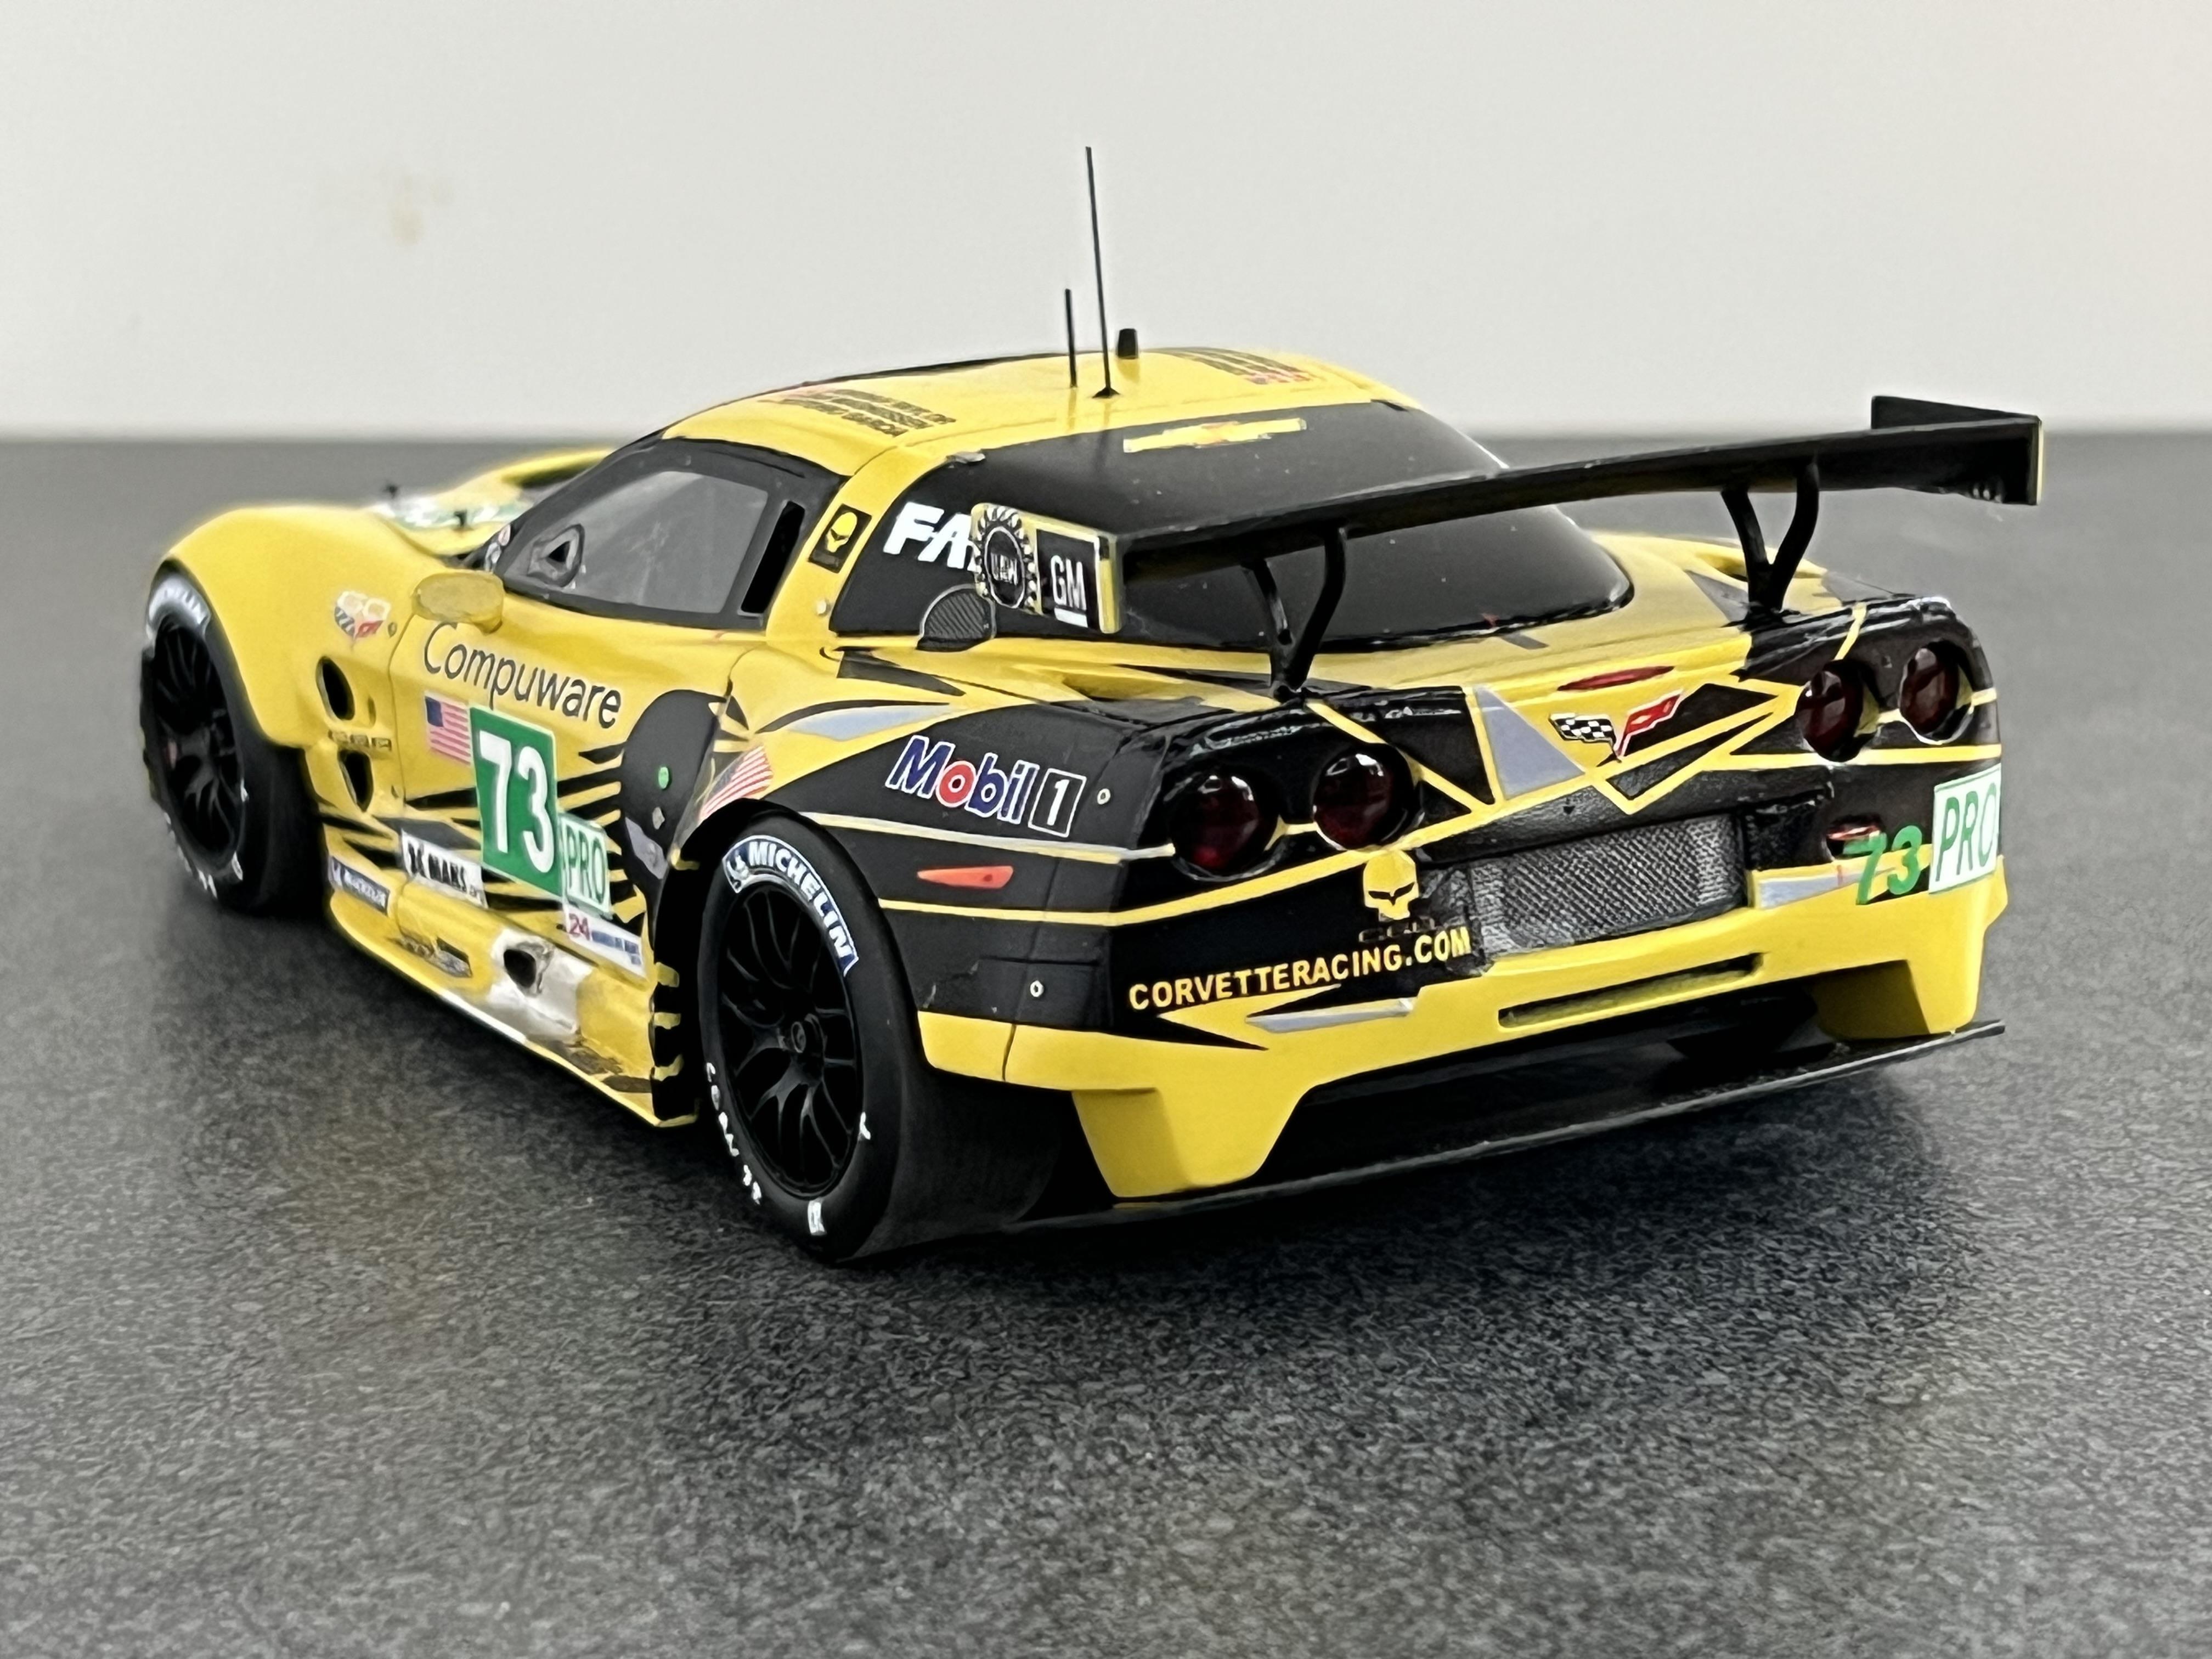
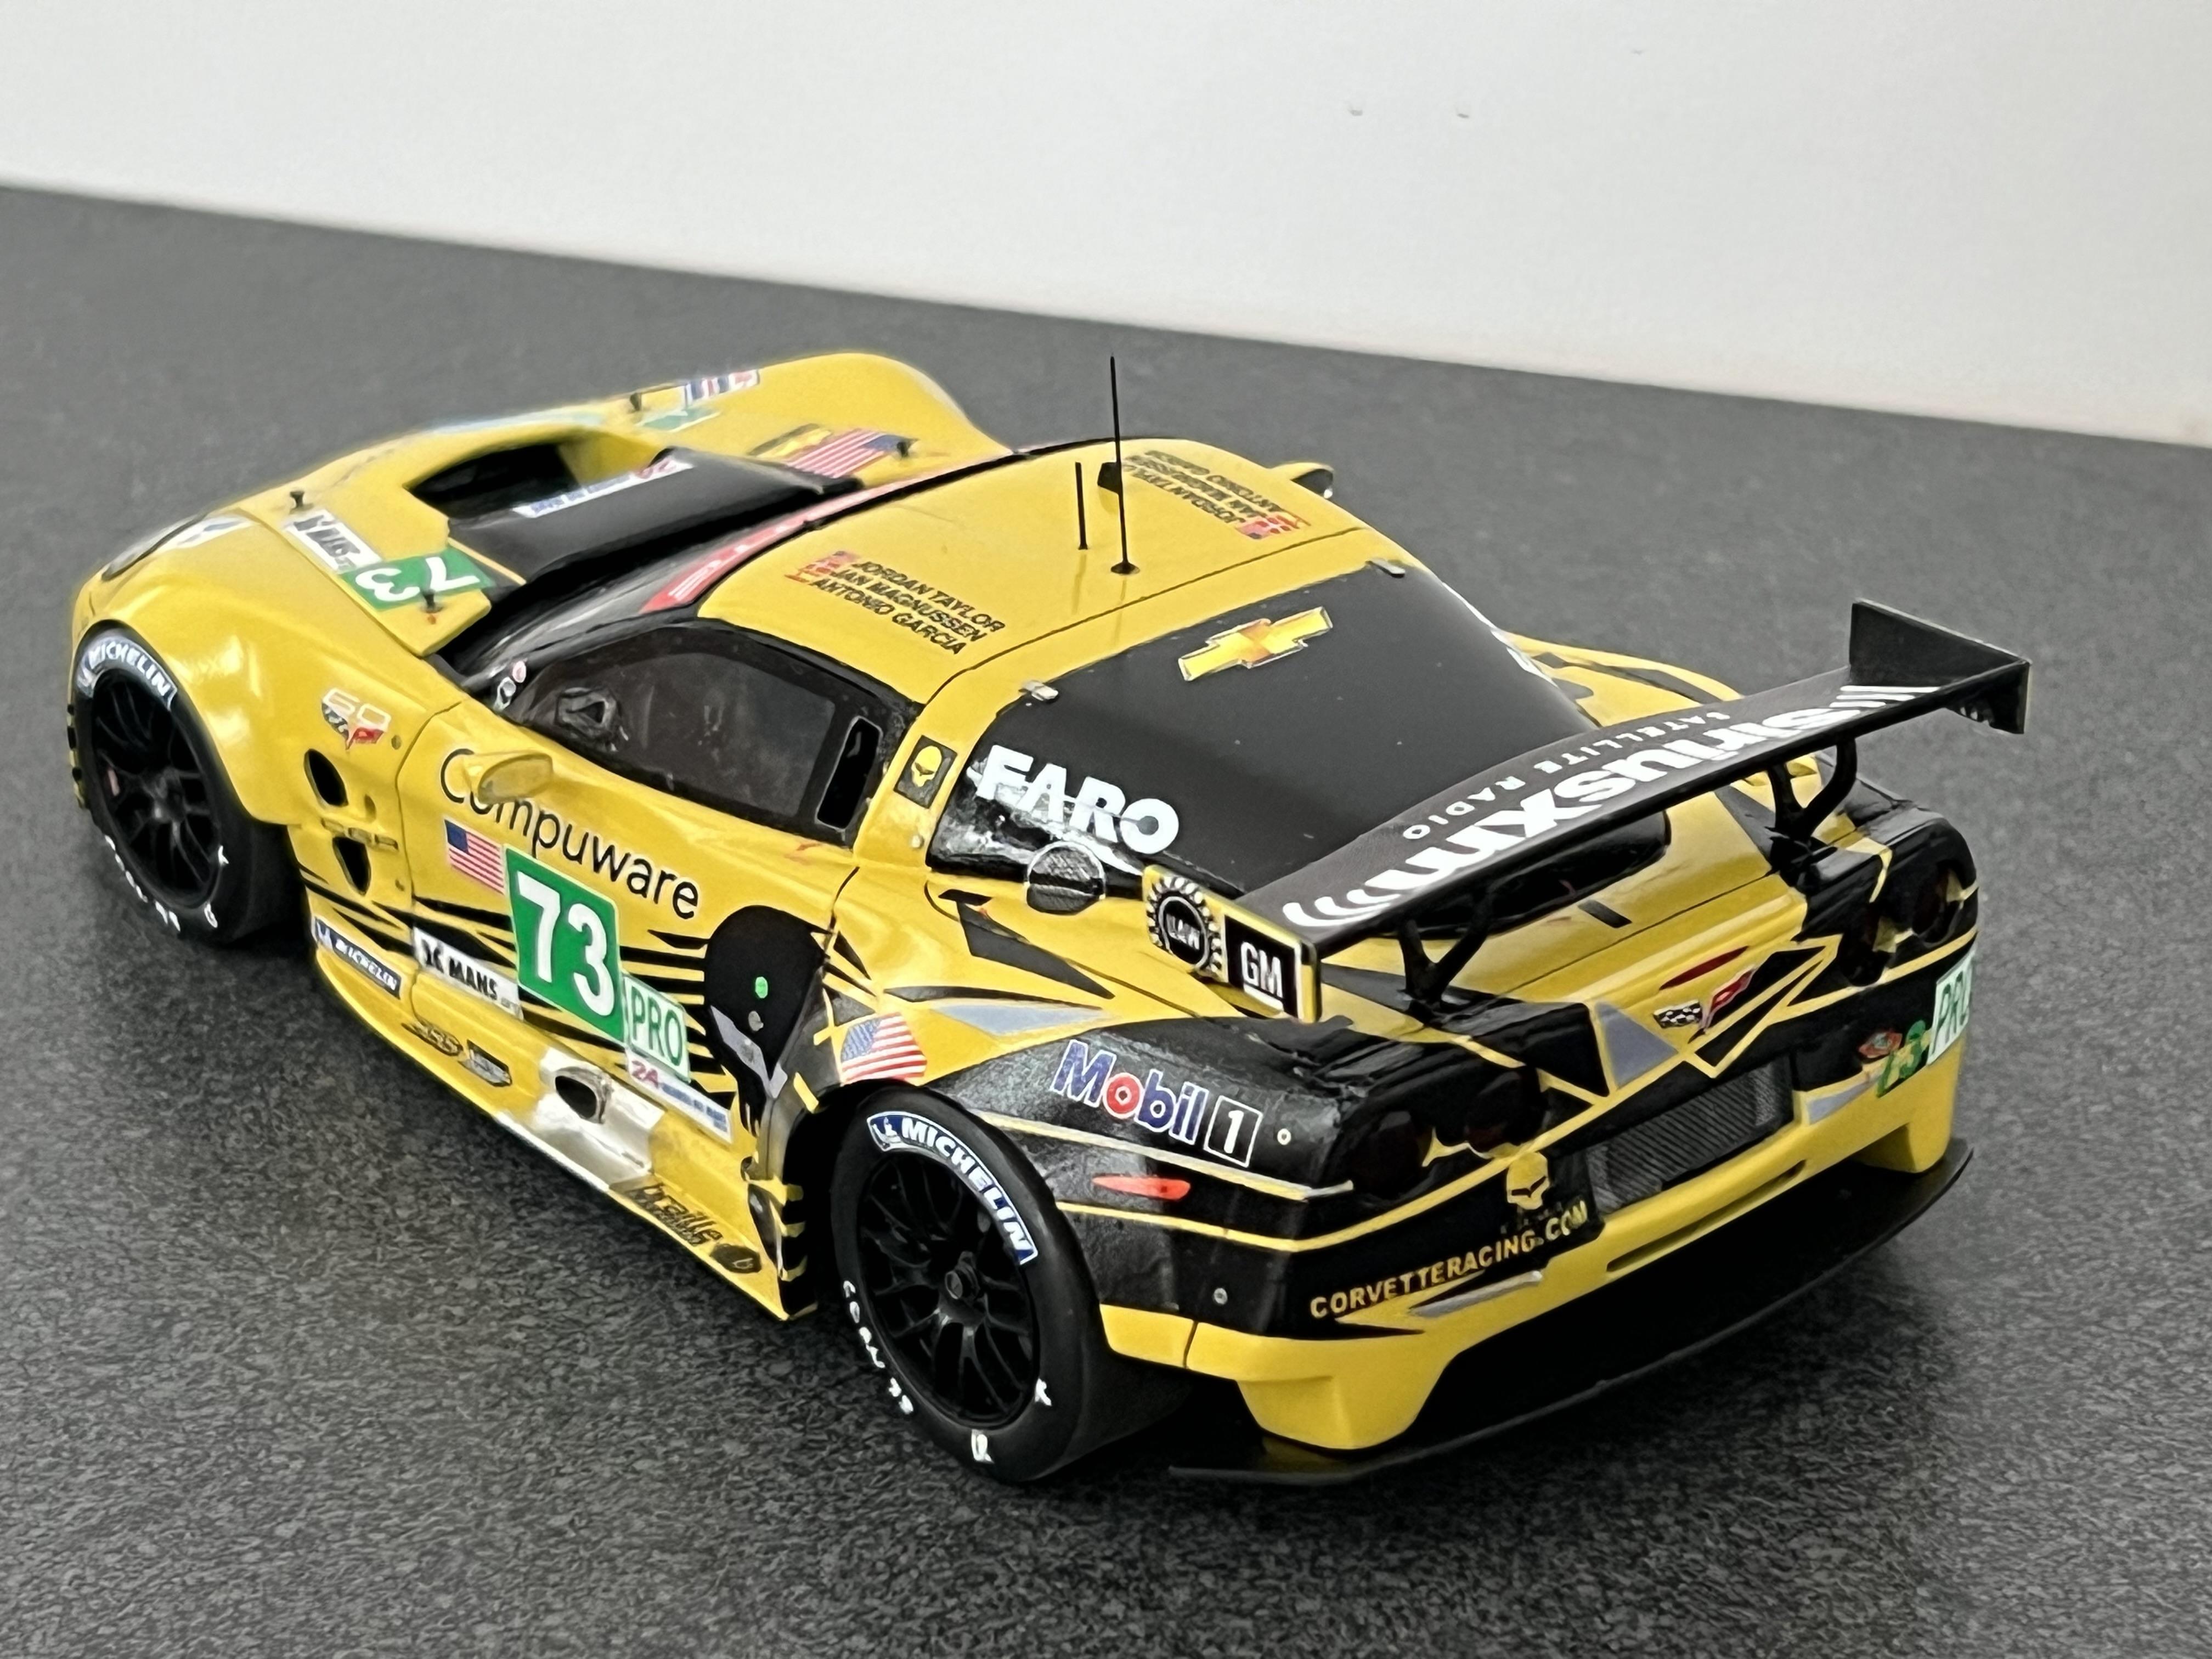
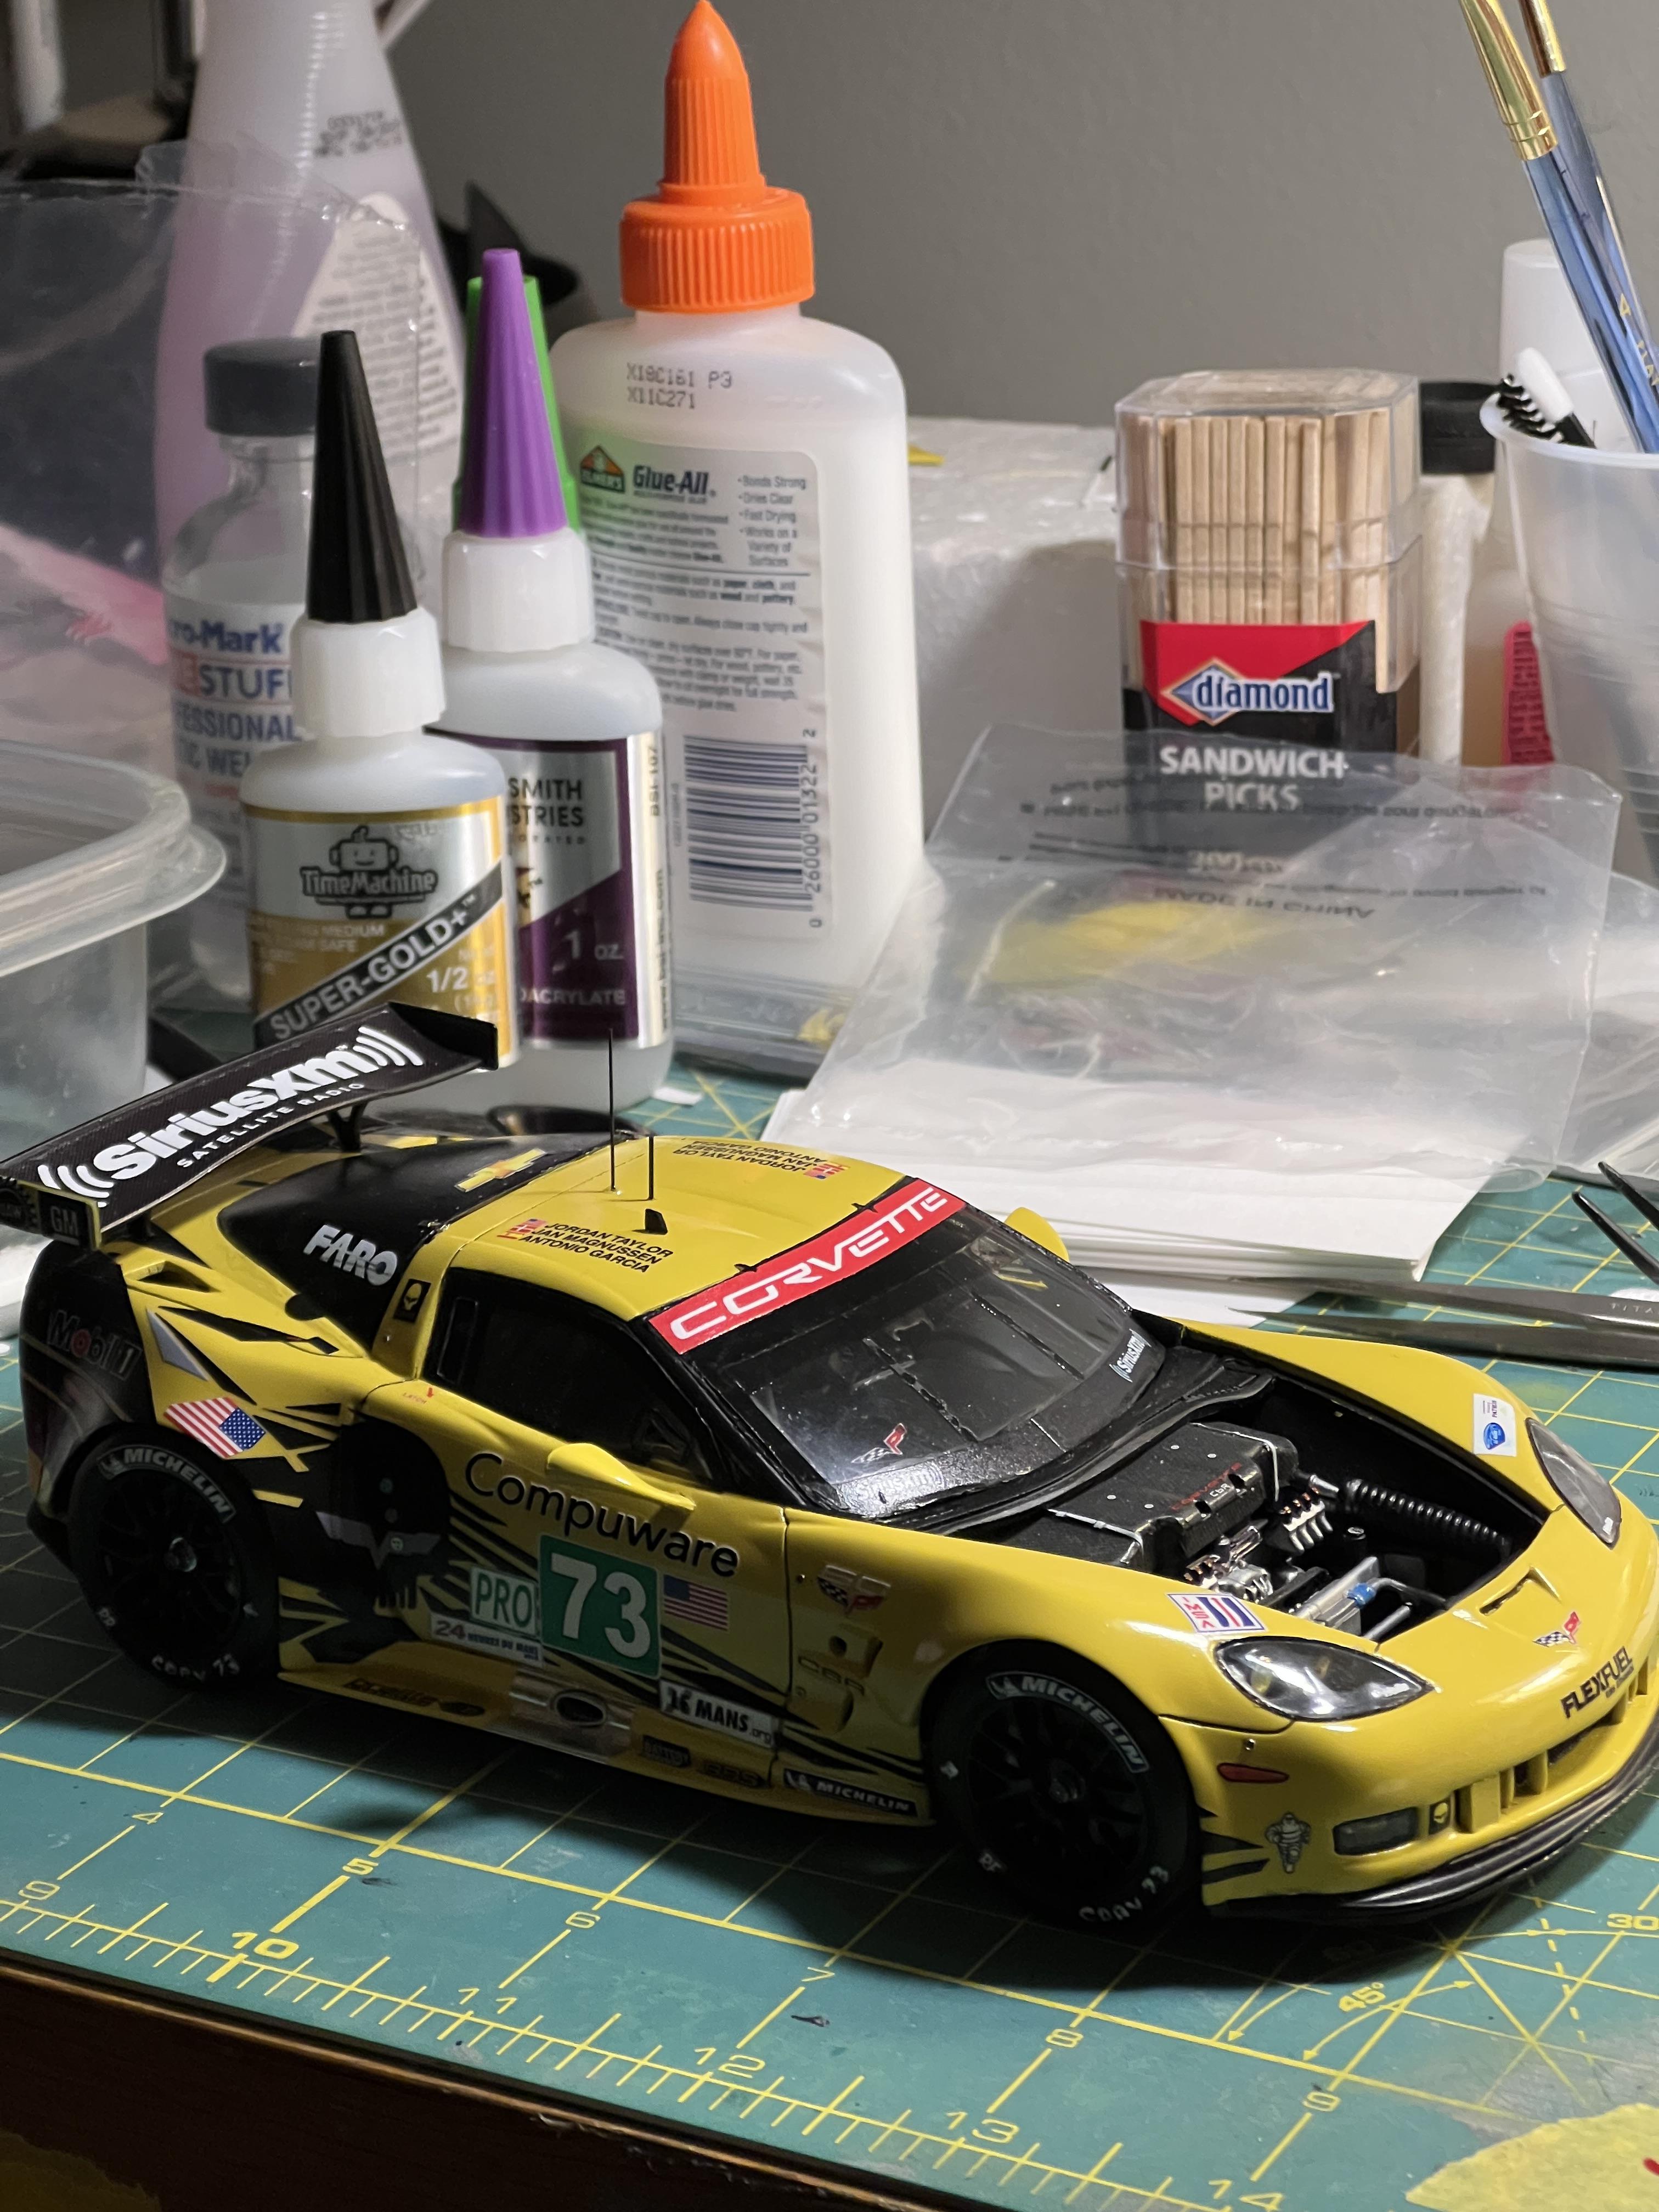
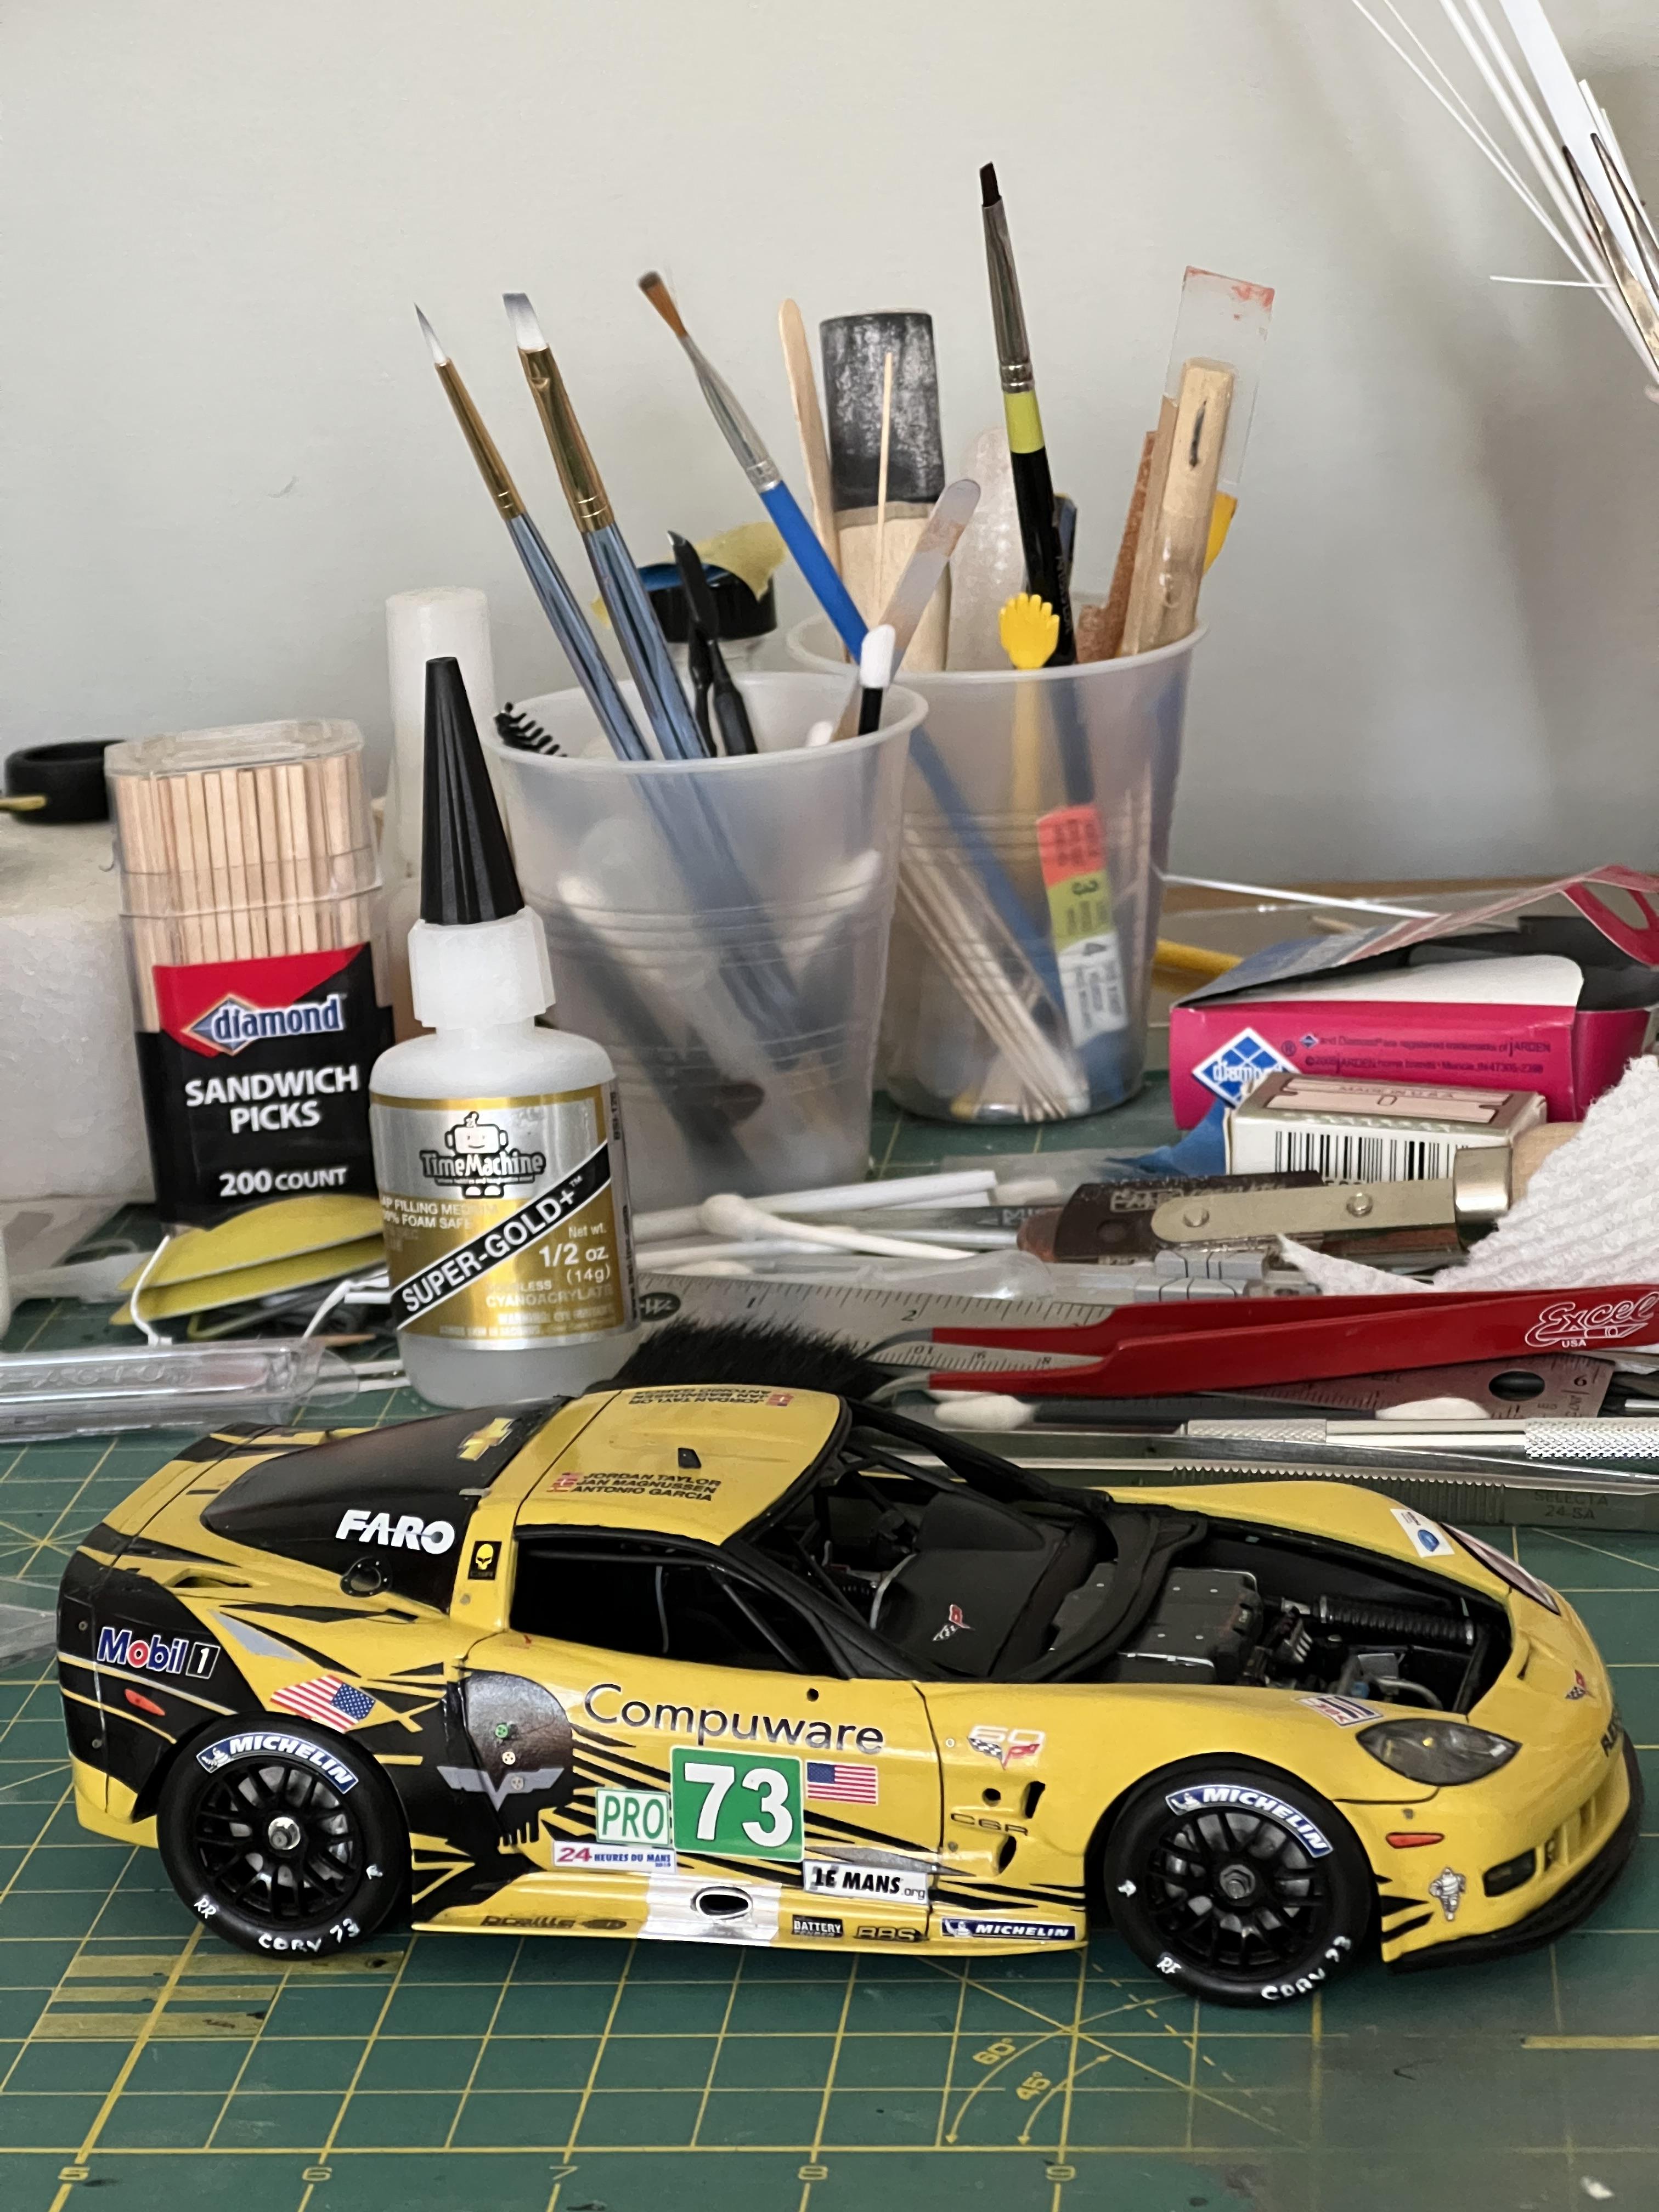
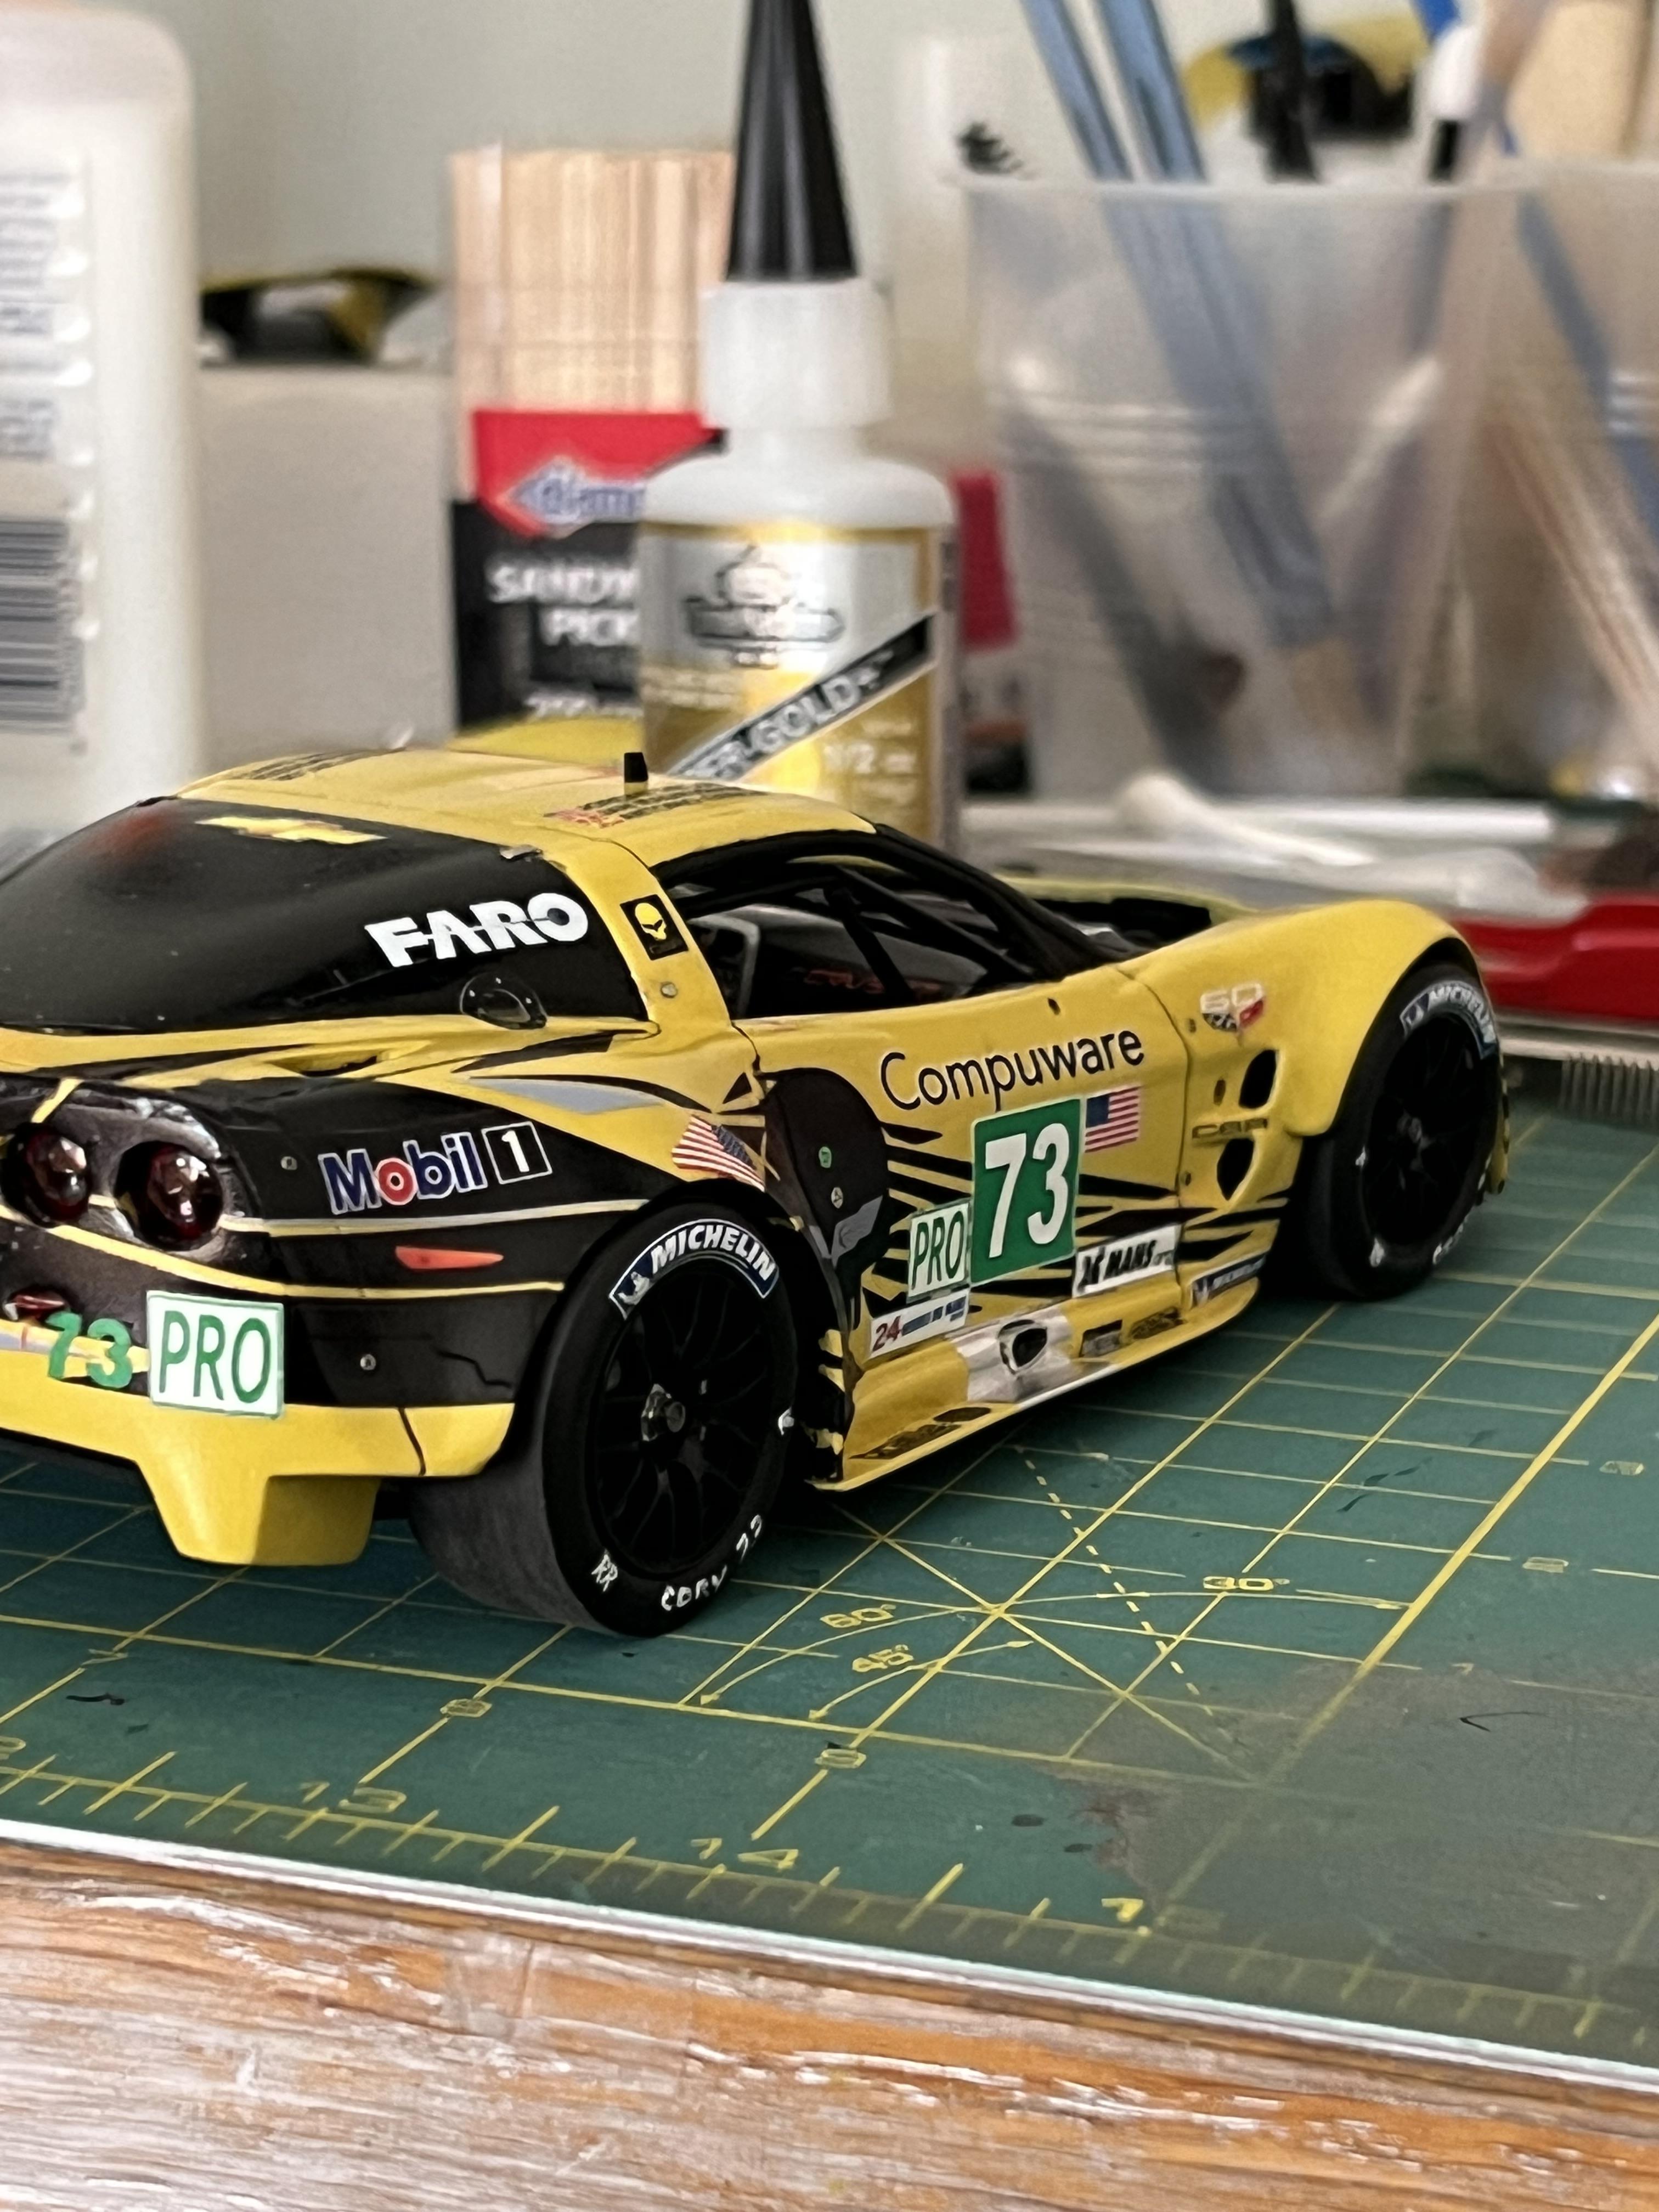
Finally completed the Corvette C6R-ZR1, #73 car, as raced at the 2012 LeMans. The model is in 1/25 scale and uses a Revell ZR1 body as the base, that was mastered by Jay Savarese; The C6R kit by Scale Motorsports donated the chassis, interior, and engine and photoetch parts; a Revell ZR1 kit donated the front and rear 'glass', the headlight and driving light lens covers and a C7R kit donated the outside rear view mirrors and the rear deck wing and struts. The main 'Jake' livery decals were from Pattos Place and other various decals were used. More detailed build info can be found in the 'WIP' section of the forum. Appreciate any and all comments!
- 12 replies
-
- 5
-

-
- corvette c6r
- c6r
- (and 2 more)
-
Jaguar E-type at 1962 24 Hours of Le Mans
AJM replied to Pierre Rivard's topic in Other Racing: Road Racing, Salt Flat Racers
Great job on this! -
2012 Corvette C6R ZR1 Le Mans #73
AJM replied to AJM's topic in WIP: Other Racing: Road Racing, Land Speed Racers
Finally completed -- added slight weathering on the exhaust ports and blackened the wheel hub locks. Below are a few final pictures of the 2012 C6R-ZR1 as raced at LeMans. I'll take some better 'beauty' shot and post them in the 'Under Glass' section --thx to all for looking and the comments, they are much appreciated!
- 32 replies
-
- 1
-
-
- corvette c6r
- zr1
- (and 1 more)
-
2012 Corvette C6R ZR1 Le Mans #73
AJM replied to AJM's topic in WIP: Other Racing: Road Racing, Land Speed Racers
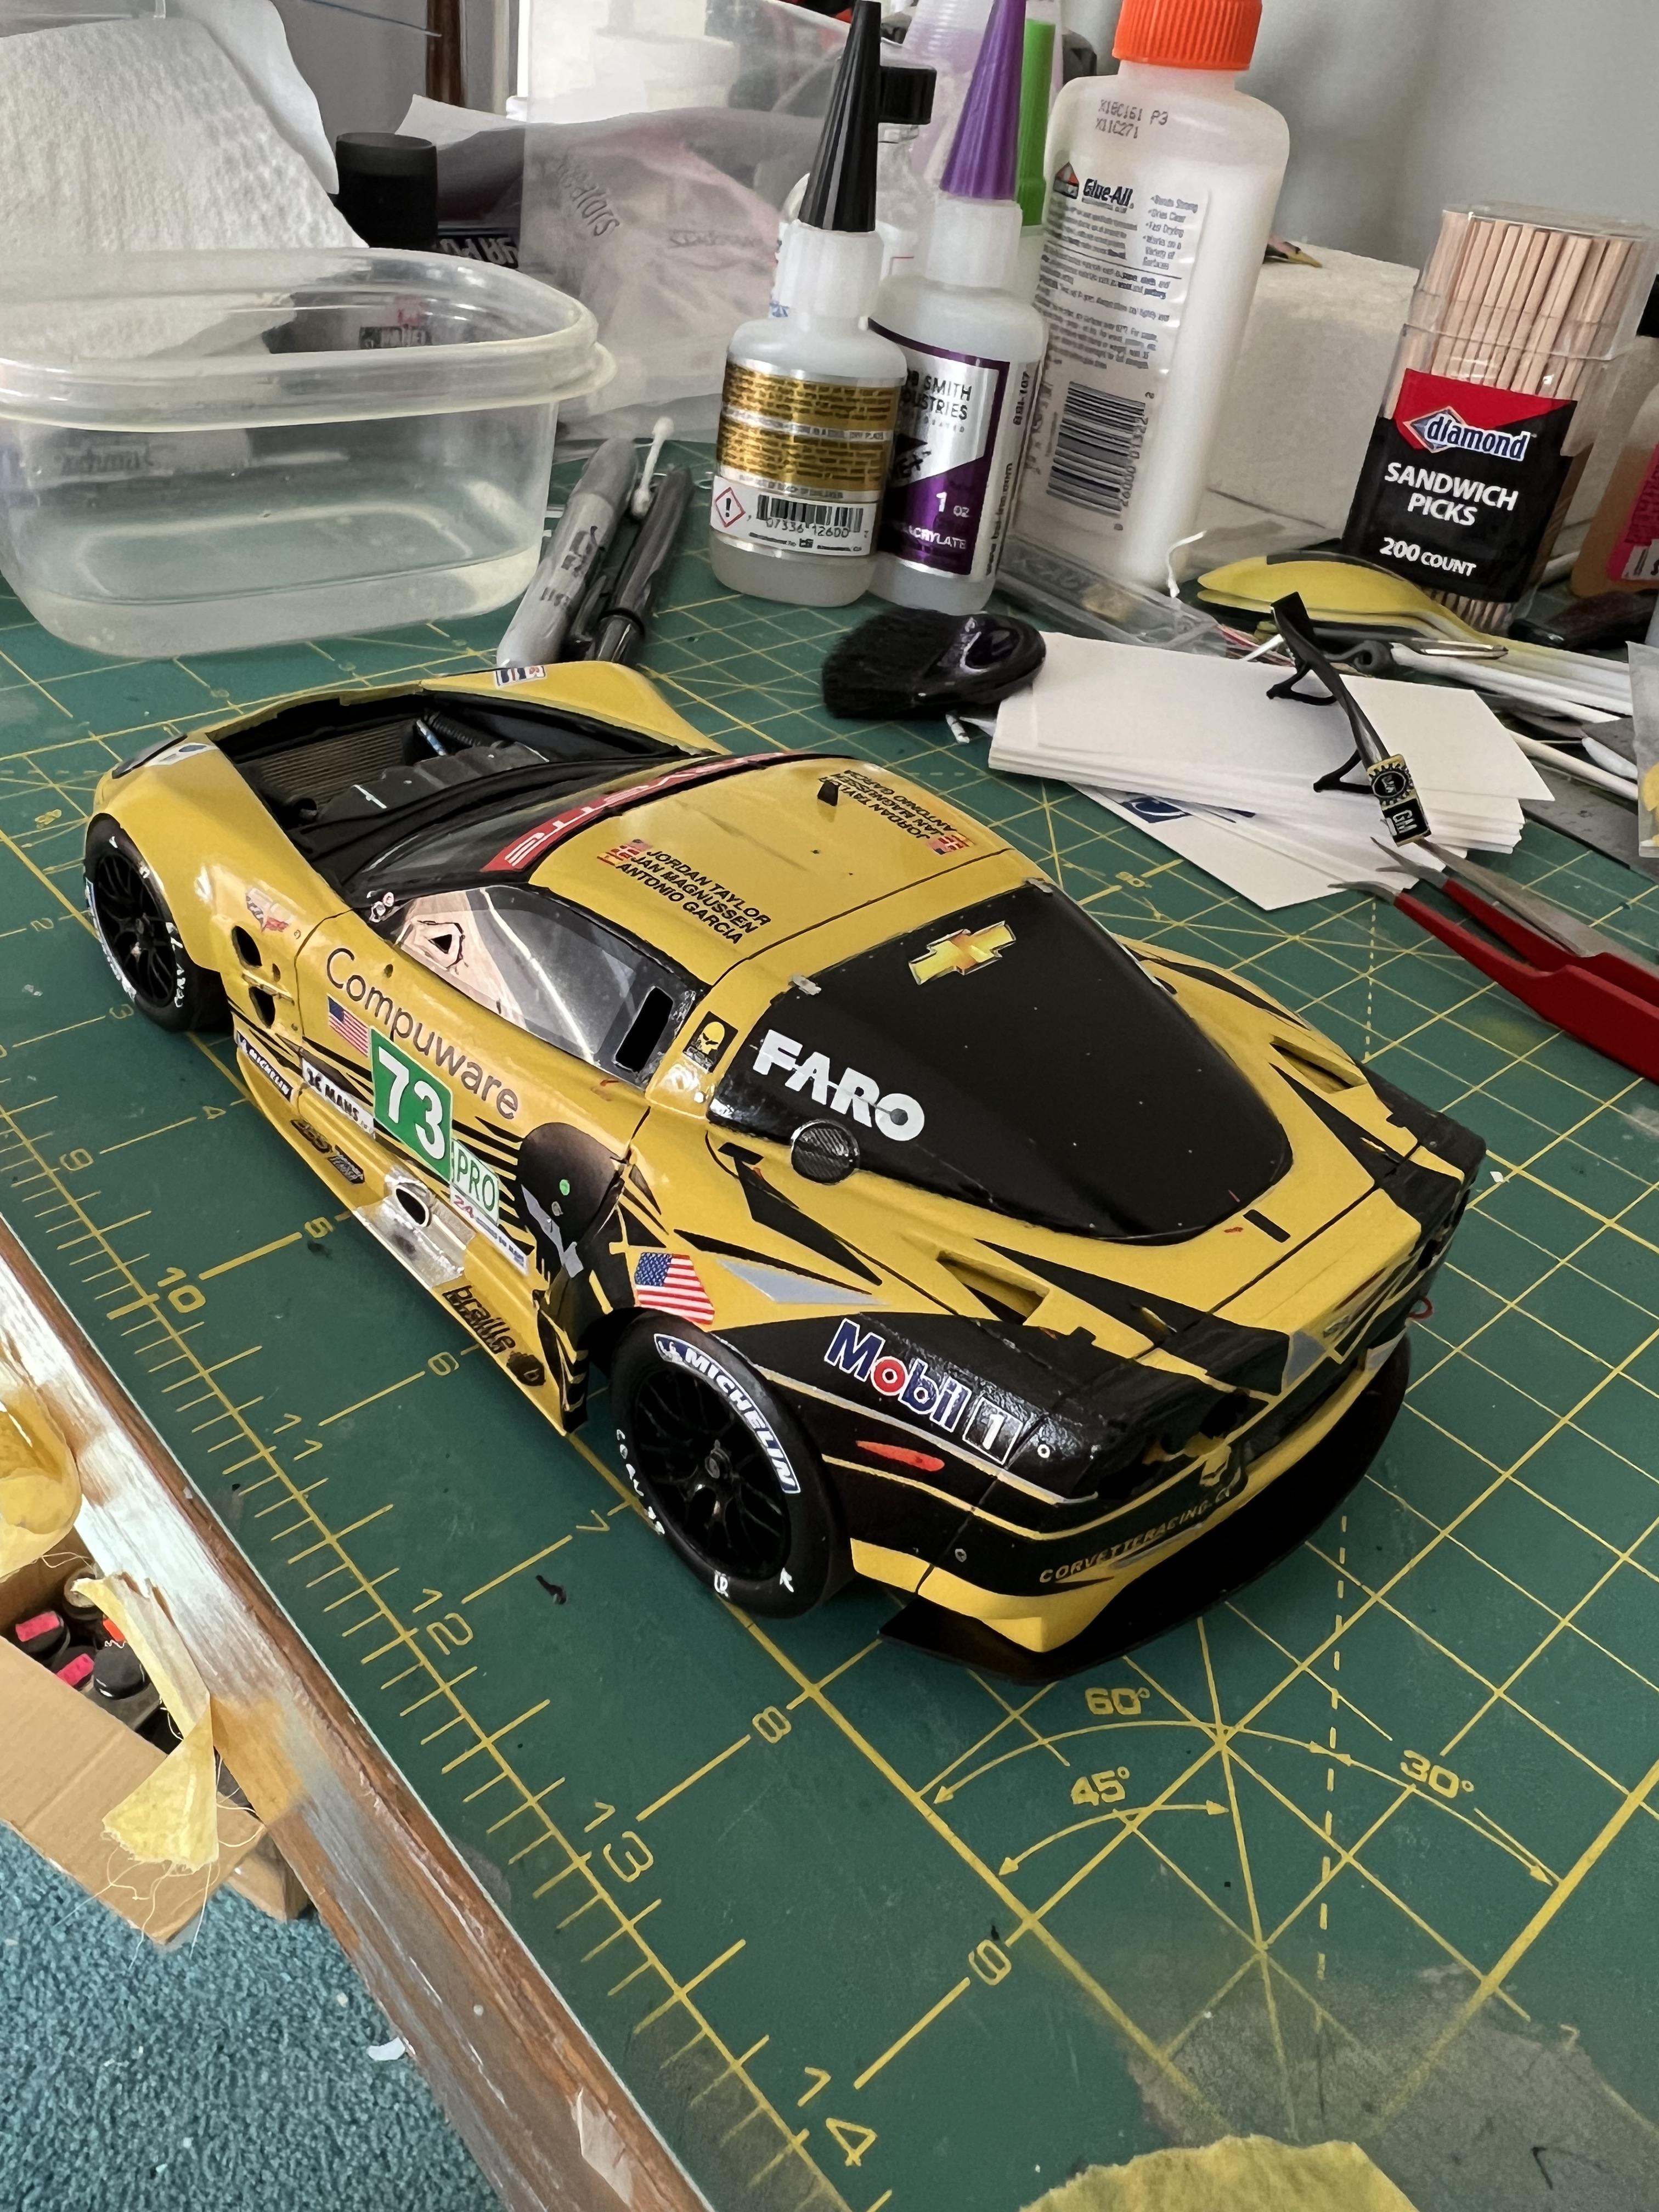
Added the GPS, communication and telemetry antennas to the roof. The GPS antenna was made from scrap plastic. Added the outside rear view mirrors. All that's left to complete is some minor paint touch-up and some weathering on the exhaust ports. I'll then try to get some better pictures of the completed model --thx for looking and the comments, they are much appreciated!
- 32 replies
-
- 1
-
-
- corvette c6r
- zr1
- (and 1 more)
-
Art -- Paint looks great! Love the carbon fiber hood!
-
2012 Corvette C6R ZR1 Le Mans #73
AJM replied to AJM's topic in WIP: Other Racing: Road Racing, Land Speed Racers
Rear Spoiler/Wing --- Attached the rear wing/spoiler from the C7R kit to the rear deck of the car --getting very close to the finish line --only a few more items to add!
- 32 replies
-
- 2
-
-
- corvette c6r
- zr1
- (and 1 more)
-
2012 Corvette C6R ZR1 Le Mans #73
AJM replied to AJM's topic in WIP: Other Racing: Road Racing, Land Speed Racers
SMS carbon fiber decals were used to simulate the fuel filler ports on each side of the rear window/upper rear fender, you can also see the rear diffuser, which was made form sheet plastic, was attached to the lower rear of the car --
- 32 replies
-
- 1
-
-
- corvette c6r
- zr1
- (and 1 more)
-
2012 Corvette C6R ZR1 Le Mans #73
AJM replied to AJM's topic in WIP: Other Racing: Road Racing, Land Speed Racers
Ride Height -- This was a very challenging part of the build, since the 'stance' is a an important (I think) part of the look of the 1:1 race car. It started with cutting axle locators in the front of the chassis to adjust the position of the front wheels in the wheel wells. I then used plastic rod for the axles and cut each one after the wheel was attached, so that I could place each wheel separately. The axle holes were reamed out so I could adjust each wheel to the wheel well and then I used 5 min epoxy to attach.
- 32 replies
-
- 2
-
-
- corvette c6r
- zr1
- (and 1 more)