Davoski
-
Posts
75 -
Joined
-
Last visited
Content Type
Profiles
Forums
Events
Gallery
Everything posted by Davoski
-
Just dragging this thread out to see if anyone has an update on a source of Jag Rear Ends....
-
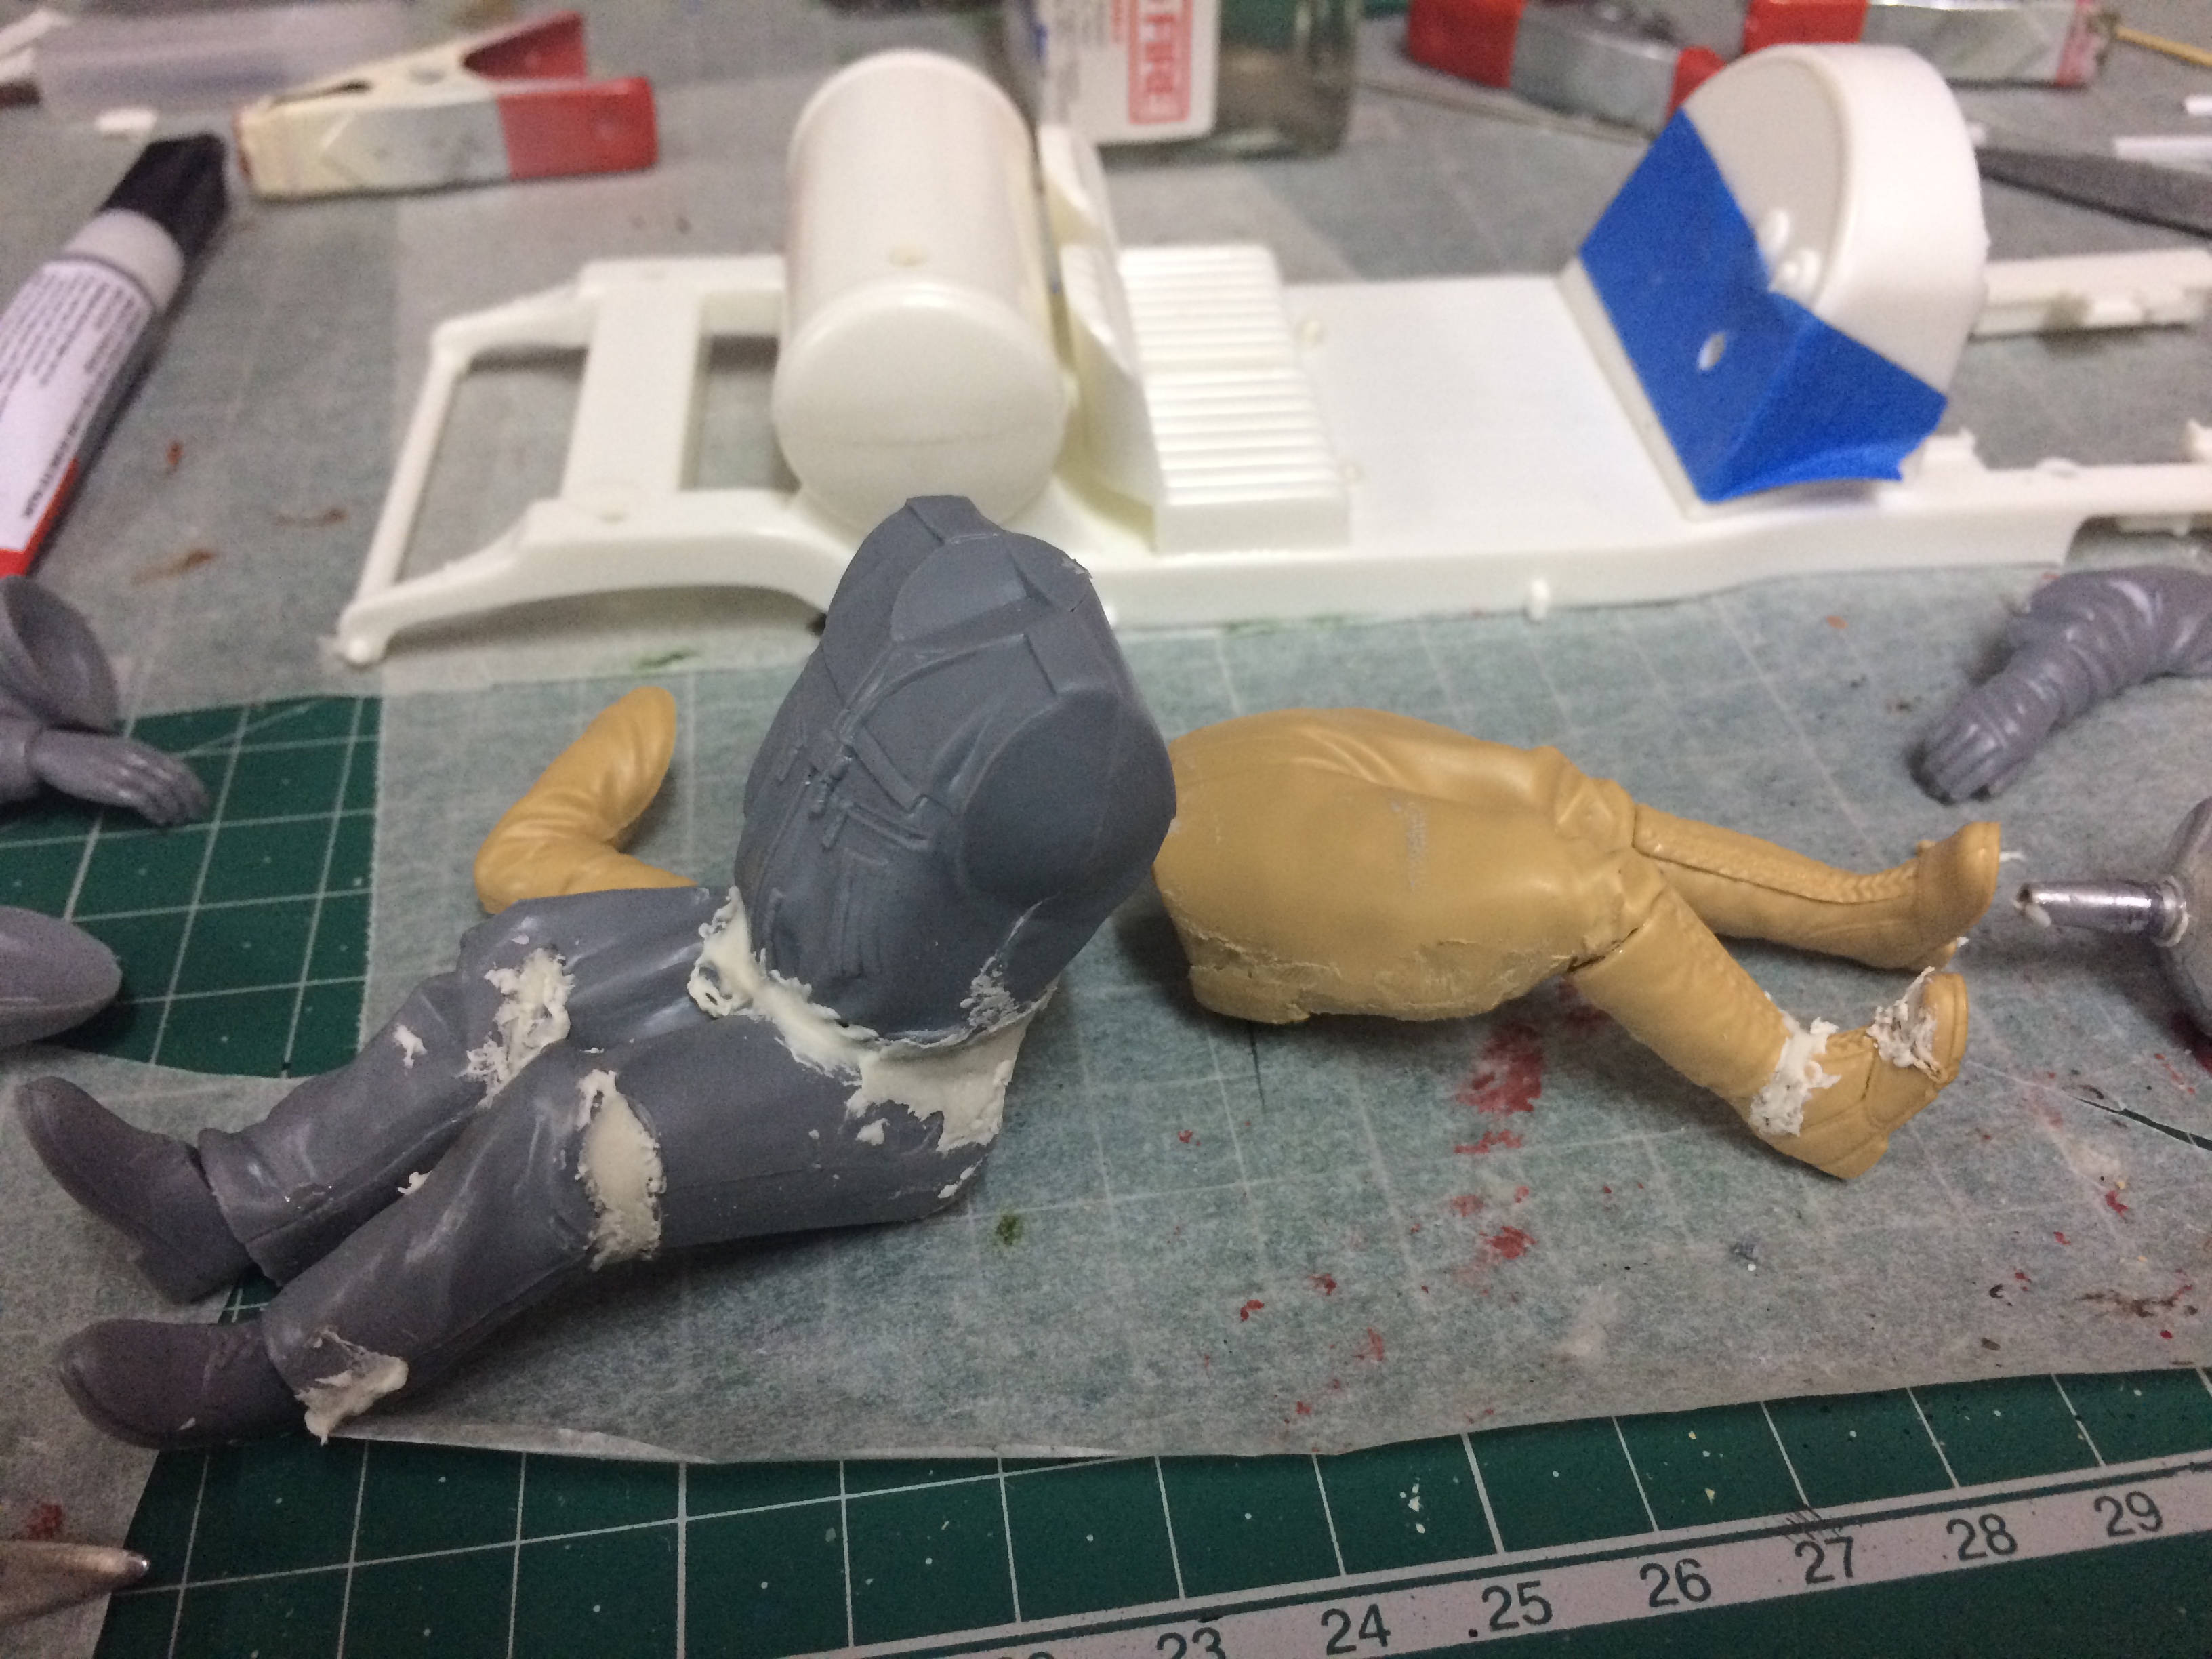
Hi Miles, The reason for the difference may be that the fashion for driving position in rally cars has changed. In the 80's and earlier most drivers drove almost straight armed whereas from the 90's onward the drivers now sit VERY close to the wheel. So yes, you will need to "cut and shut" the arms and legs at Shoulder/elbow and Hip/knee. You probably don't need to cut right through the "joint", just cut a wedge from behind the knee, for example, leaving the kneecap in place. Then heat the kneecap carefully and bend the knee to the right position. You can then fill the remaining gap lightly with your filler of choice and file or sand to finish. For the hips you can also separate the torso at the waist and take a narrow wedge from the front, or even add a wedge from behind below the kidneys. The sanding doesn't need too be to fancy or accurate because it will generally look like folds in fabric anyway. Here are some examples where I have done this: Admittedly, these particular figures were 1/16 so a bit easier but they started standing up straight and I have done 1/24 and 1/35 successfully. See more pics here and here Hope that helps.

-
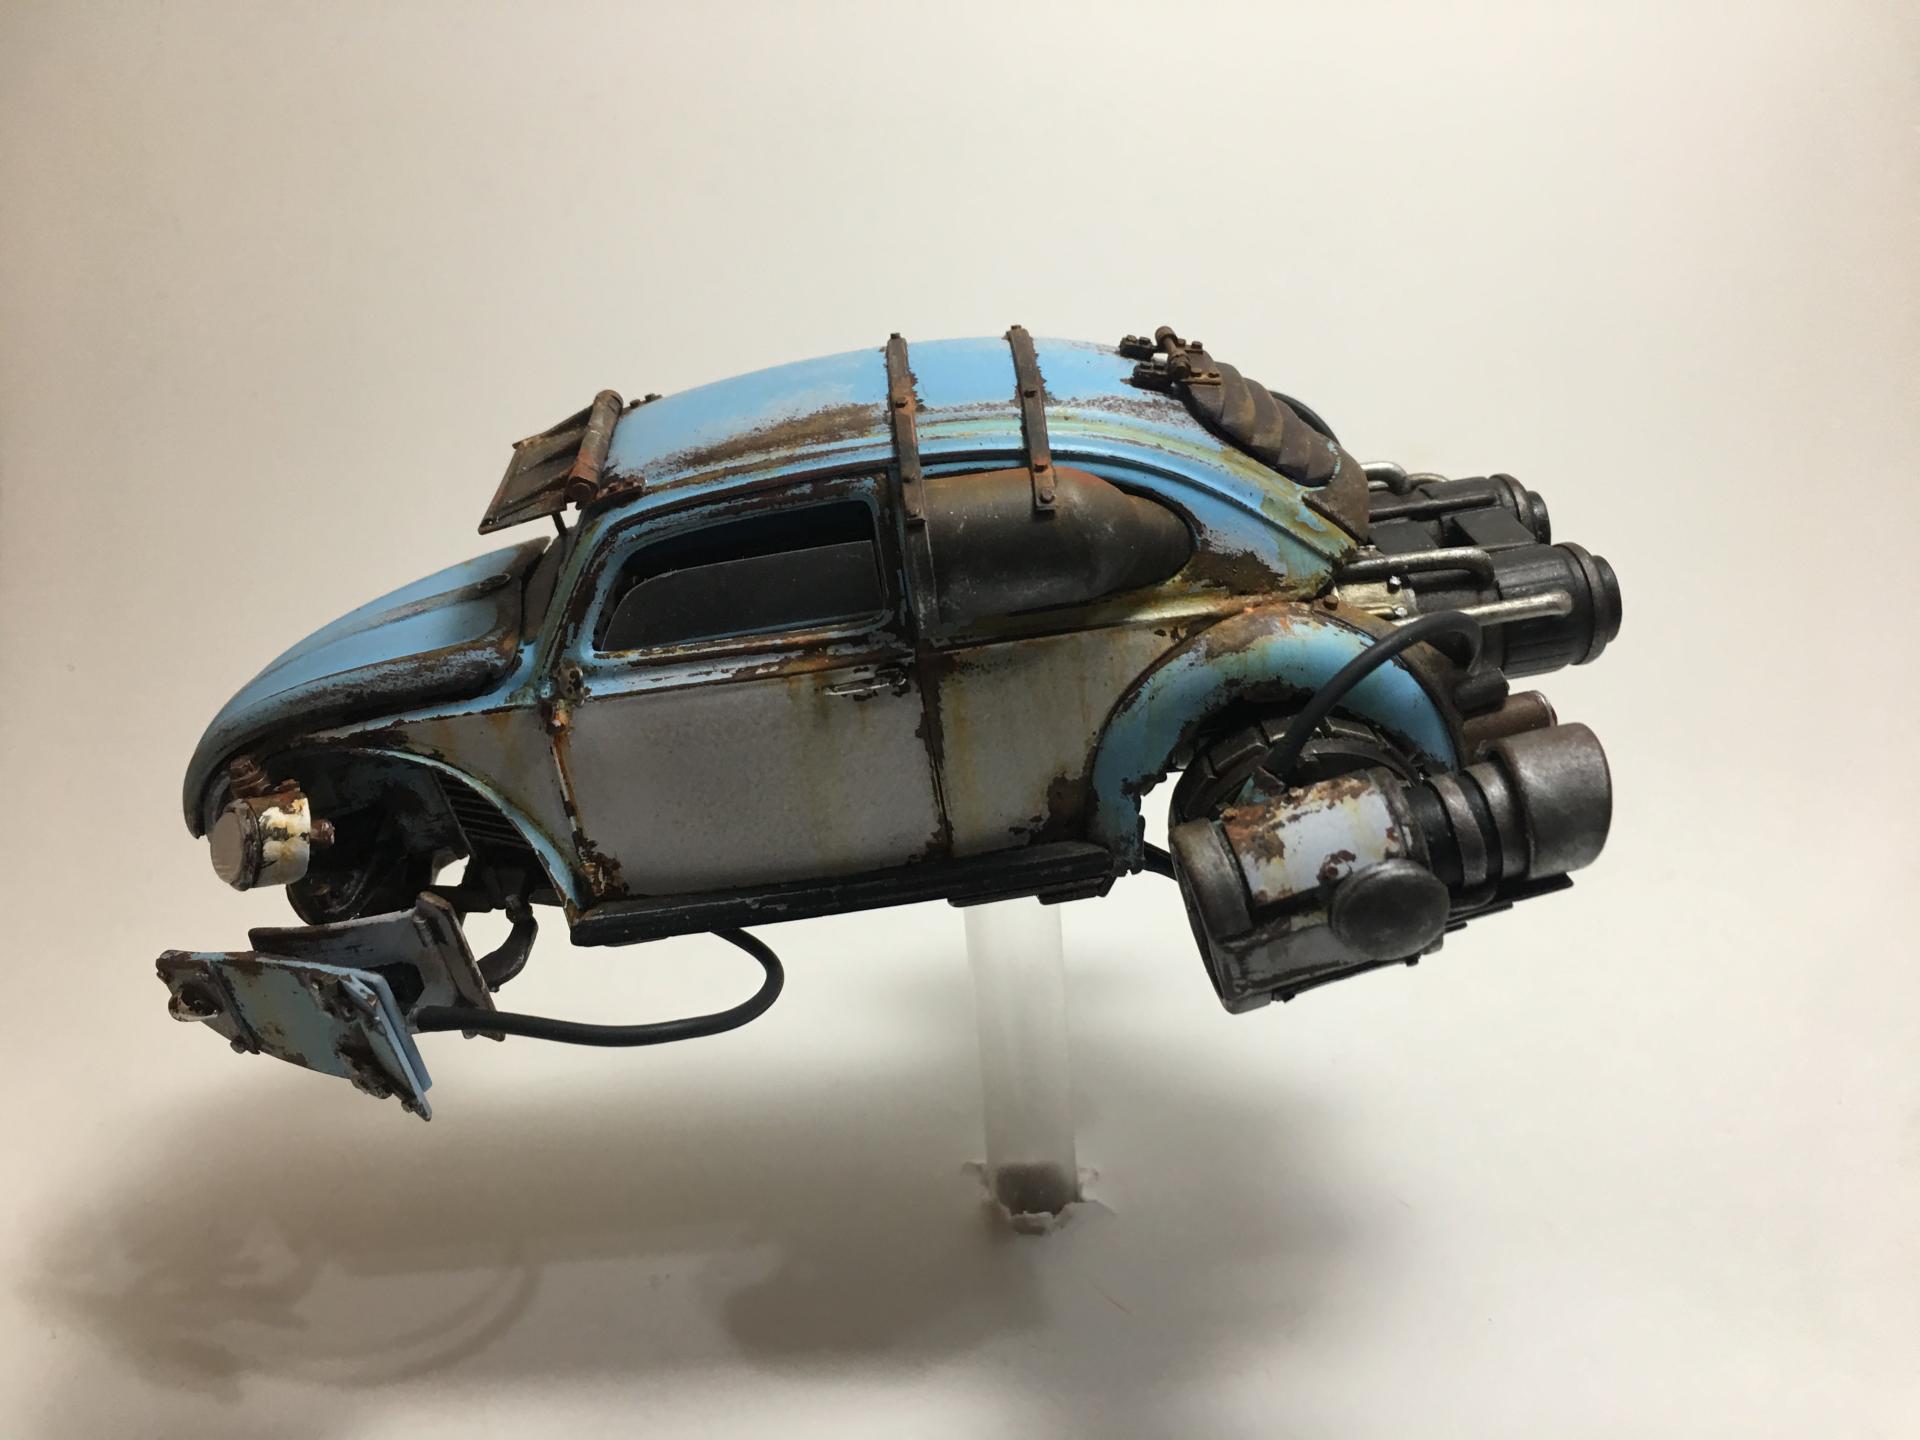
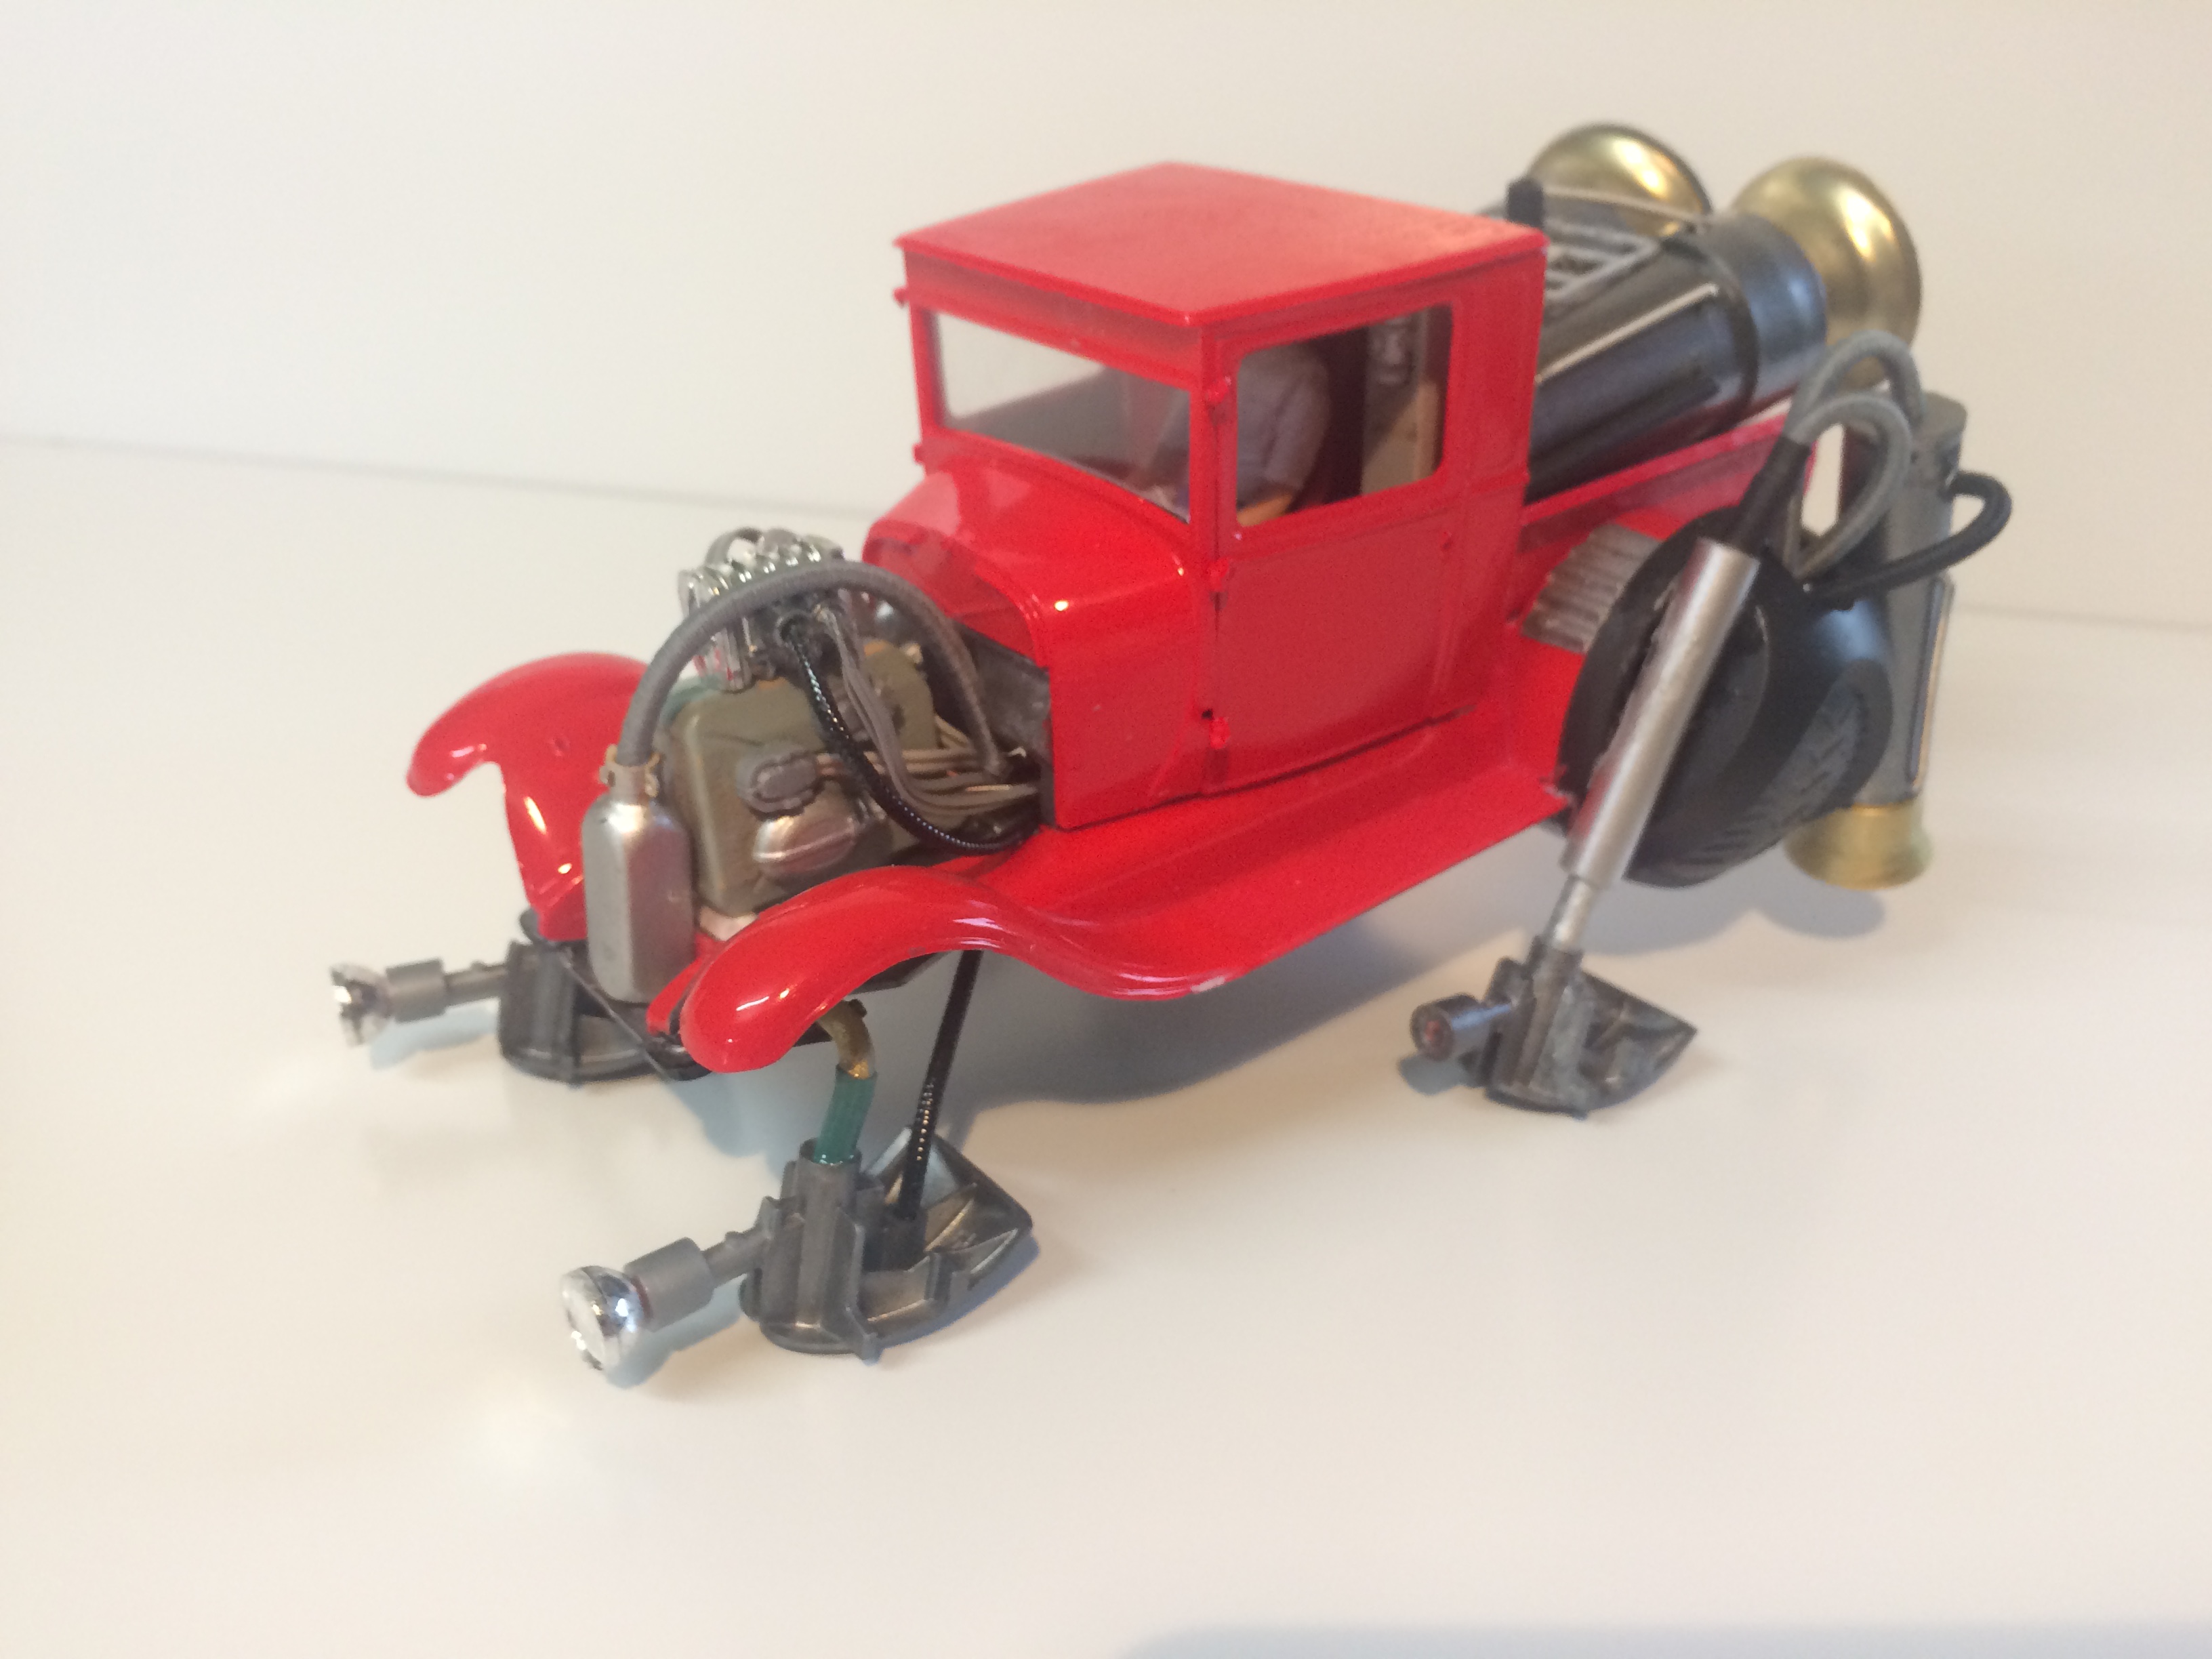
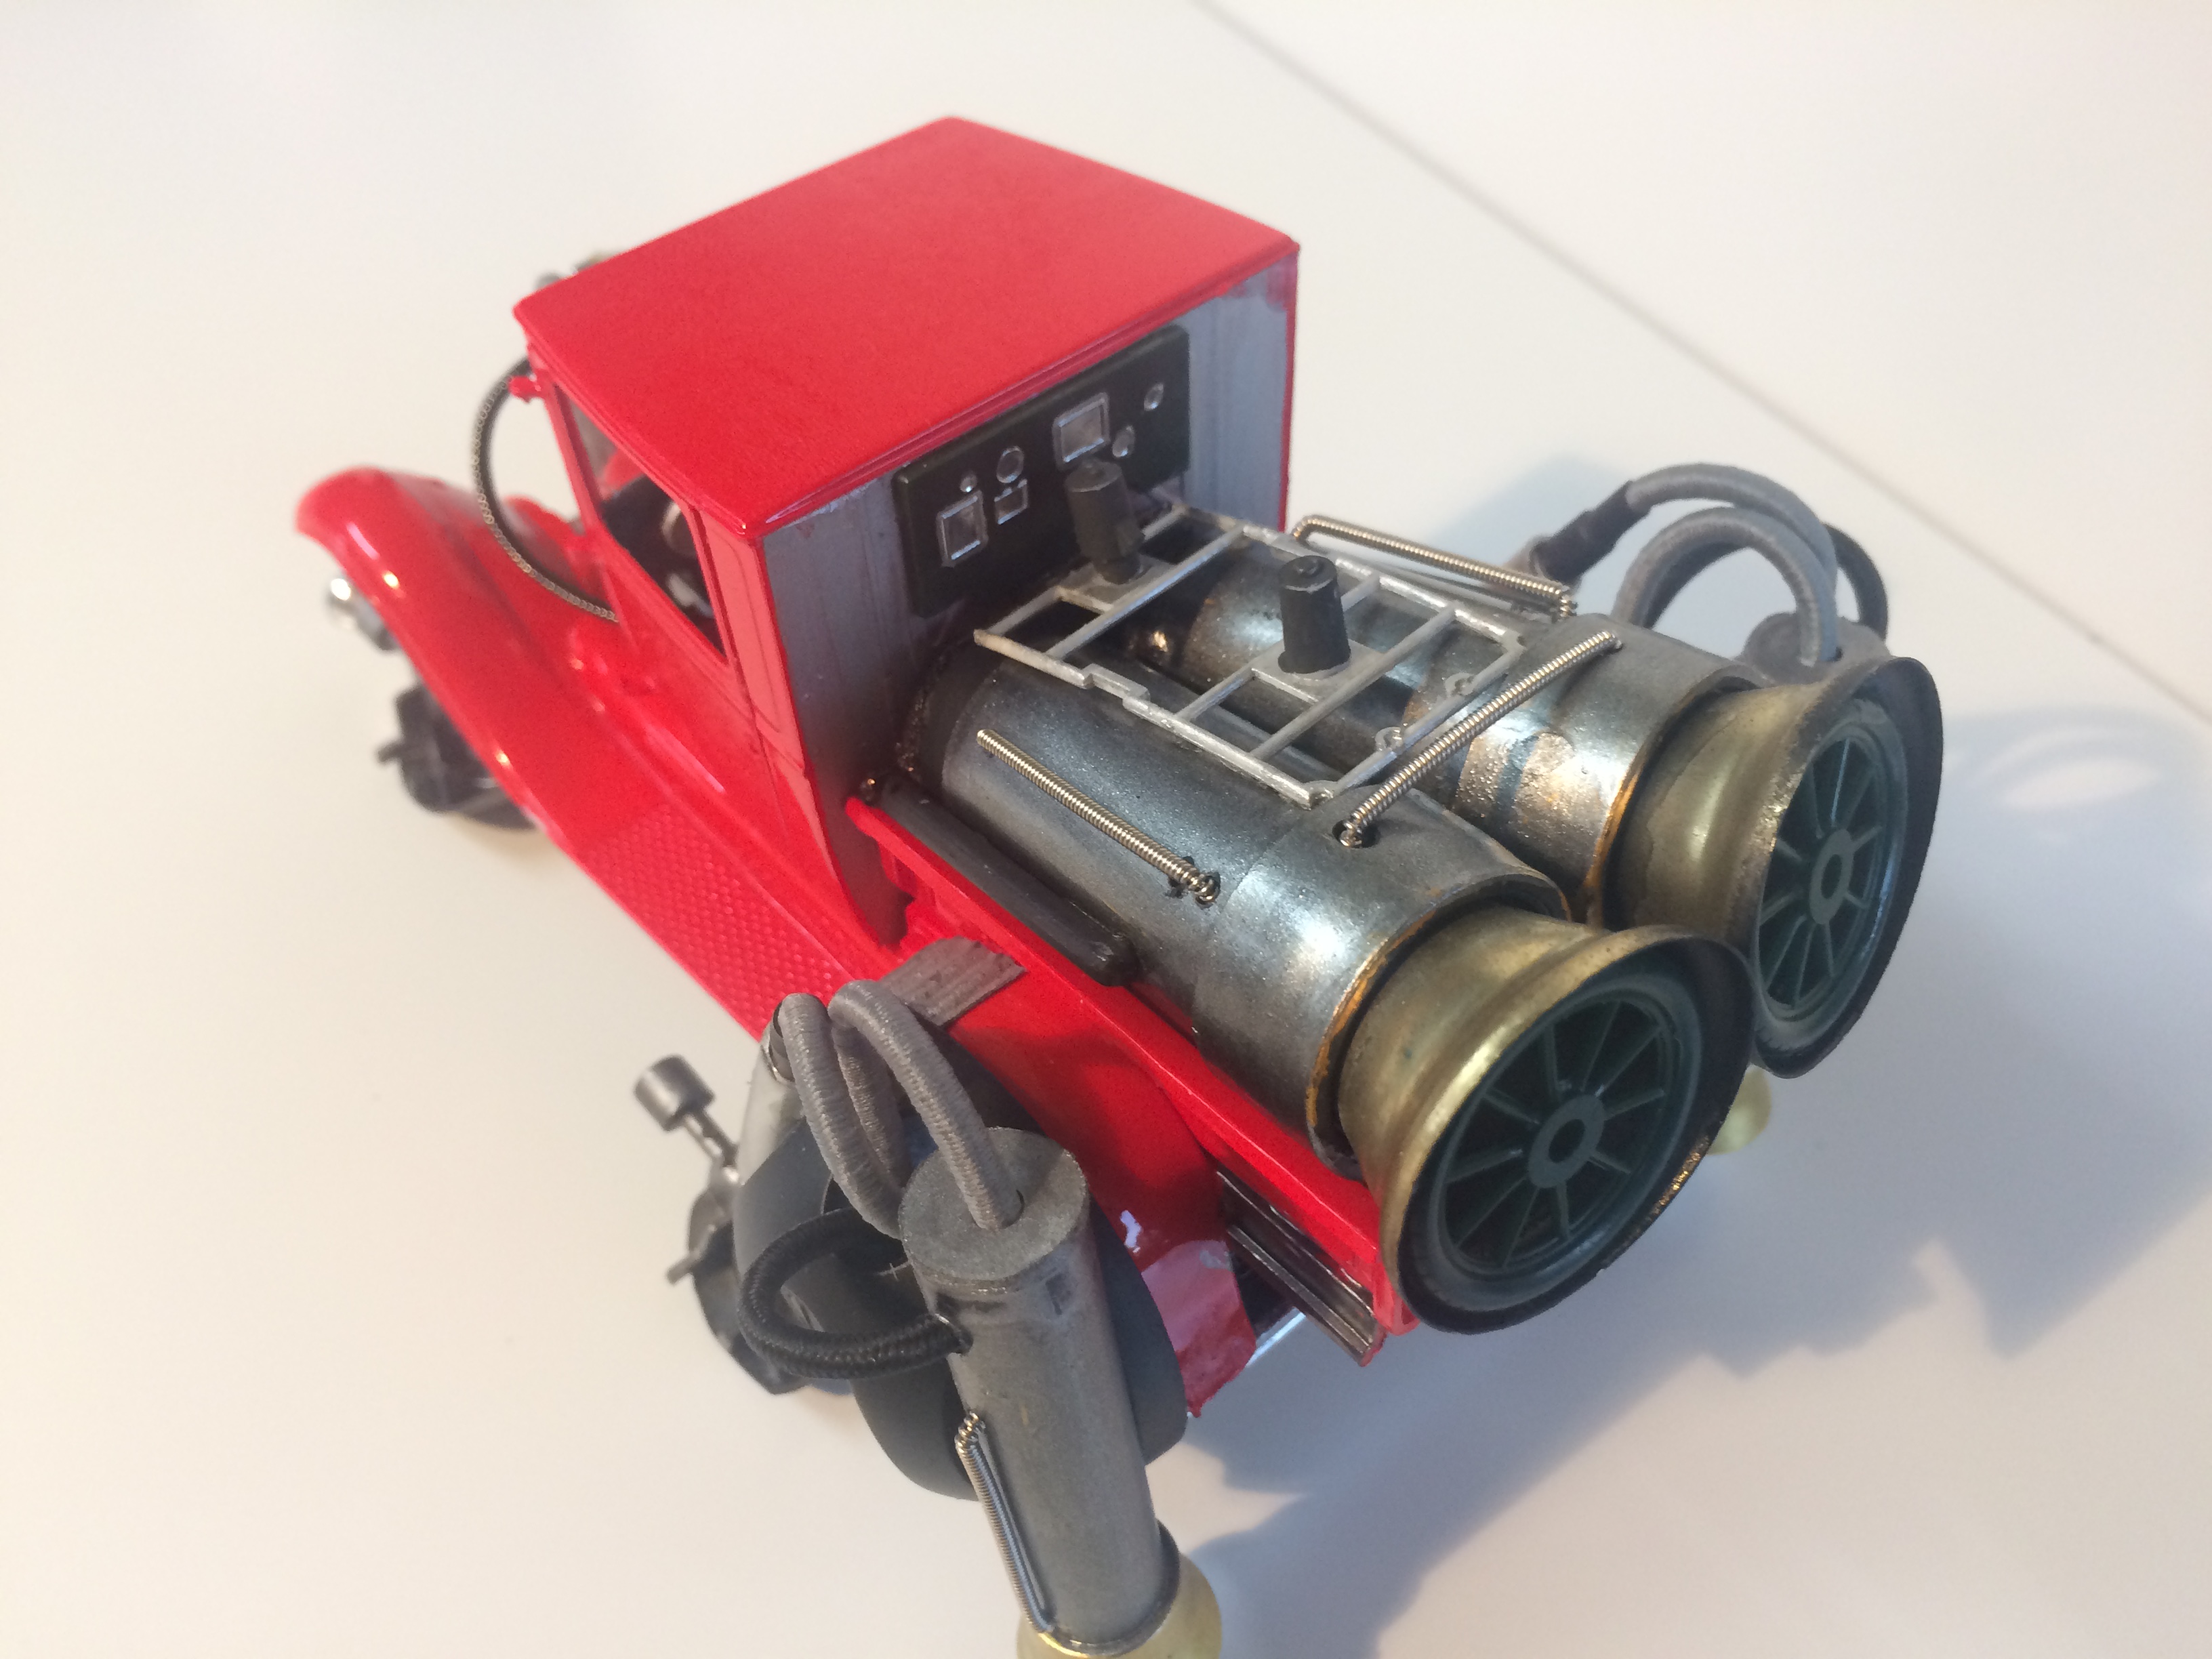
Hi guys, This is my entry to the Aussie Custom Modellers latest Facebook Build-off Contest. The theme was '29-'39 Hot Rod but, as usual, I wanted to build something out of left field. As a design concept I love SteamPunk and DieselPunk and this kind of look: And the work of DaxMan on this group: Whilst I am sure the organisers envisaged T-Buckets and Rat Rods, I had to do something different. I hope you like it. Apart from pinching some parts from my parts box, I also went to the local Two Dollar shop and bought some bits and pieces. I also just found some stuff around the house. For example, the round black pieces where the back wheels would be are tops from deodorant cans, and when I pulled them apart I found that the spray nozzle assembly was perfect for the lander feet, no modifications required to either part! I thought about weathering it but it wasn't meant to be a Rat Rod but more of a Show Rod. That said, I might still dirty up the engines a bit. I also meant to build the basics of a Drive In theater that I want for a future project but I didn't get far before the deadline: Work in Progress pics are here Link I hope you like it!
-
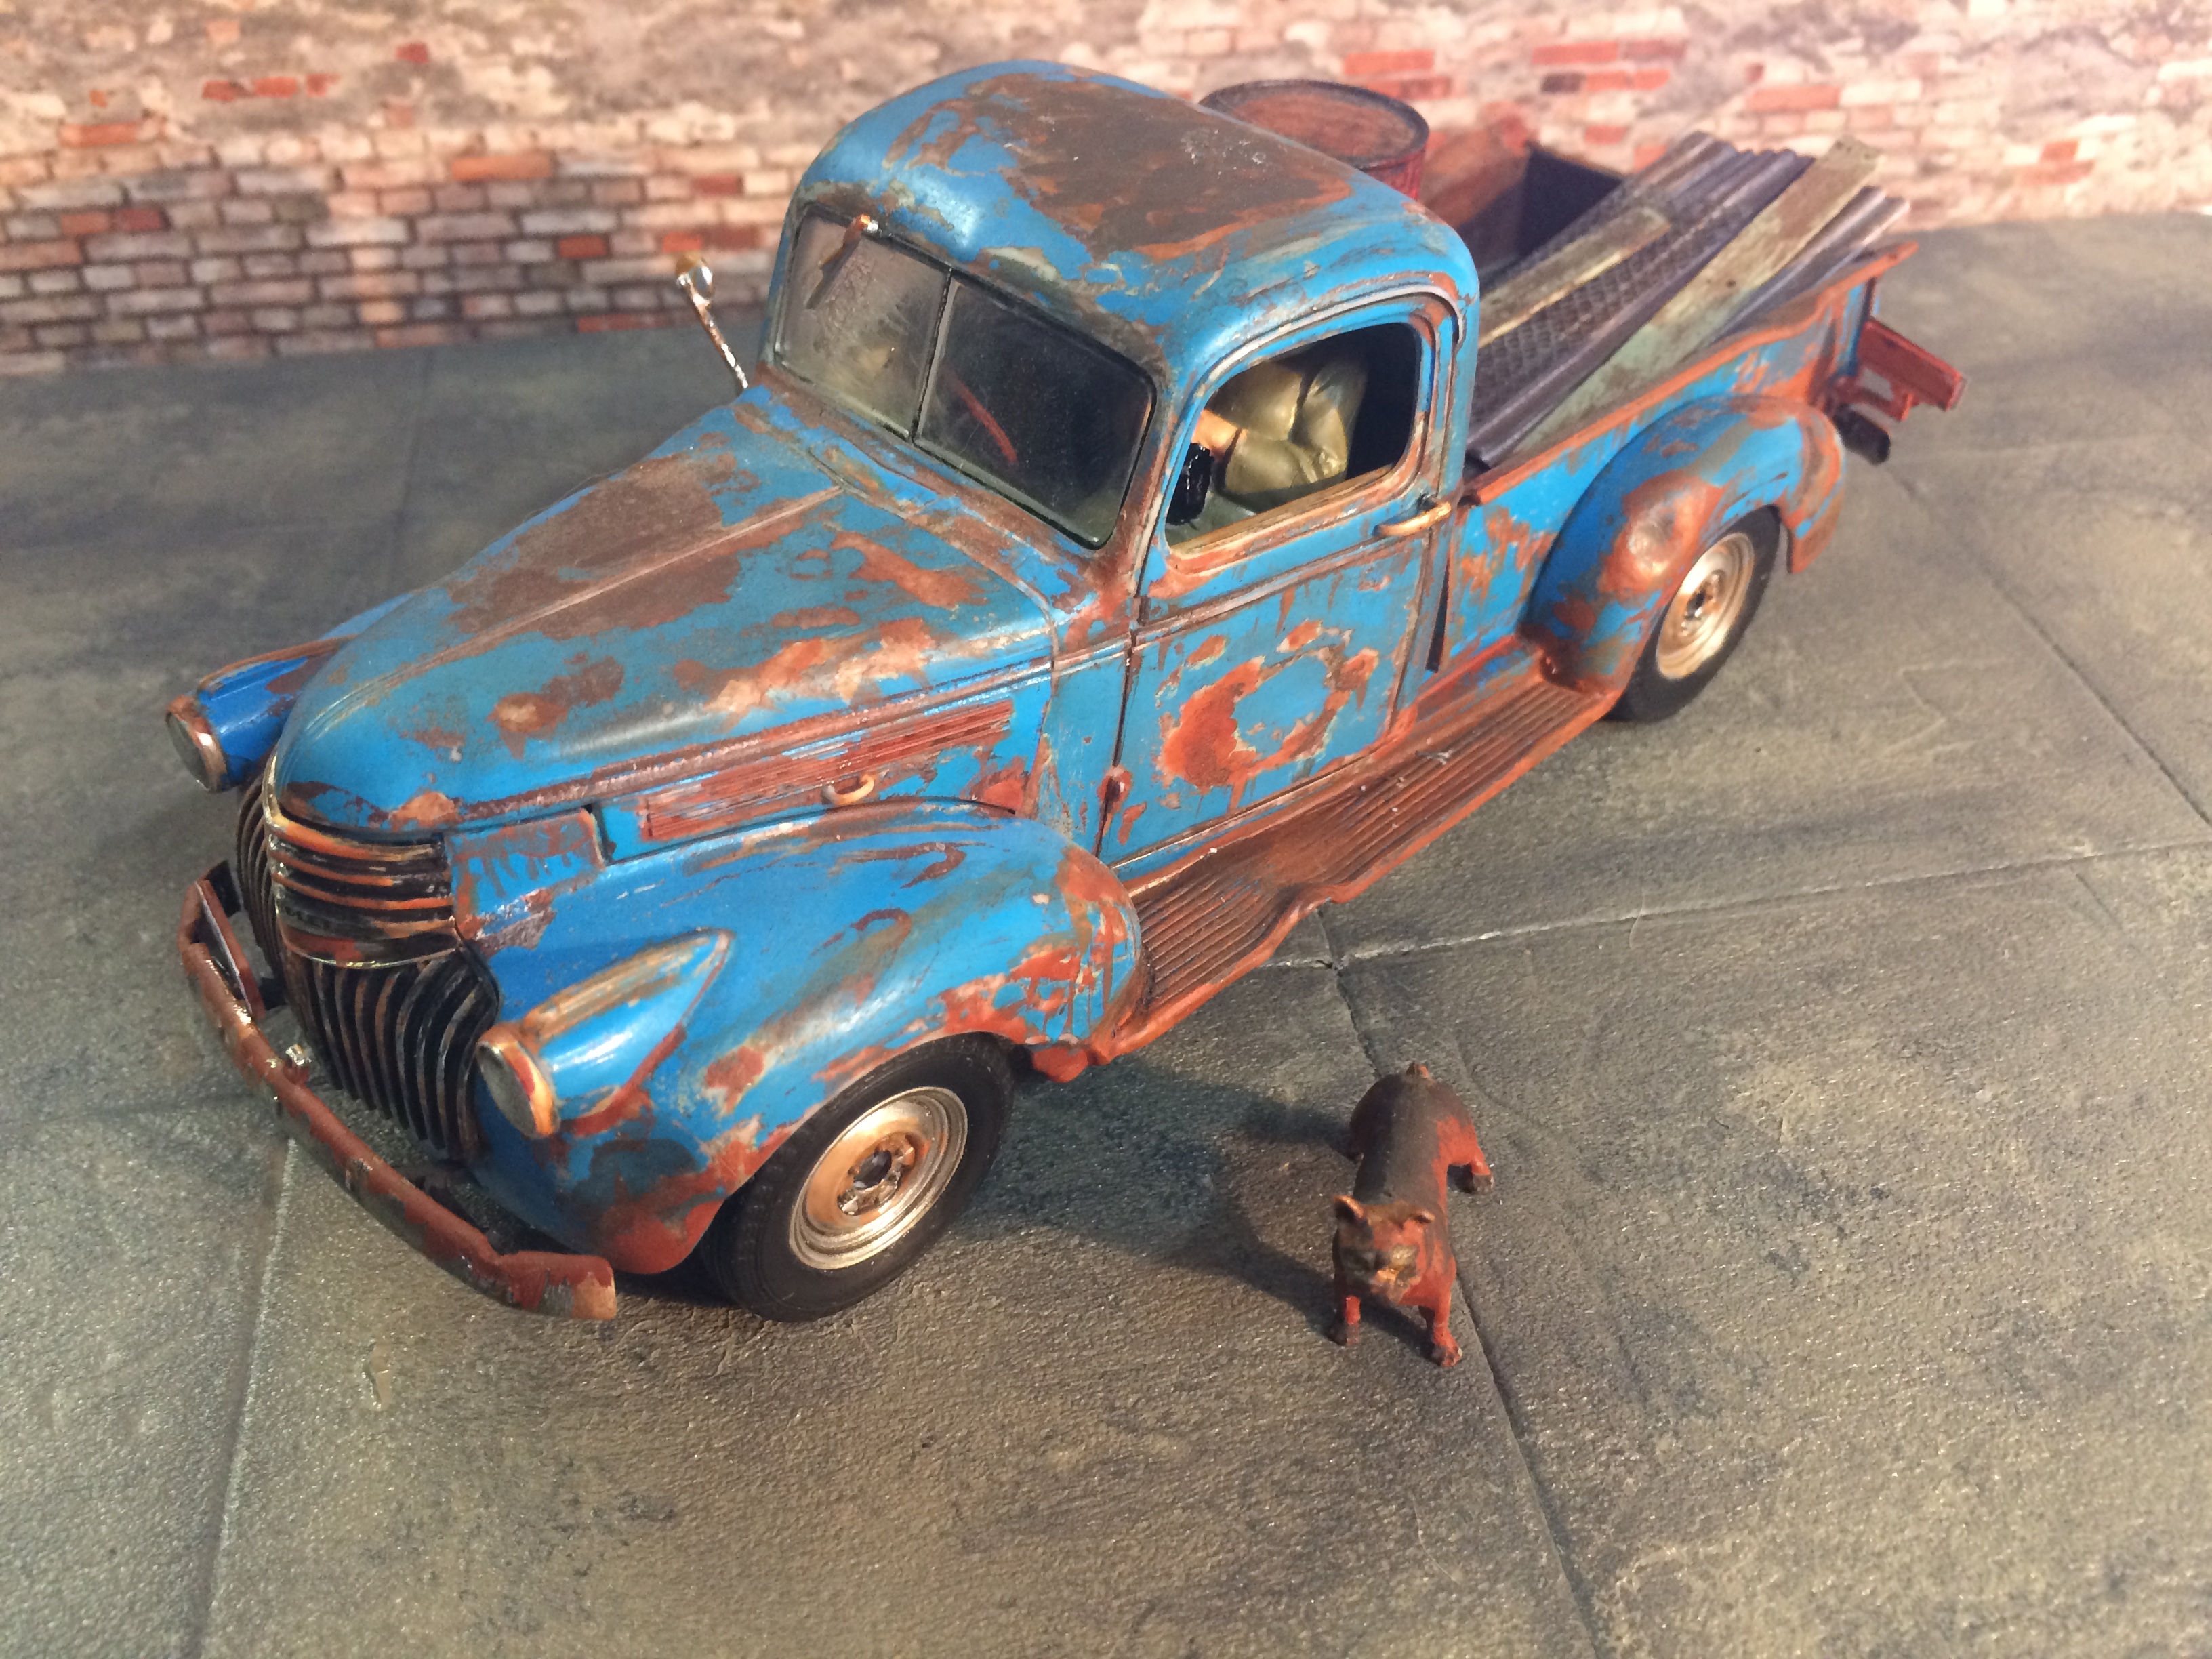
My take on the 41 Chev Pickup.
Davoski replied to Davoski's topic in Model Trucks: Pickups, Vans, SUVs, Light Commercial
Ummm......I just glued it on The base bracket is roughly a square so you just rotate it 90 degrees. I moved the steering wheel and pedals to RHD but didn't change the dash. Anybody who is picky about that would not be welcome at the Pub anyway -
My take on the 41 Chev Pickup.
Davoski replied to Davoski's topic in Model Trucks: Pickups, Vans, SUVs, Light Commercial
Aww, shucks, thanks guys -
Hi guys, I am sure most of you have built this kit at some point but this is one that I have made to go in a 1950's Aussie Pub diorama. Beryl in the passenger seat is part of a little story that the scene will tell. The rest of the diorama is about 90% finished so should only take me another 5 years or so to complete If you are interested the build sequence for the ute is here. I hope you like it!
-
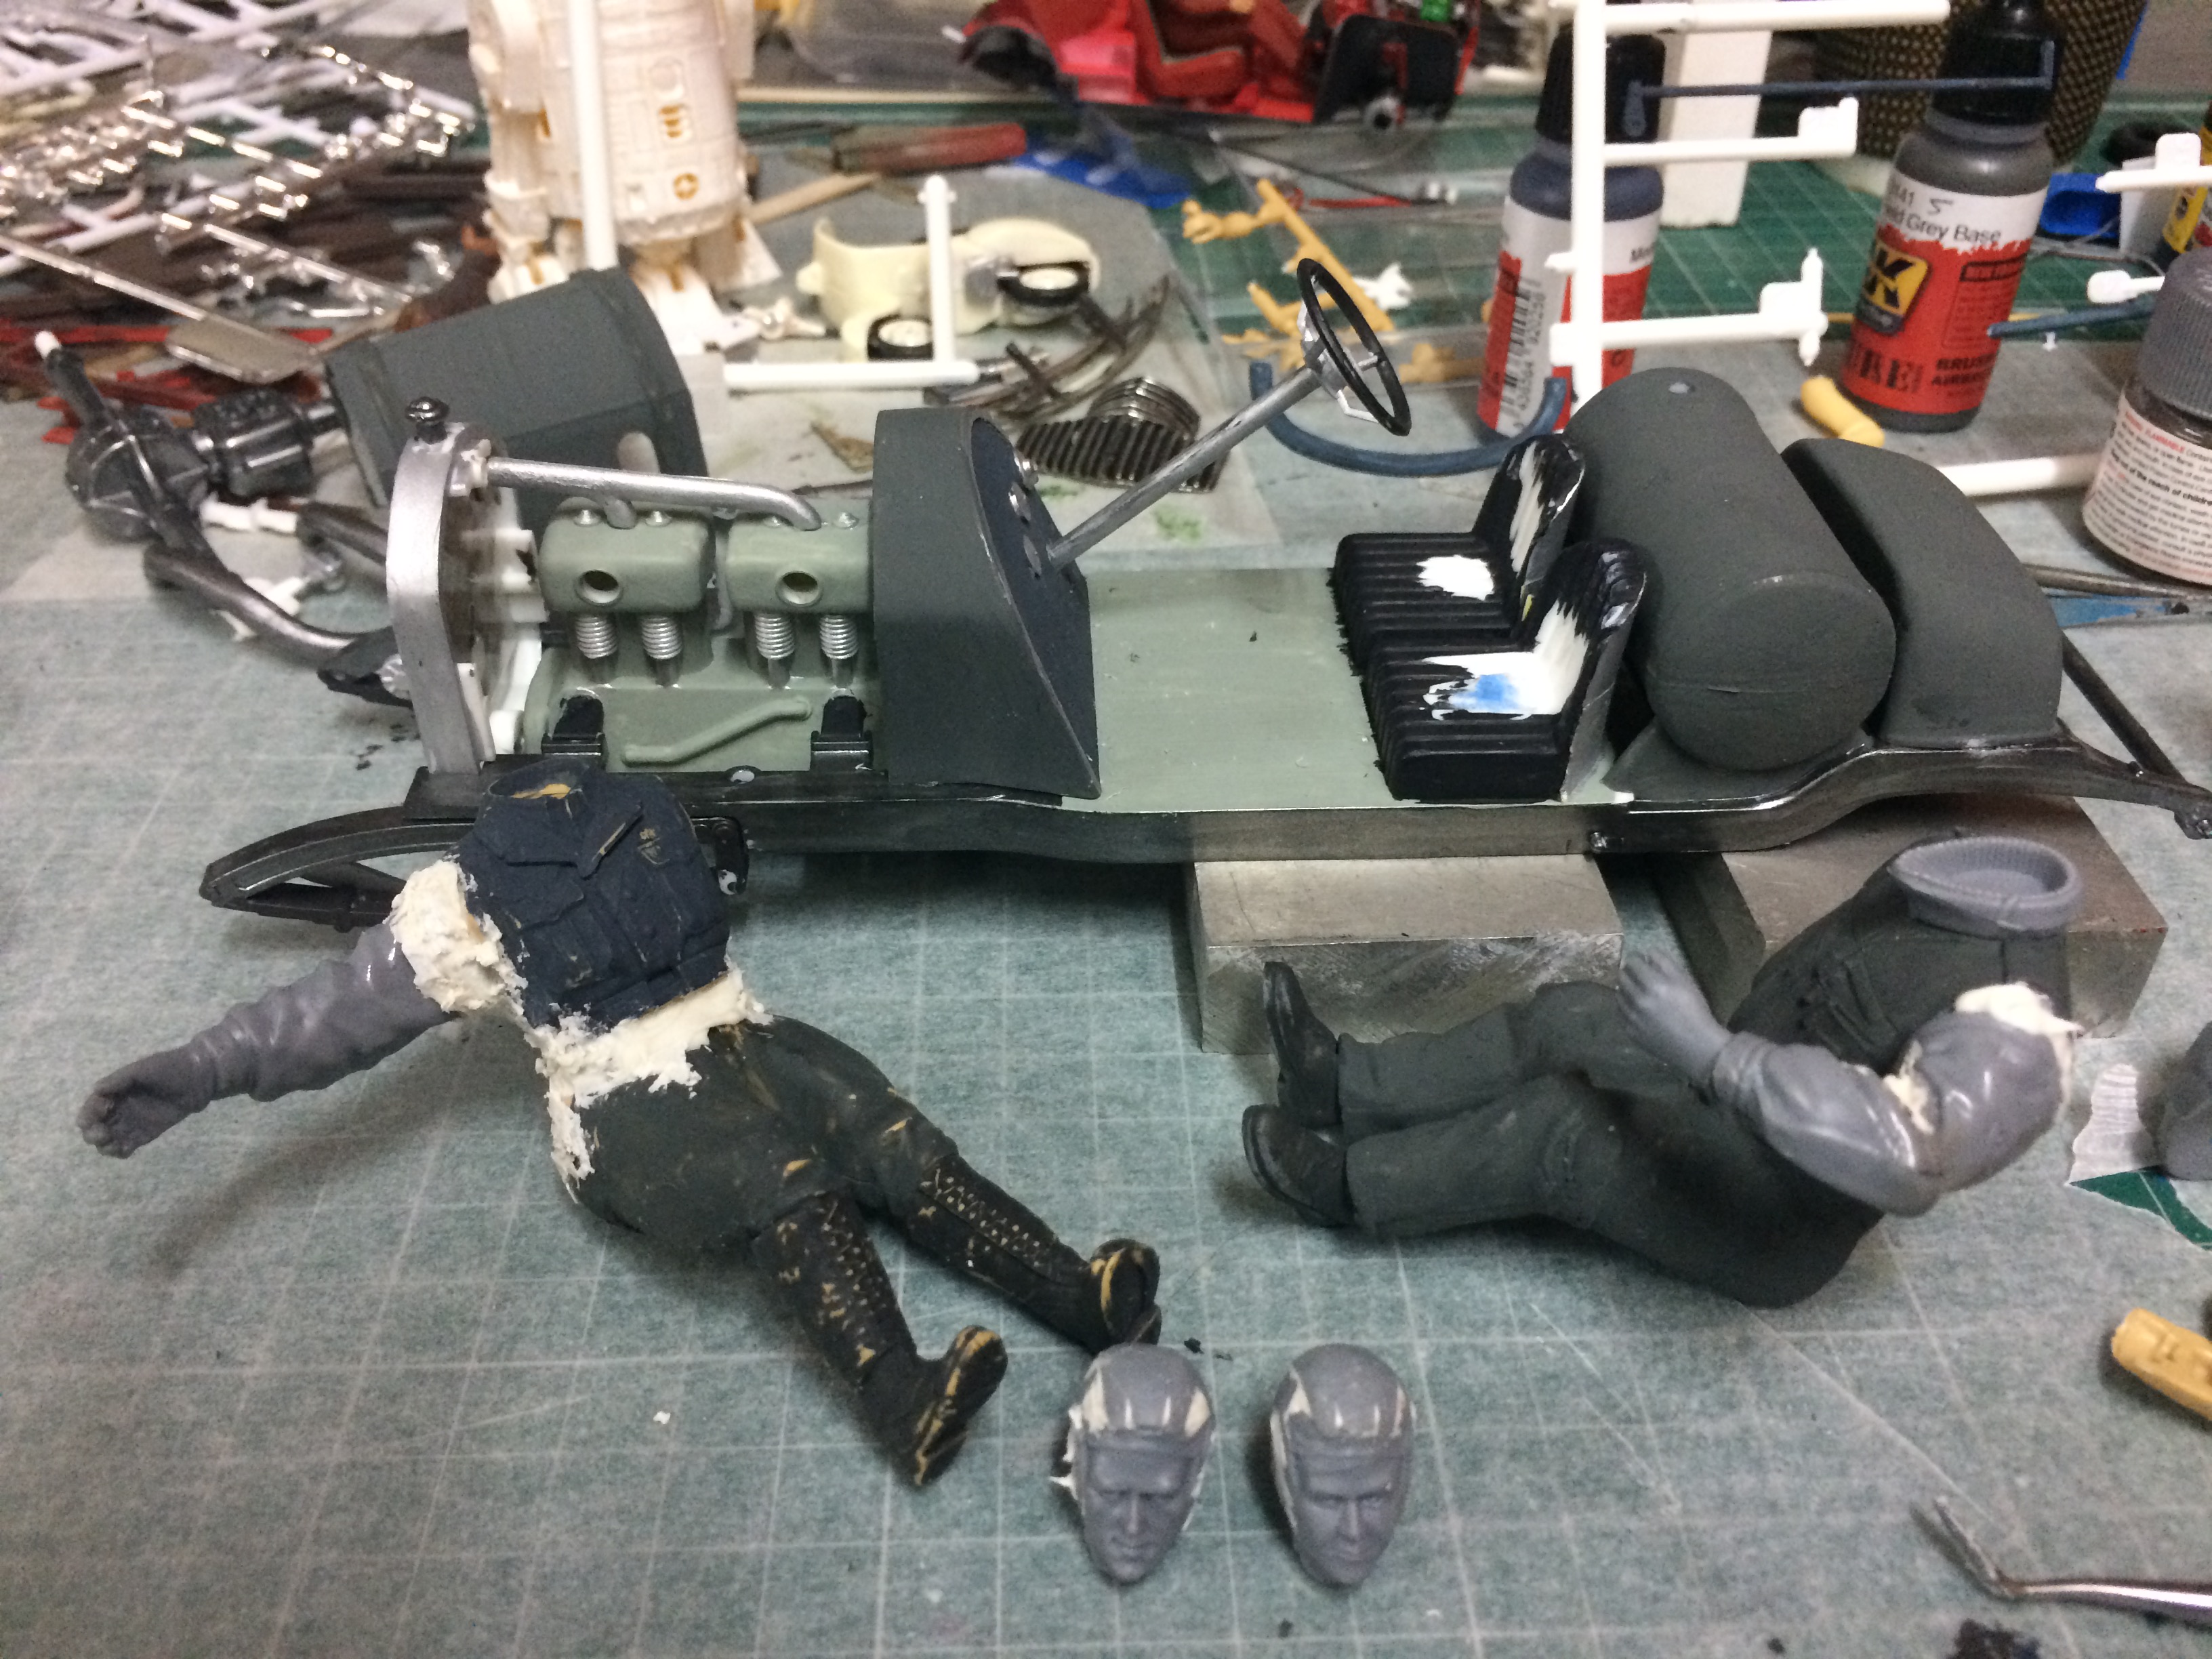
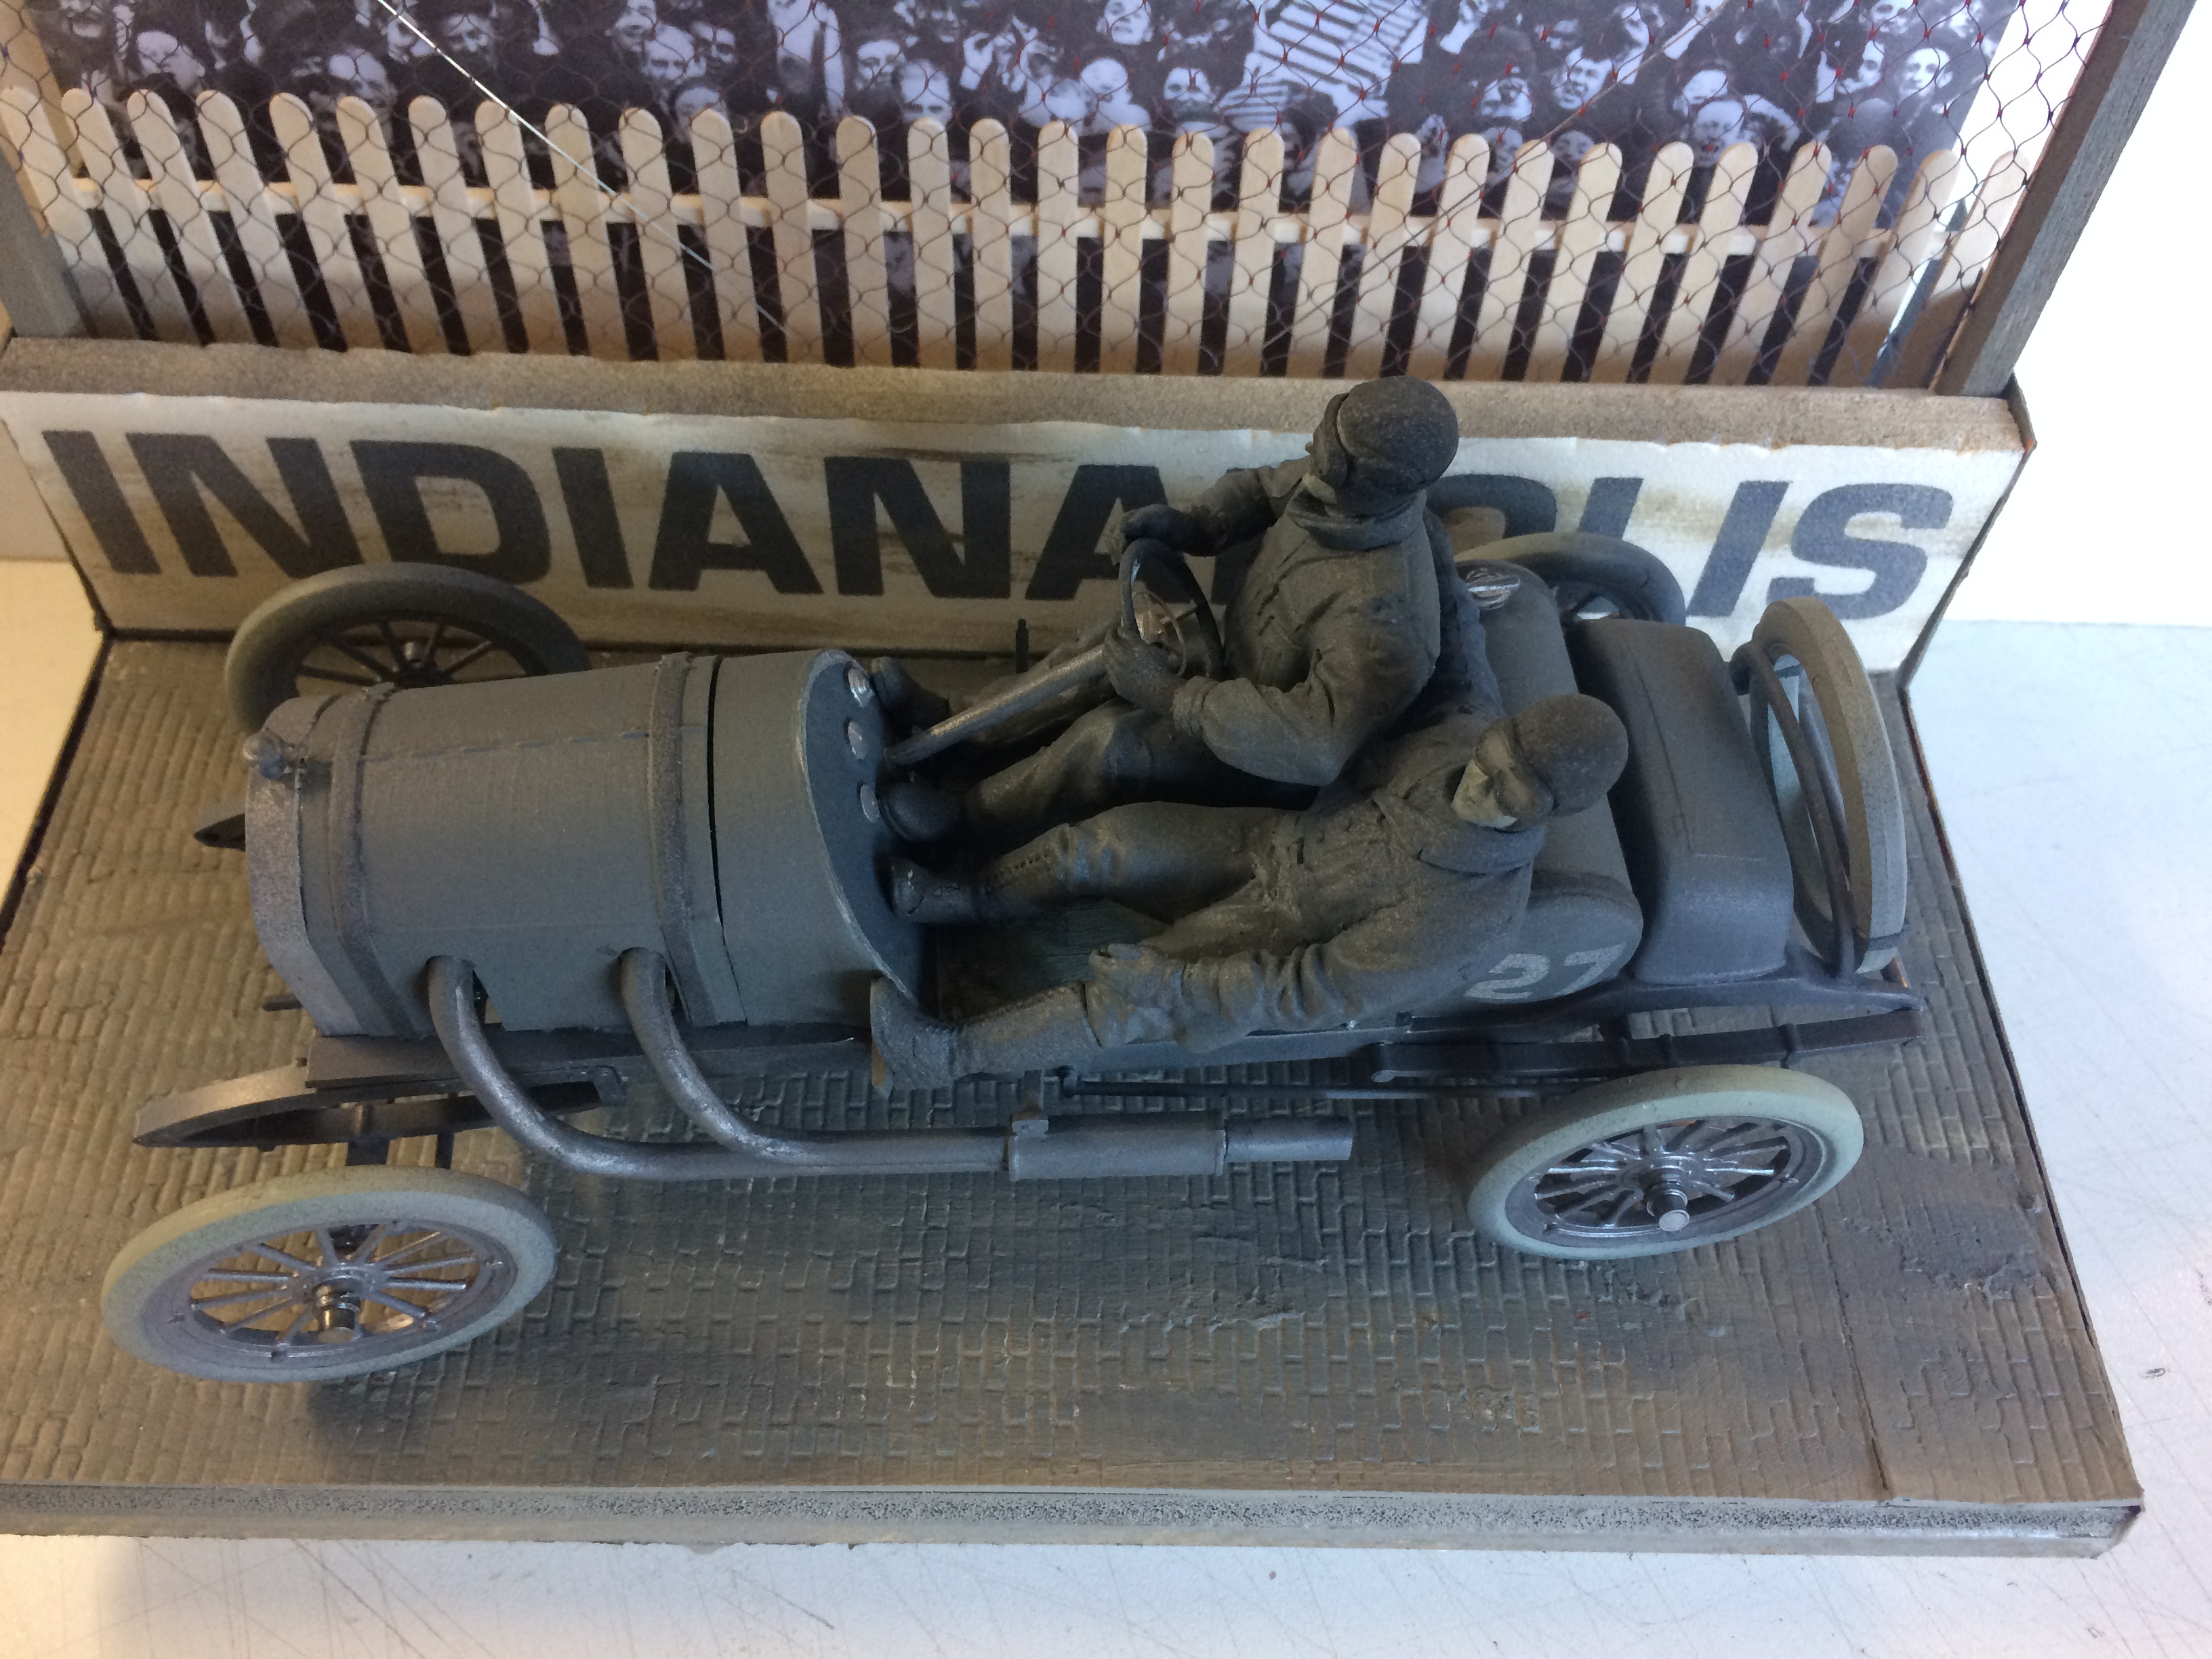
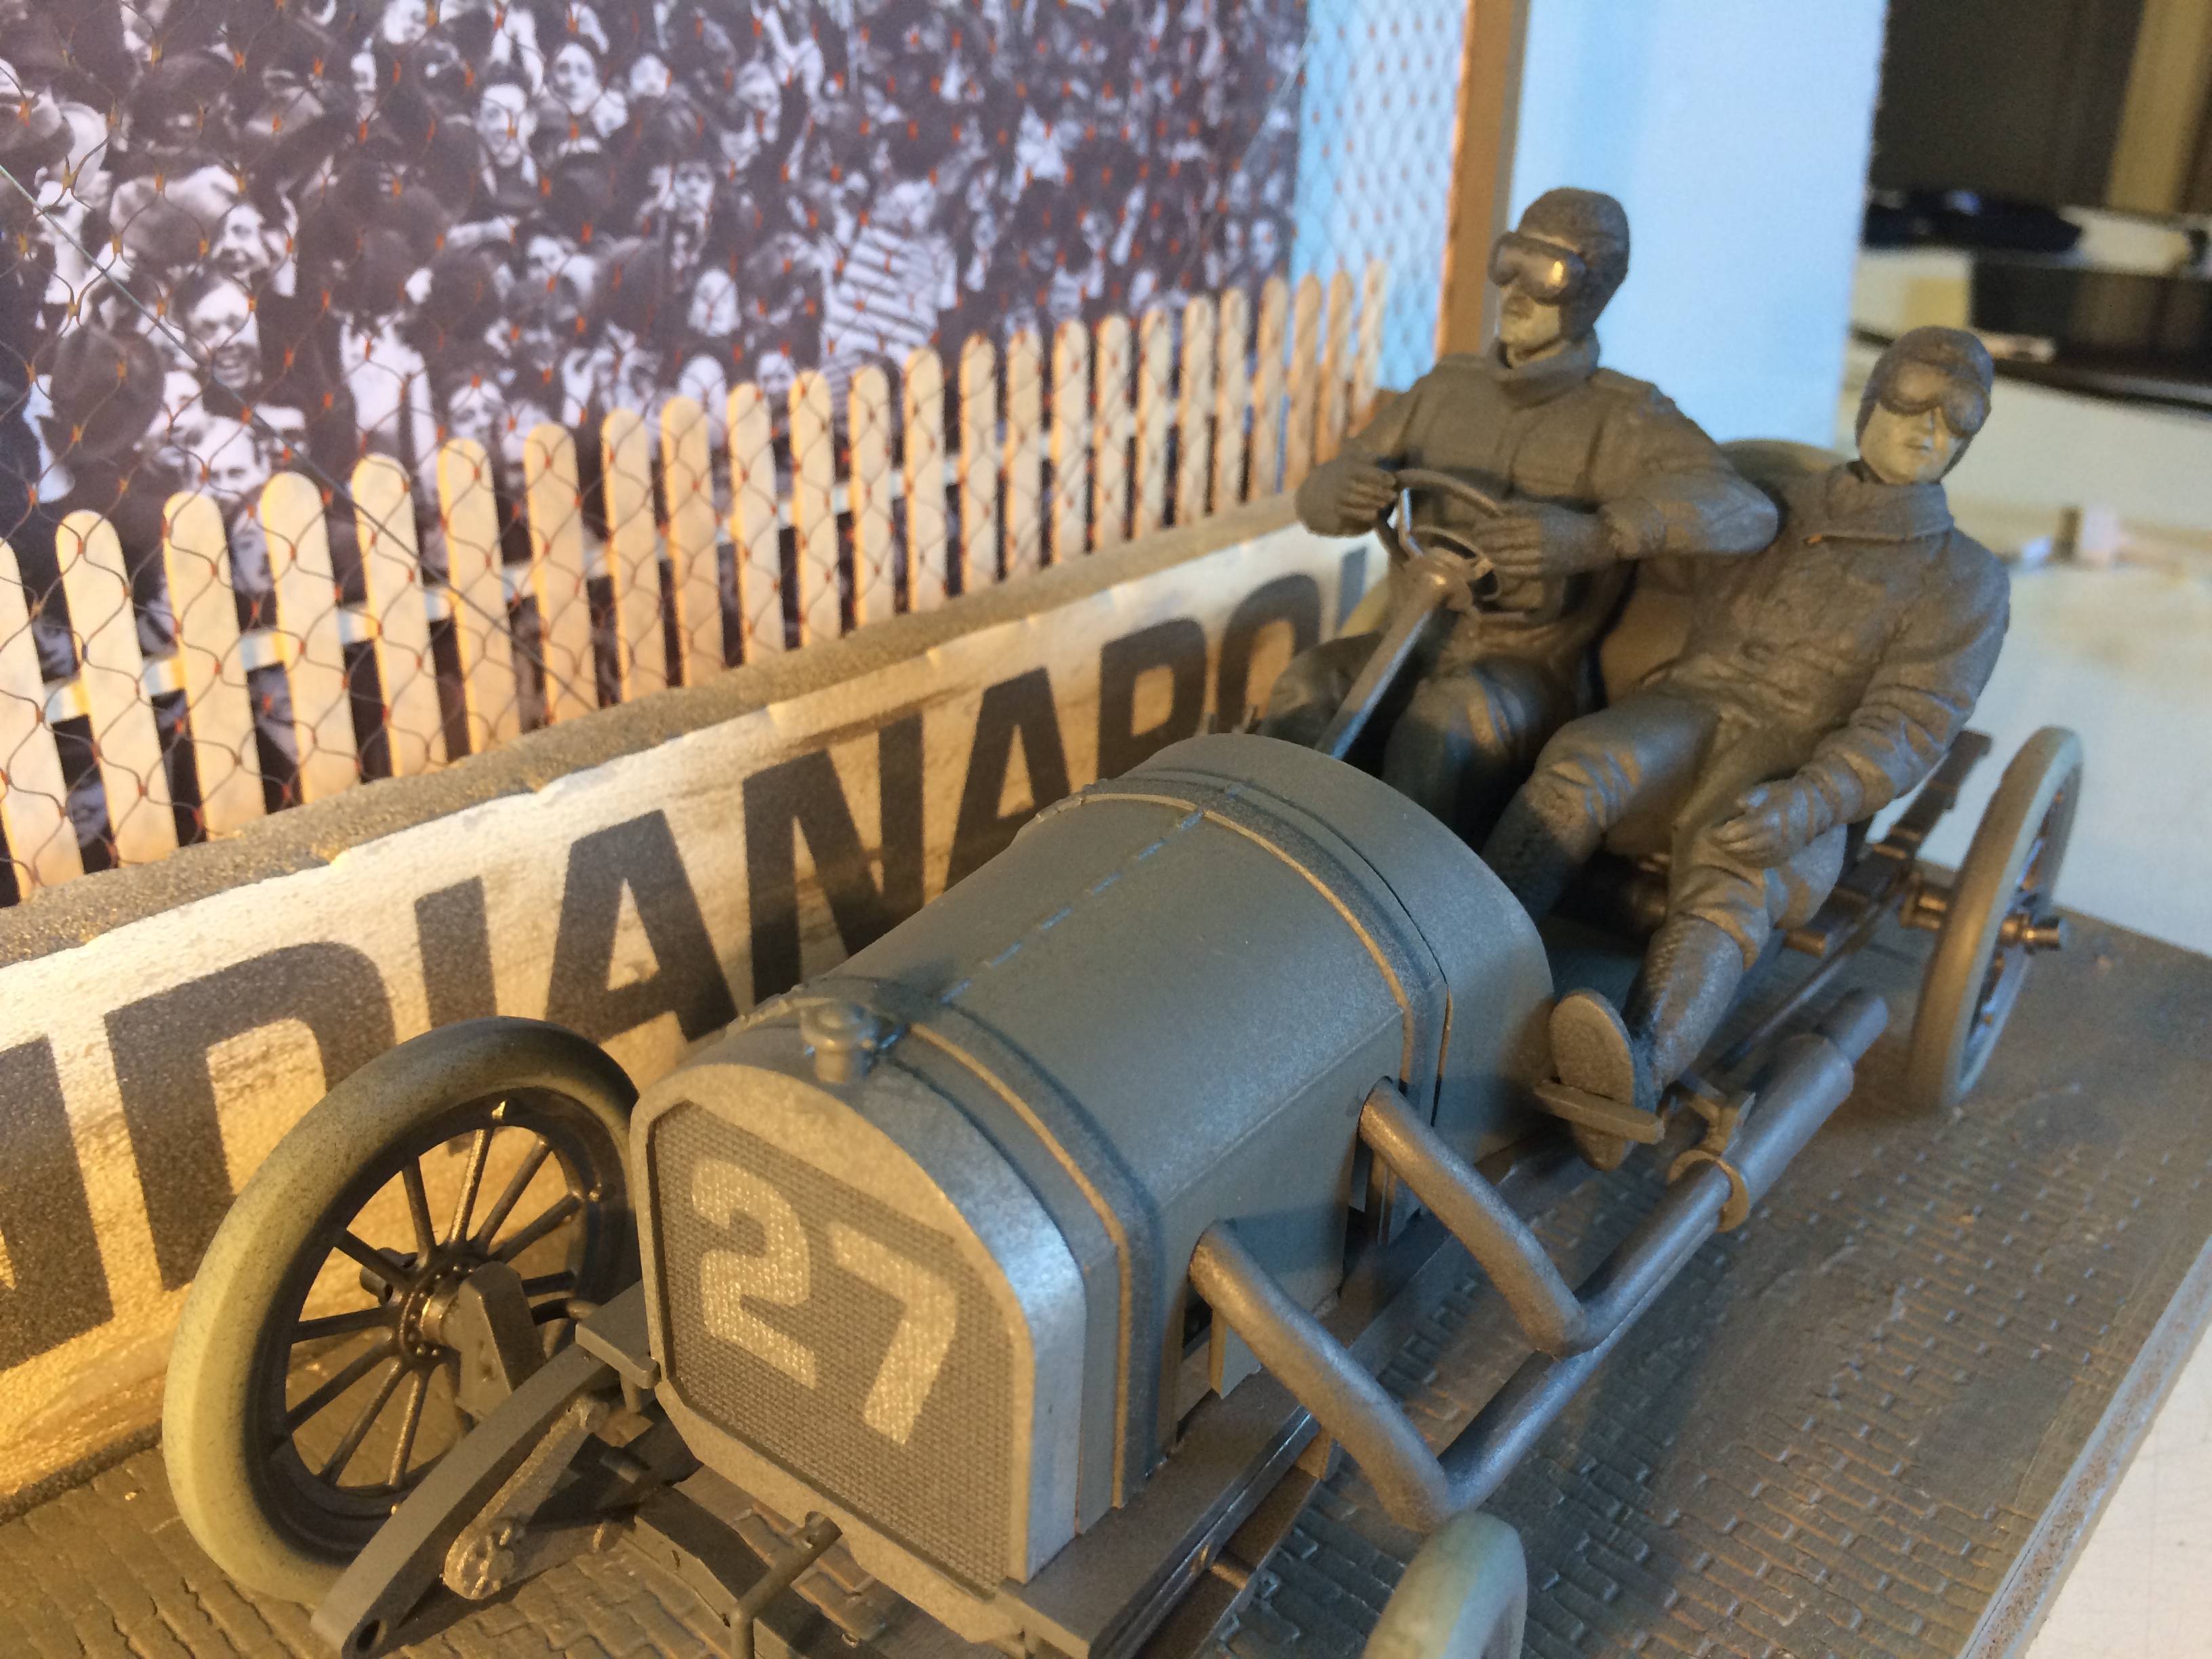
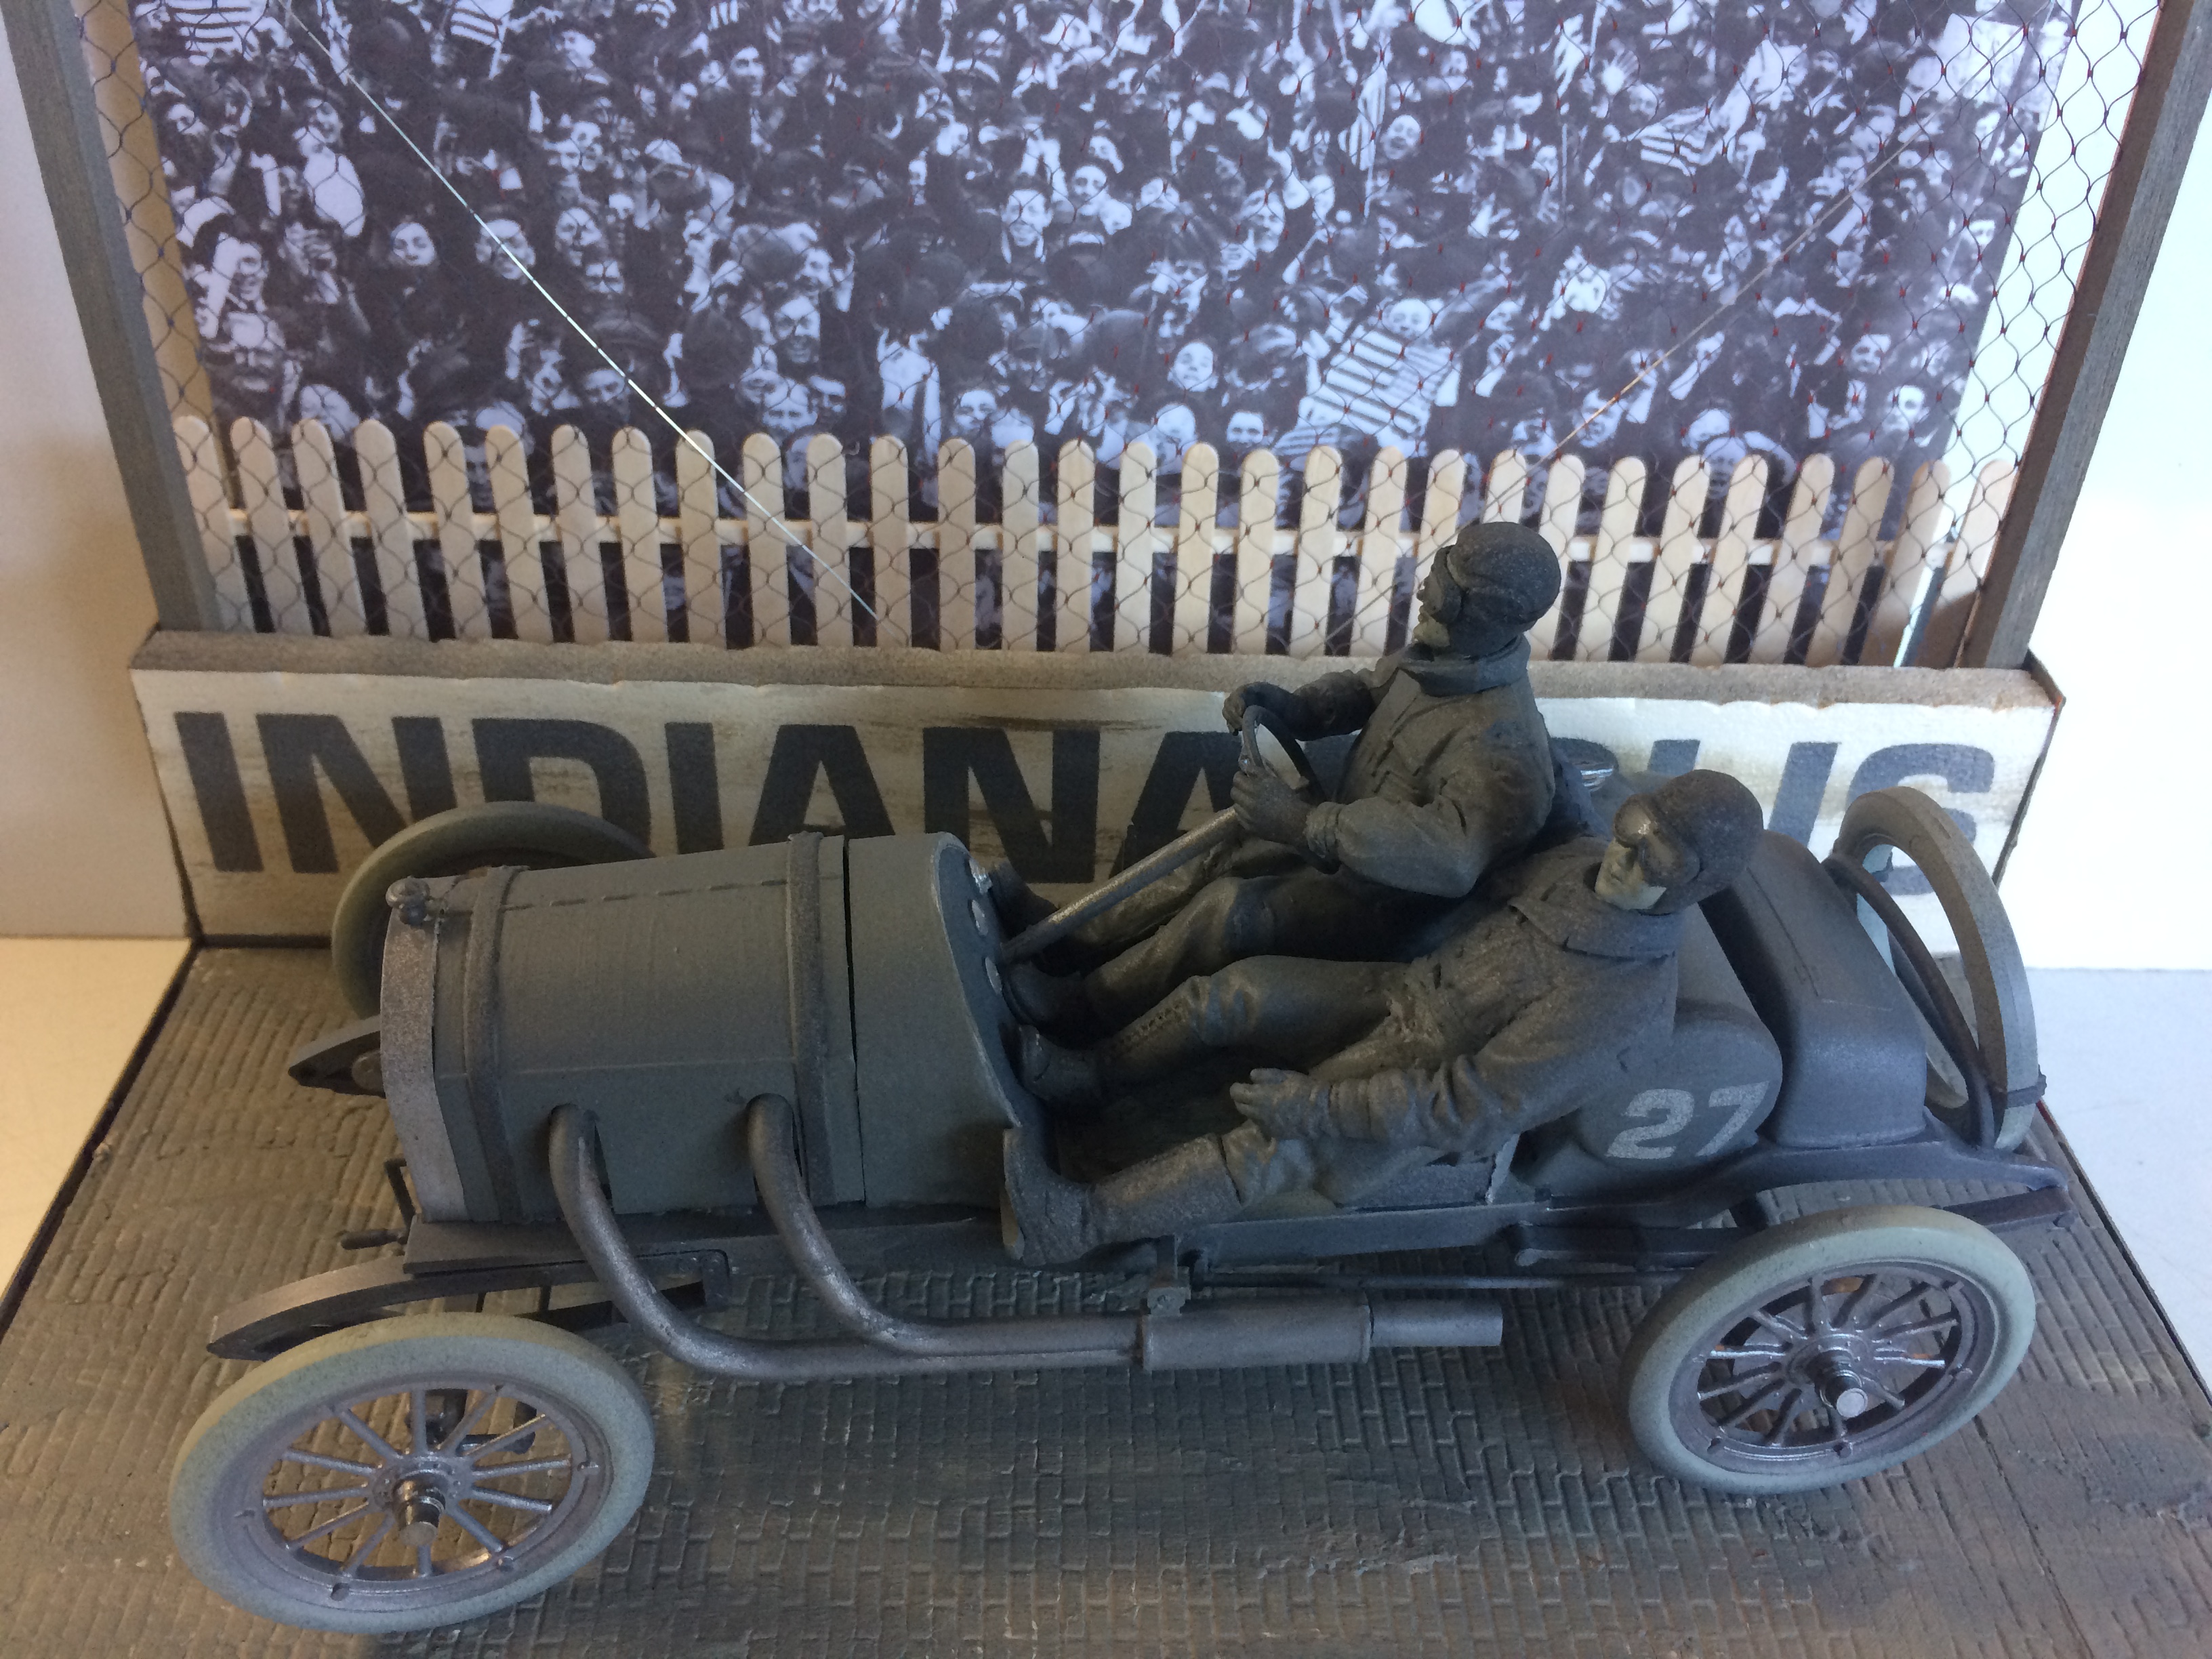
Hi guys, Most of you are probably familiar with this kit, quite basic and simple to build. I wanted to put it into a mini diorama and paint it as though it were a 1914 period black and white photograph. Not as easy as it sounds but I am happy with it. The biggest task was posing the figures and doing the cut-and-shut of the arms and legs, and I may yet readjust the angle of the heads. The WIP is here. This is the look I was going for: And this is what I got: Hope you like it!
-
This is fantastic, Bob! Where did you source the Cibie Super Oscars? I need about 16!!
-
I have a vinyl cutter and I agree with all the comments above about tracking issues. This would be the wrong tool for this job. The correct tool would be a laser cutter/engraver which would do the job in a few minutes. Either way you will need an accurate scale drawing in vector format (eps, pdf etc, not jpg, bmp). The common programs to use to do this would be Adobe Illustrator or CorelDRAW. I believe it is worth your time to learn the basics of one of these programs because this skill is useful for many types of projects. Look for a free download online along with YouTube tutorials, there will be other products as well. Have a look at my FaceBook page - David's Model Showcase - for some examples of what you can do with basic CorelDRAW skills. To actually get the cuts done look for a friendly Trophy Shop but negotiate to supply your own preferred material. The stuff they use for trophies and nameplates is different and specific to that use. Also, the cut might possibly result in a good side and a bad side. So, rather than draw just one side and cut it twice hoping to reverse one when you assemble it, copy and reverse (mirror) the drawing and cut a left and a right side. I hope this was helpful.
-
Thanks for all the nice comments, guys :-)
-
Haha, they have special movies now that come to you.
-
Buy a printer, Eric, just a cheap one and persist with learning how to use it. It adds a whole new dimension to this hobby (see what I did there?)
-
It is from one (or more?) of the Despicable Me animated movies, the movie that introduced Minions. Go watch it - you know you want to!
-
Thanks, guys, glad you like it!
-
Hi guys, So we all like model cars but they don't all have to Rods, Drags or Muscle, right? I tried for some lateral thinking with this one - Mr Gru's car from Despicable Me. The car is a 3D print from a file downloaded from thingiverse.com. The windows, cornices and awning are 3D prints from my own drawings based on a screen grab from the movie. The brickwork is a laser print on photopaper and it is all mounted on Depron foam in a $2 second hand picture frame so I can hang it on the wall. Progress pics are at: www.facebook.com/pg/davidsmodelshowcase/ (I may do an On The Workbench if there is enough interest). Here is the original screen grab I used: And here is my result: Hope you like it!
-
Nope, a Holden Commodore, not a Monaro which is the two door version. The car in the video from 2011 is a Holden V8 Supercar which race against Ford Falcon V8 Supercars in a very closely controlled 2 make series which is our premium class. The footage shows the practice day before the biggest V8 Supercar race of the year which is 1000km around the 6km Mount Panorama circuit in the country town of Bathurst about 3 hours west of Sydney. The 12 Hour Race being held tomorrow at the same circuit has evolved into an endurance race for GT3 style cars - Porsche, BMW, AMG, Audi, Bentley, McLaren, Lamborghini etc. It began as a Production Car race and is now for exotics. I believe the intention is for it to become included as part of the GT3/World Endurance Championship. There is a 6 Hour Production Car Race at Bathurst later in the year which is also well regarded. Google for info on the Mount Panorama track. You will be amazed at the extent of the climb up the mountain, the speed across the top and the massive drop back down! Here is the link to the official Live Stream Feed: http://www.bathurst12hour.com.au/streams-tv/international-streaming/ Enjoy!!
-
This is beautiful work and I have really been enjoying you progress. I am especially impressed with your attention to surface texture on elements such as this transmission showing the different metals e.g. cast alloy, cast iron and pressed steel. And the amazing reverse side fibreglass effect on the nosecone!! This is something that many modellers seem not to consider, including things like the different gloss levels of cloth vs leather vs plastic vs metal/glass in an interior. To me, this makes a massive difference to the "believability" of a model. Can you enlighten us a little on how you do the cast metal effect? It is probably at the upper limit of coarseness for this scale and would probably be too coarse for 1:24 but maybe you have a suggested variation for a slightly finer finish? Keep up the good work....
-
K&R Kustoms+Rods "barn find" dry lakes belly tanker
Davoski replied to Rocking Rodney Rat's topic in Model Cars
OK, thanks for the info and taking time to reply. I will have a look at those websites and see how I go. Cheers -
K&R Kustoms+Rods "barn find" dry lakes belly tanker
Davoski replied to Rocking Rodney Rat's topic in Model Cars
This is just beautiful! Your build thread was also great and very helpful but I would love to see some progress pics of the paintwork. Do you happen to have any you could post? Cheers -
This is looking fantastic, I can't wait for the next post. I had a 1:1 260Z back in the day, great car. Concerning the flares/spoiler I also recall that they usually had a more matt/satin finish. Is is feasible to coat them in a flat clear (which will probably come out more satin anyway)? Or a matt black wash? Keep up the good work!
-
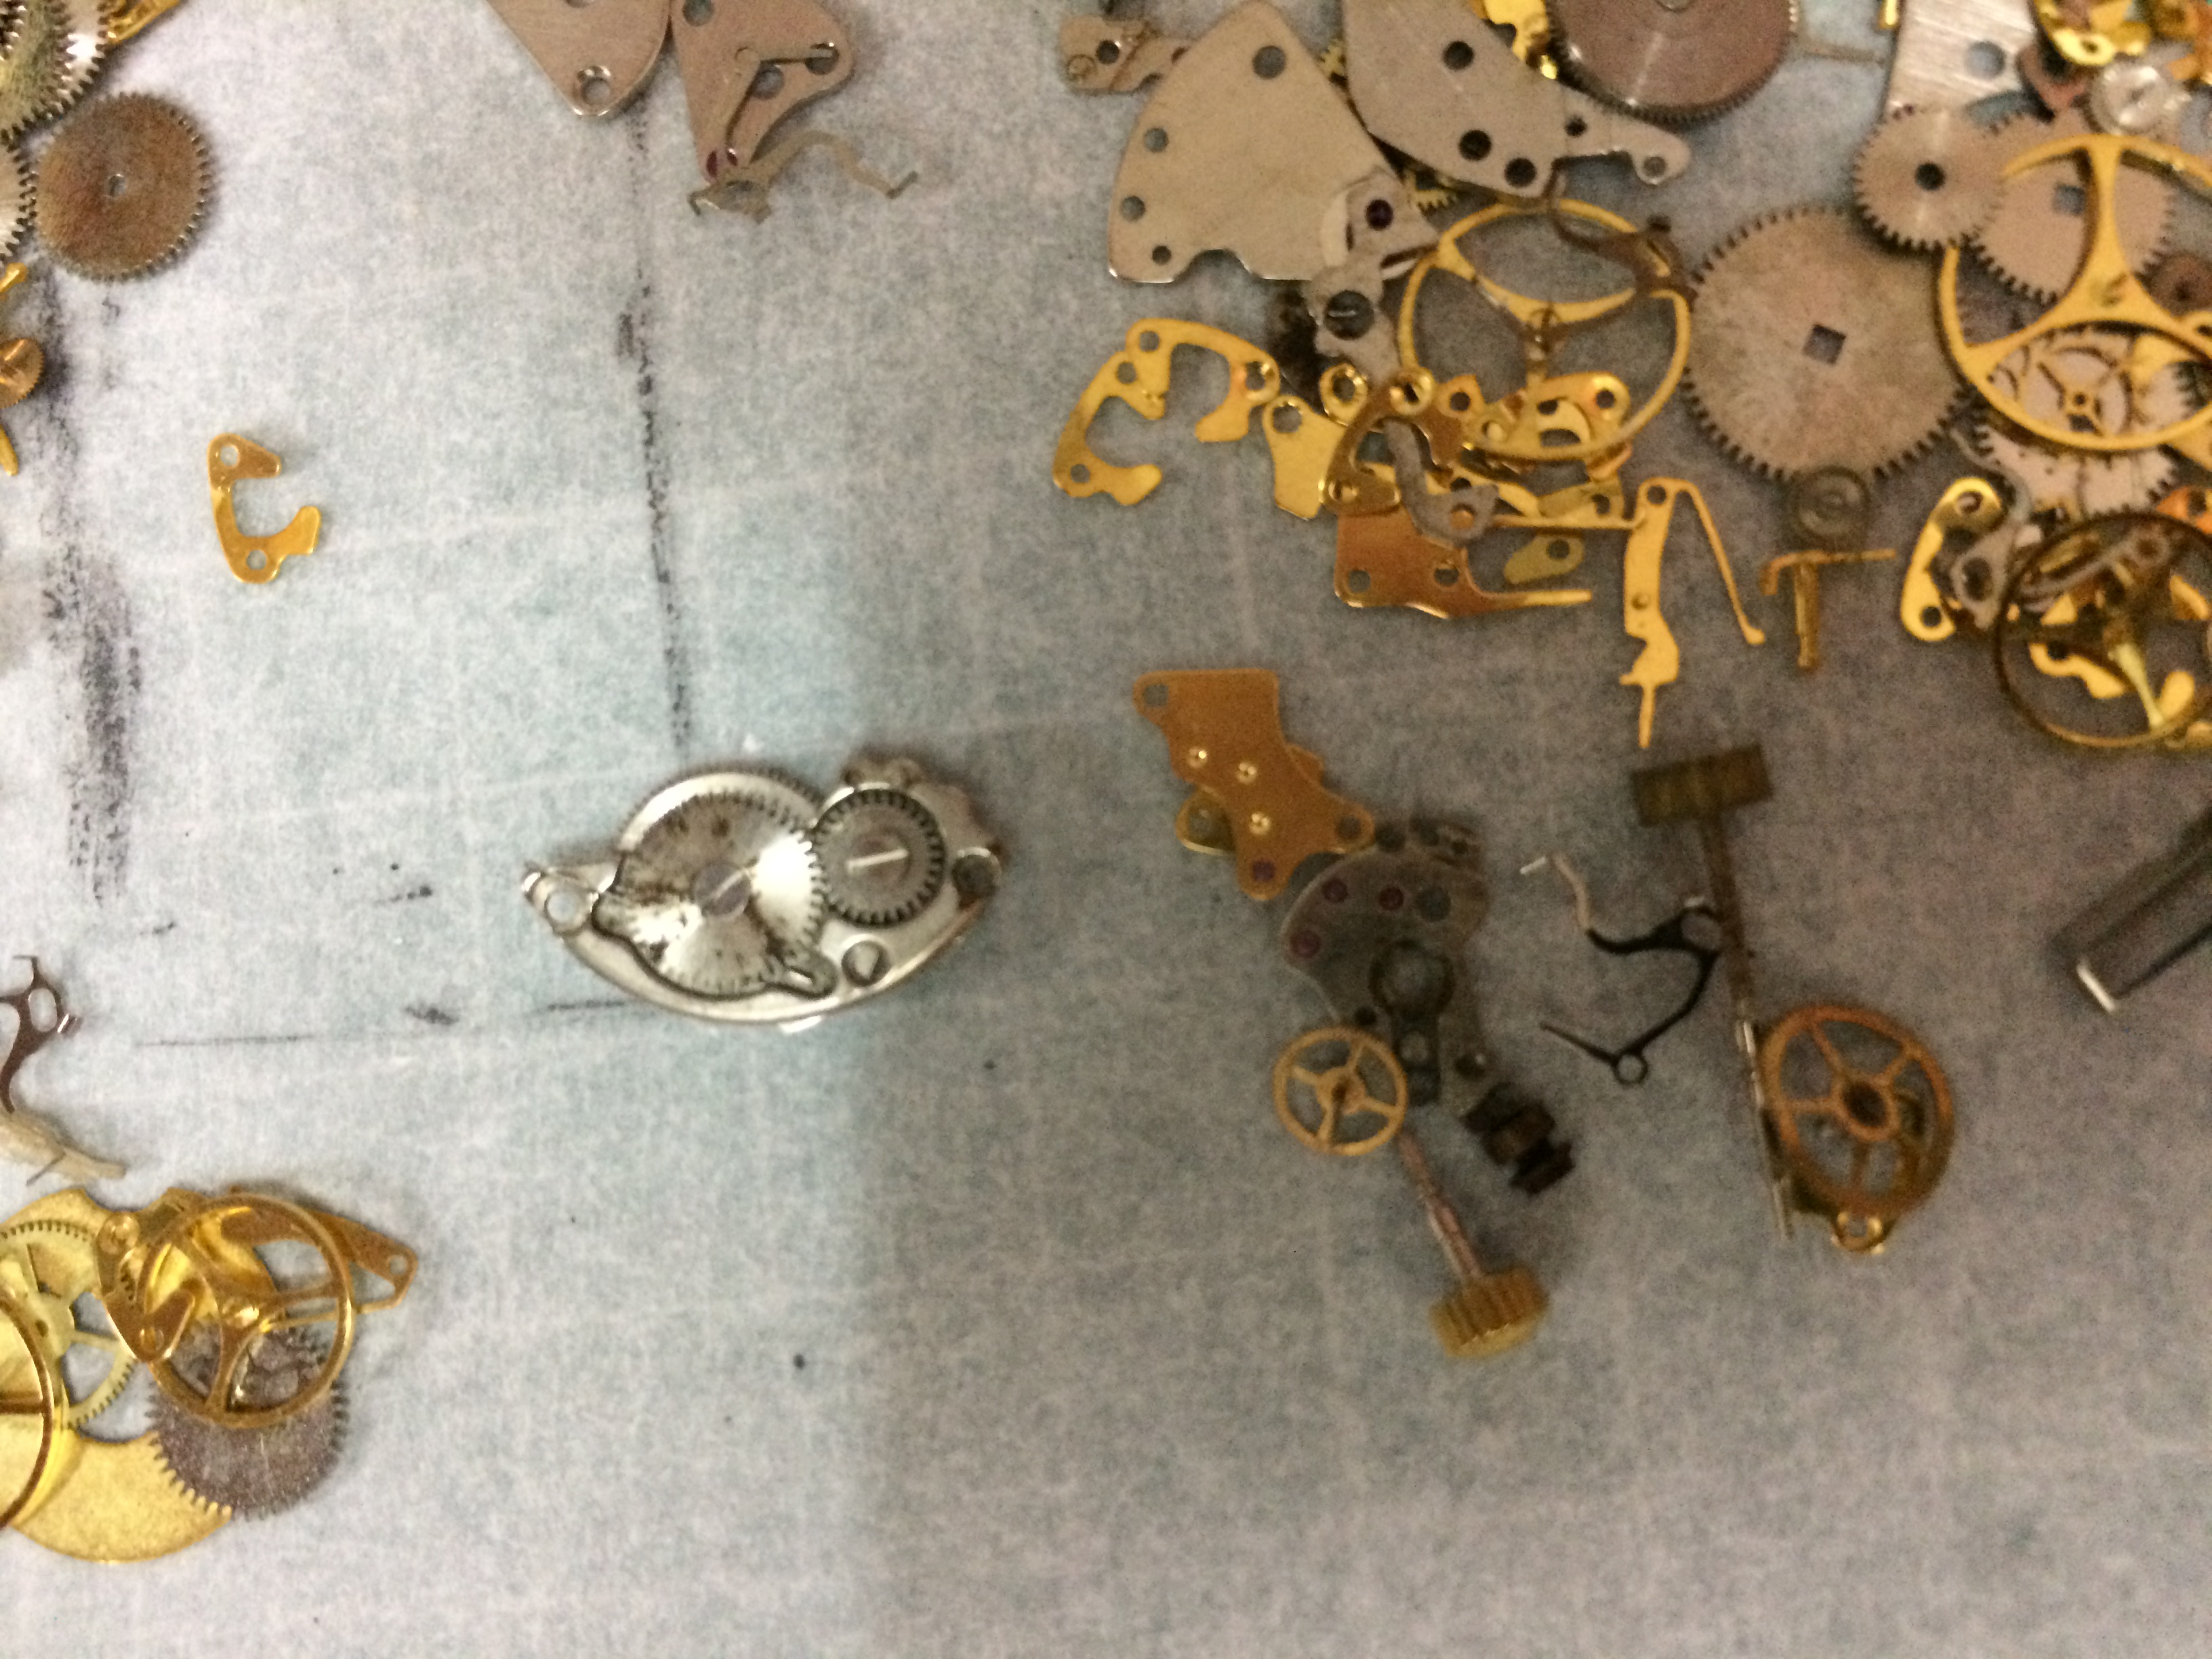
**** Sorry for the partial post earlier, Firefox or something is crashing my posts partway through. What I tried to say was:WOW, Dax, this is just fantastic, I love this DieselPunk stuff!!I wonder if I could respectfully throw a couple of suggestions into the pot for the detail you want for the undercarriage. For the hydraulic hoses have a look at guitar strings and fishing line traces (?) as well as the usual proprietary car model stuff, the scale is good and the price is cheap. Or find a friend with an electric bass! Also Google up Watch Parts or search eBay as there are guys in Singapore/Hong Kong etc who sell the insides of old watches by weight!! A few bucks for 50g if I recall. You get a mixed bag of hundreds of cogs and wheels but also brackets and other bits, usually multiples of the same bits so you can use them in pairs for LHS and RHS. Cheap, and one bag is a lifetime's supply.Keep up the good work with this, I can't wait for the paint!
-
How to make a 1980 Buick Regal?
Davoski replied to Davoski's topic in Model Building Questions and Answers
Thanks JC (and others) I Think the Monte Carlo will do the job well enough. The nose is pretty good and the droopy tail looks good too. I am sure I can live with the sweeping guards (fenders). Now to find a kit from somewhere else other than the US. For reasons unknown, postage for kits from US to Australia generally costs more than the price of the kit. :-( For those playing at home, this is for a Breaking Bad diorama with a scratch built Fleetwood Bounder (and no, the Lego kit didn't cut it!) Cheers Davoski -
Hello Brains Trust, Can anyone help with suggestions for a kit or kits that I could use to make something resembling a 1980 Buick Regal? The closest I can find is a 1987 Grand National, is there anything closer? For example, was the Regal rebadged as something else back in the day, and is there a kit for that? All suggestions welcome. Thanks Davoski
-
Hi Eric, Here are the photoetch links (copy and paste to your browser, linking is not working for me?): www.instructables.com/id/Stop-using-Ferric-Chloride-etchant!--A-better-etc/#intro www.instructables.com/id/Printed-Circuit-Board-Production-using-UV-Nail-Cur/ www.britmodeller.com/forums/index.php?/topic/234944044-how-to-make-photo-etched-parts-at-home/ www.ebay.com.au/itm/30cm-x-5M-PCB-Photosensitive-Dry-Film-For-Circuit-Production-Photoresist-Sheets-/322452881961?epid=680674256&hash=item4b13b08229:g:hMMAAOSwdGFYyP9x www.ebay.com.au/itm/Select-Size-0-01mm-1-0mm-Copper-Sheet-Plate-Guillotine-Cut-Metal-Copper-Sheet-/272563847500?var=&hash=item3f7612414c:m:mrNaBoAAKDRbA1GURZDyABA A bit more research and trial is required. Stay tuned... DISCLAIMER: This is not my info, read at your own risk. Caution: contents of kettle may be hot.
-
Nice work, CustomBoy! Can you tell me where you got the figures from? Especially the guy and girl and the photographers. Thanks


-copy_edited-1-1.jpg.4d175eb86ba7a4f7018ba5055ab57513.jpg)


.jpg.5c6b5e3a3ea417d9ee6c4beb8aaba7d1.jpg)
.jpg.ad935ea4e1d1029436b223e324d52326.jpg)
.jpg.58e35e7cdf192e24bfc311a15f2964f6.jpg)