Anglia105E
-
Posts
3,487 -
Joined
-
Last visited
Content Type
Profiles
Forums
Events
Gallery
Everything posted by Anglia105E
-
Hi Carl and Greg . . . . The colour of the real 1:1 car is a favourite of many enthusiasts, and I really like the colour myself. Here is a photo of the real Jaguar 420 and thanks for looking guys . . . David

-
Thanks for looking JC, and I agree that it is rather surprising that 1:32 scale model cars did not benefit from the link to slot car racing such as Scalextric. Somehow, it seems that 1:35 scale became stronger, due to the military enthusiasts, I guess. David
-
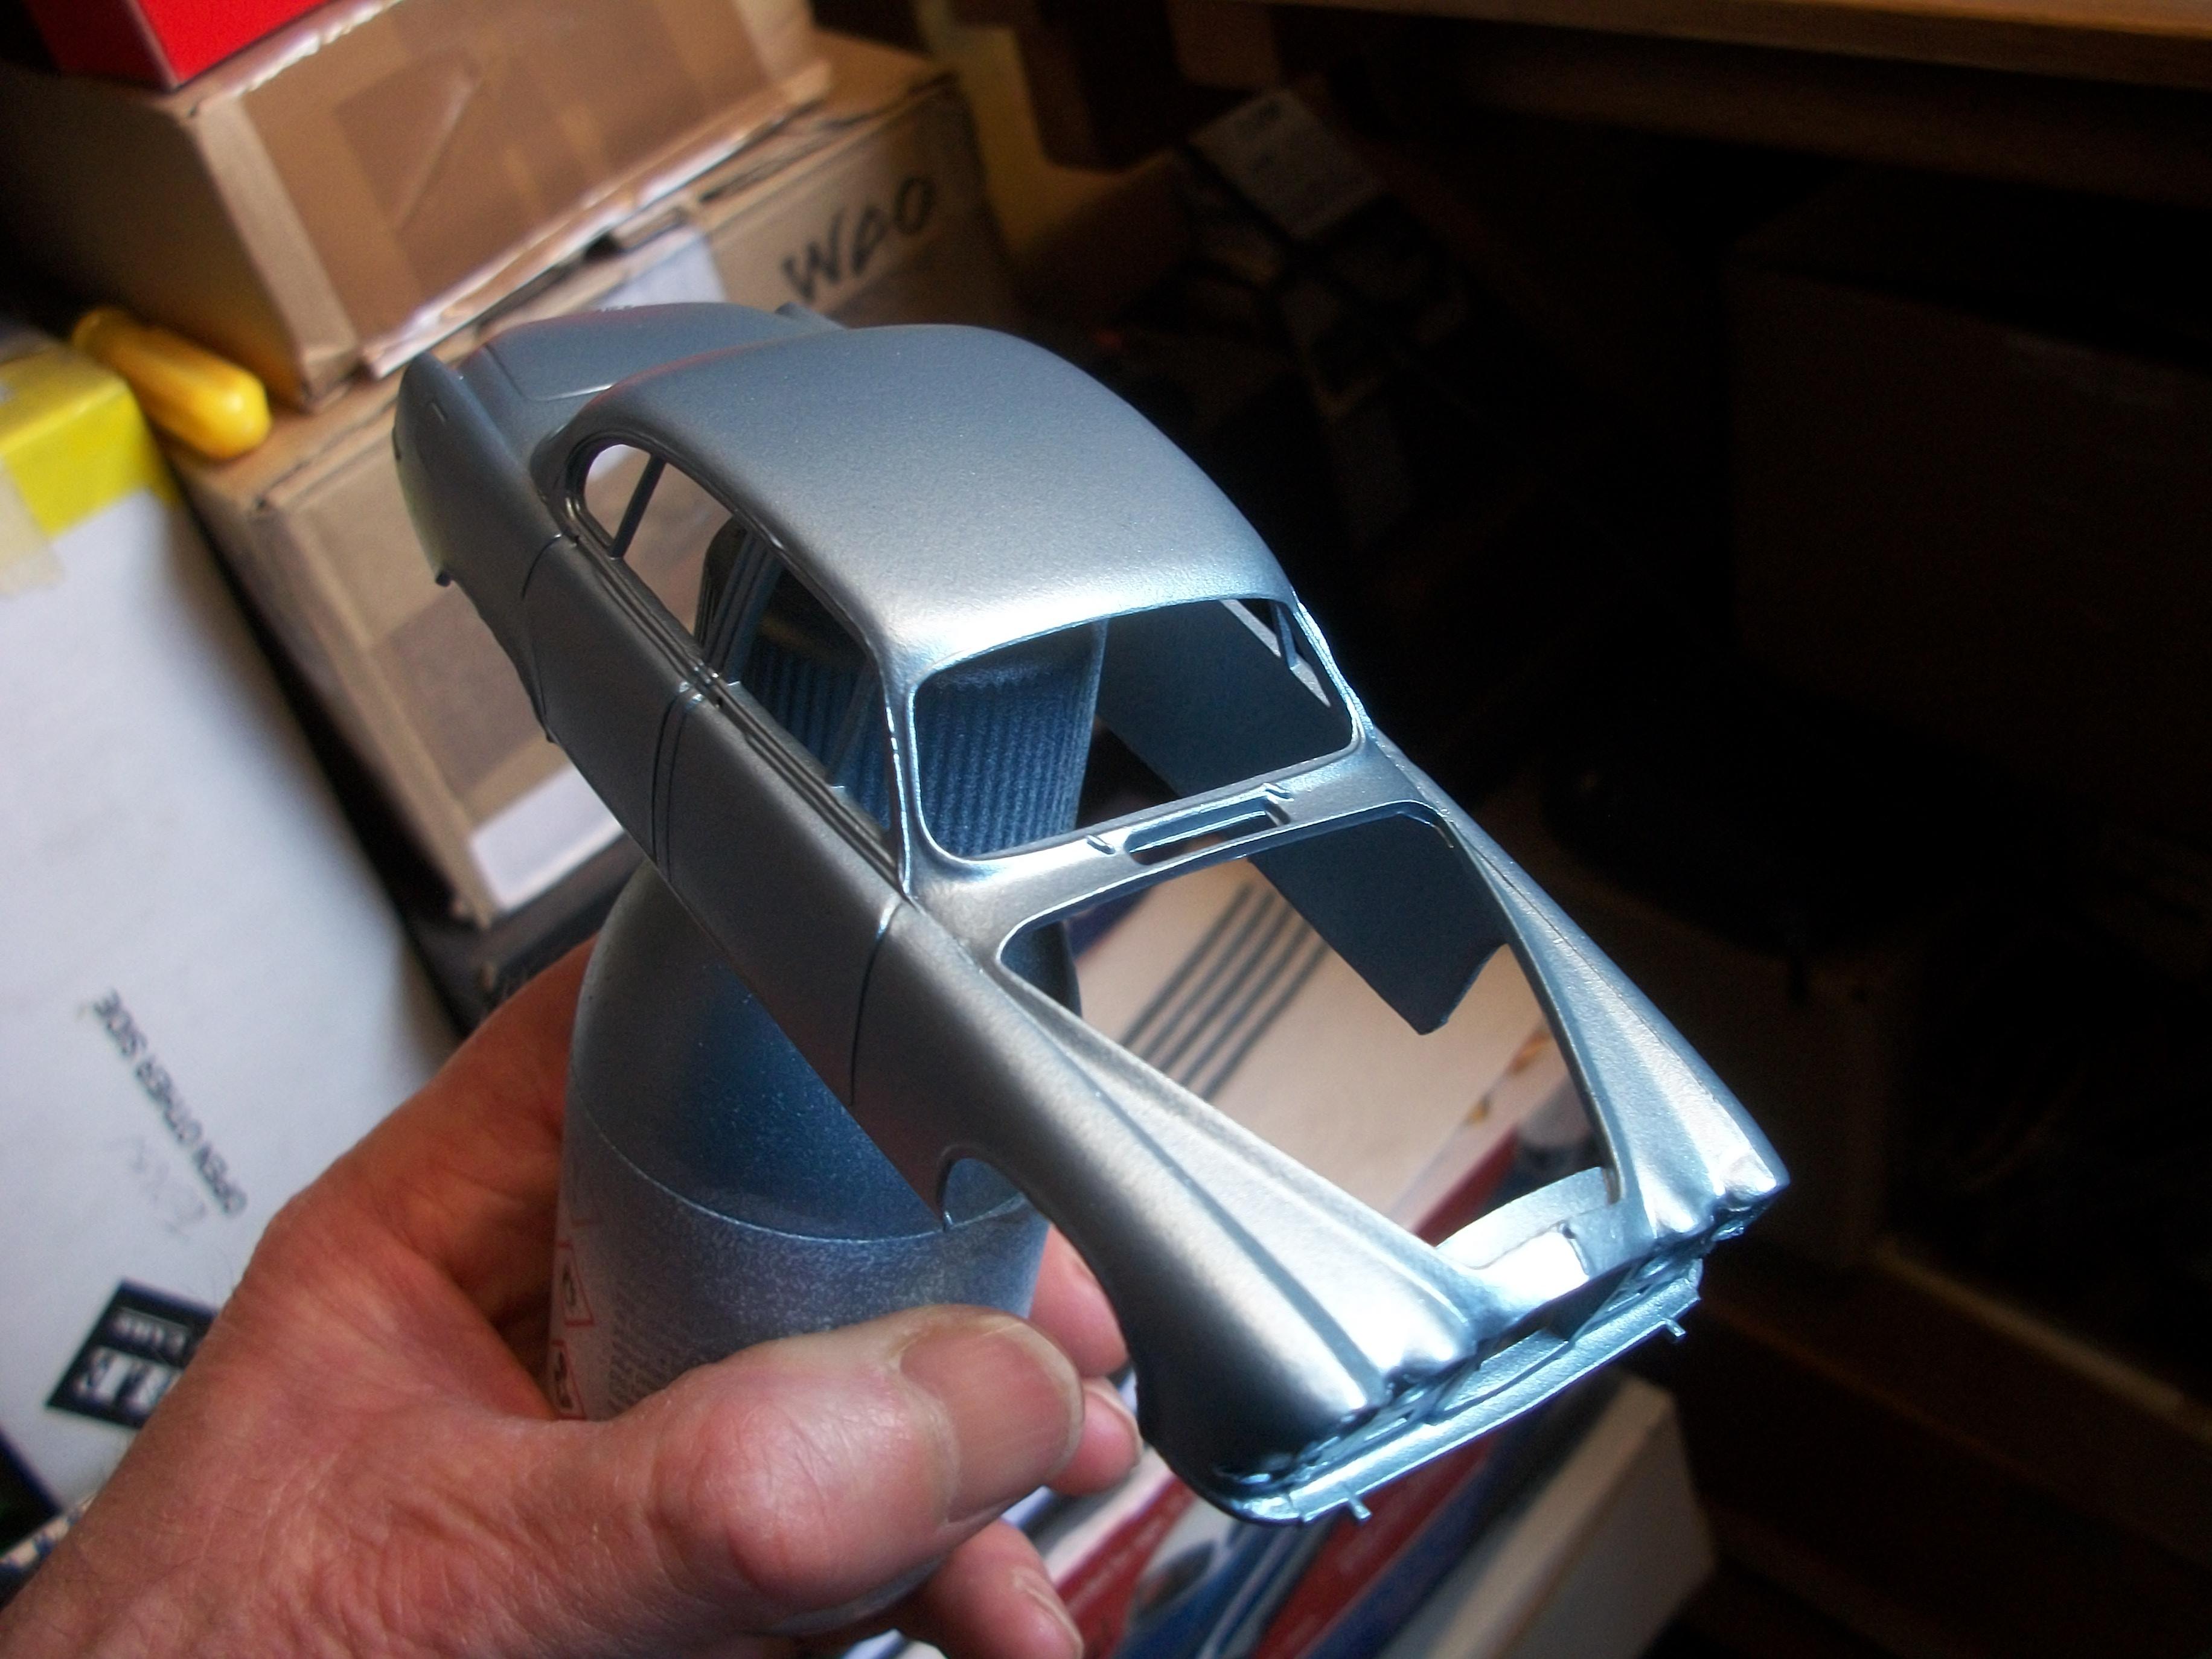
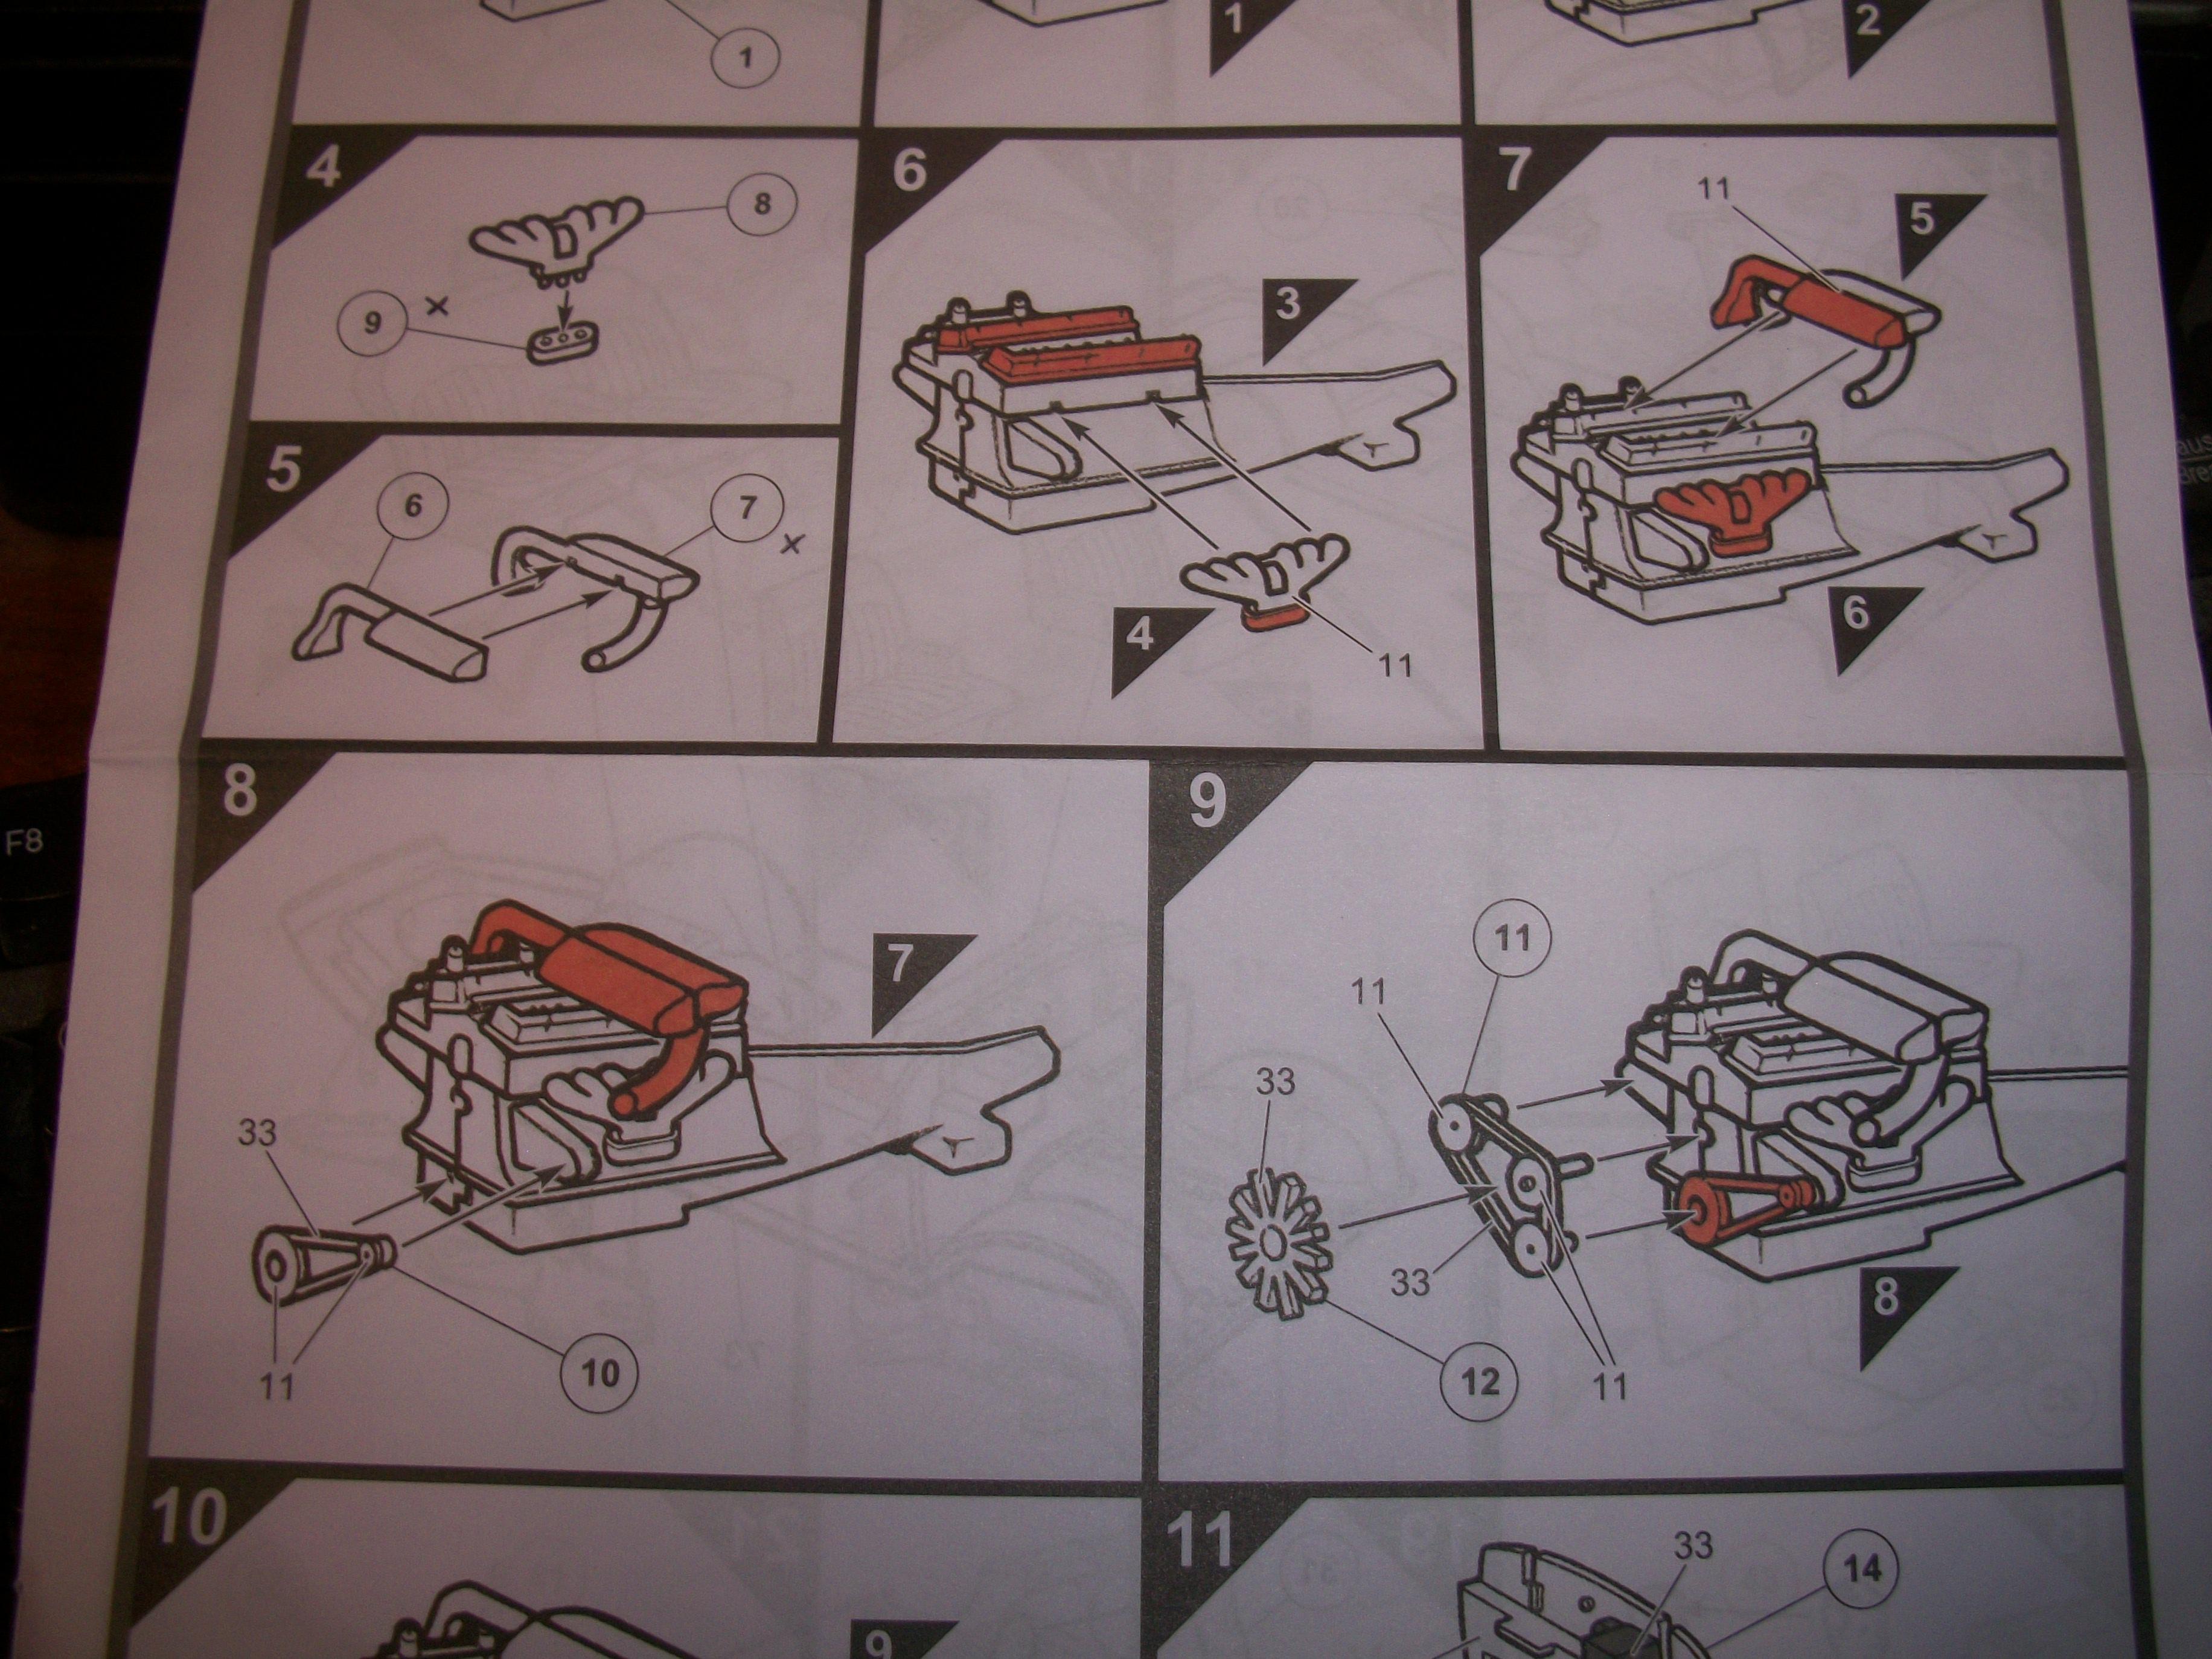
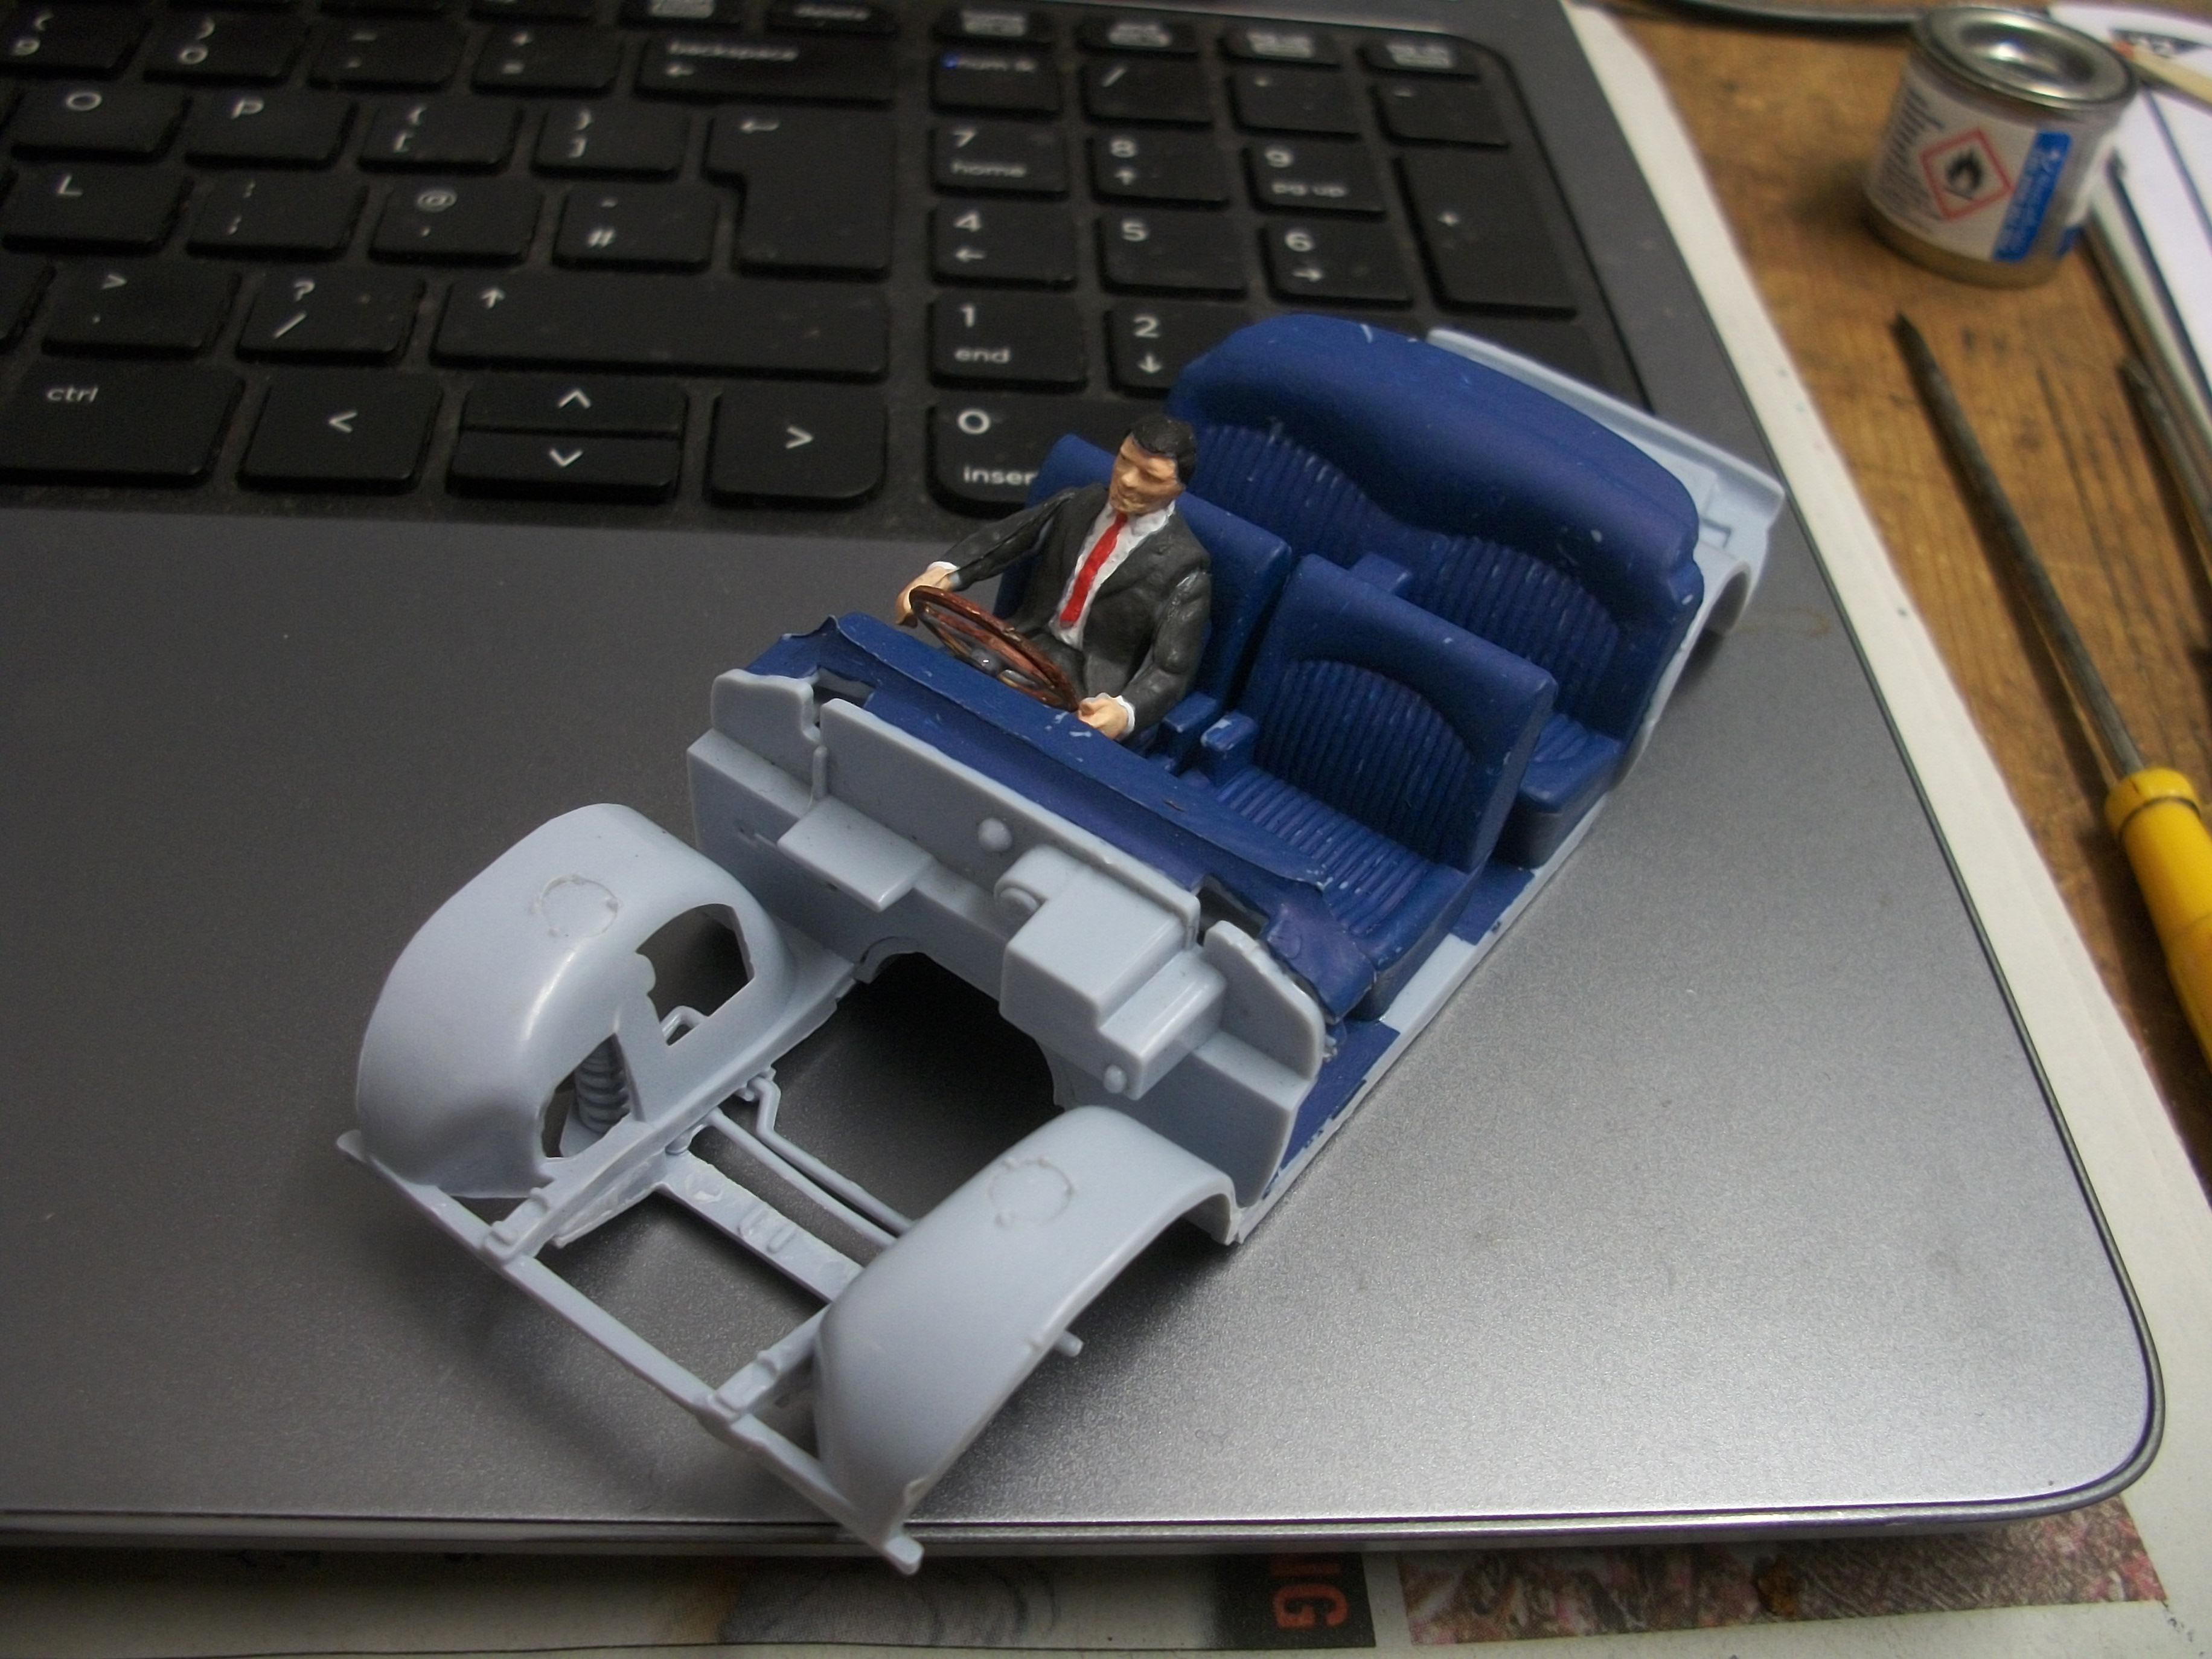
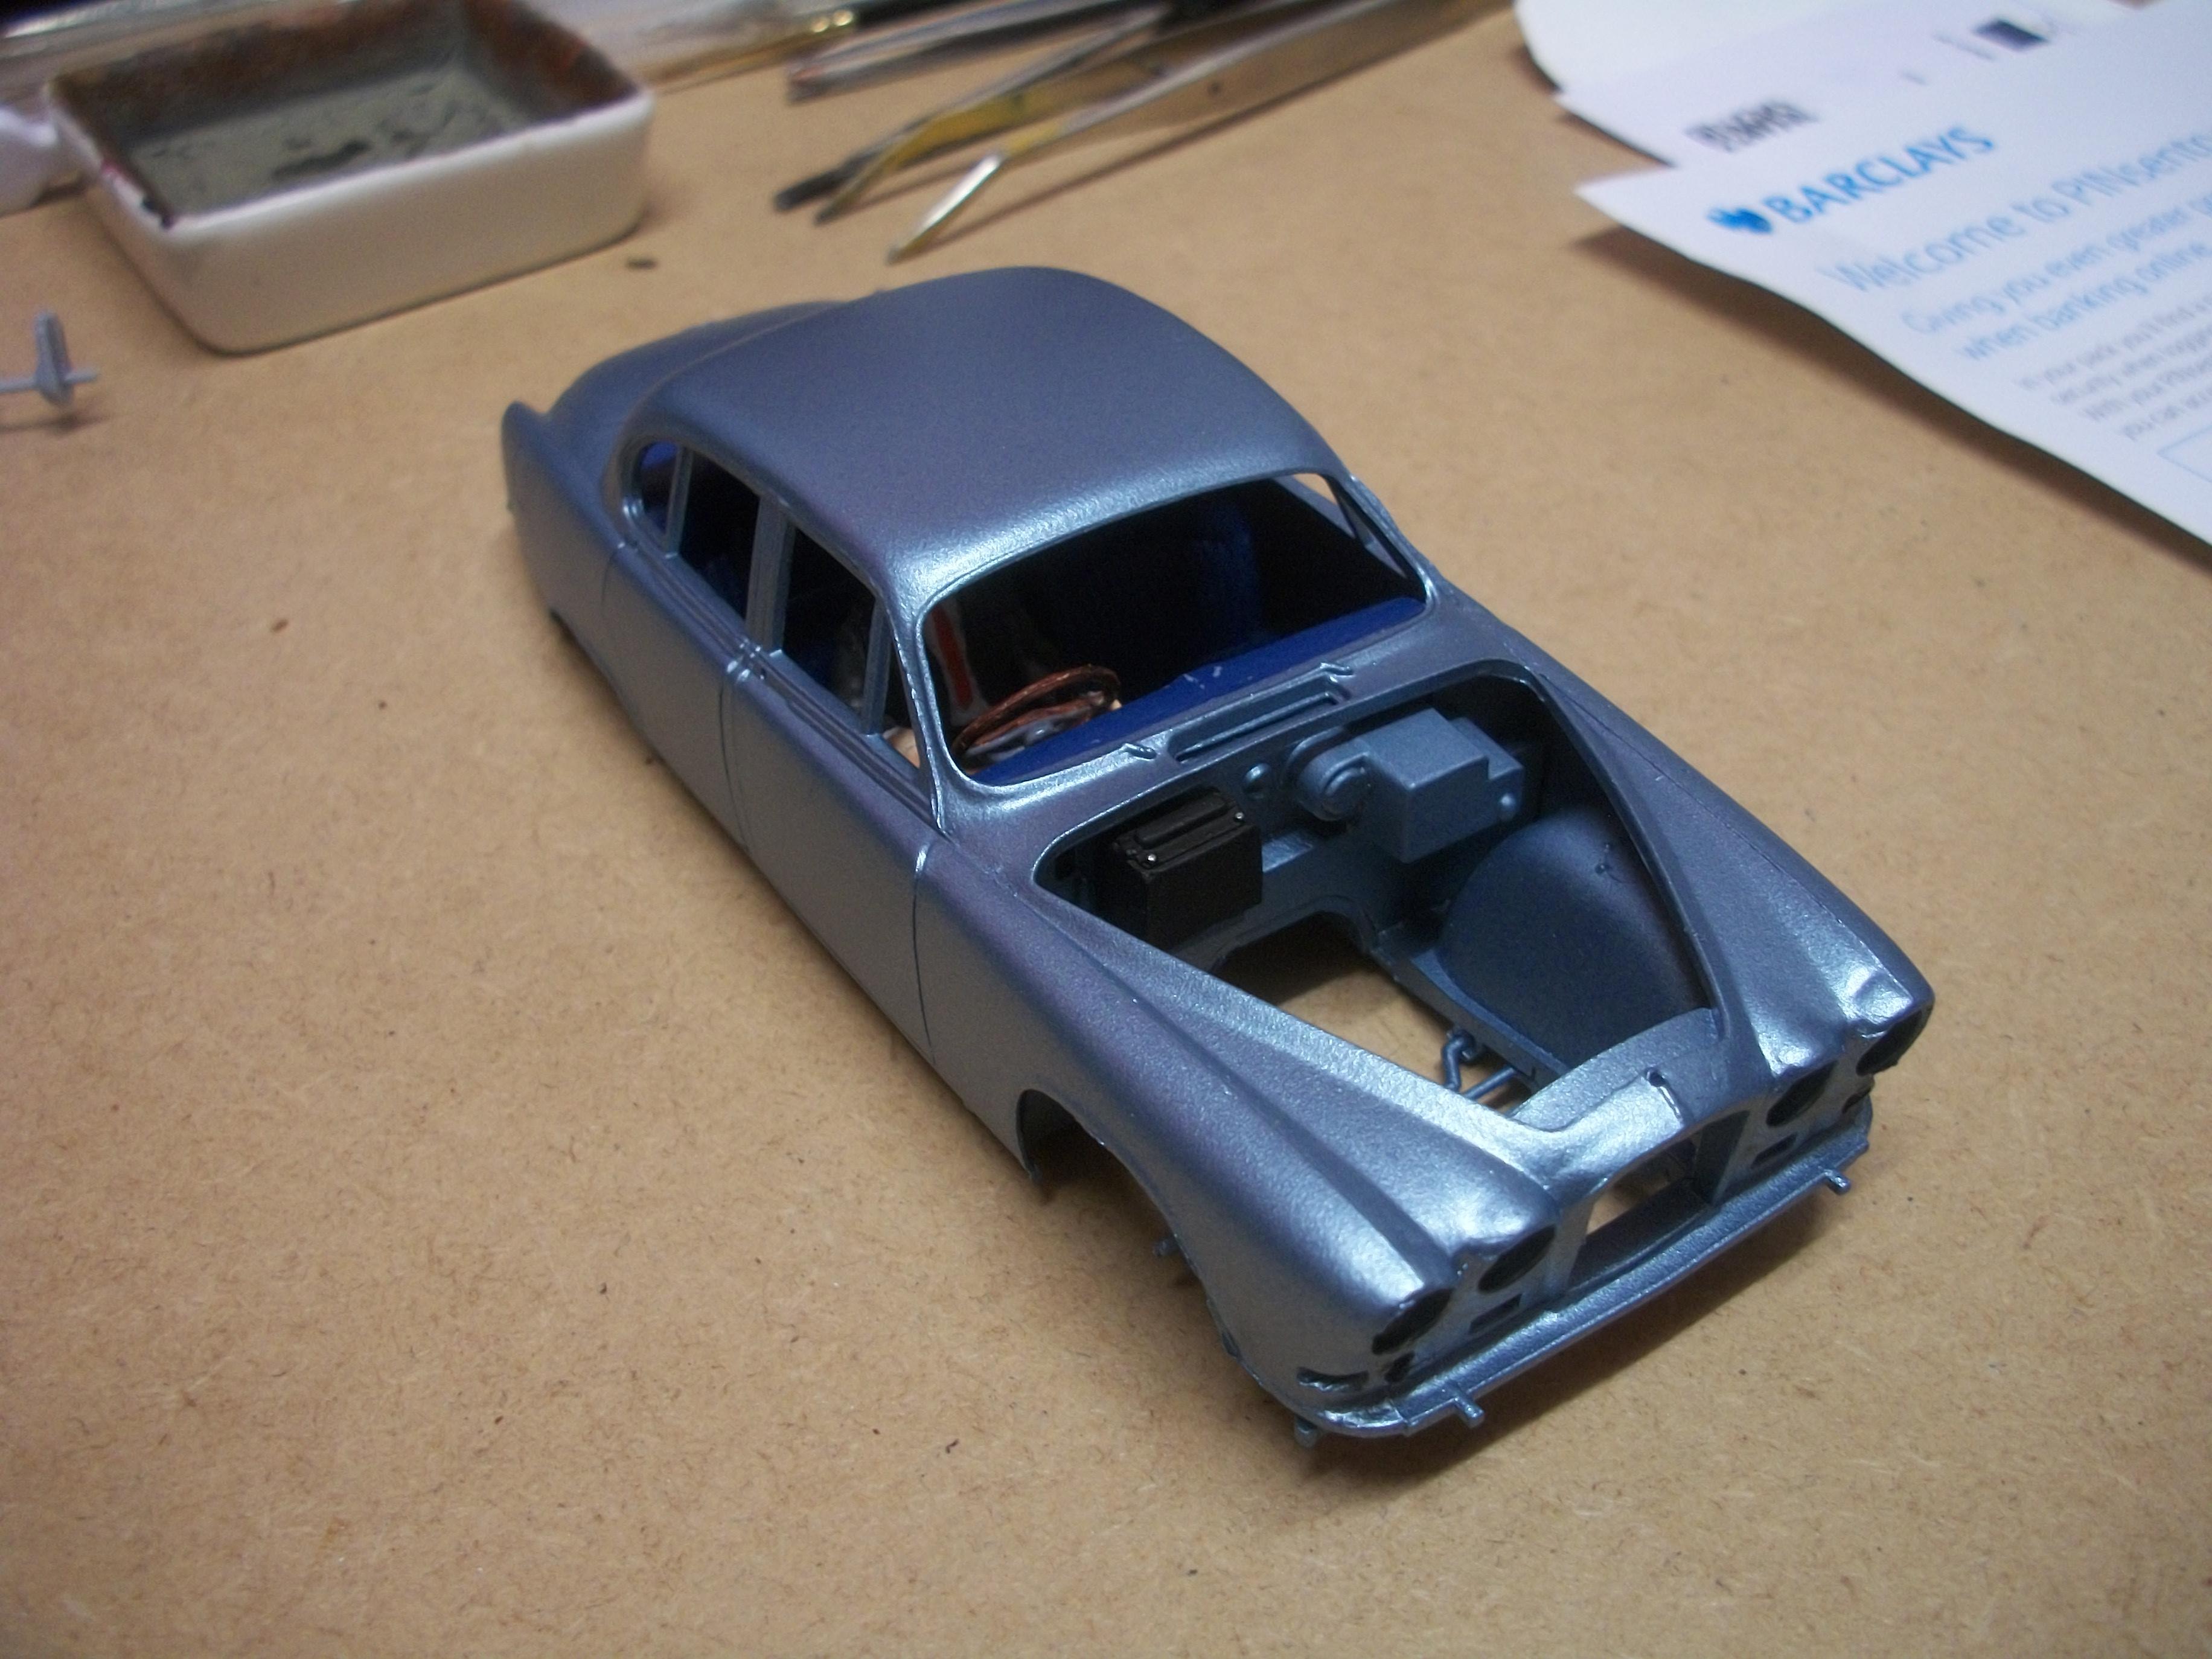
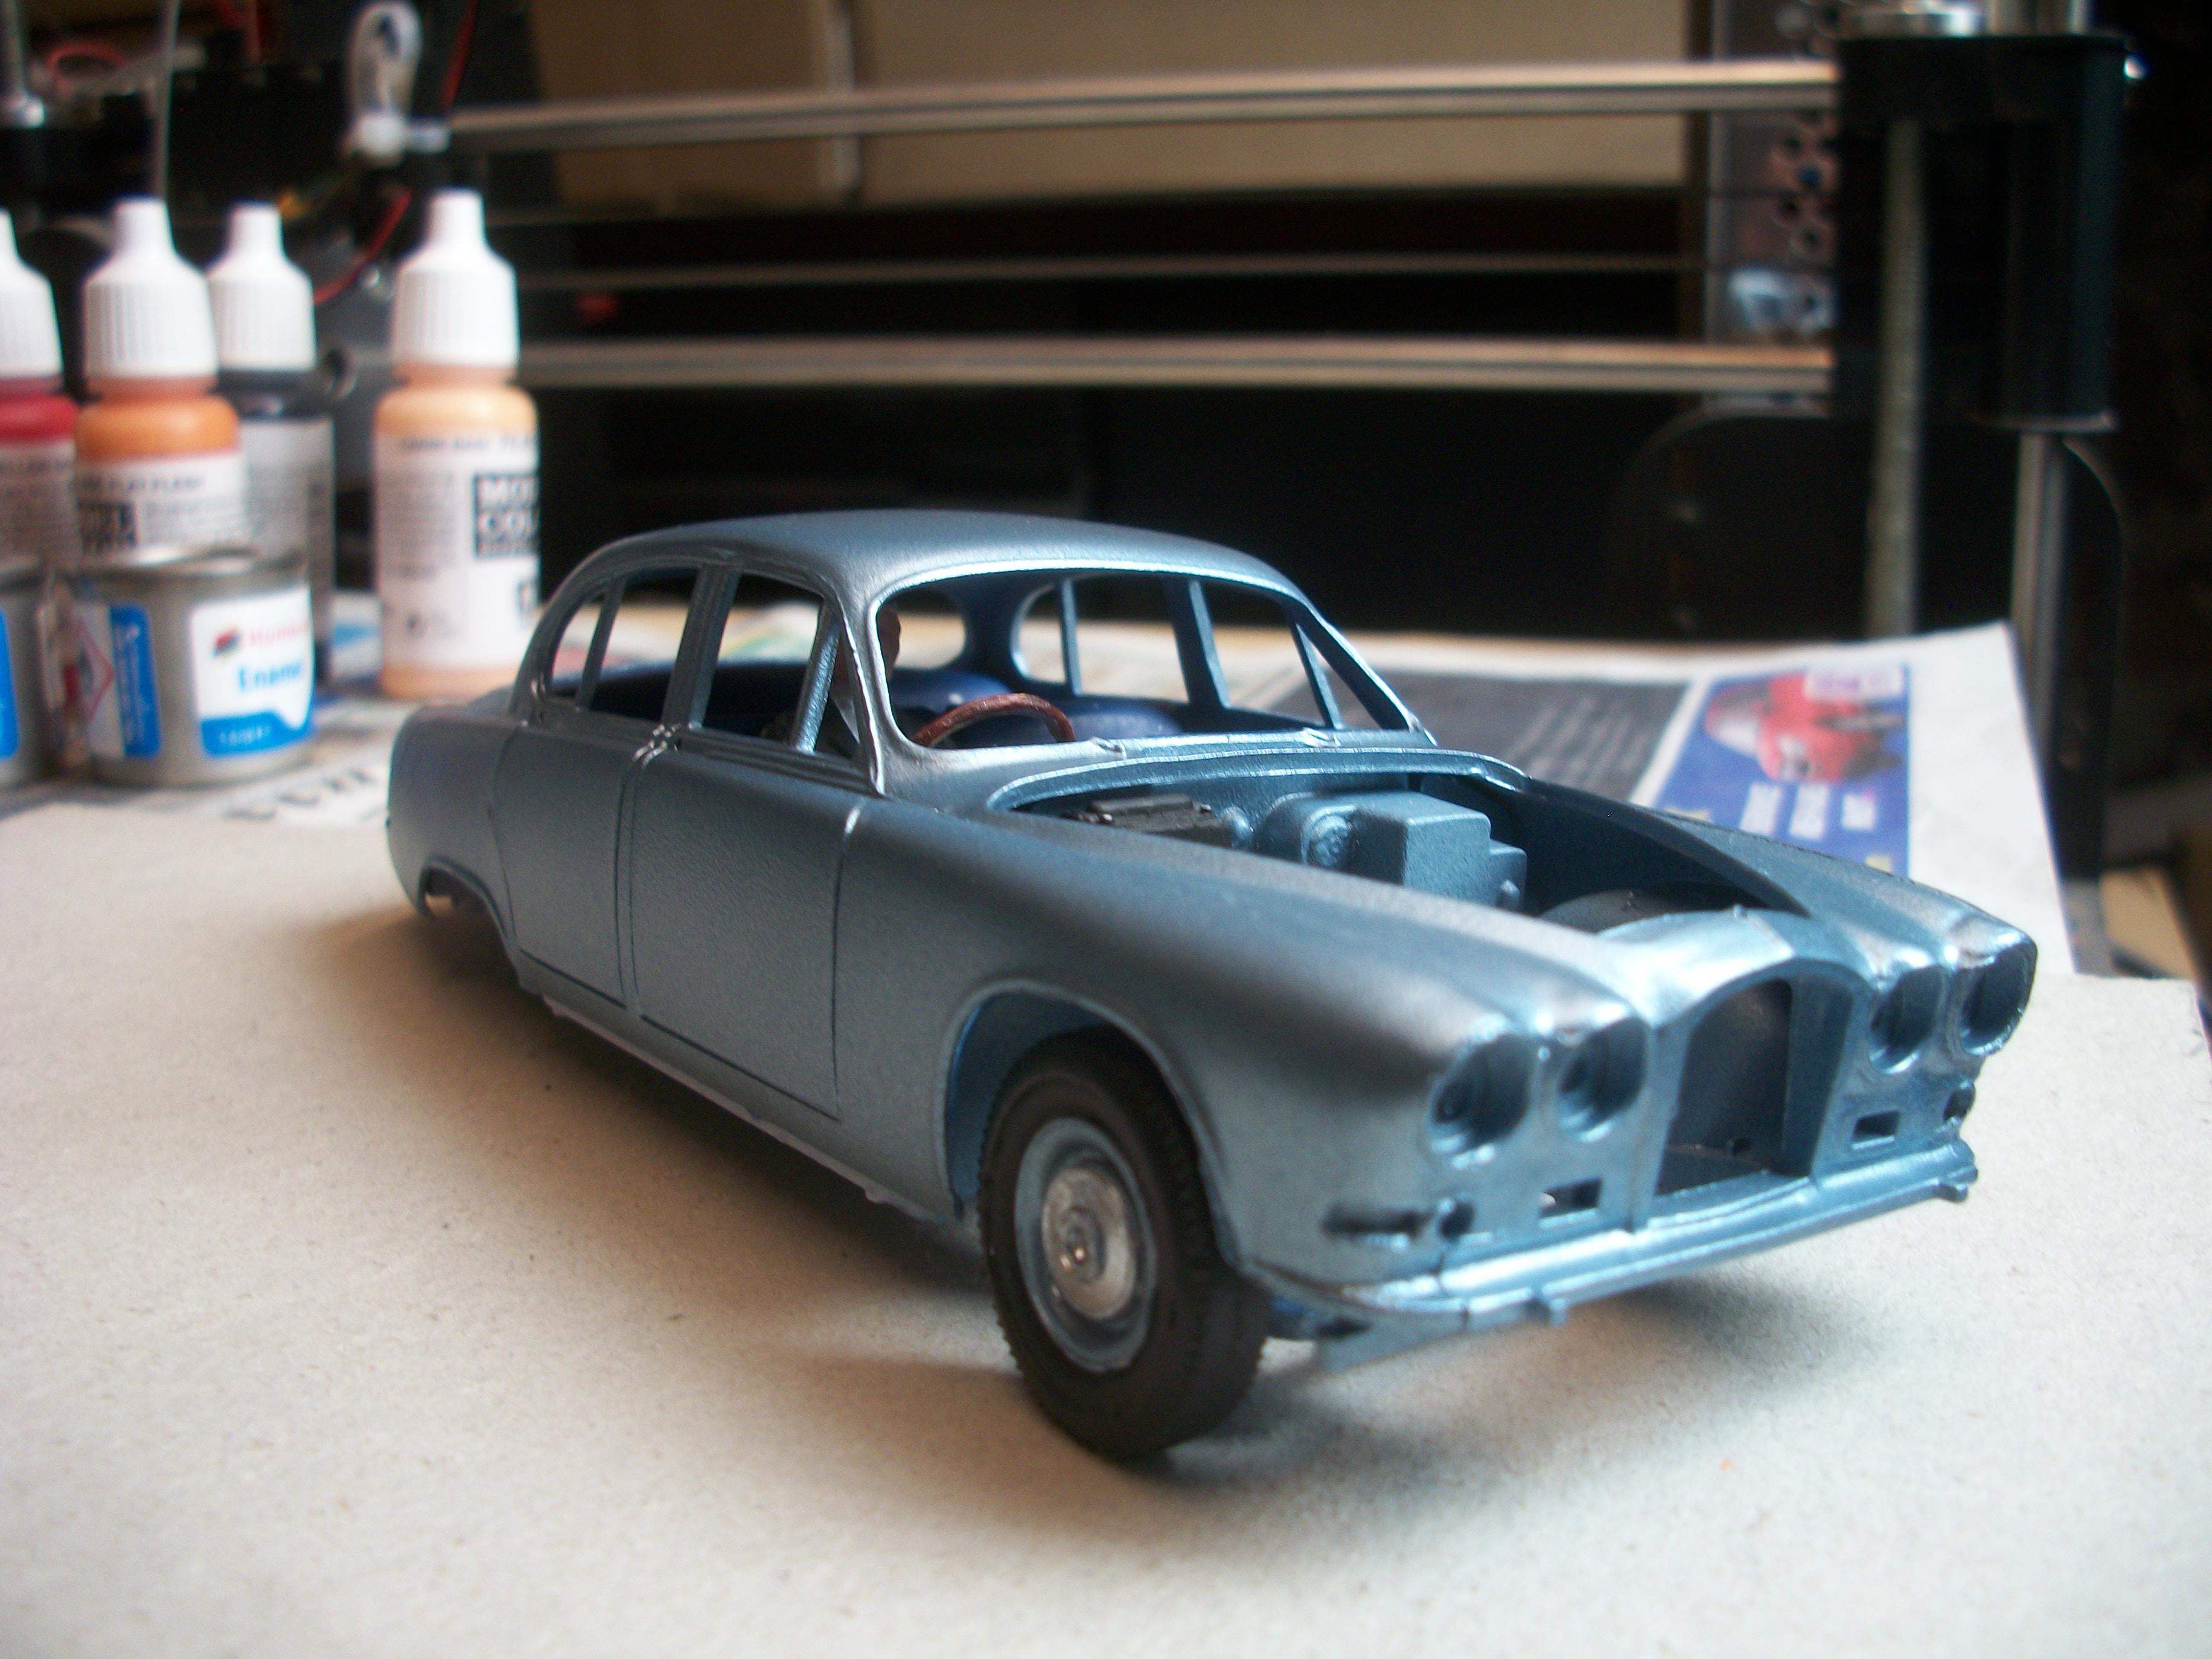
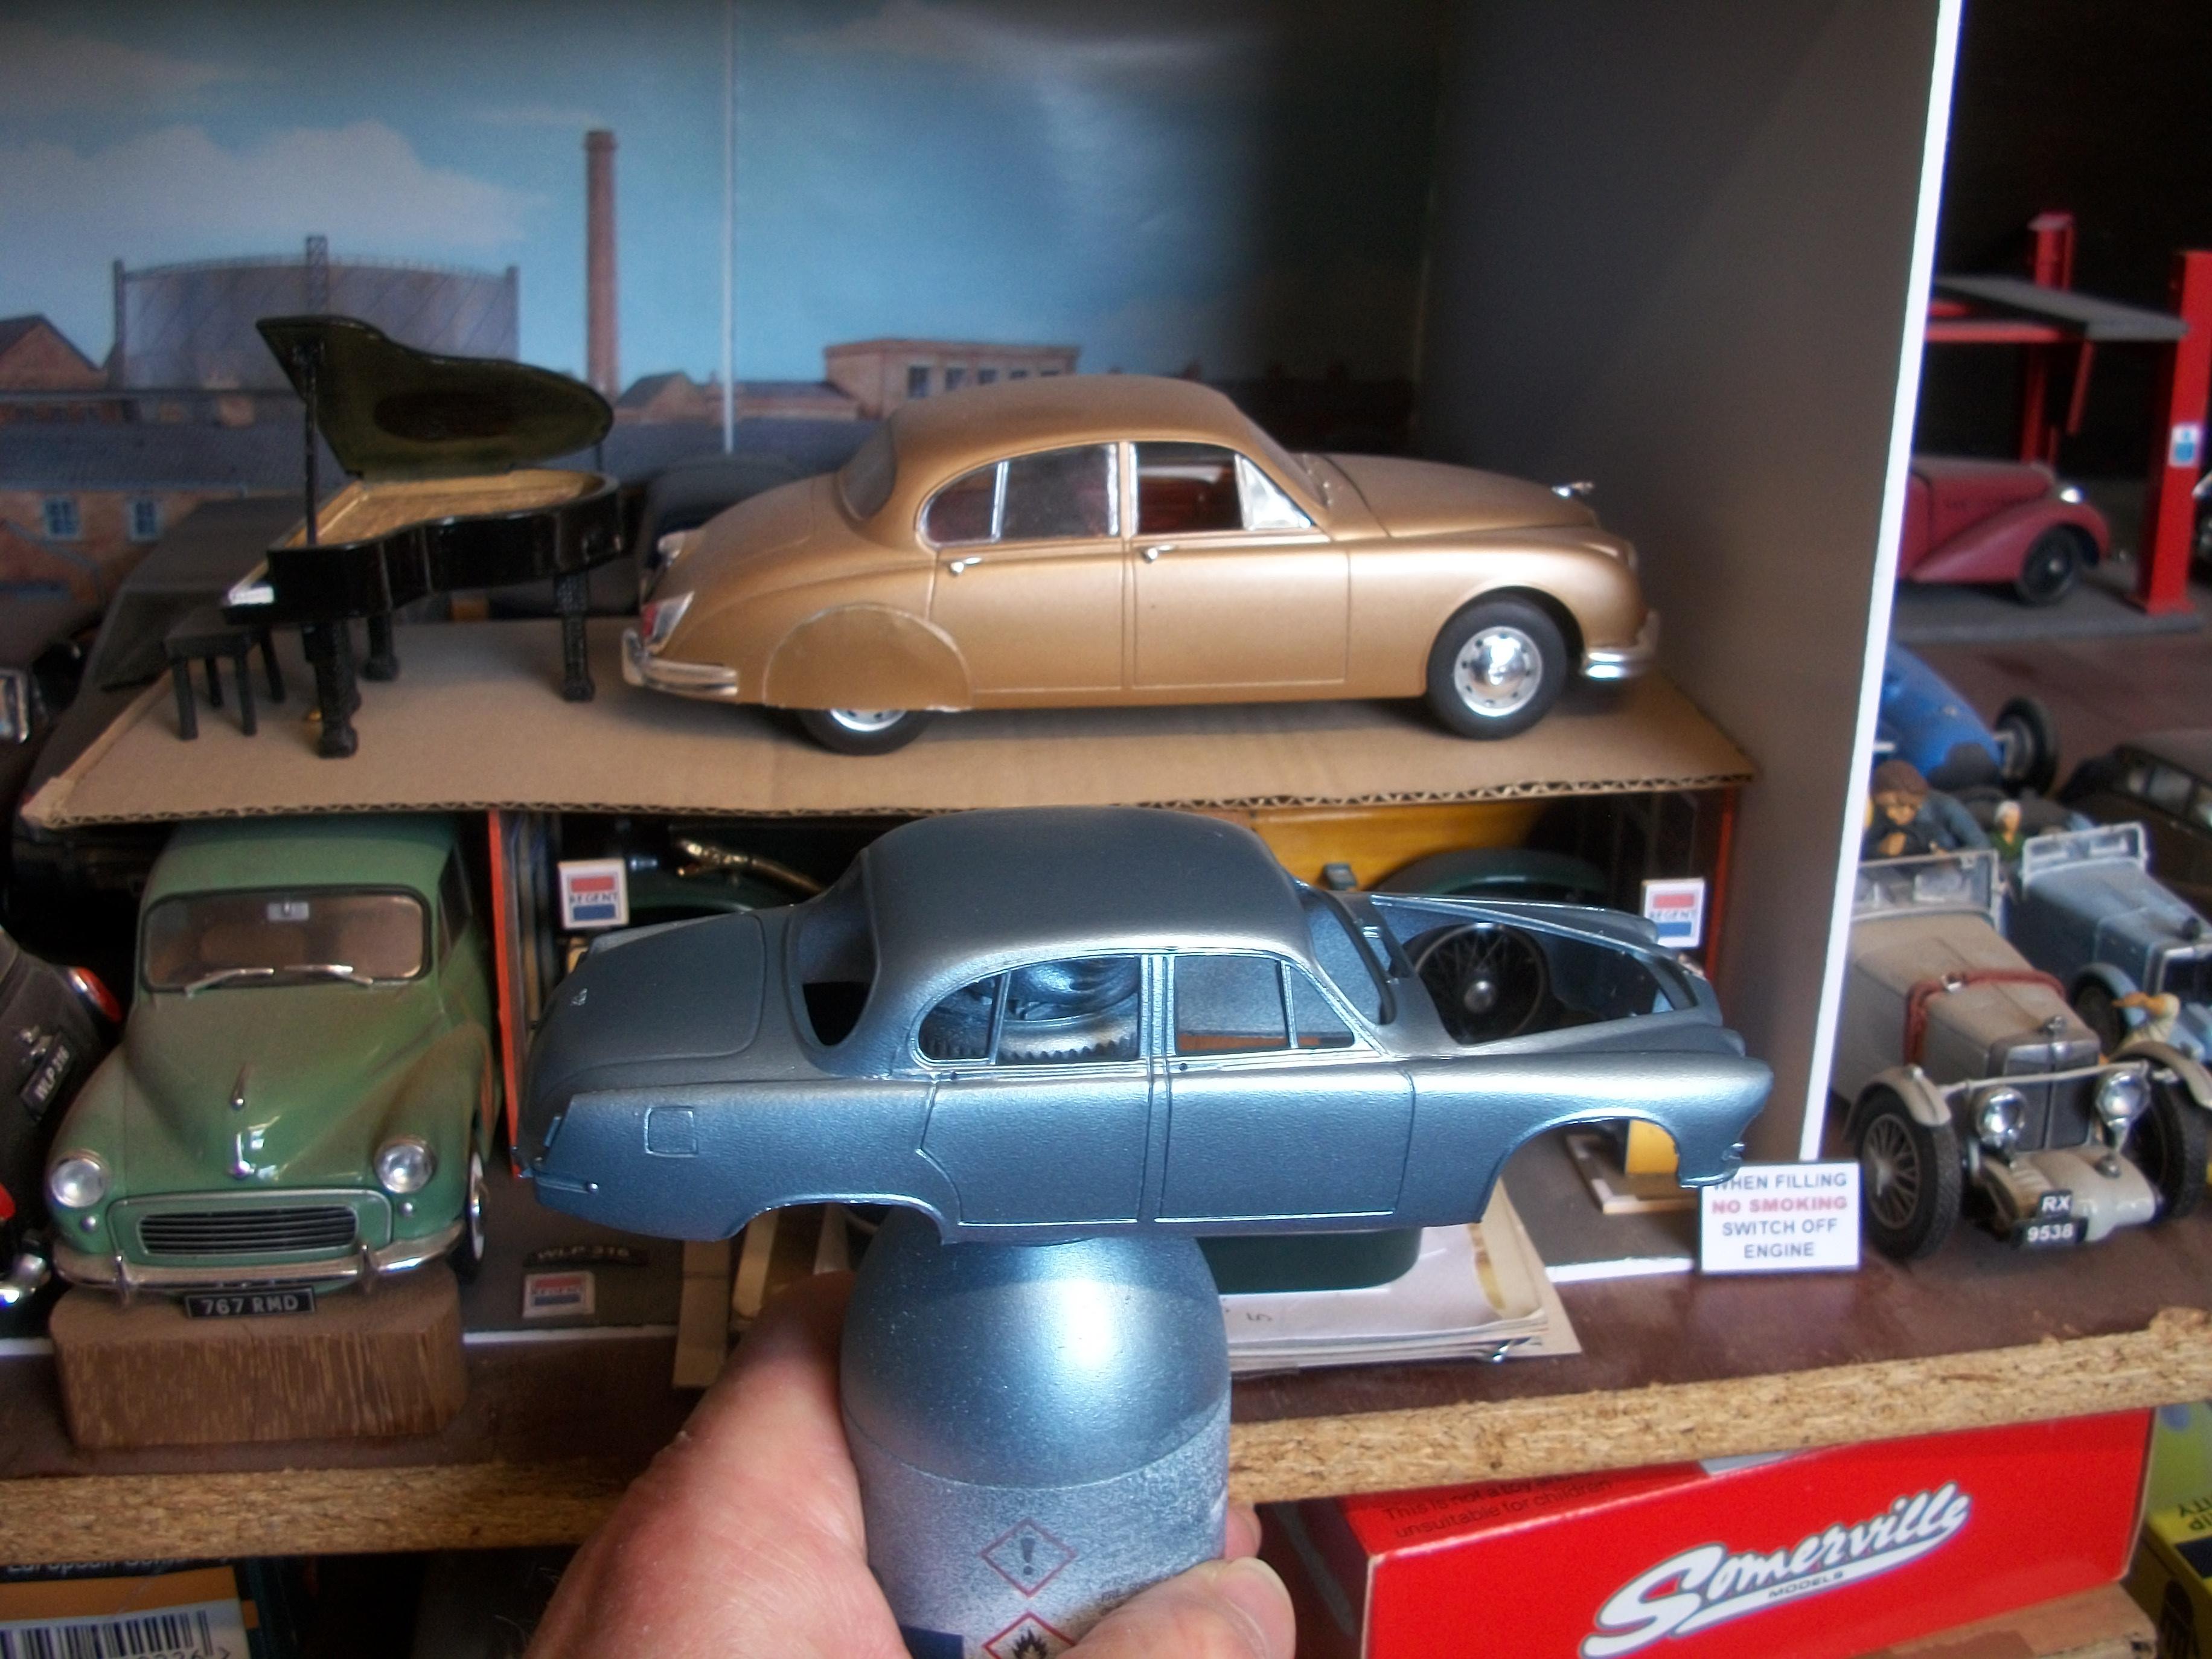
This is the Airfix 1:32 scale Jaguar 420 kit that was re-issued in 2021 . . . . The original ' red stripe ' kit by Airfix was first launched in 1968, and the kit was issued later in the 1970's by MPC . . . I decided to use Opalescent Silver Blue as the body paint colour, rather than go with the box art colour of gold, and for the undercoat I used Halfords White Enamel Primer. The Opalescent Silver Blue was mixed to order by a specialist auto paints company, using the 1968 Jaguar paint code as a reference. The body shell in this kit is generally well produced, but as you can see from the first photo there is a nasty dimple at the front end, just above the headlamps. Once this unfortunate defect had been filled with Mr White Putty R, the white primer was applied, followed by the top coat metallic light blue. There was just one part missing from the sprue in the factory sealed bag, which was half of the air cleaner assembly. I contacted Hornby customer service, and very quickly the Airfix Spares Team sent me a replacement part in the post, free of charge. This part never arrived in the post, as the British Royal Mail service is struggling with staff absences due to Covid . . . The Airfix Spares Team agreed to send me a second replacement part, which arrived within 5 days. By this time, the engine was fully assembled and painted, so just awaiting the air cleaner as the final component of the 4.2 litre straight-six engine. The chassis and underfloor is nicely detailed and this was brush painted in Humbrol Steel enamel. This whole kit has a lot of detail, and in fact has a lot of parts. One unusual feature for a 1:32 scale kit, is the hinged opening bonnet panel (hood). Front and rear suspension have quite a few component parts for this small scale model. For the interior seating I have used Vallejo Prussian Blue acrylic paint, and the driver figure is assembled from six separate parts. Once the engine bay and bulkhead were sprayed with the body colour, the battery and heater box were also painted. Road wheels are painted in the body colour and hub caps have Molotow Liquid Chrome Pen applied. The realistic looking tyres have been sprayed with Halfords Rubberised Black . . . . There is the exhaust silencer system to assemble, which is painted Humbrol Steel enamel, and all the chrome parts are now ready. It is worth noting that the MPC version of this kit has chrome parts included, whereas this Airfix version does not have any chromed parts in the box. David
-

What did you learn to drive in?
Anglia105E replied to slusher's topic in General Automotive Talk (Trucks and Cars)
I learned to drive in my Dad's 1963 Ford Cortina 1200cc 4-door, which was blue and had the reg no.: 440 LBM, and that was when I was 17 years of age in 1970. I passed the driving test at the third attempt (my Dad took 7 attempts, but he was a good driver). After passing my driving test, my Dad bought me a 1960 Ford Anglia 105E for £50, so US$.65 at today's rate. David -
I received some bad news this afternoon by email . . . . Dear David, Thanks very much for your email – lovely to hear from you! Regarding the 2022 RREC Annual Rally at Burghley House, Stamford . . . . We have had to scale back The Hunt House marquee quite significantly due to the availability of marquees at the moment (so many events taking place on the same weekend as ours!), therefore we sadly won’t be able to accommodate your dioramas this year. Fingers crossed we will be able to next year though as your work looks really amazing!!! If we are able to squeeze you in anywhere else I will be in touch Kind regards, Ailsa Ailsa Plain | Events Manager RREC | The International Club for Rolls-Royce and Bentley Enthusiasts Footnote : I was told by Ailsa at the 2021 Rolls-Royce event on 27th June last year that I could have three tables for the 2022 event. When I emailed the RREC events manager one week ago, I then received the above email reply........... Disappointed, big time !!! David
-
Nicely done Chevy there, Gary . . . . I have built several cars from my past memories, and it is always a very satisying process to go through. Those old family photos are absolutely priceless, and so precious. David
-
You probably noticed Matt, that my Tamiya 1:24 scale Jaguar Mk2 in gold has been converted to a MK1 with rear spats, but I haven't corrected the windows. They should be smaller of course. Your MK2 and your E-Type look really good in Opalescent Silver Blue, and this colour appeals to me also. David
-
Very nice build you have there Matt . . . . . and I am building one of these as we speak. There was one part missing from the sprue in my re-issue 2021 kit of the Jaguar 420, but I emailed Hornby, and the Airfix Spares Team responded very quickly indeed. The missing air cleaner part was posted to me next day for free ! I see that you have chosen gold for your paint colour, which suits this car admirably, and I have chosen Opalescent Silver Blue (light) for my paint colour. As you say Matt, the mould is getting tired after all these years (1967) and there is a fair amount of work to clean up the the parts, but I feel the result is well worth the effort. You have the road wheels in the body colour, which is correct. The driver figure is a nice touch too. Well done. Opening bonnet on a 1:32 scale model car is unusual, and there is plenty of detail. David
-
Thank you Ian . . . . I do find it more difficult working in 1:32 scale and 1:35 scale, and I think that I am more comfortable working in 1:24 scale. David
-
Cheers Les, and I shall see how the Revell interior fits the Gunze Sangyo. Thanks, David
-
Just realised that the VW Beetle is a Revell kit that I have, so not a Tamiya one. David
-
Hello Les . . . Yes, I did read somewhere that the interior parts are vinyl on sprues, and consequently they are difficult to glue and paint. Thanks for the offer, but I have a Tamiya VW Beetle somewhere in my loft storage, which is almost a complete kit. I have wanted a Gunze Sangyo kit for quite some time now, and when I saw the price of this VW it was decided. I used to own a 1:1 early VW Beetle that was a 6 volt car, but not the oval rear screen, so I think I shall paint this model in the orange colour of my real car. David
-
Ordered this Gunze Sangyo kit on Ebay yesterday, which is the 1956 Volkswagen Oval Window in 1:24 scale. This was only £30.00 GBP, so US$. 39.50 David
- 39,091 replies
-
- 1
-

-
- johan
- glue bombs
- (and 1 more)
-
Your diorama is truly wonderful, Harald . . . . and your recent work on the Alfa Romeo Gran-Turismo by PYRO is very good indeed, especially the lighting ! I have recently completed the build of a PYRO 1933 Rolls-Royce Towne Car, which is also from the 1:32 scale Table Top Series of kits. You have captured the feeling of the 1931 Mille Miglia race so perfectly. Do you find these PYRO kits easy to purchase in Austria ? There are some PYRO kits on Ebay here in UK, and they were manufactured in 1966 - 1967, which makes them really good from that period, I think. David
-
Thank you Pete, for the highly detailed explanation about how LED's work, and I do have a much better understanding of the technology thanks to your post. I have just been reading through your build that you posted some time ago, back in 2012, regarding the BUSCH Mercedes Sprinter van. From the moment that I realised these vans are N gauge, I was fascinated by your attention to small detail. That was lucky finding that the non-illuminated models did have the lighting conduit inside. Soldering at that scale must require considerable skill I would have thought. I do have an N gauge railway layout that my Dad built shortly before he passed away, and this layout does have some tiny vehicles as well. I see how you have used black paint to mask the escape of light from within the vehicle, and that was something that I noticed with those fibre optics. Quite a lot of light is visible from the sides of the fibre optic strands, both on the underside of the tram car and also inside the passenger area. I enjoyed reading your article further, with references to decals, resin casting masters, the radio antenna being the thickness of a human hair and converting the Mercedes grille to a Dodge grill ! Wow ! Your model building skills are far superior to mine. The idea to use a brass tube to mount the van in a static position is sound enough, from a safety point of view, and recently I have been looking at the possibility of using small magnets mounted on the underside of 1:43 scale vehicles, along with magnets mounted on rails underneath the diorama baseboard to provide movement of the vehicles. David
-
Thanks Peter, and I don't mind anything that fellow members might pick up on while viewing my photos. This process is very usefull to motivate me and consequently address any issues / errors / observations. Usually, I just need a little push to get things done ! Yes, as regards LED's, I shall probably end up using some for this project because the routing of fibre optic strands is a bit of a challenge, if I am honest. While I was sourcing the fibre optics on Ebay those LED's in a range of sizes did appear on my screen, but at the time I was locked into ' tunnel vision ' with the fibre optics. This is why I find all comments by members on MCM forums extremely useful. For the red lights on the front of the tram, I used a red Sharpie on the tip of the two strands. Would this work on an LED also ? David
-
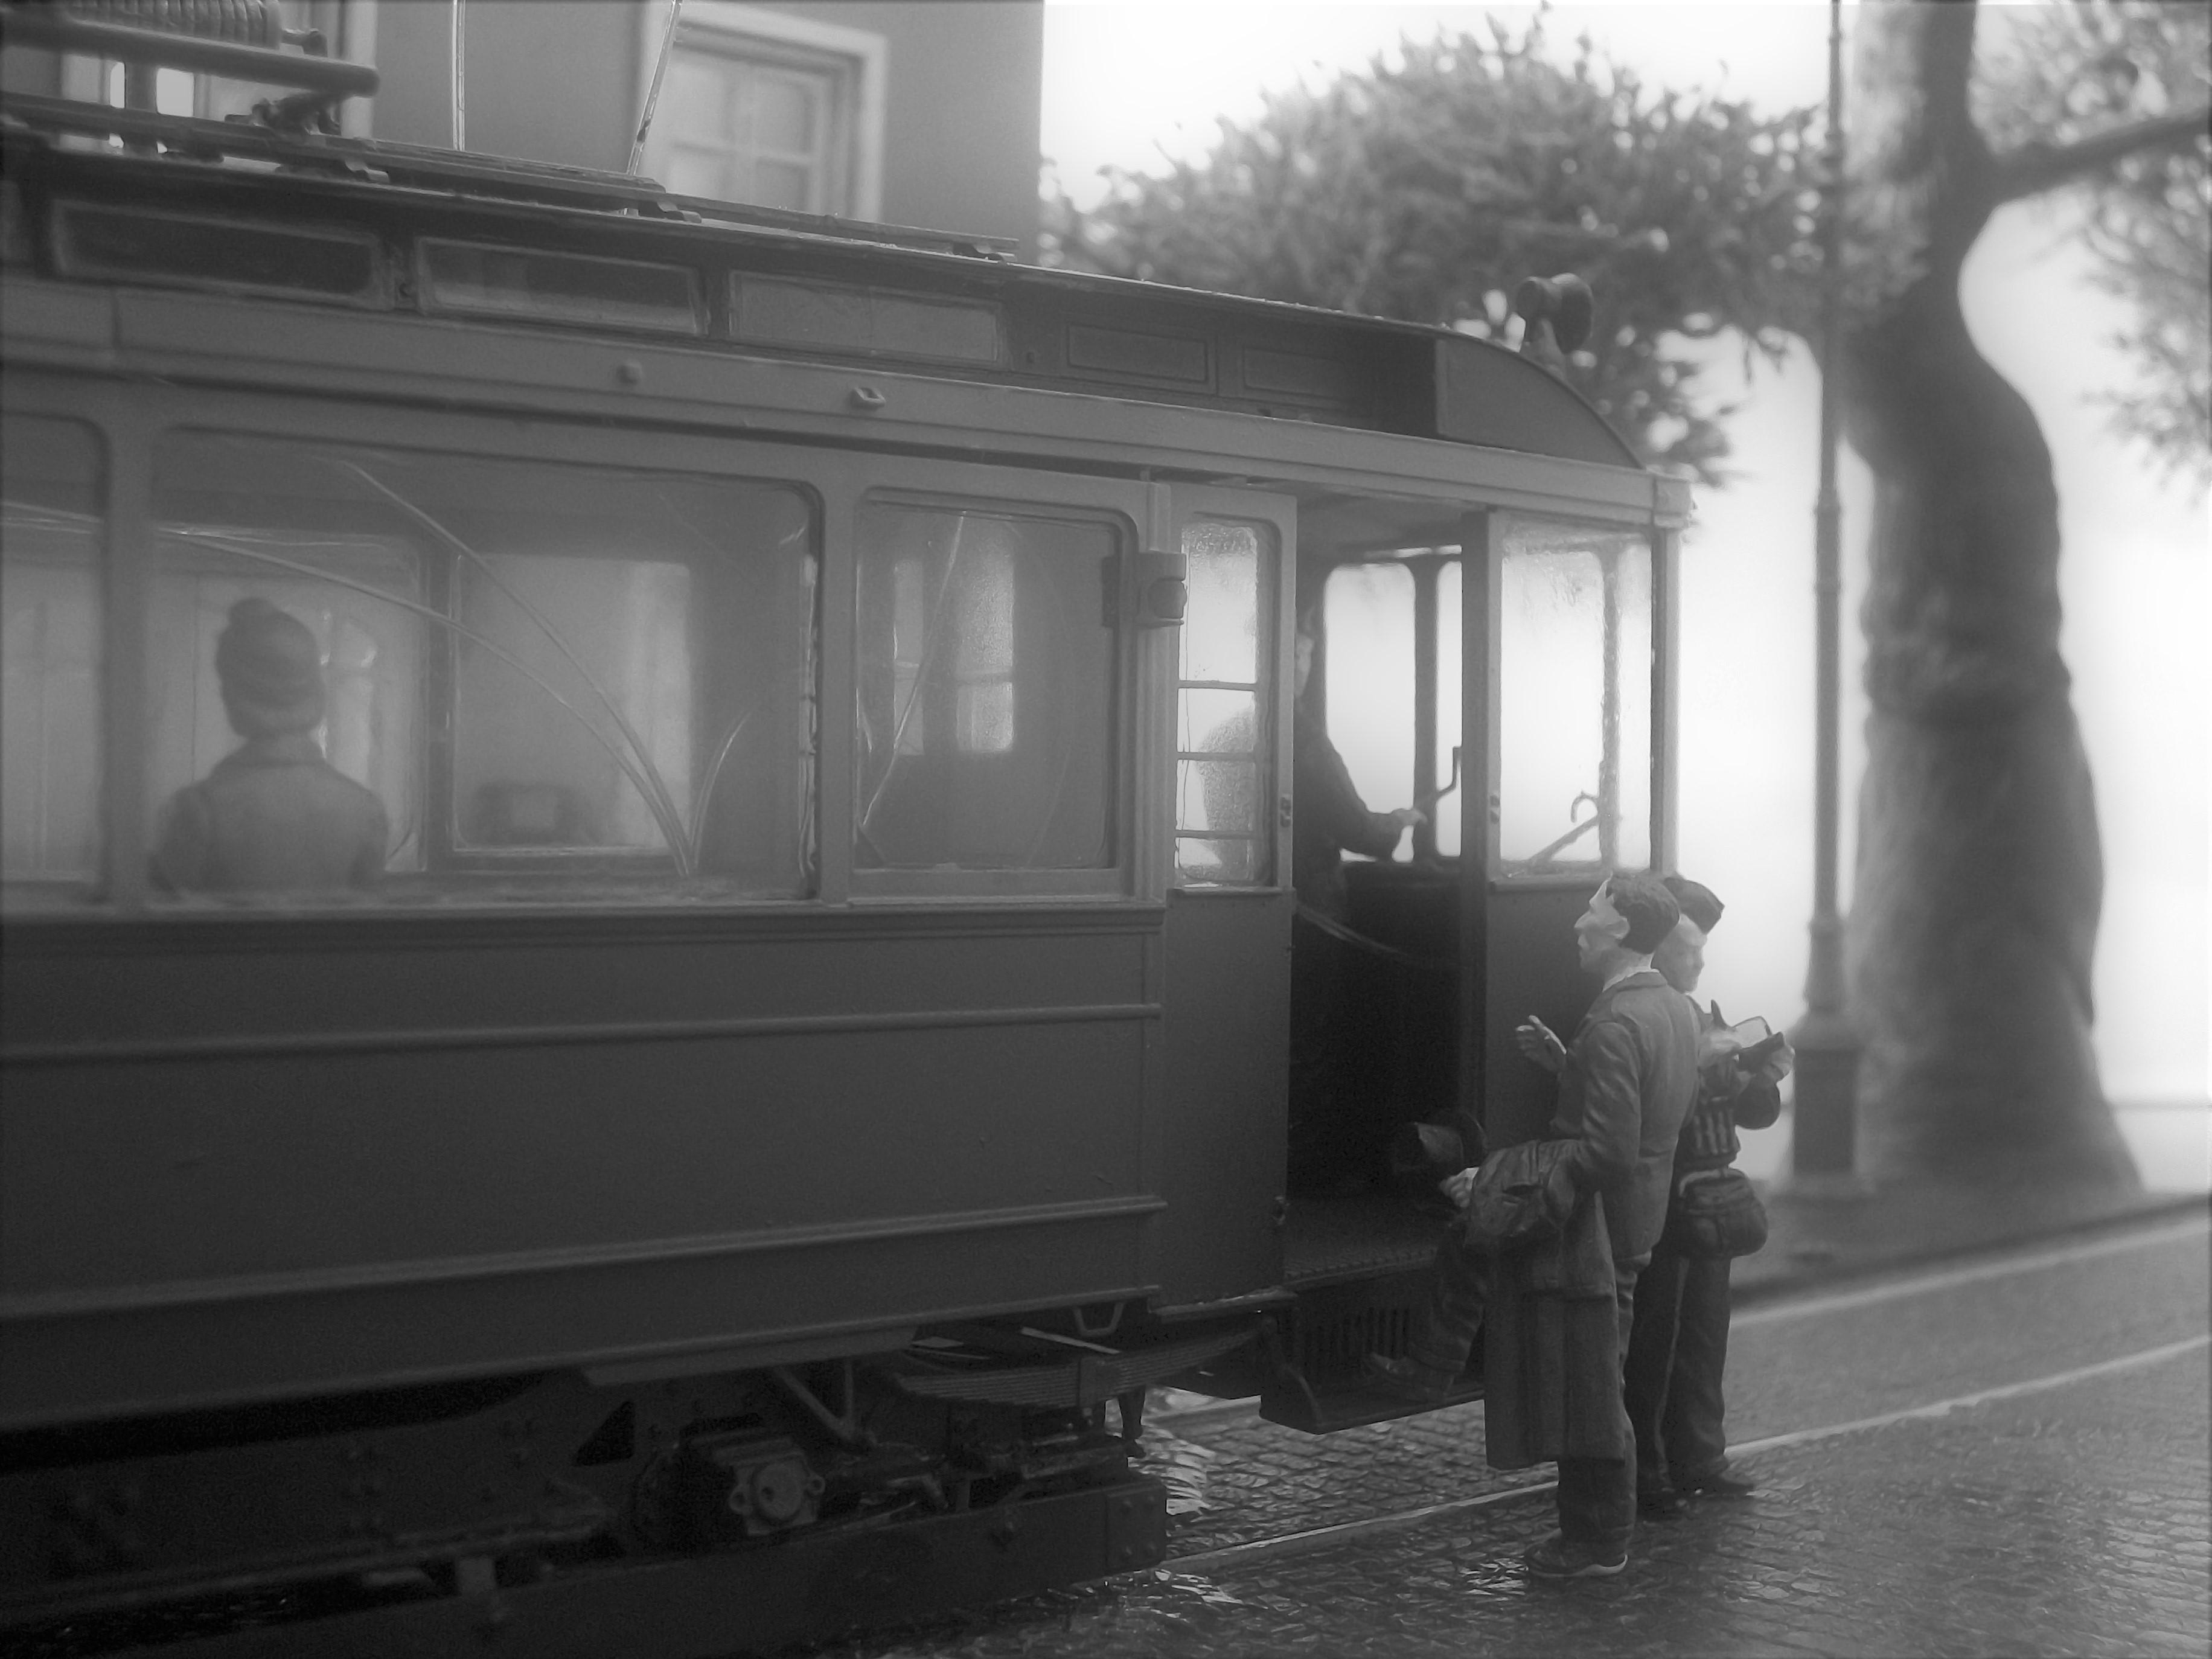
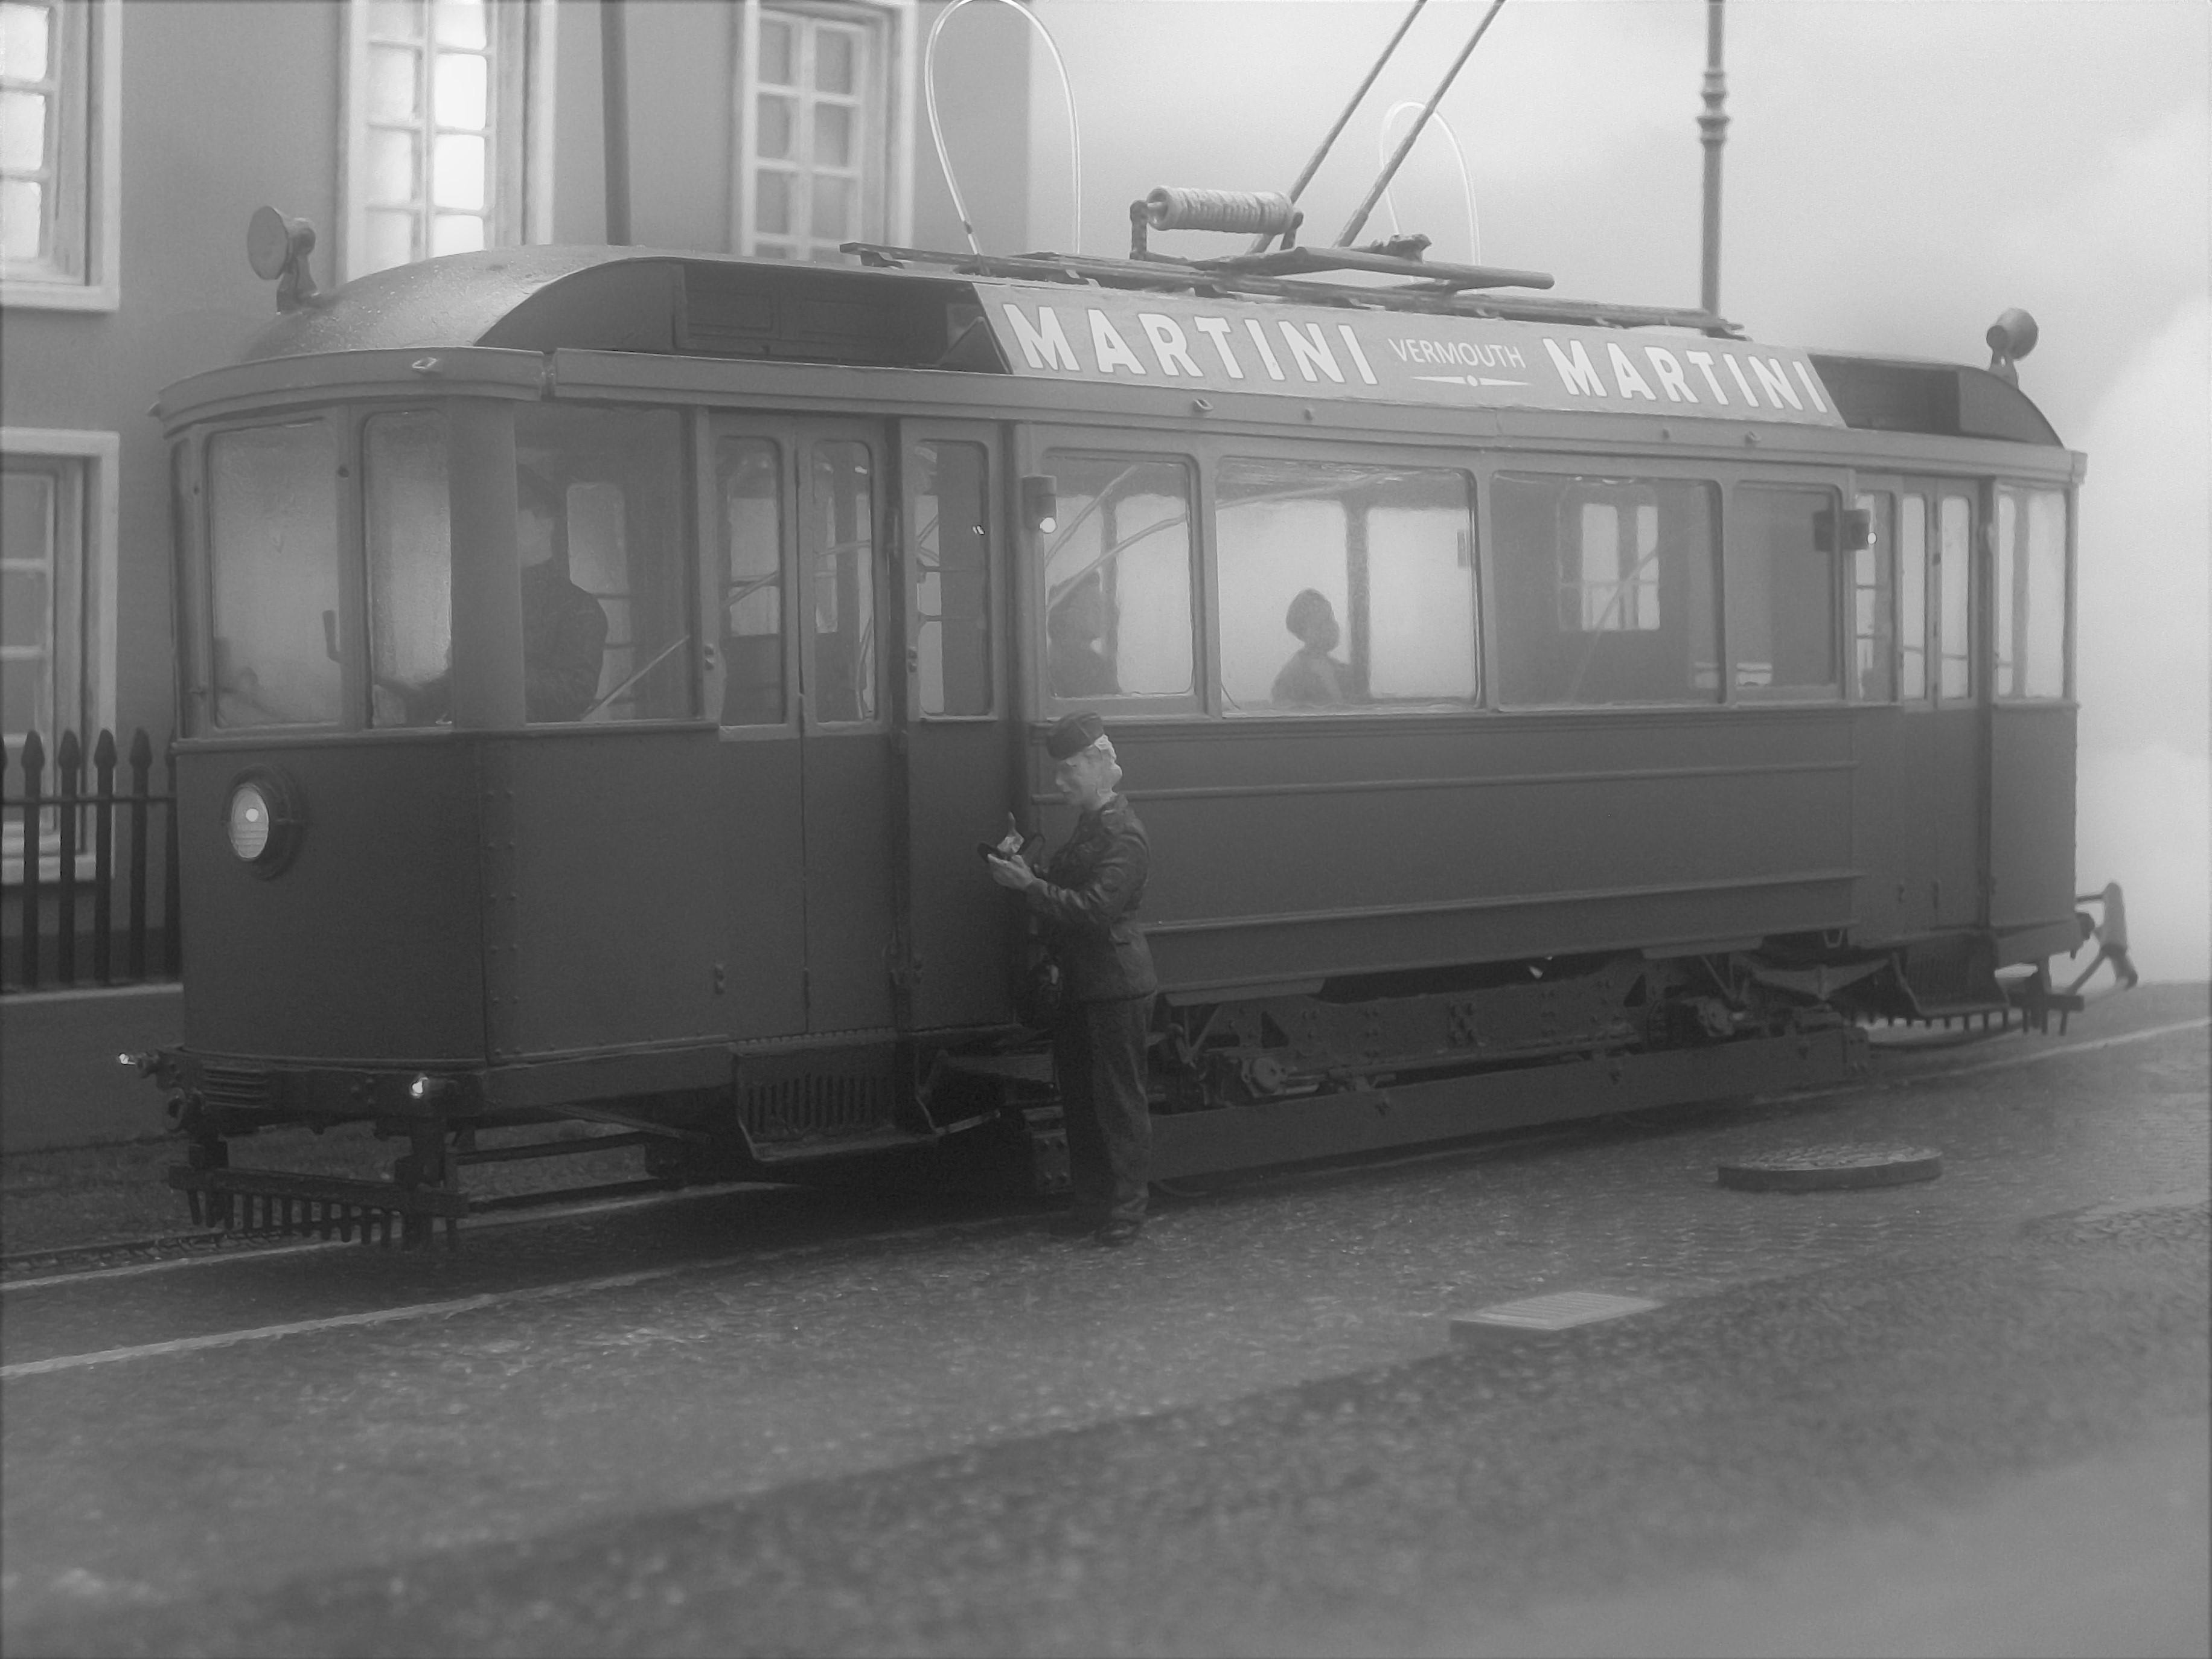
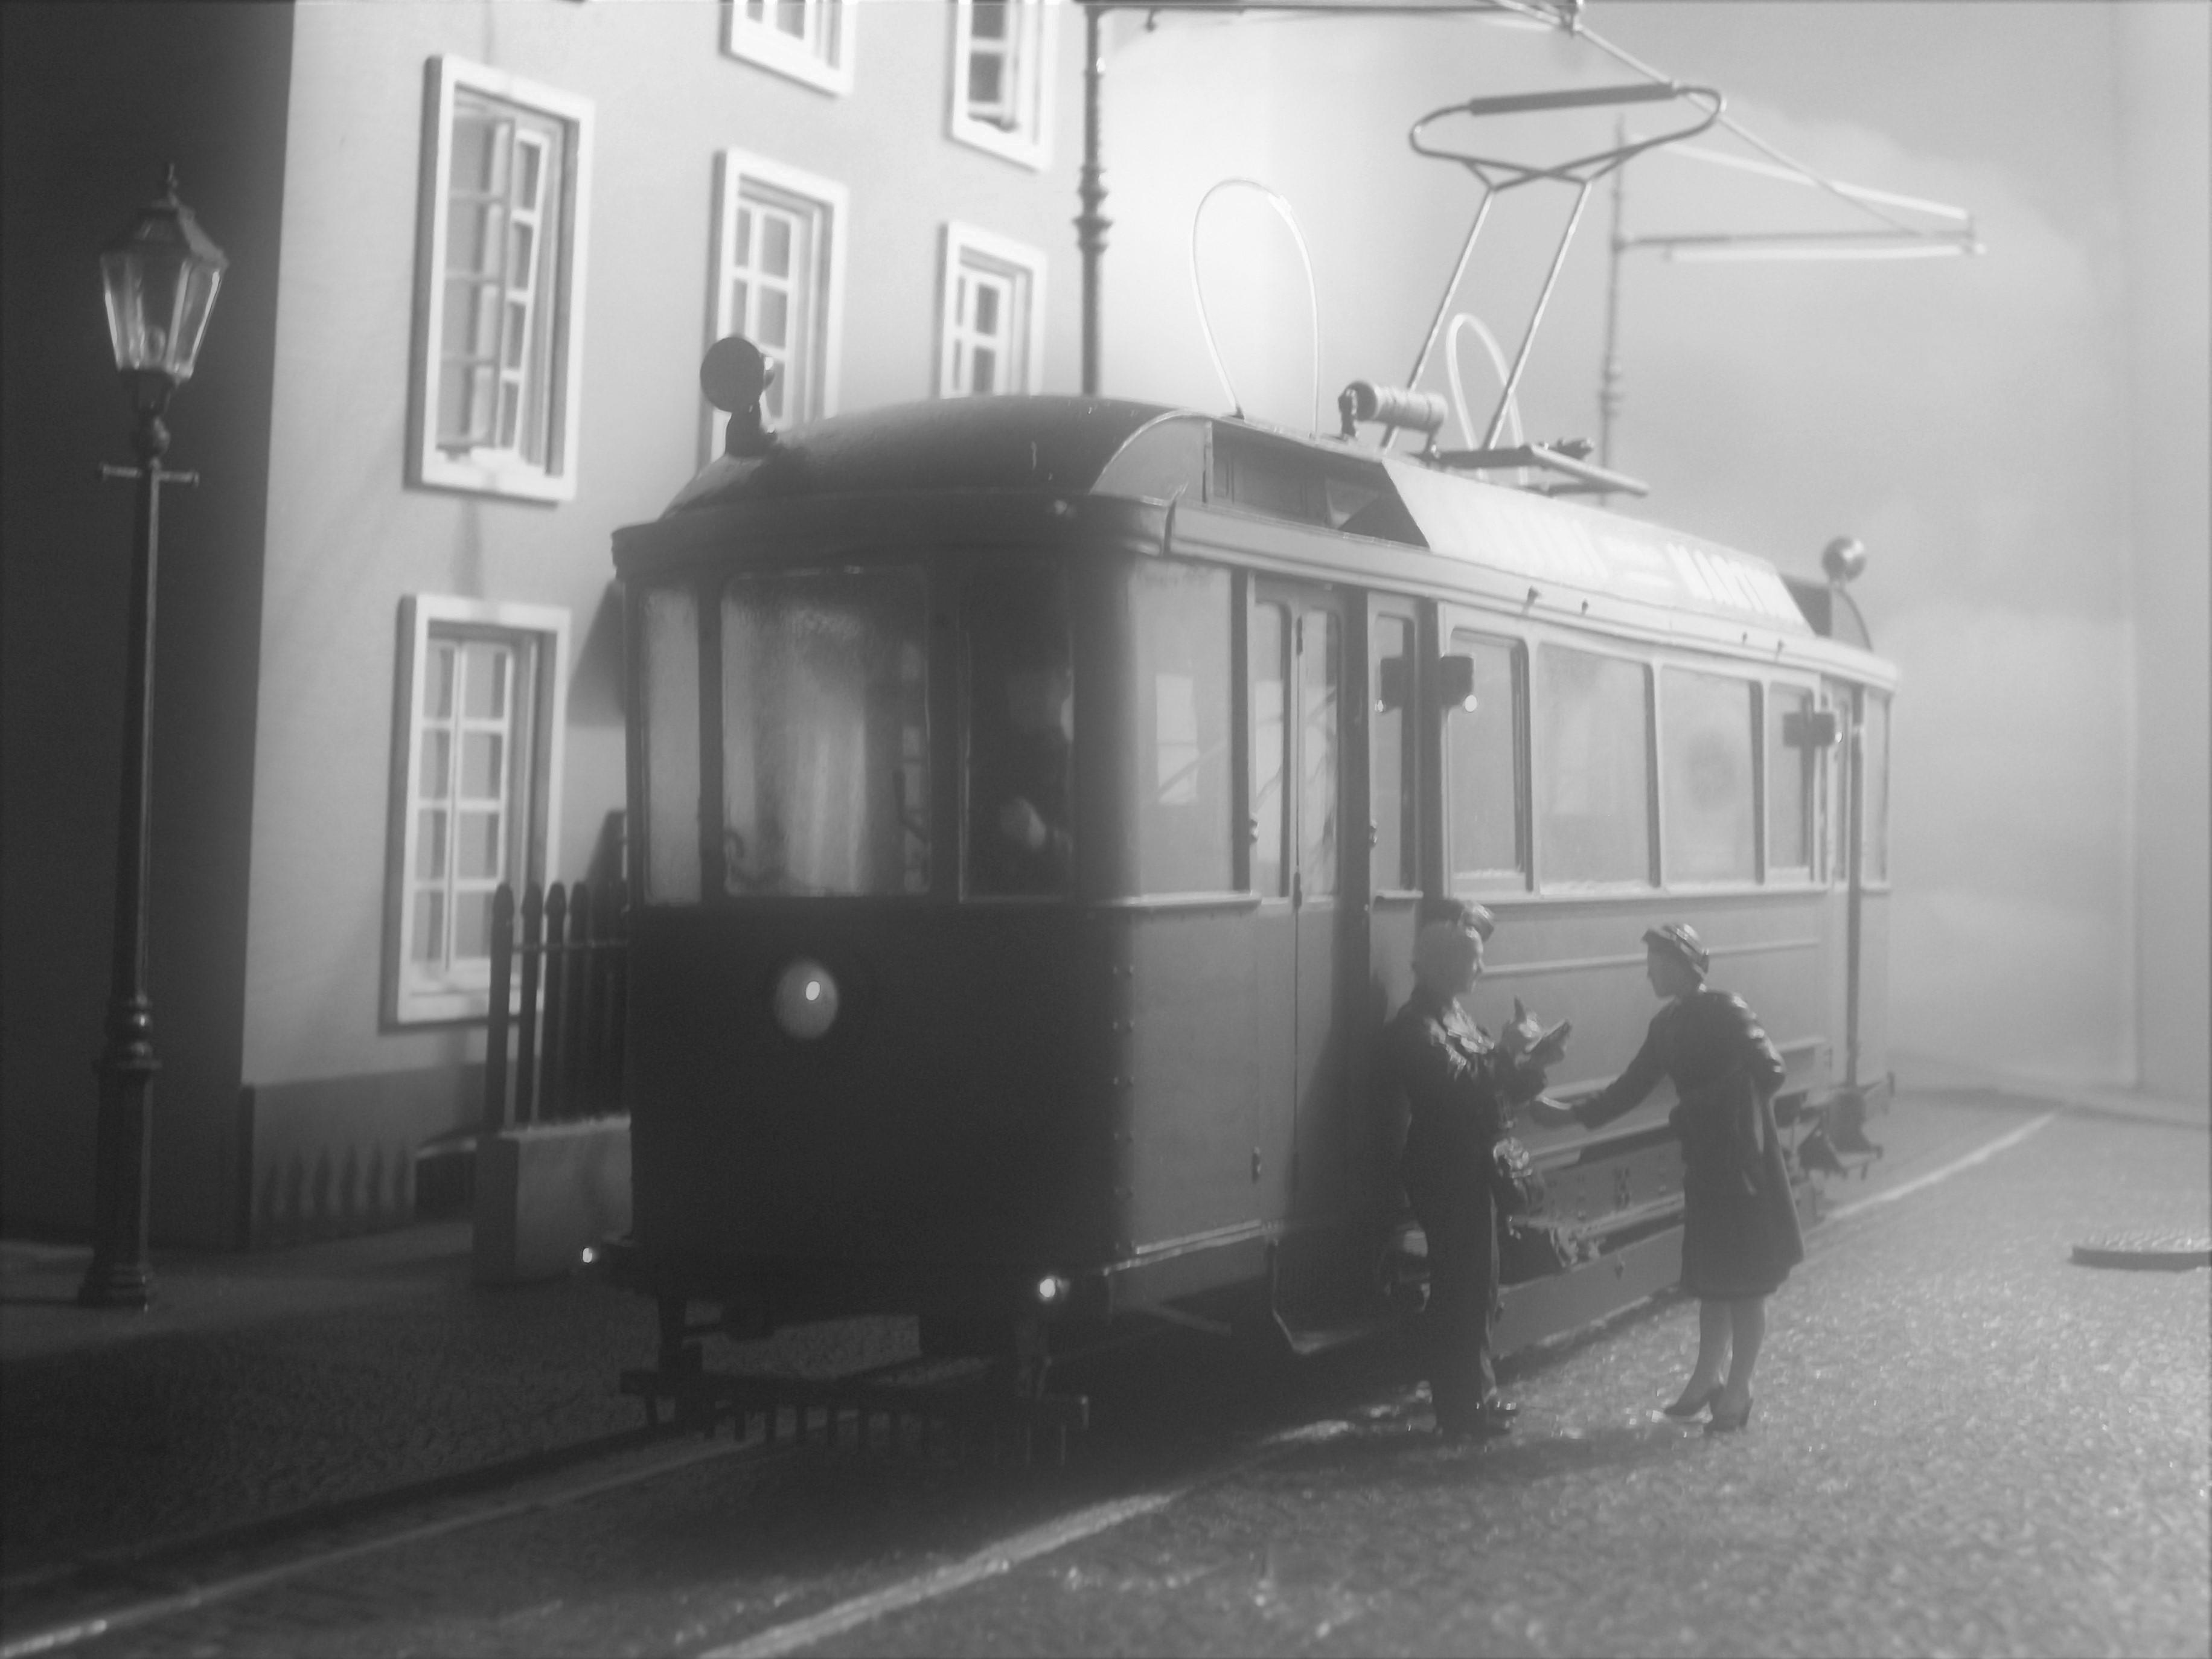
Having added a mature oak tree to the diorama composition, and also the figure of a gentleman who is boarding the tram car, here are just a couple of photos to show the other side of the tram car. David
-
Very observant Peter, and you have picked up on two issues in particular . . . . Please allow me to explain. First of all, the 1:35 scale street lamps by MiniArt do not have a hollow centre to the post, whereas the 1:43 street lamps by Pico do have a hollow centre. I wanted to run a fibre optic strand up the post to the lamp at the top, but the MiniArt street lamp won't allow me to do this. Well spotted with the ' fishing line ' objects on the roof of the tram car. Those are the fibre optic strands that are linked to an LED bulb, which is strapped to the underside of the tram car chassis. Unfortunately, those fibre optics have to be routed through the passenger area, then up through the roof, and then back down through the roof to the interior lamps. I thought about how I might disguise those fibre optic strands, such as having a standing figure inside the tram. In some of the photo shots the fibre optics are not so visible, and they can sometimes blend into their surroundings. Thanks for pointing out these errors Peter, and I am aware that there are other errors too. This diorama is a work in progress, so there will be ongoing progress hopefully. David
-
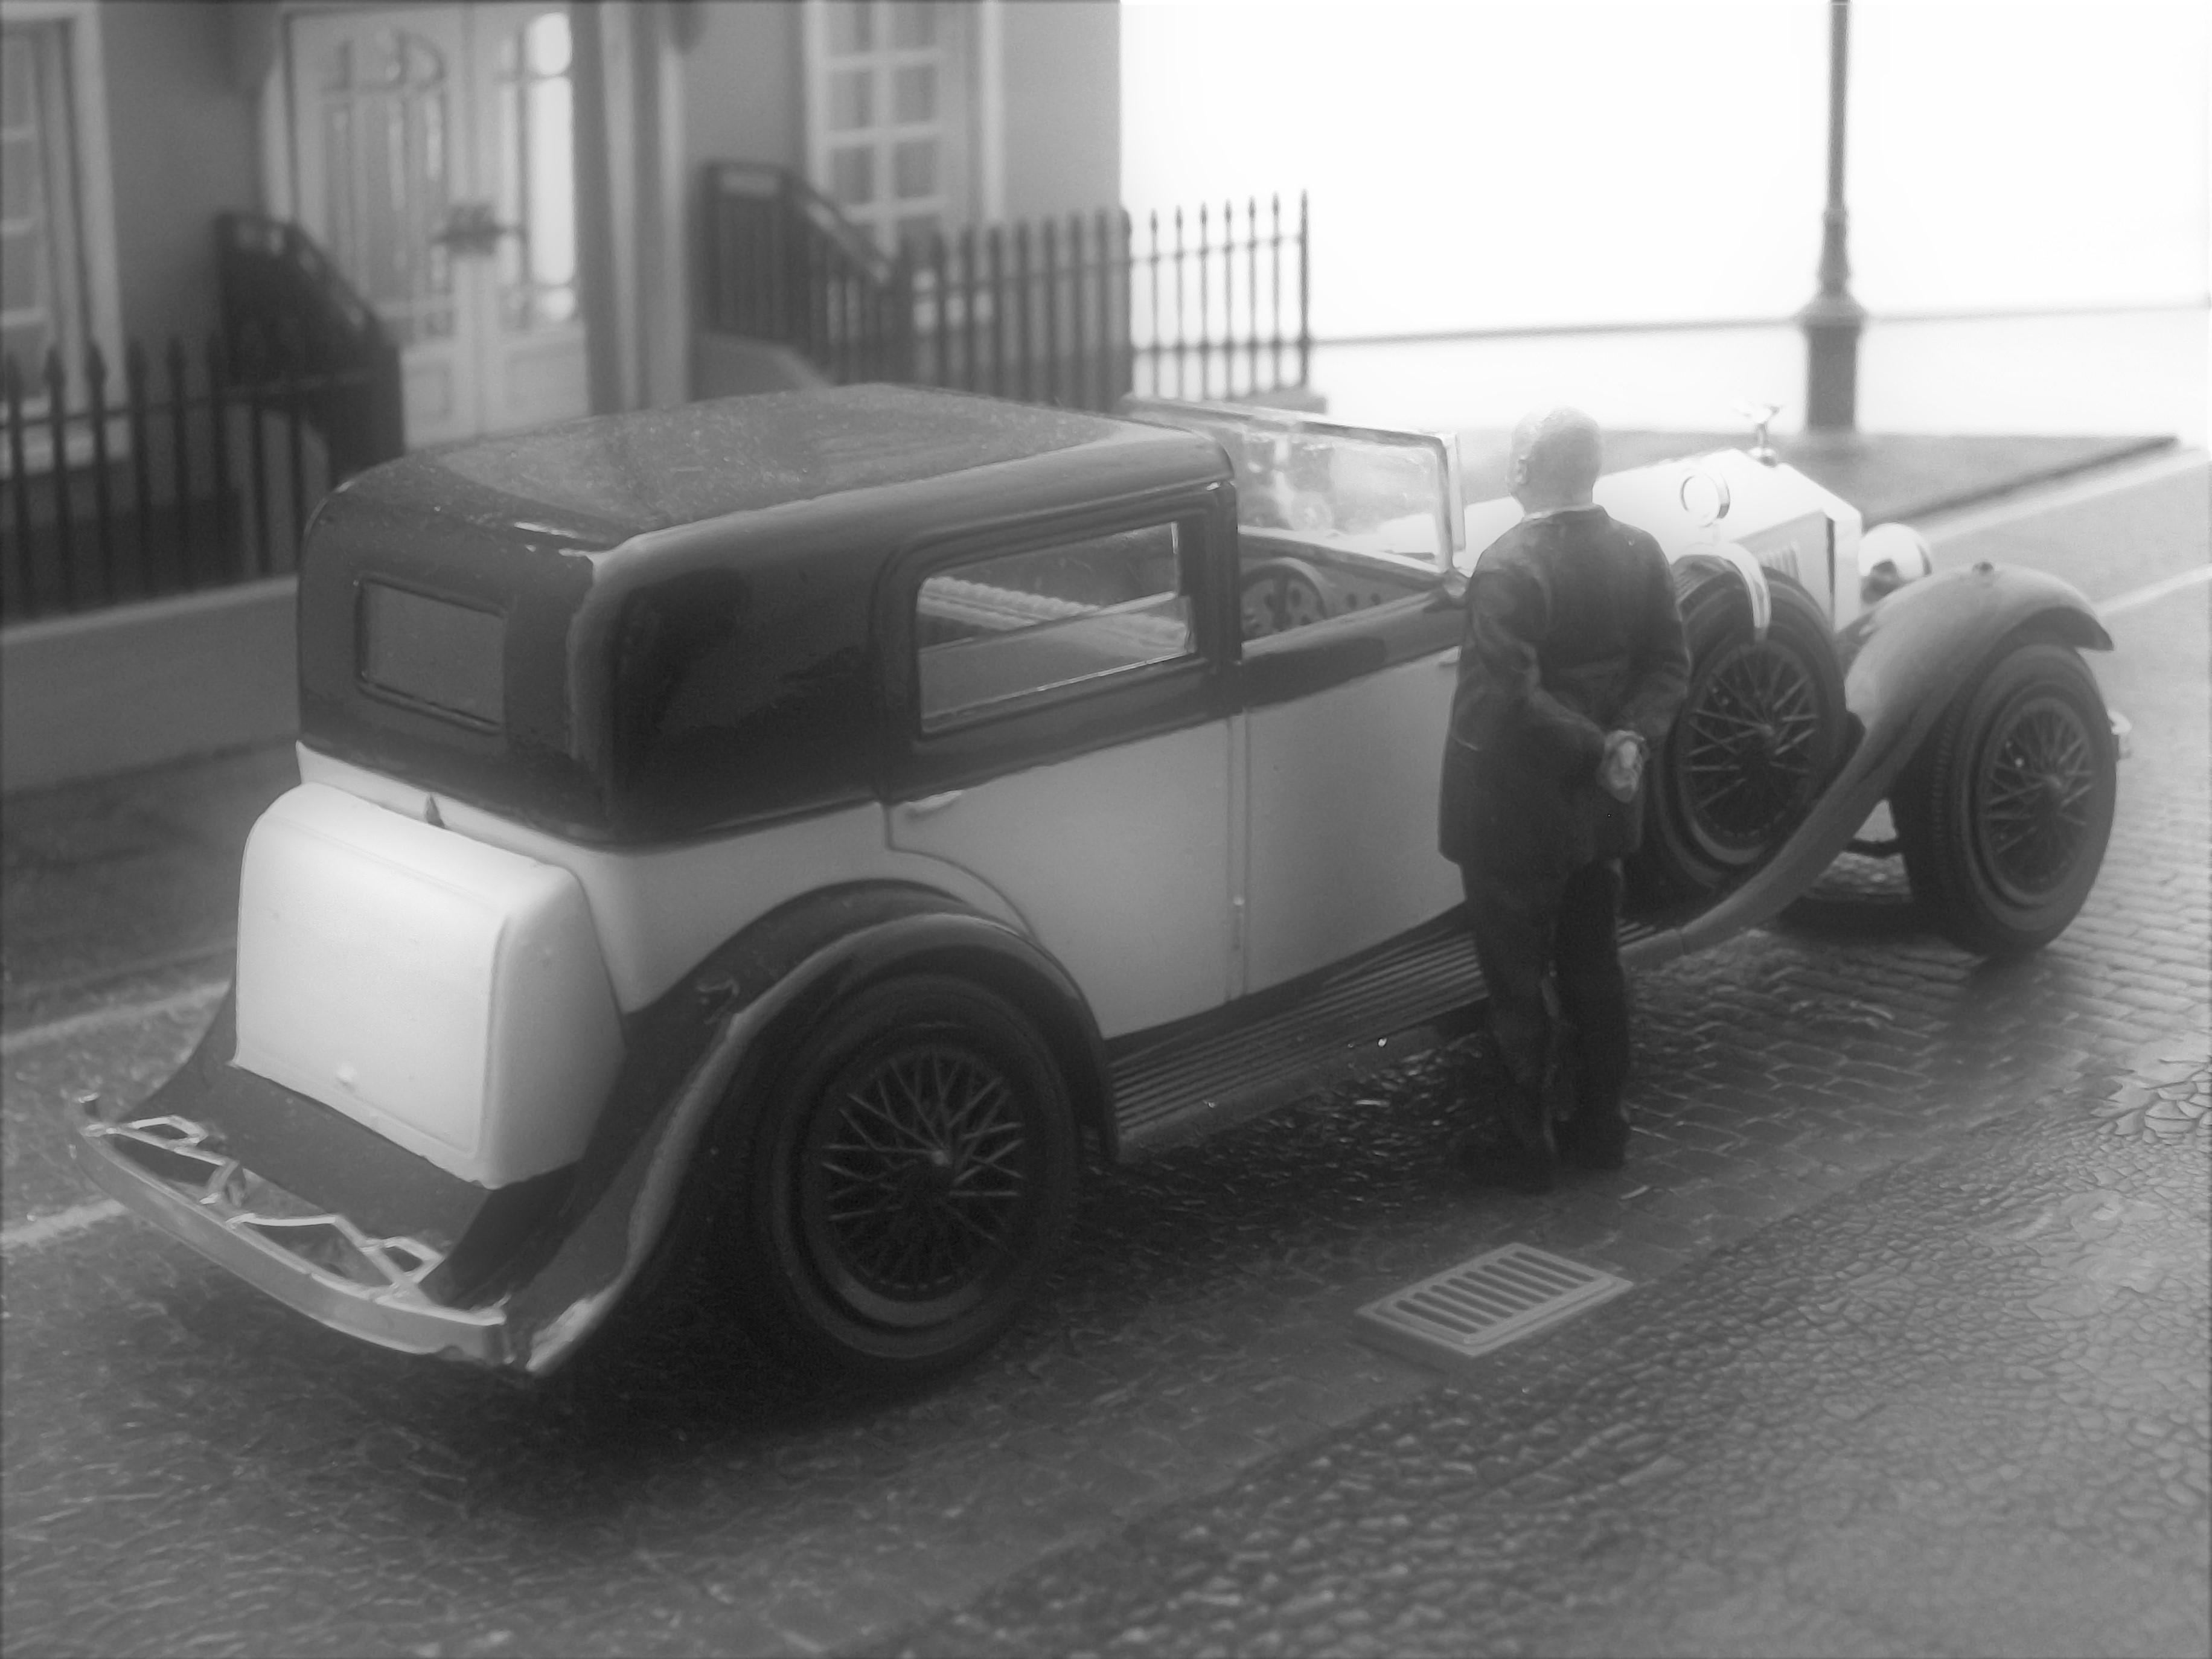
These two photograohs show the 1933 Rolls-Royce Phantom II parked on the wet cobblestone road outside the town house in Geneva, Switzerland. This motor car model has been built from the 1:32 scale Pyro kit of 1967, and the Alfred Hitchcock figure is a 1:32 scale 3D printed figure by Shapeways. David
-
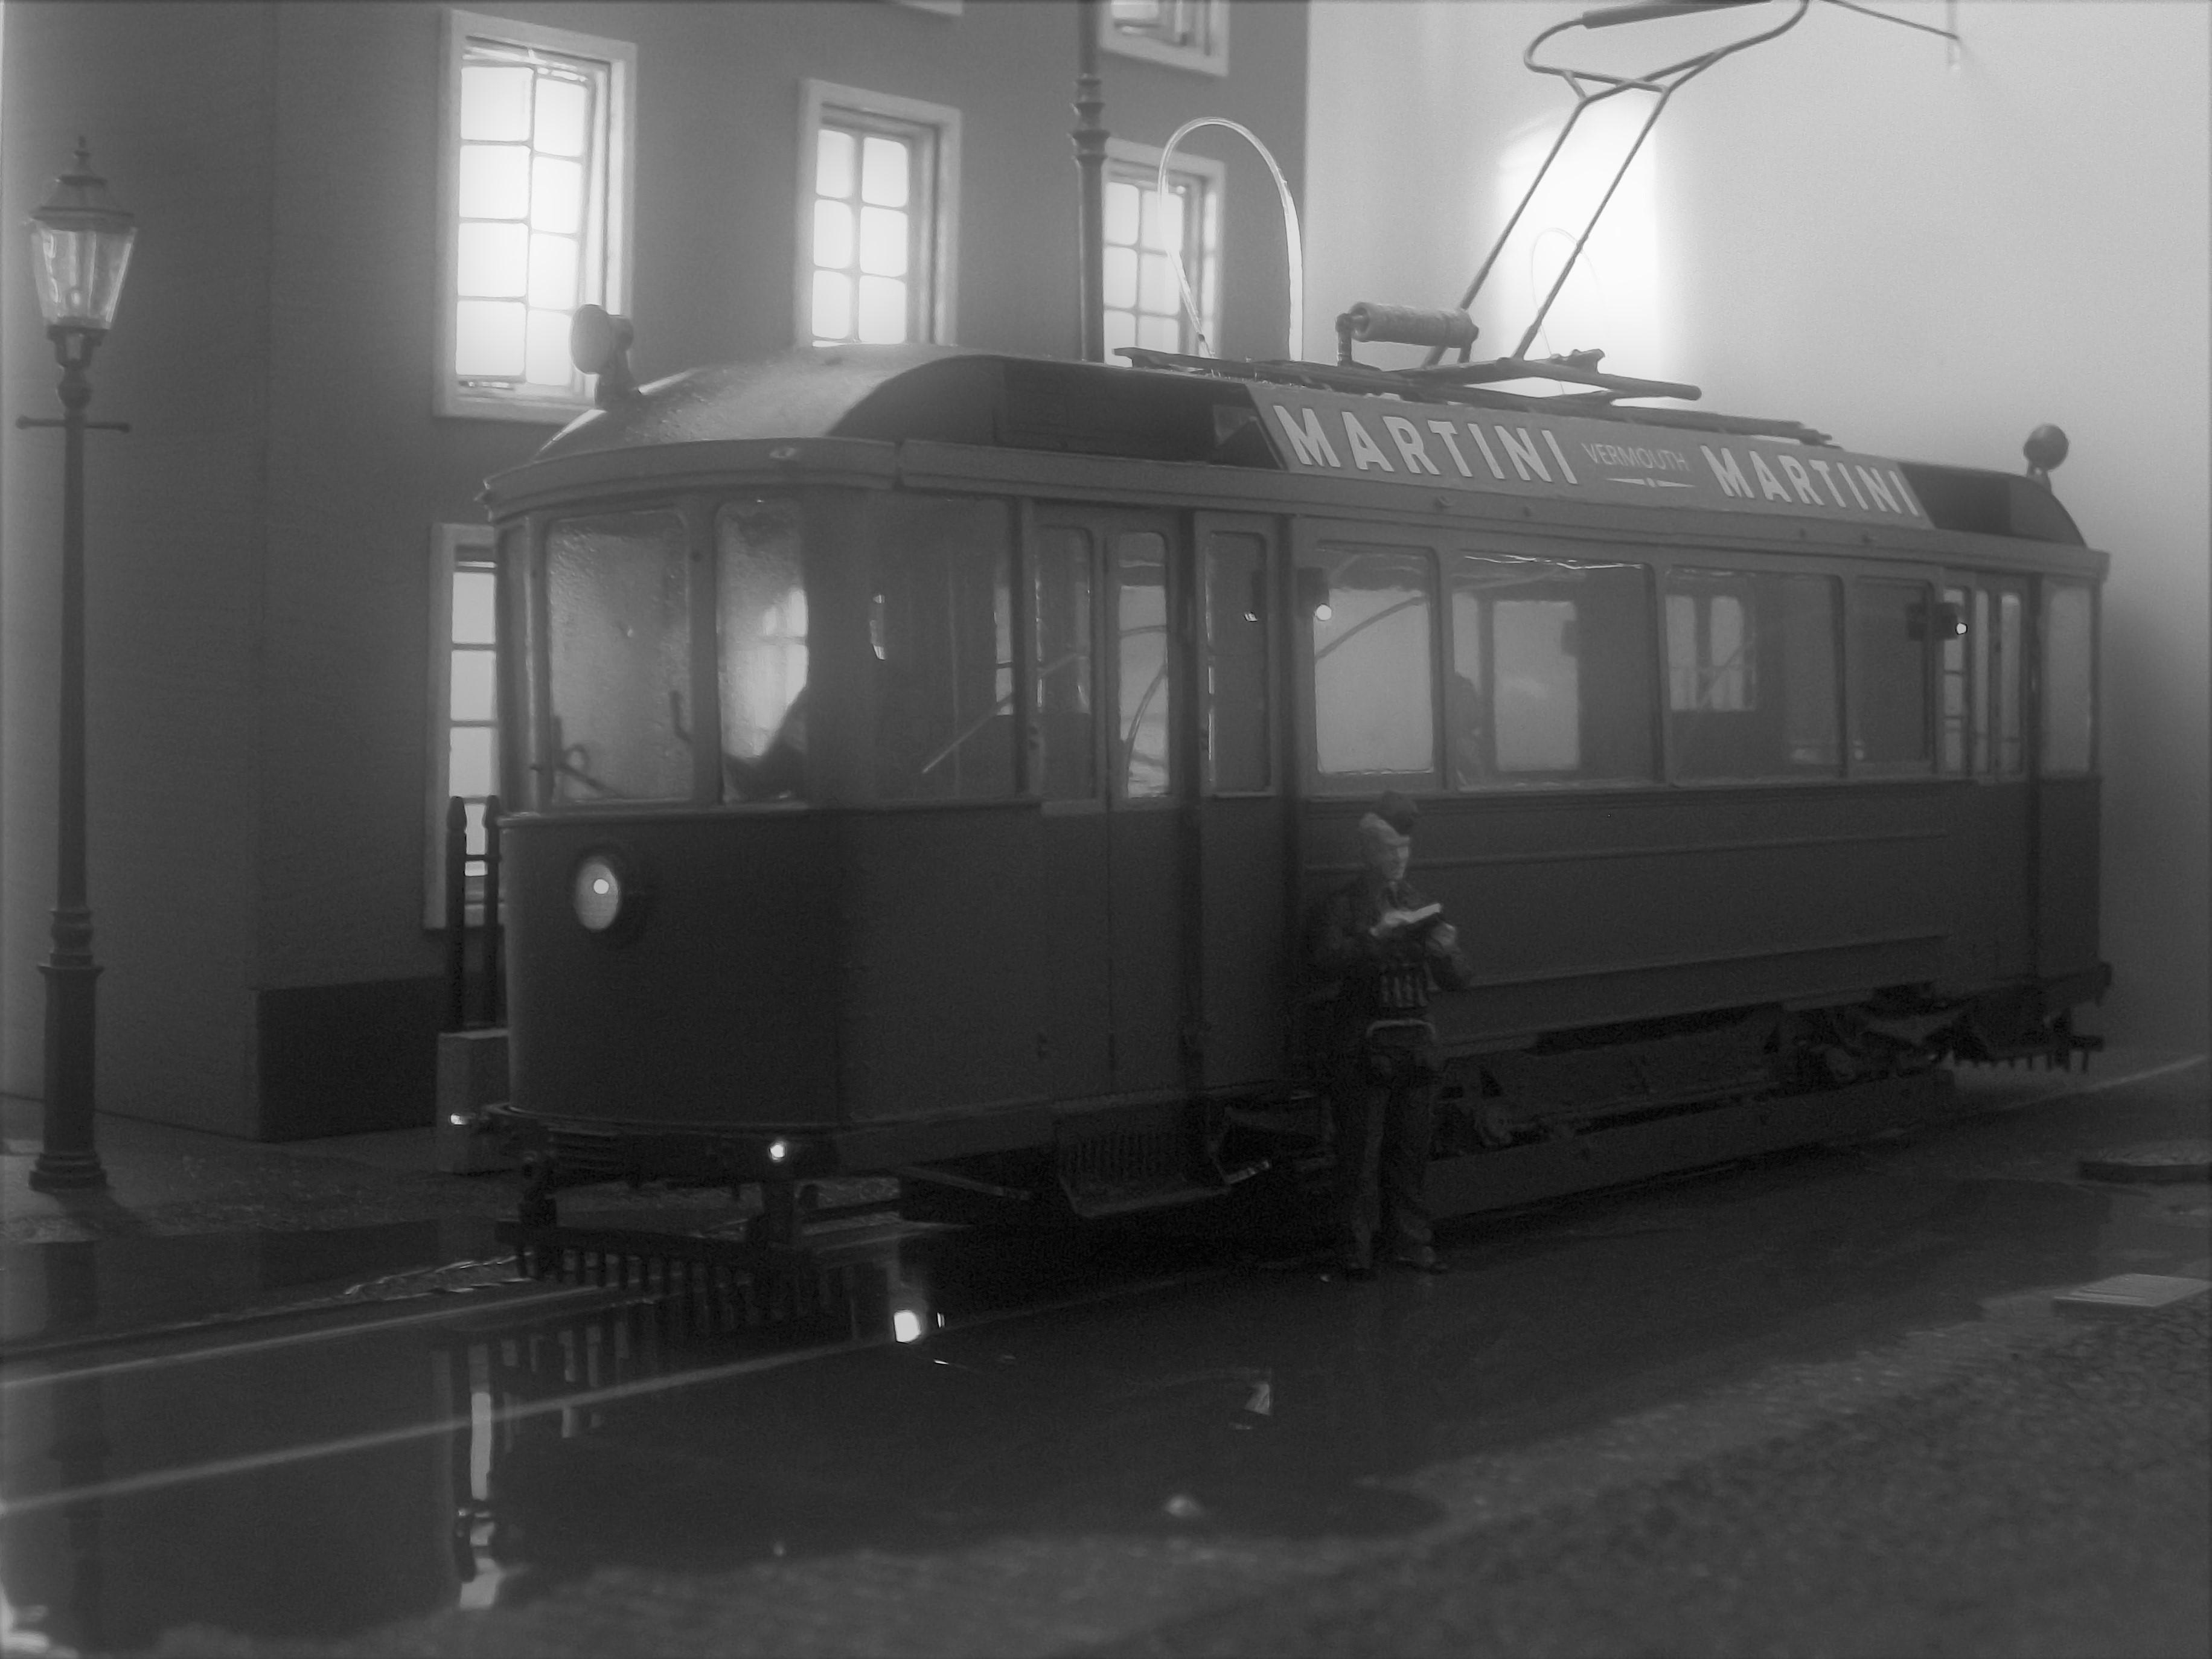
Just a few B&W photos, this time with added still water and fog effect. The process needs a little further refinement. David
-
Another beautiful crafted scale model Conrad and Yuko . . . . There is so much detail to see, and I am still looking ! David
-
Thank you Pat . . . . I am quite pleased with these early shots, and I am confident that I can create the wet cobbled street effect, such as immediately after a rainfall shower has occurred. The fog in a can is more difficult, and I was struggling a bit with the lighting source and angles last night. David
-
Here are three early experimental photos of the tram car diorama . . . These are B&W shots, with no still water effect or fog effect added yet. Thanks for looking guys ! David
-
How do YOU decide what to build next?
Anglia105E replied to 64SS350's topic in General Automotive Talk (Trucks and Cars)
Now that you have raised the question Karl . . . . I realise that my process of choosing the next build is as follows. I browse Ebay and start off by selecting my criteria for the search as ' 1:24 Rolls-Royce Kit ', then I search for ' 1:24 Spares or Repair ', then ' 1:24 Vintage Model Car Kit ', and if nothing comes up that interests me, I search ' 1:32 Rolls-Royce ', then 1:43 Rolls-Royce ' and various other Ebay searches realting to Dioramas, Figures and Buildings. I don't have much of a stash, nor do I list future builds, which is why I find myself browsing / searching on Ebay. As soon as something pops up that catches my attention, I study the description carefully and think about the price, and then go for it. Much detailed research follows the purchase, so that I know everything there is to know about that particular motor car. When you search on Ebay all sorts of stuff comes up, much of it not related to my search criteria, but the odd kit can be very interesting anyway. David -
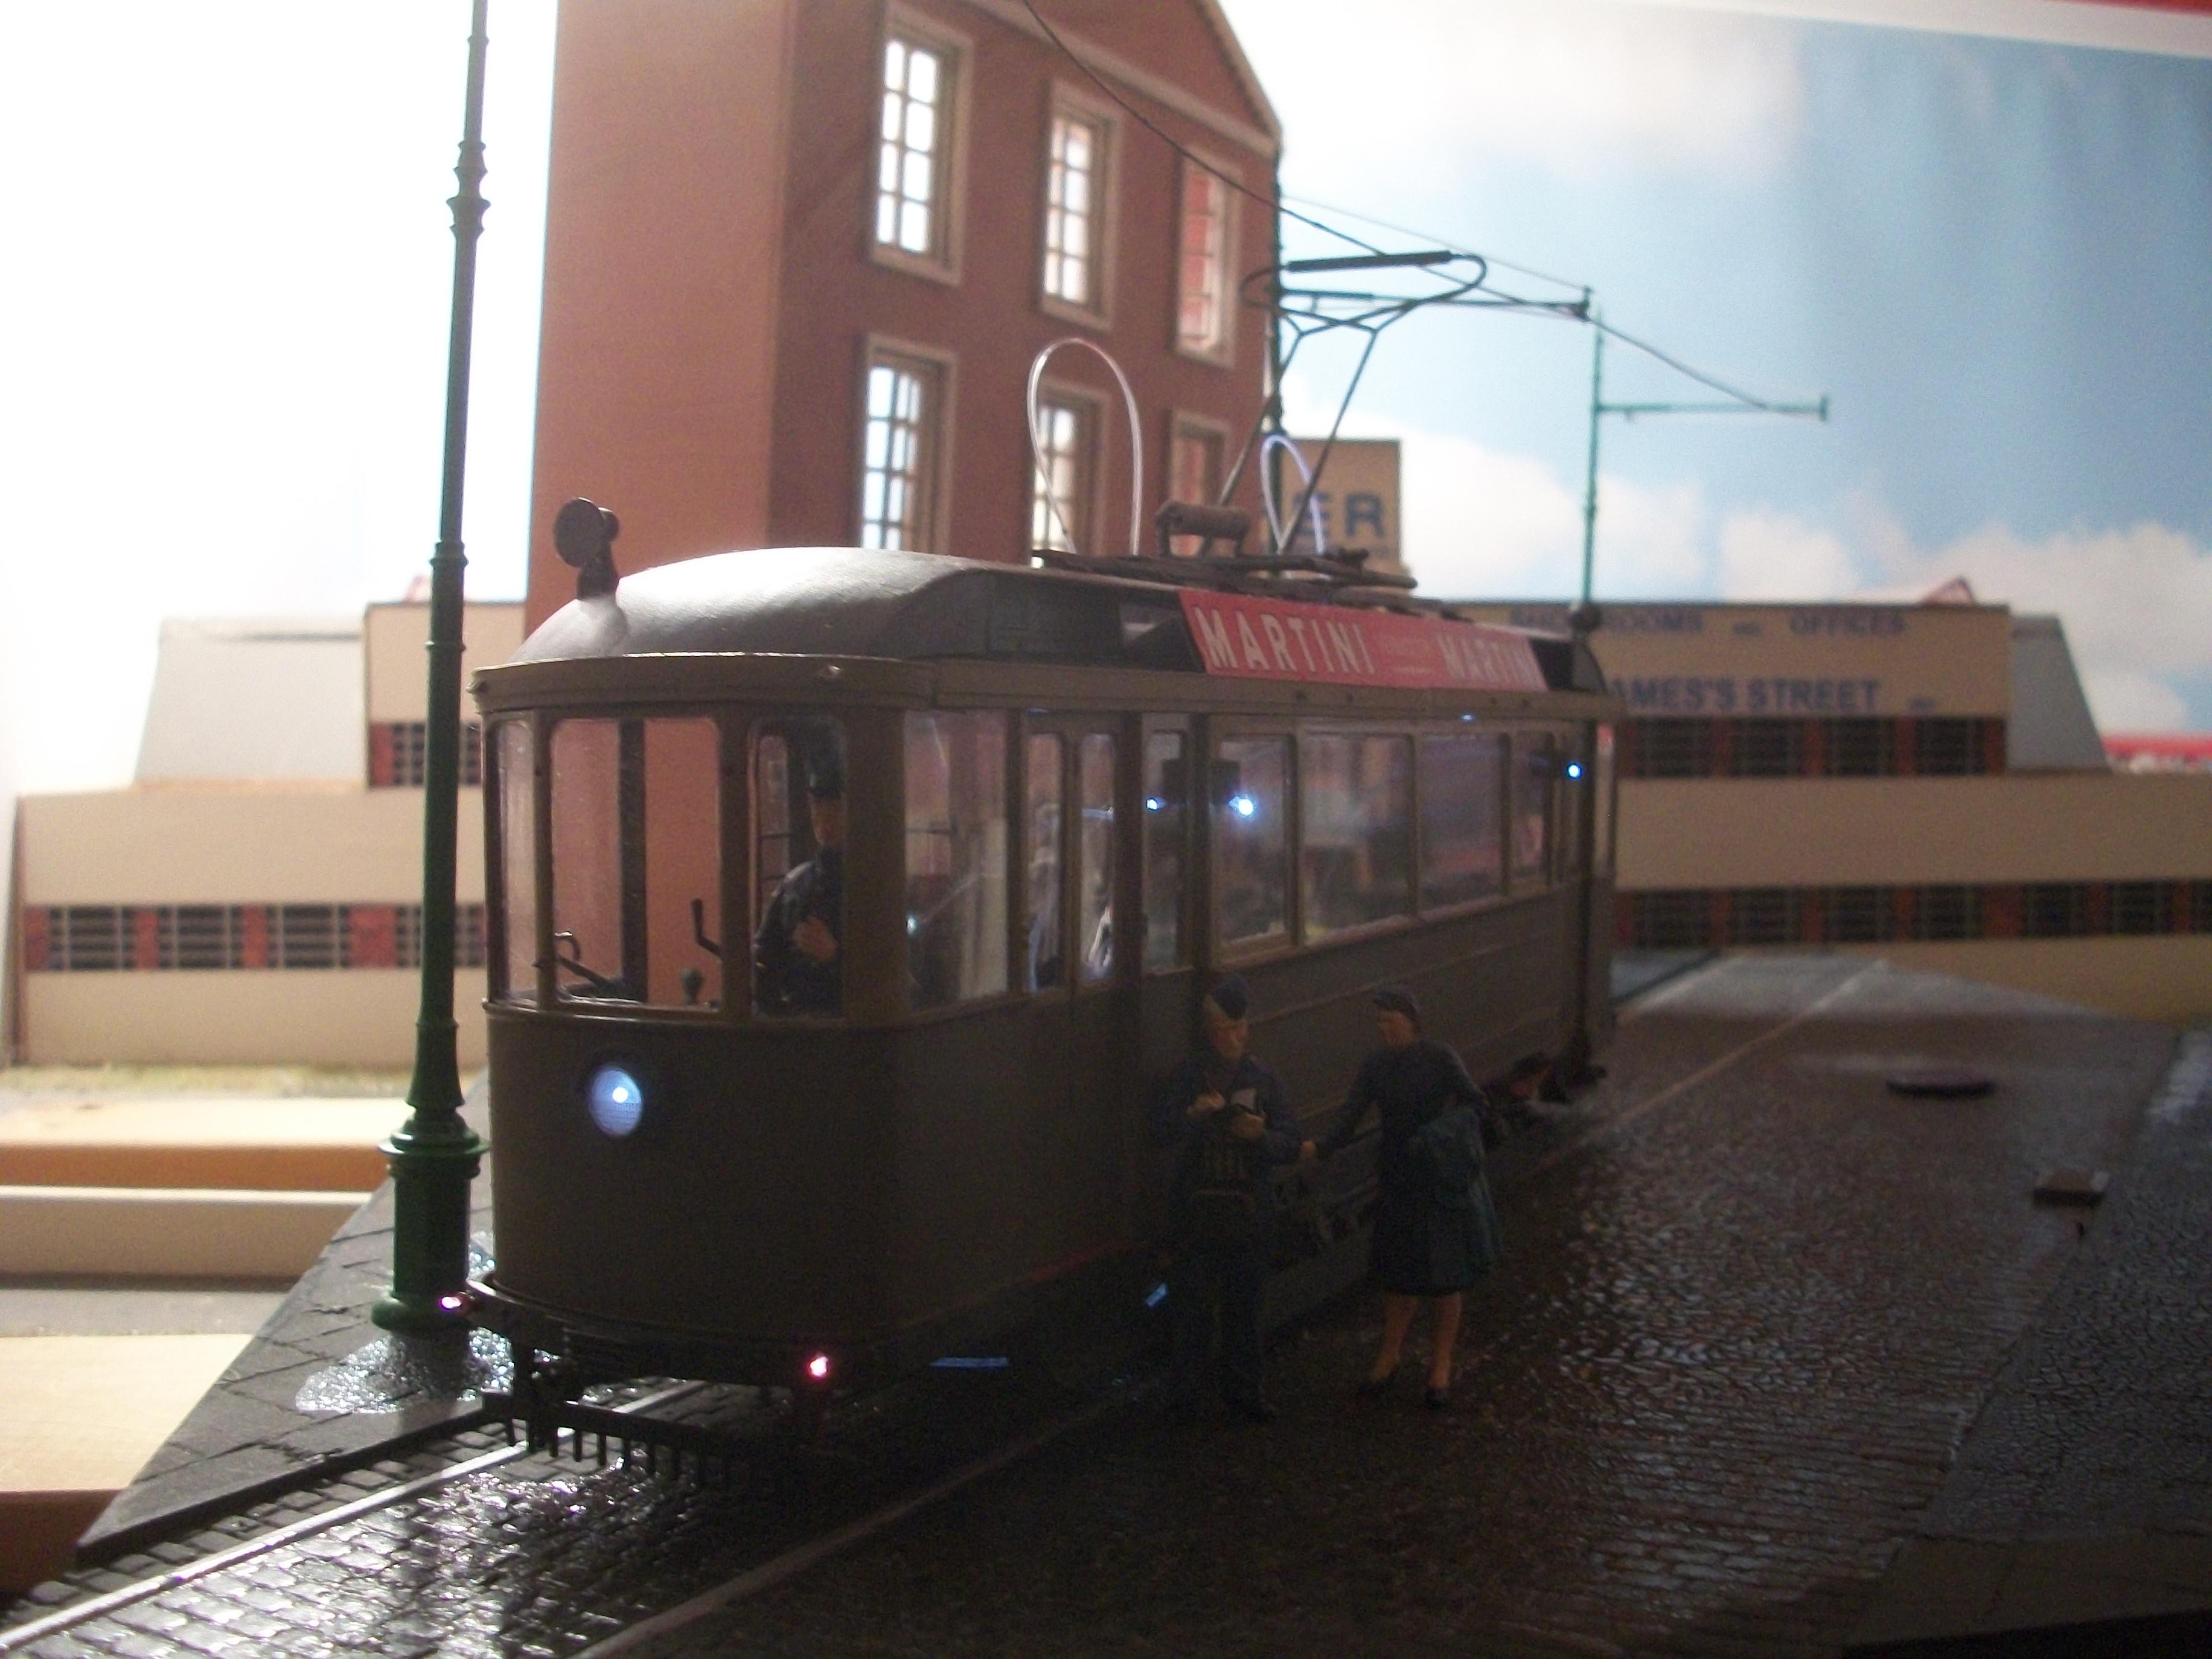
The tram car build is completed, and this one has taken 3 months and 10 days to finish. Now that both the Pyro Rolls-Royce and the tram car are ready, I can concentrate on the diorama and the photography. The Still Water will be applied around 24 hours before the photo shoot, and I shall wait until the canned fog arrives before applying the water effect, and also using the fog effect. The 1:35 / 1:32 diorama has been moved down from the top of the Hooper factory and the attached photos were taken in this new position. There will be some advanced B&W photography, as well as colour photography of this European House diorama very soon, and the topic will be posted in the ' Dioramas ' section rather than in this ' WIP: Dioramas ' section as a completed project. David