absmiami
-
Posts
4,780 -
Joined
-
Last visited
Content Type
Profiles
Forums
Events
Gallery
Everything posted by absmiami
-
 this is fr a Ditzler paint code card that was glommed off the net ,,, I think I got it ..... opposing viewpoints welcomed ...
 -
??? ?? ?????

-
??? ?? ?
-
Model master enamel paint - had good fortune mixing a pale green metallic color on the Cooper FIII last yr - so lets see if i can cook up some Viking Blue - the interior metallic blue is too dark out if the bottle- per the bottle top photo - but with a little added aluminum I’m close - while wet - its a shade darker than the Zero Paints V blue - but it seems to be getting lighter as it dries - we’ll see what I’ve got in the morning - one thing for sure - the silver metal flake is much more scale accurate than the Zero …
-
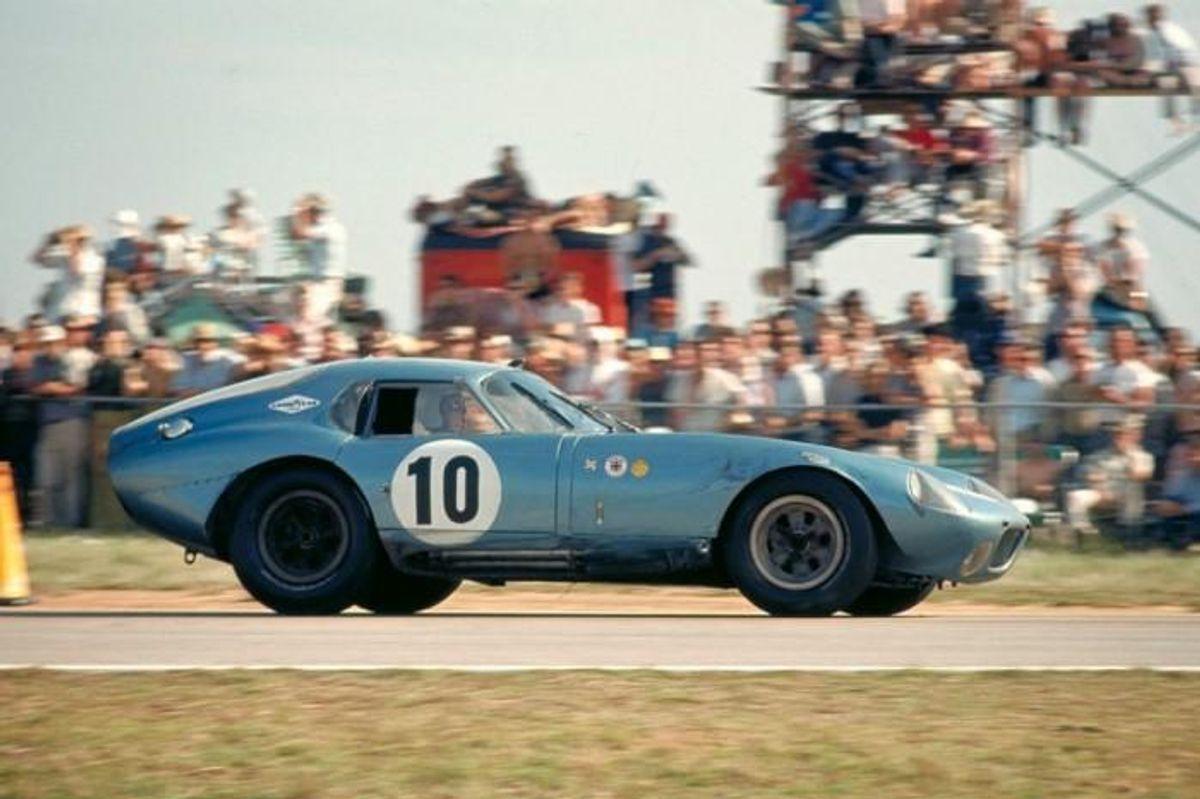
By the way - the Lemans shot you’ve posted is the best shot of the Shelby team Wheel jacks that exists …
-
By the way G …. The finish on the wheels - appears to be titanium - ish - but maybe with aluminum rims - the whole thing looked dull and tired after a few hours at Sebring …. Agree ?
-
Stay tuned Gramps … got some more work for you … gonna post a mix of Model Master enamel paints tomorrow - and we’re gonna have a stare down of Model Master vs Zero ….
-
Hiro Boy zipped me some Zero Paints - DHL - expensive but nearly the speed of light - here’s the Viking blue - what do you think ?? i think the color is very accurate - but im a little unsure - the metallic is a bit overscale ?? Always a problem the metallic finishes in scale … i think it will look great from 3 feet away but maybe not great in close inspection …. ???
-
And Archer made very good decal sheets - Woody has just closed the storefront side of his site - but the sheets will be available fr some on line sellers that have stock … and Micro Mark sells some sheets too …
-
Doors off - and trunk … very nice …
-
Bob Breslauer’s Scale Hardware produced .05 rivets in brass and nickel - stocks are limited now - they will soon be unobtanium - but 2287 is a worthy project for my last stocks …. There are some others that are gettable now - but the price point is not so good …
-
Published as a softback in ‘94 - this book by Friedman is still the best source of color shots of the ‘64 season - think it is still available …. Lots of good shots of the Viking blue team cars at Sebring - no shoulder belts are visible - think all the team cars used lap belts - Pierre gets this right on #1 …
-
Thats one of the best color shots - afx researched this and posted a link to a site that states that the Shelby team painted their cars Viking blue in ‘64 - before agreeing to a color change in ‘65 at Ford’s request - when i get the Zero paints Viking blue ill post a sample and we’ll see …
-
The blisters were riveted onto the fenders - so once everyting is sanded to an acceptable shape - ill drill the rivet holes and place some rivets …
-
Also - have to remove as much of the fender flares as i can w/out losing the shape of the wheel arch - 2287 had no flares - another unique feature of this car …
-
Speaking of spoons - the blister behind the rear wheel appears to have been a Pete Brock aero trick to direct air behind the fender and then out the crescent shaped openings in the tail - to keep the tail planted at speed ?? Maybe it didnt work - none of the following Daytona Coupes had this feature - and 2287 lost its blisters - when ? - after its Bonneville trials - maybe before or when Phil Spector aquired it - so even though the Simeone car is preserved - or unrestored - it is not as raced in ‘64 - thats okay …
-
Ok. Ok. Now i understand why you took the trouble to replicate the backside of the license plate …
-
Andrew - this looks like a good choice for a first resin …. Clean up the flash and throw on a coat of primer - now you can find all of the other casting flaws - then sanding sticks - some more primer - pay close attn to the trim and fit of the “glass”… and think about adding Mr Clark - in or out of the car …. And the kit should come w a roll cage - if it doesnt - that would be a good addition …
-
Phil - just want to be sure you know that Team Lotus had a second Cortina entered - for Mike Spence. - it was a no show - but it was entered - so it counts - would like to see you do it w the engine - just sayin …
-
Well done Pierre - added some special sauce with the becassa picture app …
-
Pierre - keep checking Model Roundup for the Ferrari - i got an austin Healey kit fr their site that I’ll add to this thread …
-
Spoon credit to Steveracer …
-
Back to #10 daytona coupe - on the sebring camaro build thread that smiles has - there is a good suggestion to shape fender flares using plastic spoons - i had forgotten how useful these little devils were ….