Misha
-
Posts
1,014 -
Joined
-
Last visited
Content Type
Profiles
Forums
Events
Gallery
Everything posted by Misha
-
Great technique and tip for the pulleys plus great detail on the engine! Thanks Misha
-
Thanks everyone for your kind comments and encouragement. Looking forward to be back at the bench after the holidays down here in Scottsdale. Cheers Misha
-
For the first time in quite awhile I can post a completed year end build! While I have a ton of WIPs, getting one into the display case has been a struggle. Usually it's the process rather than the result for me. So I was very happy to complete this pair based on the Tony Nancy rail and the 55 Chevy pickup. Together they depict the LaBelle Speed Shop from California back in 63. I was so pleased with the result that for this new year the plan is to complete a number of my Duece WIPs, ranging from a five window rail to a salt flats roadster, and a couple of T's. Hopefully you'll see the efforts at this time next year. Happy New Year to all, Cheers Misha
-
 While I haven't tried the product, I do feel that the forum is set up to help each other. I would like to know of other modellers experiences, for truly that is the best way to learn. By sharing information we can save a lot of grief that others have discovered or found a way around a problem. I hope to see others chime in with their experiences, rather than suggest that one try it out themselves. The forum exists so that we do not work in isolation. Cheers Misha
 -
I use the tiny ziploc style bags used by jewellers with a note describing what the part is and the kit it's from. From there it's into metal Twinnings tea containers labeled "Intake Systems", "Ignition Systems", etc. Only problem is I'm a coffee drinker, so there's a lot of loose tea around the house! Cheers Misha
-
Dodge Challenger Hellcat 1/25th
Misha replied to MG Brown's topic in General Automotive Talk (Trucks and Cars)
I would certainly be interested, and would buy one or more if it were full detail. I've had a look at the pre-painted kits and am not impressed as its like working on a jigsaw puzzle. Those kits may be good for novice builders or young kids, yet for me, I prefer the challenge! (No pun intended) Cheers Misha -
Fab job Jason, looks like it's ready to turn a few laps! Good to hear about the decals, with your great paint job it looks terrific. Now that the 240 is listed to be reissued it'll make a great stable mate. Would be great to get alternate decals for the 510 for other BRE schemes. Jason, you've spurned me on to move this kit higher up on the build list. Cheers Misha
-
Great job Gordon! Your paint skills really come to the forefront with the subtle shading giving greater definition to Mr. G's body (it's a lot of area to cover). The Roth and Wierd-O figures are such a treat in allowing for greater detail and diorama displays. I've had the good fortune to view Gordon's work and his skill with these kits is amazing and inspiring! Thanks for your work, Cheers Misha
-
Hi Bill, While I've been building for decades now, it's only recently that I've begun posting some of my work. My experience so far is that it's a great way to encourage oneself to keep at the project. It's exciting to photograph the progress, post it, and then begin receiving feed back. I also find this forum to be friendly, with thoughtfull comments. It also improves your skills much in the way that joining a club does. Modelling is a solitary experience, so sharing your work is always a thrill, whether by way of a show, club meeting or here on th e forum. I would say, go for it! I would very much like to see how you approach the S&M build. Cheers Misha
-
Congrats on a beautiful build! Been following your work on this one and it's great to see all the correct details on this iconic rail. It's a beaut! Thanks for showing how it ought to be done. Cheers Misha
-
Thank you to all for the comments on the LaBelle team! It's wonderful to have such a positive feedback. Thanks to Dave, he nailed down the exact look I was going for, a shop truck that has been rodded yet still has a daily job. The Baby Moons really do set it off right. The rail, if one is patient, isn't that big of a challenge, especially with CA glue. Glad to see the Tony Nancy kit is being re-released. The weekend was a gas! It was great to see a lot of old friends. It was also an opportunity to peruse the dozen or so vendor tables, picked up a few cool items, including an original front bumper and headlight casting for the 65 GTO along with the rear, the Dick Tracy 36 Ford (for a roadster version, the door seam is in the correct position) and a couple of bags of old AMT trophies. Won a Honda CRV kit in he raffle, gonna head to the beach in a surf version, maybe. The entries for the show were truly amazing, some amazing paint jobs, plenty of imagination, and top notch building skills were on display. This year saw a change in the organization as an NNL style was adopted, with awards based on the votes cast by entrants. There were no placings for each class in an effort to make it less competitive, not entirely my style..nonetheless I received ,any gret comments from fellow modellers on my work. Overall a very pleasant Saturday. Thanks again for all the comments, Cheers Misha
-
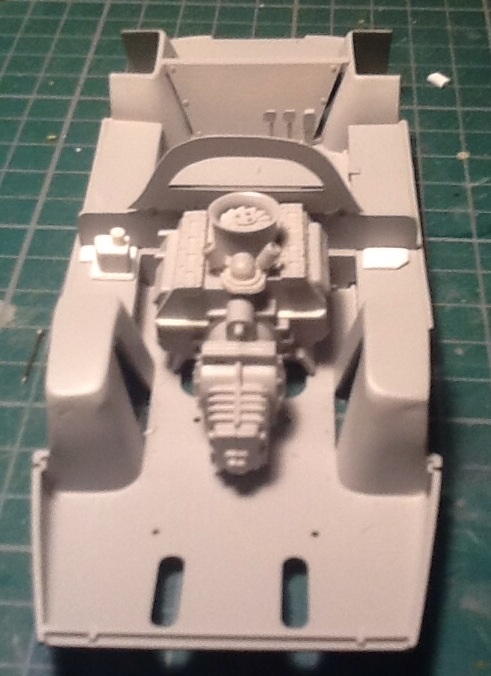
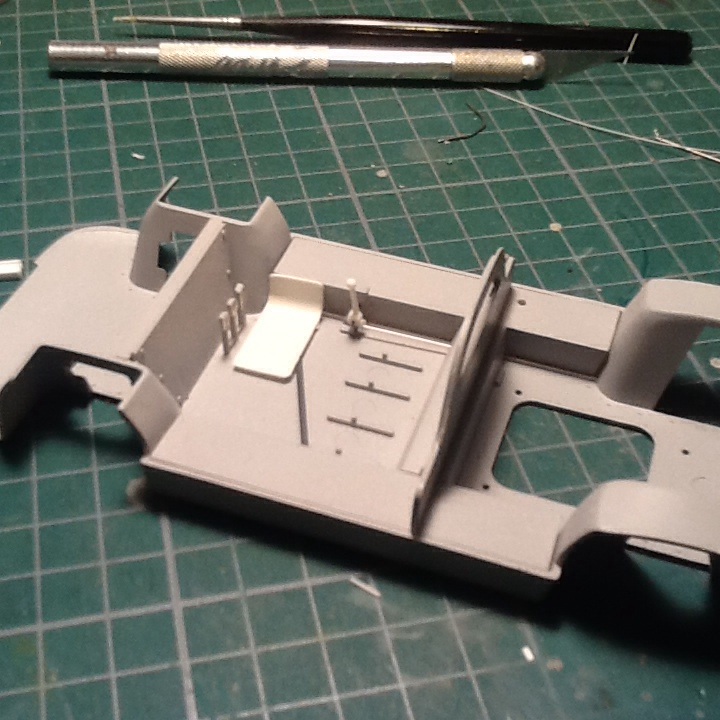
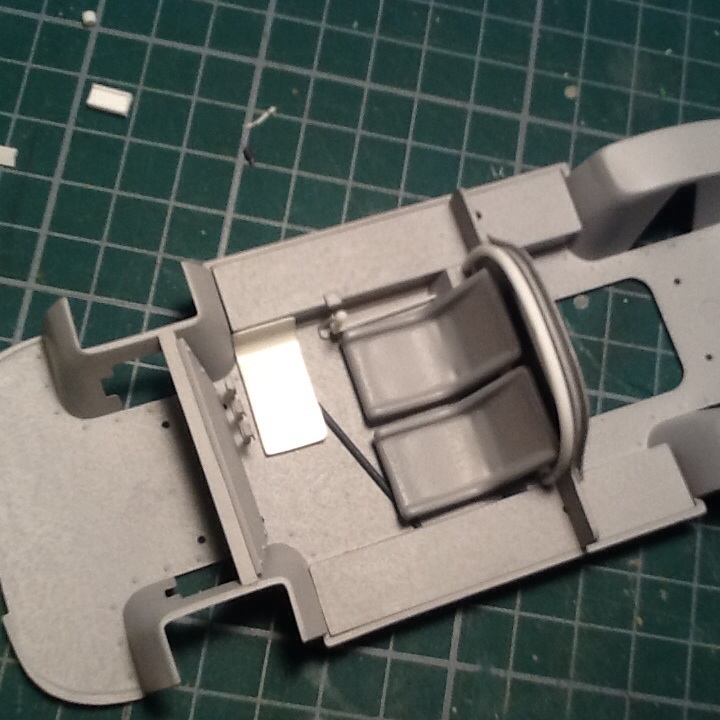
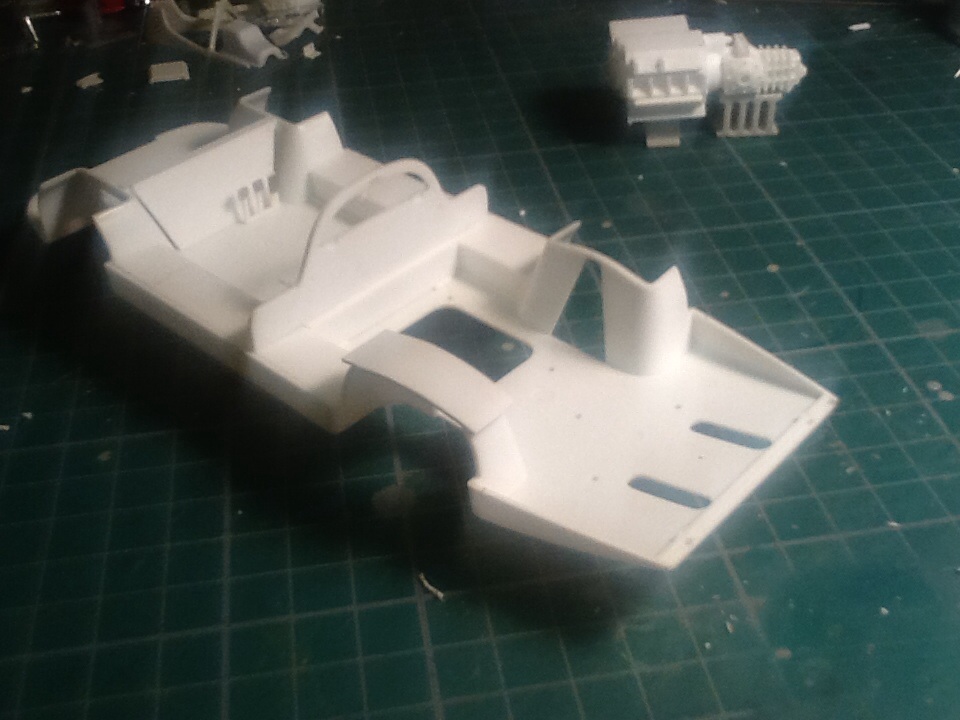
My first Under Glass posting of the LaBelle Speed Shop team from 1963. It features a period Jr. Fueler rail along with its push vehicle, the shop's parts chaser, a tricked out 55 Chevy Stepside with a warmed over 409 with dual carbs. In keeping with the period, all parts, such as a generator, are 63 or earlier. The Jr. Fueler roadster T body and rail come from the Tony Nancy kit, the SBC, including the injectors is from the 55 Nomad and is wired and plumbed. Timing cover is from a 63 Vette. PE safety belts along with a detailed interior with added bits and wiring. Metal finishes are Testor's Metalizers. The 55 Chev Parts Chaser features a 409 from the 62 Chevy with valve covers from the Trophy Series 57 Chevy, along with its bench seat. The engine is also wired and plumbed, metal finishes are Alclad. Satco whitewalls are fitted on steelies with Baby Moons from the 56 Vicky. The tonneau cover is modified from the 53 Ford F1. My main accomplishment is to have this duo ready for tomorrow's annual "Island Classic" in Victoria, British Columbia. Early tomorrow morning I'll be off over the Malahat pass with my entry! Cheers Misha
-
Wheel Part Pack brain storm...
Misha replied to Luc Janssens's topic in General Automotive Talk (Trucks and Cars)
For a different treatment for nostagia or rat rods, it would be great to see the commercial wheels and tires from the 37 Ford pickup or delivery panel. Sanding the backs opens up the spokes which looks bang on. Cheers Misha -
Edurance Racing Group Build (Official Thread)
Misha replied to mikevillena's topic in Community Builds
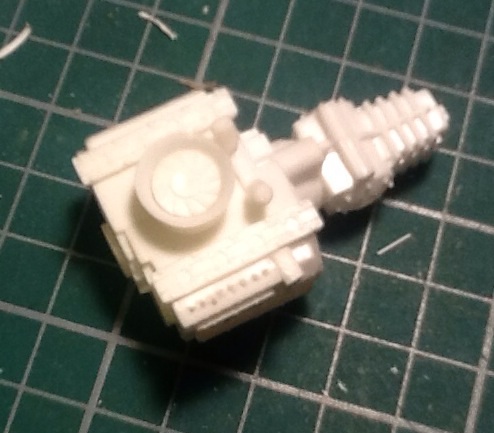
Creative gizmology and scratch building! Sun is shining so workbench doesn't get as much attention. Been carving and cutting plastic to have the Porsche 907 resemble more closely the prototype. After priming the body tub and good portion of the engine I've added detail to the crankcase shroud horizontal joint, and have begun the fuel pump and pickup arrangement on the starboard side and the fuel filler pipe opposite (need to pick up some heavier gauge solder). Inside I've added the drivers heat shield on the floor and up the side (these cockpits were notoriously hot, with the first "cool suits" being used here first!), a more accurate shifter arrangement with linkage running to the back, and a floor supporting brace. Later will come the fire extinguisher, windshield fluid bag, fuse panel, plumbing and driver's harness. Cheers Misha
-
Edurance Racing Group Build (Official Thread)
Misha replied to mikevillena's topic in Community Builds
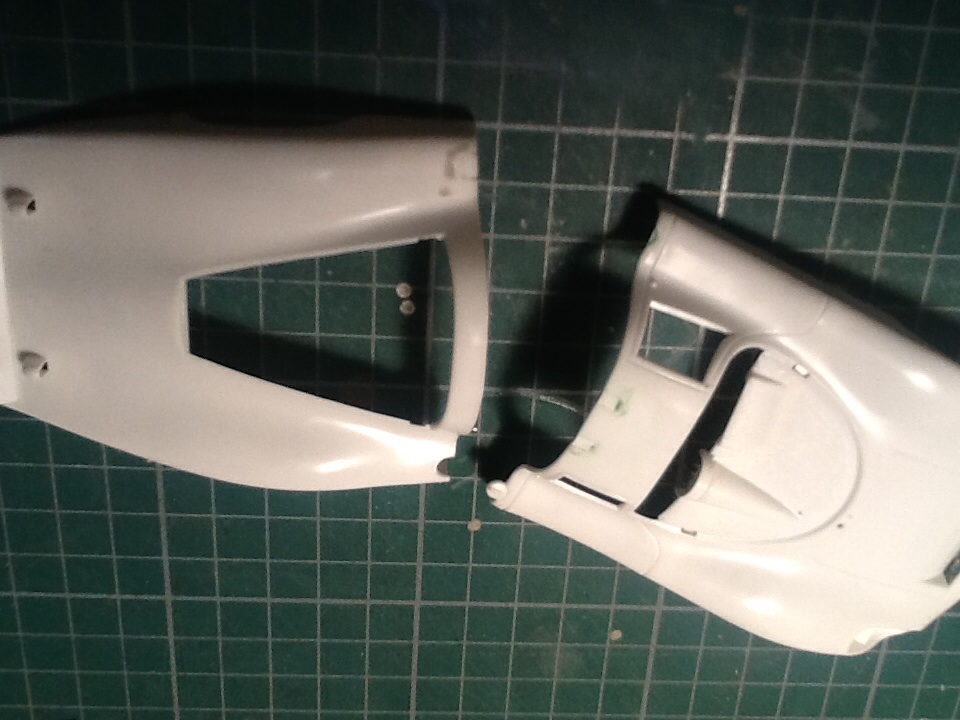
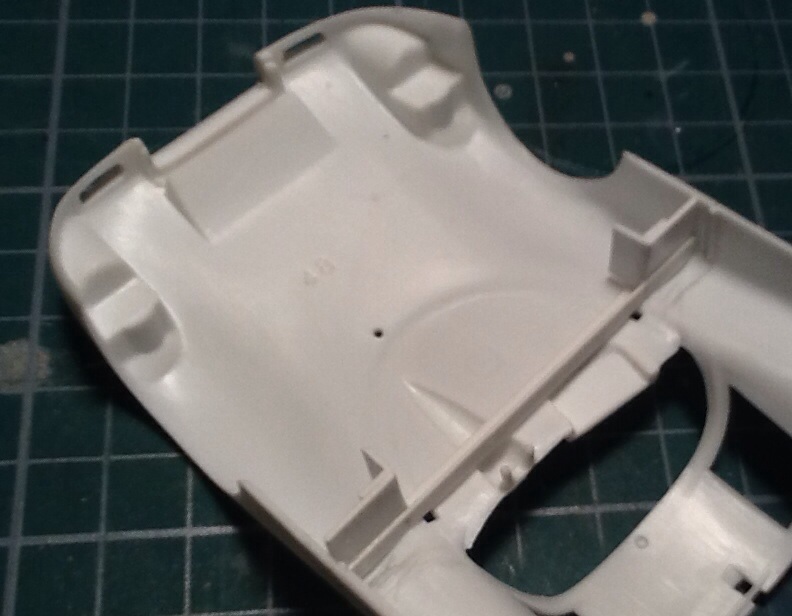
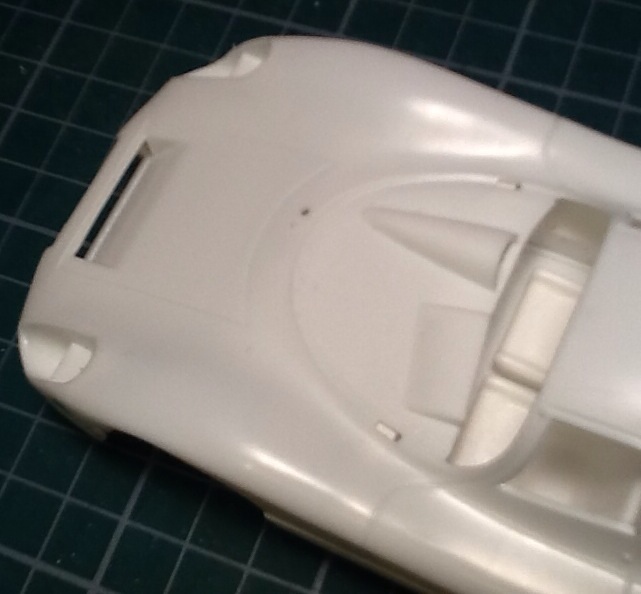
It's been a busy summer, yet with September in swing it's time to get back to the workbench! Spent the long weekend getting the body ready for primer. The first task was enclosing the rear wheel wells by filling in the top of the arch. Another item was to construct the small wells for the rear body latches. Using the razor saw I made cuts in the body sides followed by installing small pieces of plastic channel to provide the well depth. A major problem was the gap between the front body shell and rear firewall. The solution was to place a thin piece of styrene halfway up the firewall and using a file card template to cut the curve and window opening. To complete the basic interior structure, I detailed the small instrument housing, the switch panel to the left, and positioning the steering wheel column. To complete the body shell the wonky hinge arrangement, completely wrong and out of scale, was eliminated by cutting and filling. Other body imperfections were also filled and sanded in perpetration for the primer. Did a mockup of the pancake engine with the existing kit parts which illustrated the lack of detail when compared to photos of the actual engine. The instructions provide for a 907 or a 908, neither of which was accurate. Using a combination of parts I fitted the injection pump and scratchbuilt the pulley attachments. The two part fan and housing lacked a proper base that was solved with a shaped piece of plastic. The fan was detailed with Grandt bolts and nuts. This assembly will be finished in raw fiberglass. The dual distributors are very basic, lacking the engine housing running in between them; this was easily replicated with bits of plastic. Finally, after a quick wash and scrub, the parts were ready for primer! So here are the top body parts in primer!!! Still have a couple of sink holes in the nose section, having filled it with Tamiya putty. Otherwise it has turned out well, and leaving the coat to cure for a couple of days will allow me to begin masking in preparation for applying the white top coat. It's fortunate that most of the inside of the Porsche were sprayed a grey primer over top of the raw brown fiberglass, as the colour matches my primer. There are a few smaller parts that will be in that fiberglass colour. Thanx for looking, Cheers Misha Sorry got the snapshots out of order...
-
`70 Plymouth Cuda "AAR" 340 + 6 pack-Revell
Misha replied to 69NovaYenko's topic in Car Kit News & Reviews
I heartily agree Greg! The AAR would round out the kit offerings, almost like the old 3 in 1 kits of my youth 'cept now you build all three. Then Revell can focus on more brand new toolings. I'd much rather get a new kit, rather than repops, especially at today's prices. Cheers Misha -
Sorry, one is a 65 that was recently repopped in the original issue box, and the 66 is much more simplified compared to the 65. The earlier one has a detailed chassis and opening hood. So the differences are major, go for the 65! Cheers Misha
-
Since Monogram has released the Deuce and T- Bucket in 1/8 scale, I would like them to repop the engine kit with all the various options. It been tempting to get an original, yet the price remains a bit high. Is this mold still available? It would spurn some more sales for the other two kits! Cheers Misha
-
Datsun 510s
Misha replied to Austin T's topic in 1:1 Reference Photos: Auto Shows, Personal vehicles (Cars and Trucks)
I do believe that the wagon did not have the independent rear suspension, using a solid axle instead. It's a detail that one may overlook perhaps in order to use the sedan chassis? Cheers Misha -
Edurance Racing Group Build (Official Thread)
Misha replied to mikevillena's topic in Community Builds
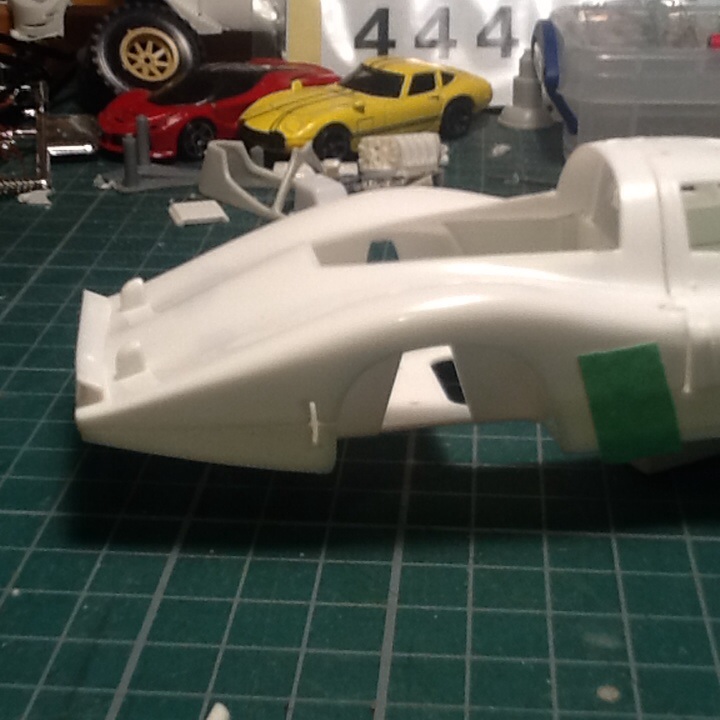
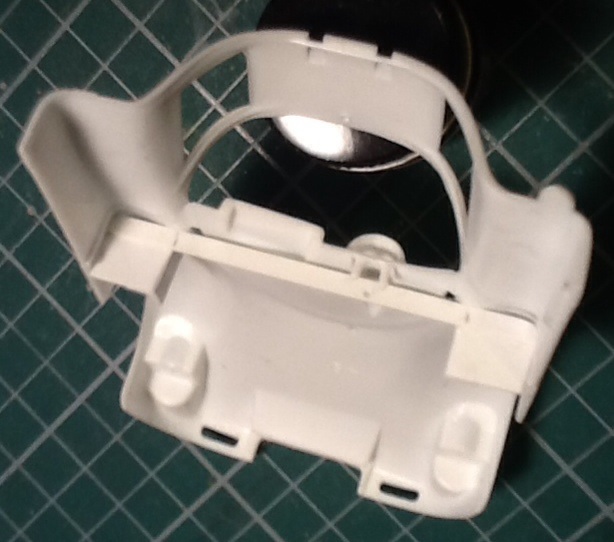
Porsche 907 LH / Fitting the pieces together... With summer at its height it's hard to get to the workbench. Been busy with fitting the parts, constructing sub assemblies, and detailing major body parts. The simple approach by Heller to the interior spaces has required the addition of bulkheads between the leading edge of the doors to the front wheel well. This area is very visible thru the huge expanse of glass and provides mounting surfaces for electrics, hose connections, fluid bag and fire extinguisher. I scratch built the bulkheads into the upper portion of the front body shell. Also hollowed out the small instrument dash to accept a panel with tach and engine vitals. The moulded in front grill was removed to be replaced with a PE piece. Pedal detail has been enhanced with PE as well. Still need to construct the shifter assembly to fit between the driver seat and right side bulkhead. The left gas cap was removed and the resulting hole in the rear body piece was filled. The front suspension was dry fit, it's toy like workings being very apparent. The addition of brake callipers and brake lines will help as will detailed painting. The wheels require air valves and come unplated saving a step. Looking ahead at the engine assembly, Heller has provided a delicate injector assembly with stacks, a rack and injector pump with pulleys, top, two part cooling fan and two angled distributor bodies. Keeping the stacks on the sprue as they require small holes to be drilled into each one, at the same angle, to accommodate the fuel lines from the pump. Going to begin prepping for the primer coats to go on. Then sorting the parts for Alclad finishing. Still have a few fit issues to solve, main one is the huge gap between the firewall and front body when it's fitted to the belly pan. Progress is a bit slow now, yet the forecast is for clouds and rain, so that means more workbench time! Cheers Misha
-
Congrats Phil on building a great replica, plus meeting PJ and having him autograph the model! Cheers Misha
-
Hi Michael, Thanks for solving the kit's origins. I took a closer look with these ole eyes and spotted, emblazoned on the interior of the belly the Heller brand logo! Brought to mind building my fair share of Heller 1/72 aircraft, often obscure French types with gorgeous camo schemes. They offered next to no interior detail, yet displayed delicate fuselage surface detail and good fit, always a bonus. Their replica of the Porsche 907/8 follows much in the same tradition. I've recently posted an update in the Endurance Racers Community Build thread, please have a look. I pulled out an old Heller build out of the cabinet, a Bloch 152 in 1/72. It has a scatchbuilt interior, vacu formed canopies, gunsight: all before photo etch, just basic modelling skills, plus imagination.
-
Edurance Racing Group Build (Official Thread)
Misha replied to mikevillena's topic in Community Builds
Porsche 907 LH Caution: Rather long entry... Having had time to closely examine the Heller kit of the Porsche 907 Lang Hang (re-popped by Union) and performed some basic construction steps, I'm very pleased by this project. The web provides a wealth of visual references which allows modellers to accurately depict a certain vehicle, in this case chassis #005, that won the 1968 Daytona 24 Hour, with two other 907s placing second and third. The various auction sites are great for detailed "Walk Around" photos, perfect for gearheads! One also begins to notice various details to improve or correct the model. Overall impressions of the kit are positive. The body pieces have very minimal mold lines; most of them are found on the edges. They are also very delicate and thin, with very fine detail displayed by the rivets in the belly pan and the fine Dzuz fasteners on the hood. Ejector pin marks are quite widespread but will be mostly hidden from view and those that require work are easily dealt with. Only serious sink marks appeared on the nose sides, again a case of Green Stuff and Mr. Surfacer. The fit of the three main pieces are generally good with the exception of the lower leading edge of the rear piece (the one that doesn't get glued) where it meets the rear of the door and belly pan. It spreads out some what. Fitting the rear window appears to help, though the solution seems to fit pins, so the piece fits when closed. The only major discrepancy I've discovered is the extra refuelling cap on the right side of the fender; it doesn't appear in the photos. The major issue with the kit is the sparseness of engine bay detail. The fuel caps in the kit lead to nowhere, just empty space when the rear is lifted. The photos show the right side space to be occupied by the fuel pipe to the tank and all its extra hoses for venting and overflow. The opposite side is occupied by the fuel pump and assorted lines leading to the injection pump. All of that needs to be scratch built. The overall lack of detail in the engine compartment is furthered by having the rear body work removable or posed in the open position. If this were a curbside, I would say bravo, for the expansive rear window does show off very good detail of what is seen; once you open the body work, it's a disappointment, and a challenge!!! Enhancements to the body will be to add release catches for the rear body work just aft of the rear wheel openings; to remove the front grill and replace it with photo etch; and to detail the rear spoiler which has been somewhat fudged by the support struts added, and the omission of the release catches just below the spoiler. The lack of detail is extended to the pancake eight cylinder engine. The construction is very basic with most of the detail spent on the top with individual injectors, fan shroud, and rudimentary dual distributors (2 plugs per cylinder!). Paint detail is also poor, missing completely the raw fibreglass light brown required. The remainder of the engine bay has the basic tube frame and venturi stacks for the airscoops that lead to nowhere. Luckily a poorly lit photo of the Porsche garage offered the solution showing long air hoses leading forward to each wheel well for brake cooling. The front and rear suspension setups are also very rudimentary, with the front having toy like workable steering! The front will mainly be hidden by the fixed body work, yet the rear will require some basic additions such as a sway bar, again very evident in the web photos. The rotors lack callipers, not outside the skills of most, yet its always so nice to have them, and we've become accustomed to having them. The tires are decent, nameless, and exhibit nasty attachment points that ruin the tread pattern. The wheels, thankfully are unplated, in fact there is no chrome sprue in the kit (saving me a step with stripping). The only serious flash in the entire was evident in one of the wheel castings, yet a fresh #11 took care of that. The interior is also on display through a huge expanse of windshield and side windows. While the actual racer is quite sparse, there are a couple if items to look at. The photos show and incredible amount of detail on the side bulkheads, ahead of the door openings. There are a number of hoses, what appears to be a windshield water bag, fuse box and wiring, all quite visible. On the kit the entire bulkhead structure is missing, with open space to the front wheel wells. In addition, the kit positions the shifter on the bulkhead next to the driver (the fuel tank, I believe?), while the prototype has the shifter and its linkage in the open, next to the bulkhead. Both are acceptable modelling tasks to add detail (oh, but I wish...). The transparencies are a work of molding art, especially considering when this kit was engineered. The rear displays delicate open, yes open louvres, along with the large top louvres. This is the only piece I have trial fitted and it did so beautifully, in fact it will help strengthen the entire rear body work. I'm hopeful that the front windscreen and headlamp covers will fit as well. The headlamp lenses are also included, as are clear rear lights, rear view mirror, injector mesh covers (for the 908 model, yet I've discovered a use for them!), and the firewall window. It's this last piece that will require a bit of detailing, as the sliding panel was missed altogether (imagine that it was for cooling the cockpit by allowing greater air flow. The drivers wore NASA style cool suits to combat the high interior temps due to oil and water lines running under and around them. A first for motor racing, later adopted by NASCAR and others). The decals provided offer the markings for the Chassis #005 that won at Daytona, Porsche's first endurance win, and a second set of marking for the alternate 908 model. Considering the age, I'll scan them and then spray a decal preservative before attempting to use them. Thankfully the markings of the day were very minimal. Imagine I'll replace some of the Porsche crests with newer. better registered sets. Thank you for staying with me for so long! This serves as an intro to the project and will now be followed by more WIP style entires. Cheers Misha -
Well, got the rule, dividers, paper and pen and here are the results... It does appear to be somewhat undersized; overall length is 179 mm (as opposed to 194), width is 64 mm (72 mm), yet the overall height 41mm (39 mm) and wheelbase 95 mm (96 mm) are very close, maybe the tires are overinflated on mine. The difference in length of 15 mm and 8 mm seems to be significant, although it would still remain a small vehicle. The overall proportions appear correct when compared to photos. Thanks JC for doing the calculations and interest. Cheers Misha
-
Kit Review of Union's 1/24 Porsche 907/8 Joining the Endurance Racing Community Build, I have chosen the Porsche 907 chassis #005, that won the 1968 Daytona 24 Hour, with two other 907s placing second and third. It marked Porsche's first endurance race win. I believe that the kit dates from the 80s, and was part of the Japanese line of Union kits that also had a Ferrari 512 S, Porsche 917 K and repops of certain IMC kits from the 60s. I believe that this kit made its way into my stash from those early days, buying from the LHS. For its age, this kit displays very fine body detail with thin moldings especially the transparencies which feature fine open louvres on the sides and the unique top with its slots. The major downfall of the kit is the lack of detail and basic inaccuracies with the eight cylinder pancake engine and in the rear engine bay. This is especially unfortunate considering the huge expanse of glass in the rear deck. The body is split into three parts, belly pan with the front and rear parts separated at the engine fire wall. The mold lines are minimal with fine detail displaying scale rivets along the underside and textured inside detail. There are a number of injection pin marks, yet most if not all will be hidden from view. The fit appears to be good, so far. The engine is a real disappointment, especially after checking all the great detail photos available on the web. It will require a fair amount of scratch building of details that will extend into the very sparse engine compartment. There is the basic tube structure included, yet there are obvious omissions such as filler caps on the body that lead nowhere, venturi stacks in the back that appear to be under scale and also lead nowhere. The suspension is very basic, both front and rear, and will be mainly hidden by the body work. There are brake rotors, yet no callipers. The front displays posable steering with its accompanying clunky set up. It ought to be easy to add callipers, with brake lines and paint detail that will add to the realism visible under the Porsche. The tires offer decent tread detail with no lettering on the sidewalls. The wheels are in bare plastic (there is no chrome sprue, thankfully as it eliminates a step in prepping for Alclad.) The decals provide for two vehicles, thankfully including the #54 version I'll be building. Because of the age of the decals, I'll photocopy the sheet first, and spray the sheet with the decal solution to prevent breakup of the transfers. That about wraps up my comments, please add your comments on this kit and any difficulties one may encounter, plus photos of completed builds. Cheers Misha