Mike Williams
-
Posts
366 -
Joined
-
Last visited
Content Type
Profiles
Forums
Events
Gallery
Everything posted by Mike Williams
-
64 Dodge D100 Pickup Pro Street
Mike Williams replied to AmericanMuscleFan's topic in WIP: Drag Racing Models
Oh Francis, I understand the woes of having to paint metal parts, but understand your dilemma. Judging from the rest, I'd suggest making the brass bracing strips to have a different look, and saving the aluminum. Paint a graphite-appearing metalizer on the brass straps...? These brushed gently with a cotton swab (or similar) after drying on brass make a very nice finish! The brass straps are perfectly fabricated, but the star here is the tank, with the brass cap, not the straps! To hell with the brass straps, save the tank! I'm smiling again. Also, concerning the finish on metal parts, do you have a sandblaster with different grain usage available? The difference between a hand-buffed and smooth metal part can be sensational when fine grained glass beads and other abrasives are applied. Five parts with the same finish, can be easily made to look very different when an air blaster is involved. Your small scale fabrication is a joy to view! Mike.. -
PACERS, Fuel Altered, 1:16 brass, 1965
Mike Williams replied to Mike Williams's topic in WIP: Drag Racing Models
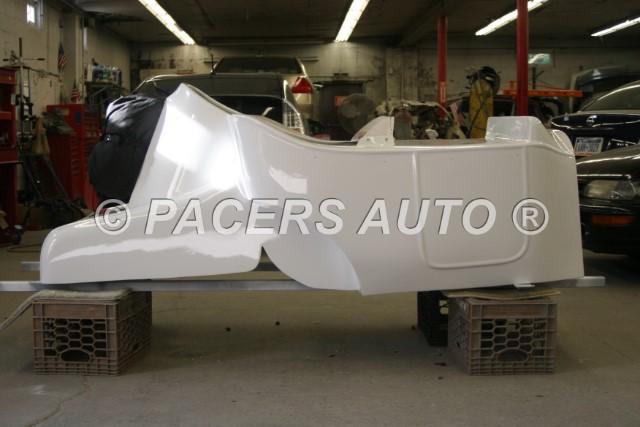
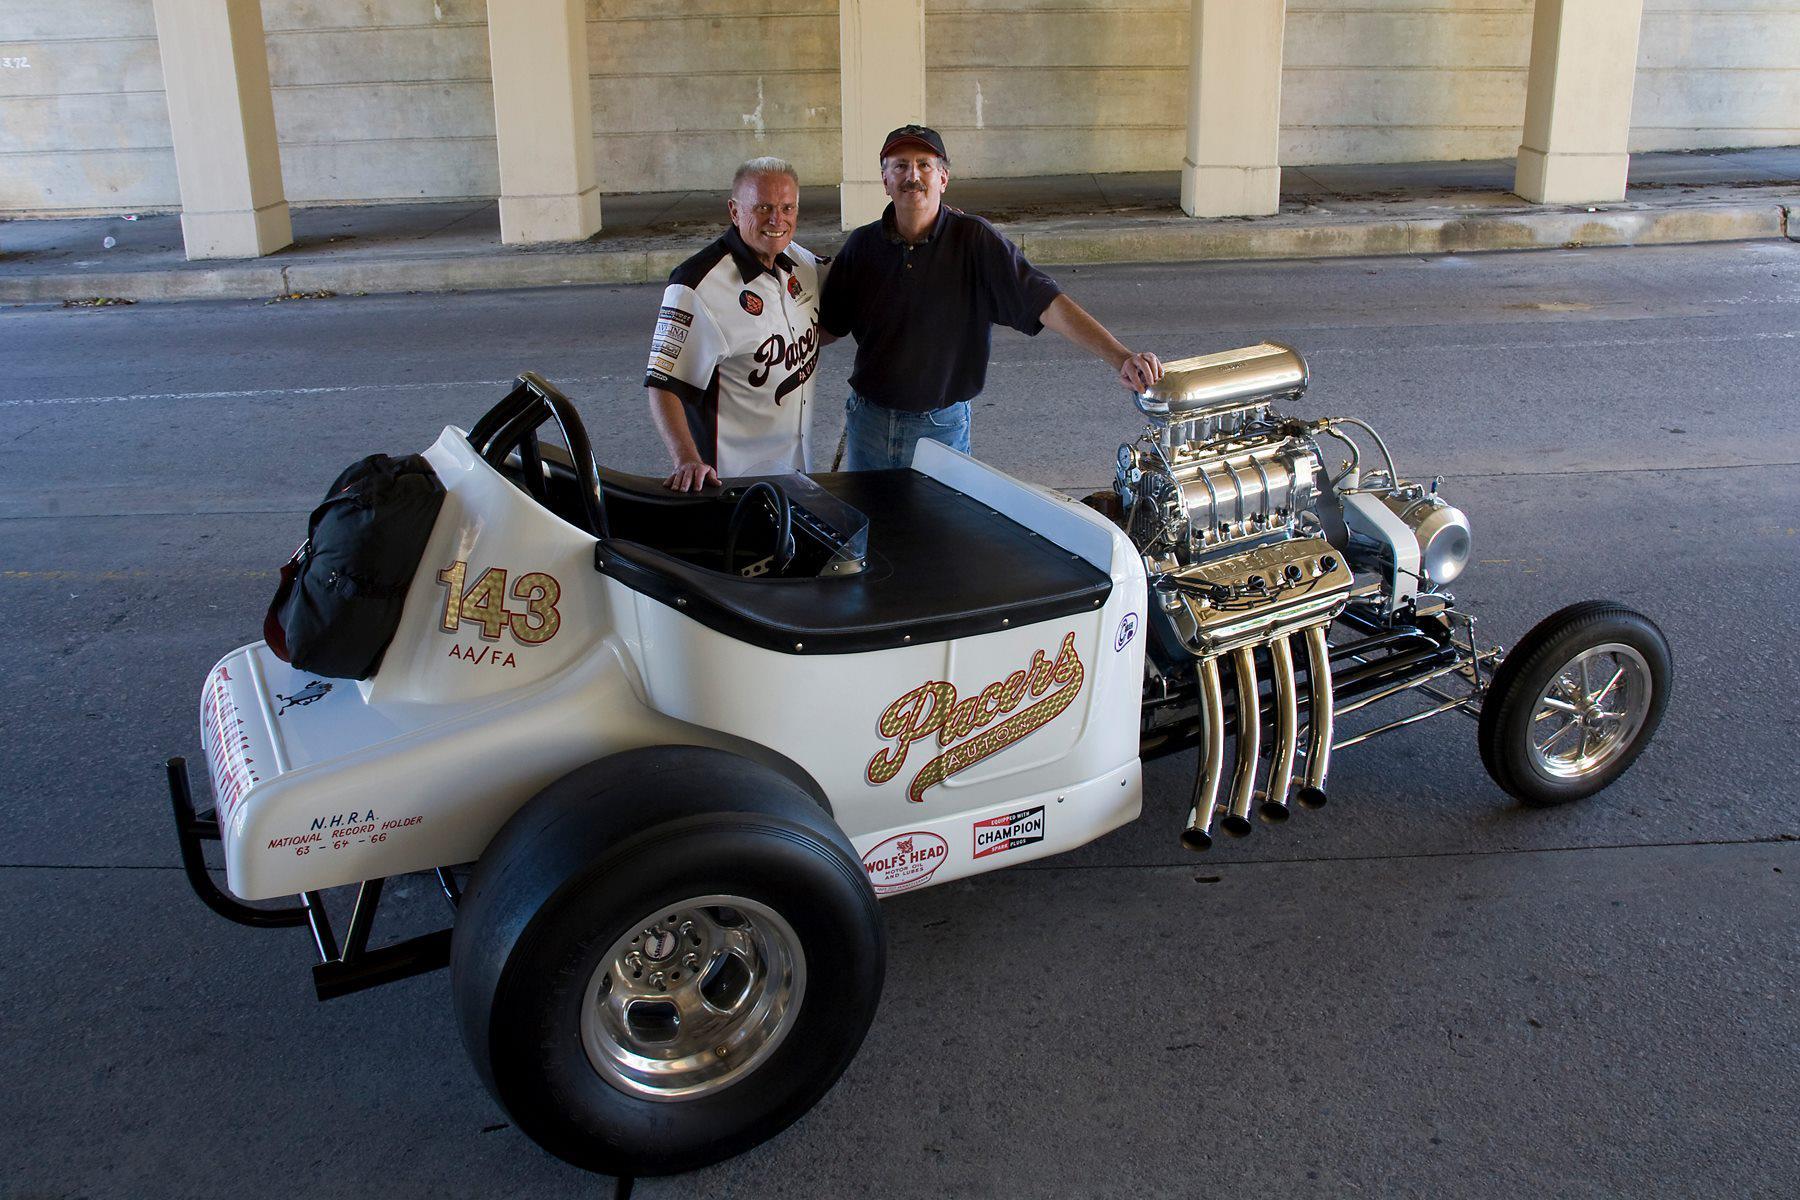
@Scott, hi there, how you doin? Thanks for viewing and commenting, appreciated! @Francis. The original PACERS Fuel Altered car was a steel bodied Bantam, back in 1961! Motor vibrations and increased power started to crack the steel body, so the team added a '23 Ford T, fiberglass body to the existing chassis, leaving all the rest unmolested. So, meantime, several of these cars have been made, two of which were exact replicas of the original 1963 fiberglass Ford T body. First off, 1961 Bantam body.... Soon though, the Ford T body.... Here, the clone car, built exactly like the original.... Mike..
-
PACERS, Fuel Altered, 1:16 brass, 1965
Mike Williams replied to Mike Williams's topic in WIP: Drag Racing Models
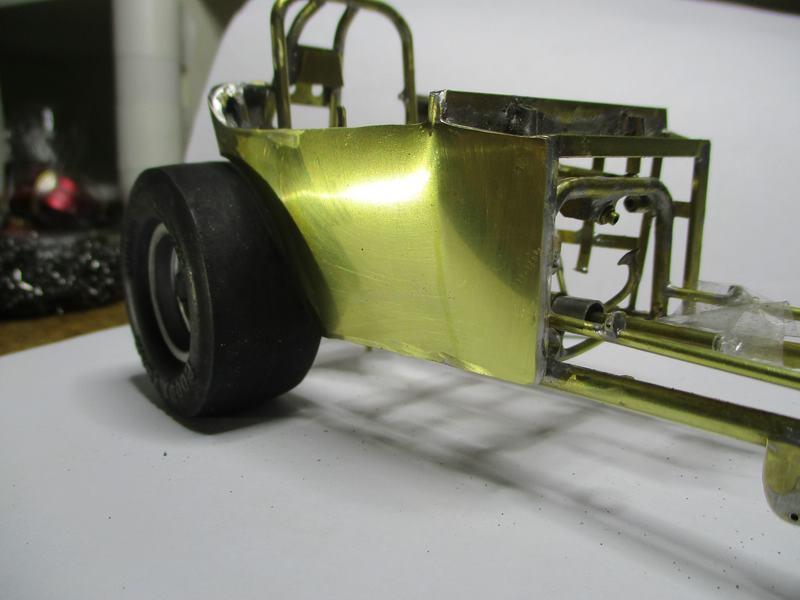
@Francis and @Art Laski, many thanks for viewing, things are moving along well with the bodywork. UPDATE: On to the trunk now. Luckily I have lots of real car photos so there is nowhere to have to resort to guesswork, it's all there. More later... Mike..
-
PACERS, Fuel Altered, 1:16 brass, 1965
Mike Williams replied to Mike Williams's topic in WIP: Drag Racing Models
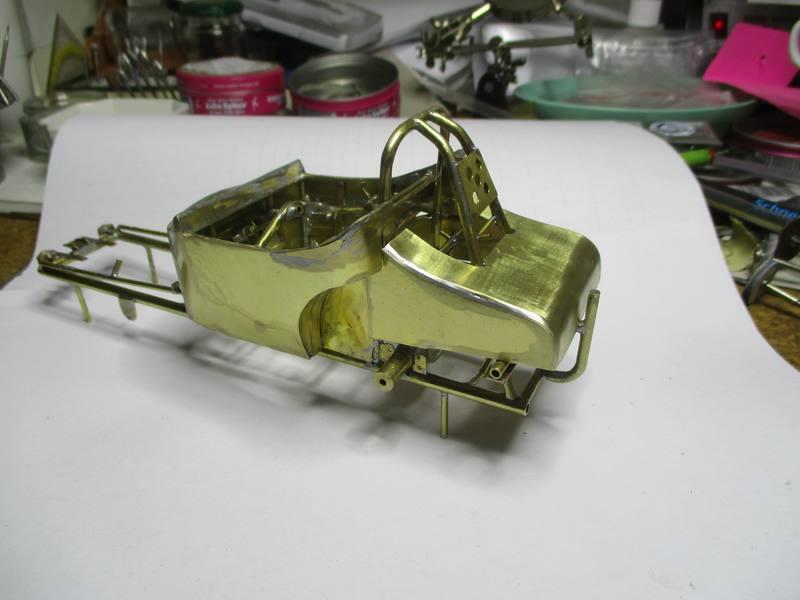
BODYWORKS. I thought during the planning stages the '23 Ford T was doable at the bench. Having only a couple of touchy areas with compound curves, being the cowl and at the rear of the tub, the rest shows gentle curvature and simple, slight bends. The chute pack molding on the trunk was also touchy, more on this later. Here the right side tub panel; Marked are areas that will need attention; Now for the left side; Here the firewall with motor plate, now the body is getting sturdy; Now the cowl. This short piece has a bowed form at the firewall, then transforms into a curved concave toward the windshield area. I decided at best to use two sheets for this one; I'll play with this for awhile then on to the trunk. Mike..
-
ROYAL CANADIAN 1/16 SCALE TOP FUEL DRAGSTER
Mike Williams replied to Ian McLaren's topic in WIP: Drag Racing Models
Looking very good Ian! -
ROYAL CANADIAN 1/16 SCALE TOP FUEL DRAGSTER
Mike Williams replied to Ian McLaren's topic in WIP: Drag Racing Models
Lee, thousands of modelers go there only for the drag racing car models groups. Car models only, not the woke social circus. Not all of FB needs to be avoided. Mike.. -
64 Dodge D100 Pickup Pro Street
Mike Williams replied to AmericanMuscleFan's topic in WIP: Drag Racing Models
Smiling now...Francis, that's the best use I've seen for styrene sprue leads! Wonderful. QUESTION: Concerning the parts added, for instance the kill switch assembly, will all of these be removed for painting procedures? Mike.. -
PACERS, Fuel Altered, 1:16 brass, 1965
Mike Williams replied to Mike Williams's topic in WIP: Drag Racing Models
@Tortuga Kustomz, Marcos, your enthusiasm is inspiring as well! I can't wait till you get your new workbench area settled, you'll be building some serious scratch projects! @Kingslug, thanks for dropping by. I know of Ken Foran, have also read his book, great insight there! No, personally I have no use for a lathe or milling machine, although I do appreciate the skills. Only machine is a Dremel-type, smaller handpiece and a drill press for drilling holes in brass, using the same handpiece. Good luck, I do hope you'll enjoy the brassworks, but beware! Danger of addiction! Mike.. -
PACERS, Fuel Altered, 1:16 brass, 1965
Mike Williams replied to Mike Williams's topic in WIP: Drag Racing Models
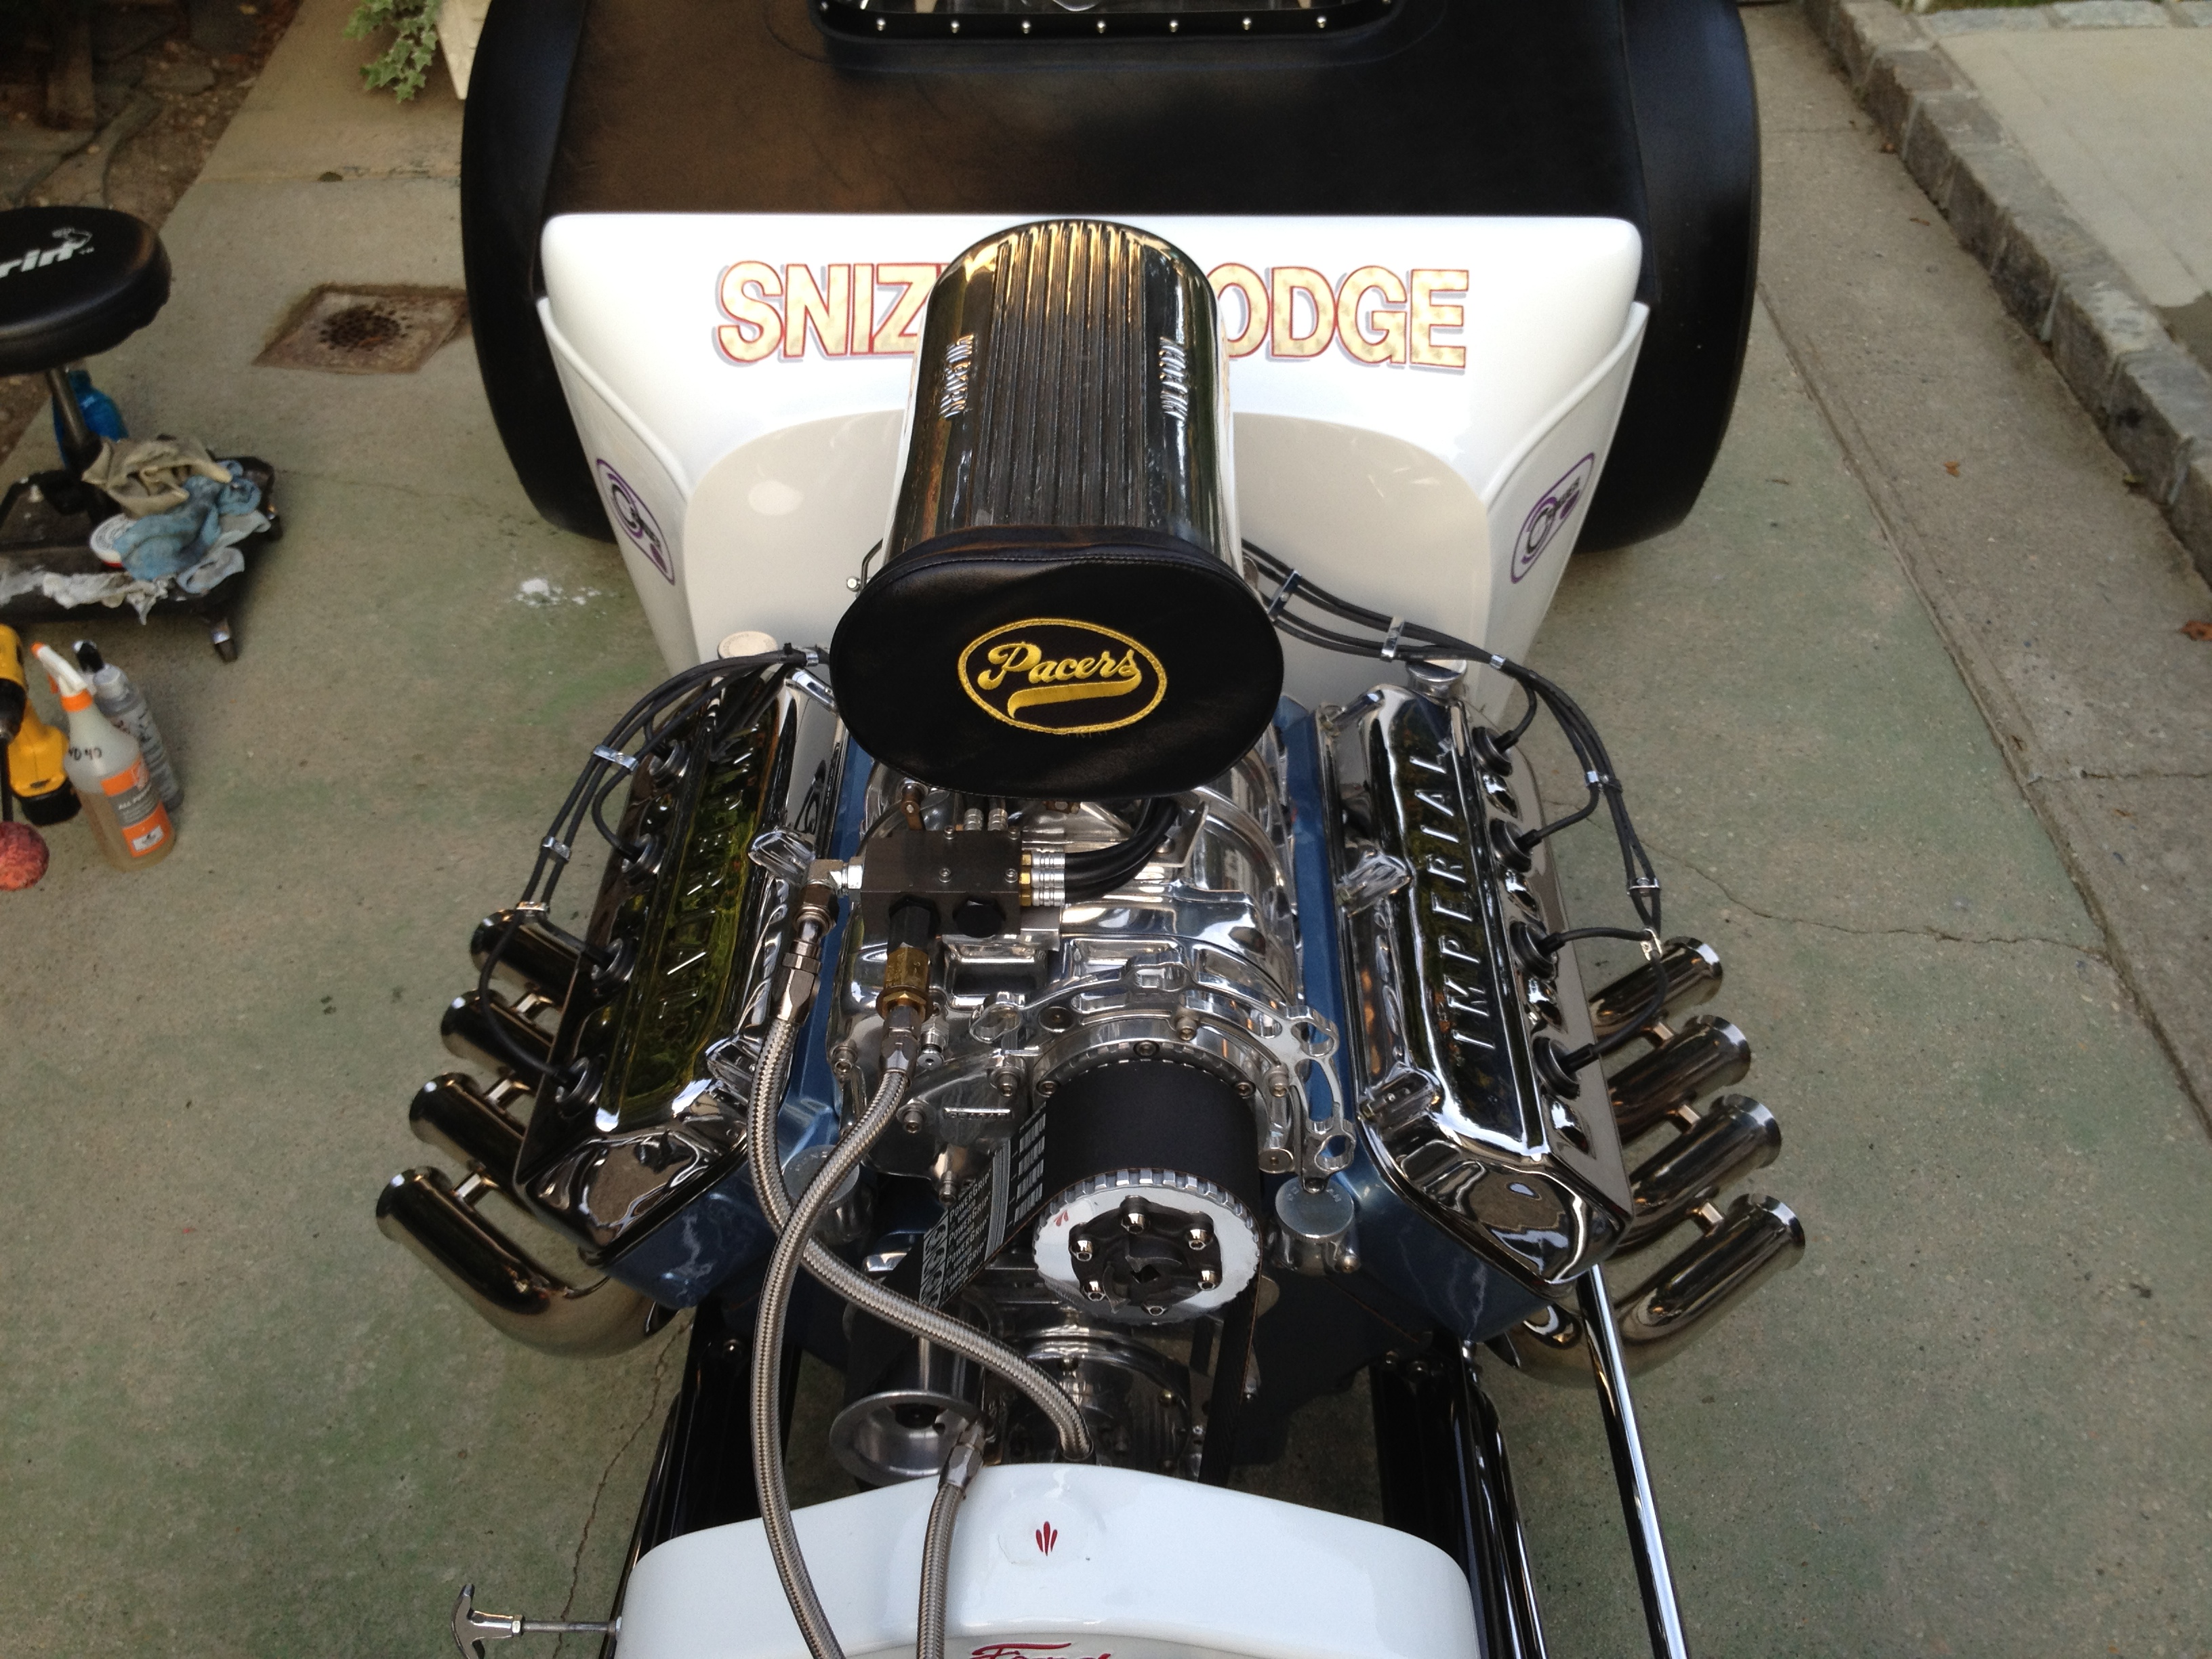
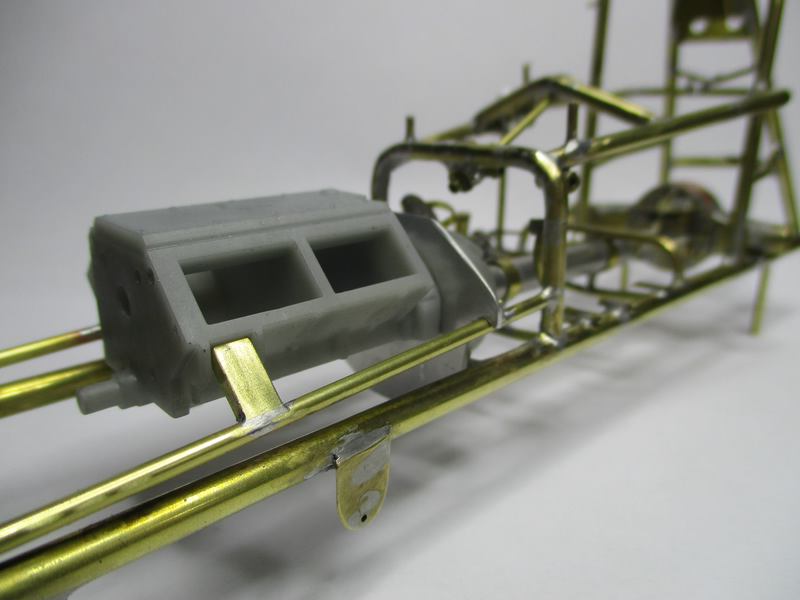
@sflam123, great to see you here, Steve! I'm not especially active here anymore, only the WIPs. See you on our group! Thanks for looking. UPDATE: Moving forward, motor works is the agenda. Fuel supply, grill and fuel tank. All real car photos by Scott Snizek. Here the radiator shell; Fuel tank. There were several sizes over the years, the largest being for cackle events. I chose a somewhat smaller version but still letting the tank dominate the front view....because I like it and suits the car well. All sub-assemblies are finished. Now the fun really starts, body work. Mike..
-
PACERS, Fuel Altered, 1:16 brass, 1965
Mike Williams replied to Mike Williams's topic in WIP: Drag Racing Models
@Francis, with this radius there was no big concern about collapsing. The tubes did however, lose some of the roundness, although not visible to the eye. The 3mm leverage rod wouldn't fit without slightly grinding out the ends. Much tighter though would be a problem. Actually, I'll try a smaller radius soon, but I used the last of my 4mm tubing, the shop I order all brass from has vacation till the end of next week. For a FED for instance, the pipes have a 9" radius, being then significantly smaller. Instead of a 38mm diameter of the glass, it would need only 28.5mm. I do believe the brass tubing will have to be stuffed with a tight fitting solid rod in this case. I could order thicker walled 4mm brass, but feel it wouldn't make much difference, maybe even worse as more material has to be bent. I'll try this as soon as possible and get back to you. Yes, the leverage rod was only in a few millimeters. No noticeable visual change to the tube itself. They appear utterly round. Mike.. -
PACERS, Fuel Altered, 1:16 brass, 1965
Mike Williams replied to Mike Williams's topic in WIP: Drag Racing Models
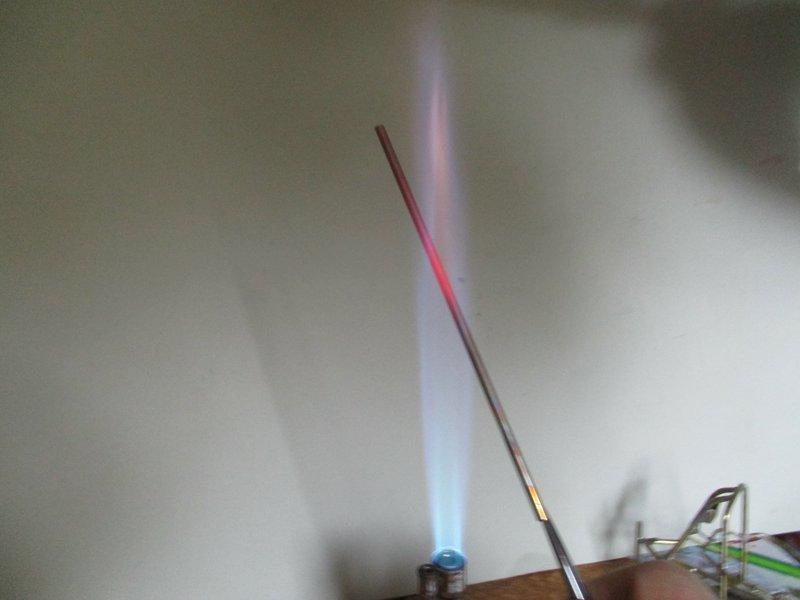
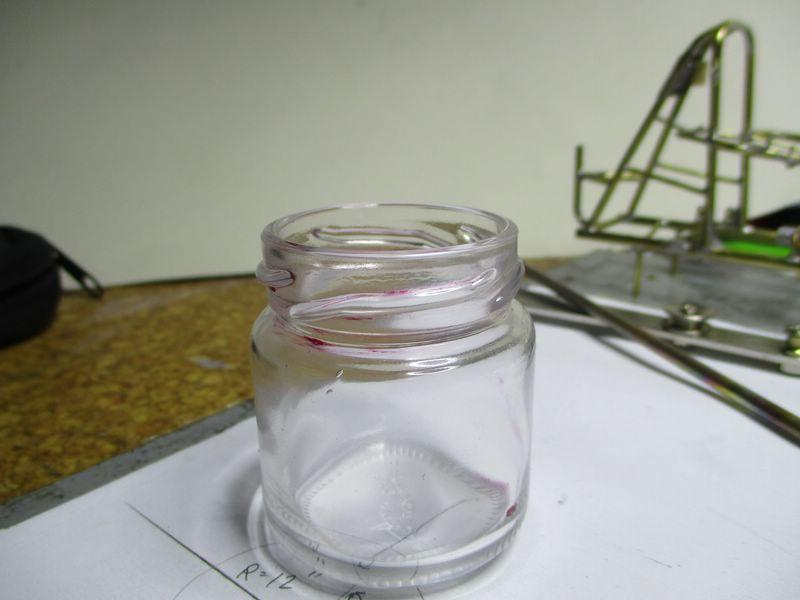
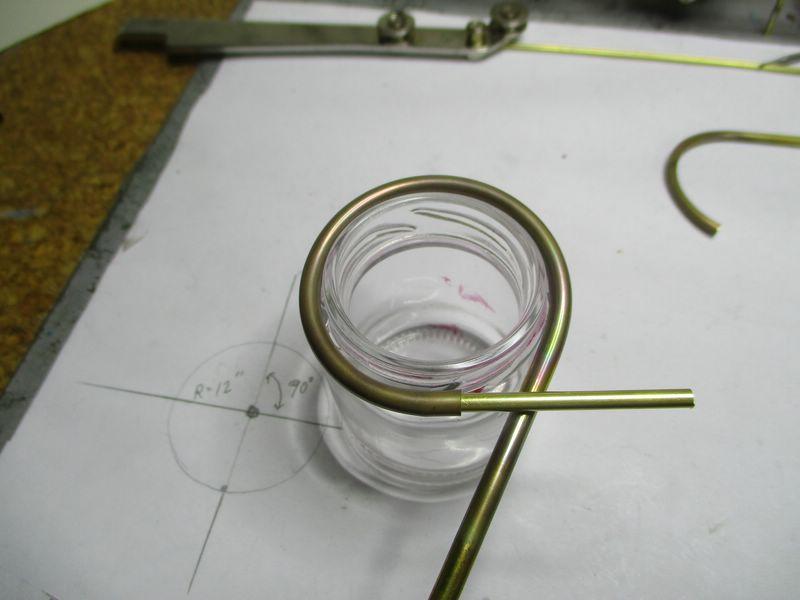
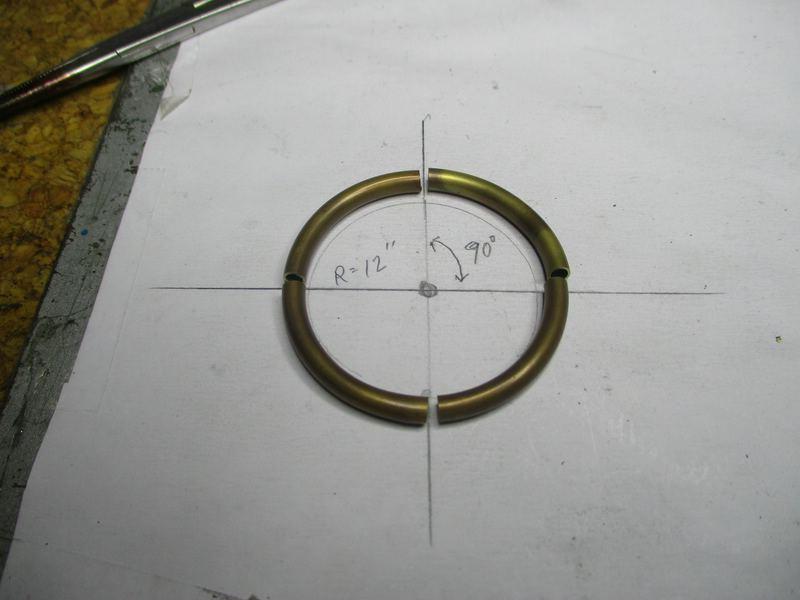
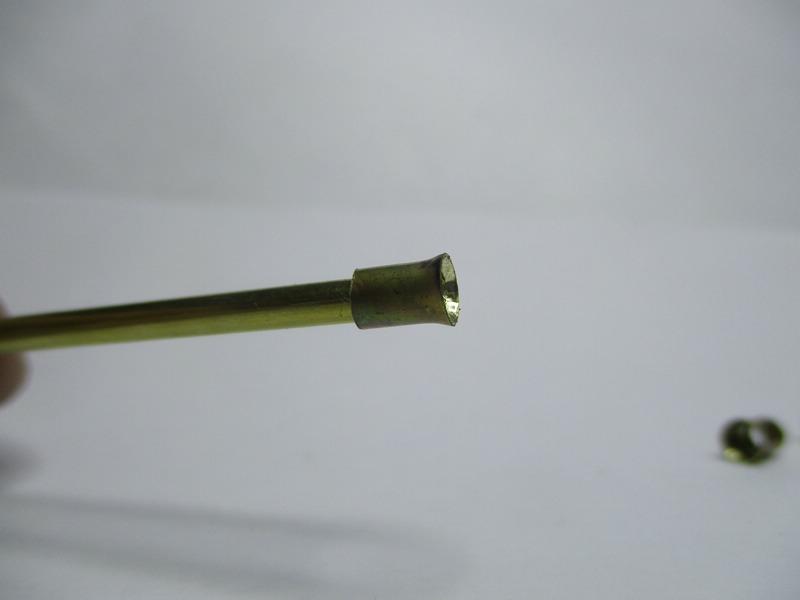
@Francis, yes, a bit more brass never hurt. Plus, an excellent use for all the scrap that accumulates. UPDATE: Moving on to the exhaust pipes. They're always a pita to make, in real life and on our models. I'm using 4mm brass tube of the thinner walled variety. 3mm tubes just slide in, which is the size used for the studs already cemented into the heads earlier. Here a short sequence on how I chose to bend the tubes on this project. The real motor has 2.5" stainless steel pipes, 12" radius at 90°. 4mm brass tubing is a perfect scale match. First off, 12" radius = 24" diameter = 38mm in 1:16 scale. 90° makes an equal 4 segments from a circle. Simple drawing made and marked. Annealing brass tubing. Let it glow then allow to air cool. Luckily a glass paint mixing jar at hand with a perfect 38mm rim. The annealed brass tubing bends easily around the rim using just your fingers. I like to add a solid wire inside the tube to act as leverage, also the reason for not cutting an exact length for the circle. Leave the rest, easier to hold and bend; The last segment not round yet, so the first was cut off to make room around the rim; Here all 4 segments chopped at 90°. Using the same 4mm brass tubing, short pieces were flared. Again, a tube was annealed, the inner lip reduced with a fine bur, then a small, prepped round screwdriver was hammered into the tube. 2 solid raps with a hammer and the flare is good to go. Will be soldered onto the existing bent tubes once they sit perfectly. Here 8 exhaust pipes all bent to an exact angle and proper length. More later on this.... Mike..
-
64 Dodge D100 Pickup Pro Street
Mike Williams replied to AmericanMuscleFan's topic in WIP: Drag Racing Models
That's a very nice setup, Francis. Cleanly executed and looks very convincing. This is one of those simple and very effective designs, anything more is unnecessary. Perfect, a keeper for my files. Mike.. -
PACERS, Fuel Altered, 1:16 brass, 1965
Mike Williams replied to Mike Williams's topic in WIP: Drag Racing Models
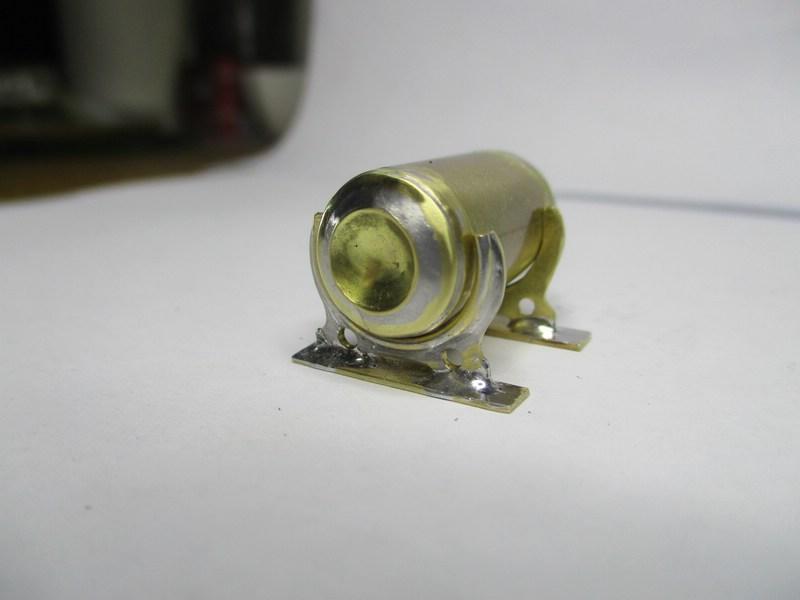
Thanks fellows. Things don't go well all of the time. The LPH 392 clutch can was just fine but I slipped and ruined the flange, ripping out a bolt hole and scratching the aluminum motor plate. So, here the new clutch can. The flange just a tad wider. Still works though, lots of holes for bolts and nuts too. Here 2 photos of the can on the real car, courtesy Scott Snizek. Brass can. The can just hangs for now, but should've been placed a bolt hole or two further left; The polished brass will make a fine base for a later Alclad treatment. Mike..
-
PACERS, Fuel Altered, 1:16 brass, 1965
Mike Williams replied to Mike Williams's topic in WIP: Drag Racing Models
@misterNNL, yes, and the photos I've received are excellent quality, too! Blow them up and every detail is clearly visible. A huge benefit. @Francis, the grooves...that bad huh? Laughing...a 0.3mm thin disc and one after the other, took about 2 minutes using my trusty Proxxon handpiece. I figured the belt would eventually hide most of the flaws, it went OK. Great that you're smiling. @dueces wild, glad you approve. -
PACERS, Fuel Altered, 1:16 brass, 1965
Mike Williams replied to Mike Williams's topic in WIP: Drag Racing Models
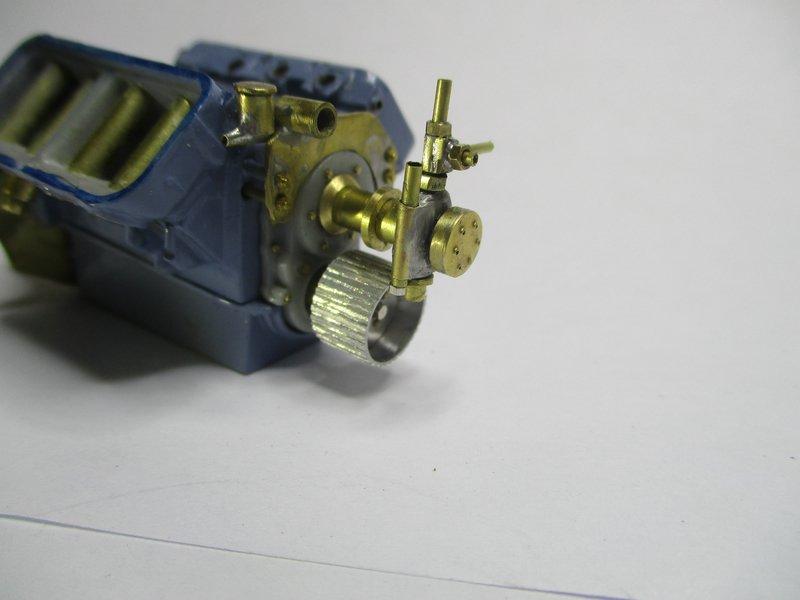
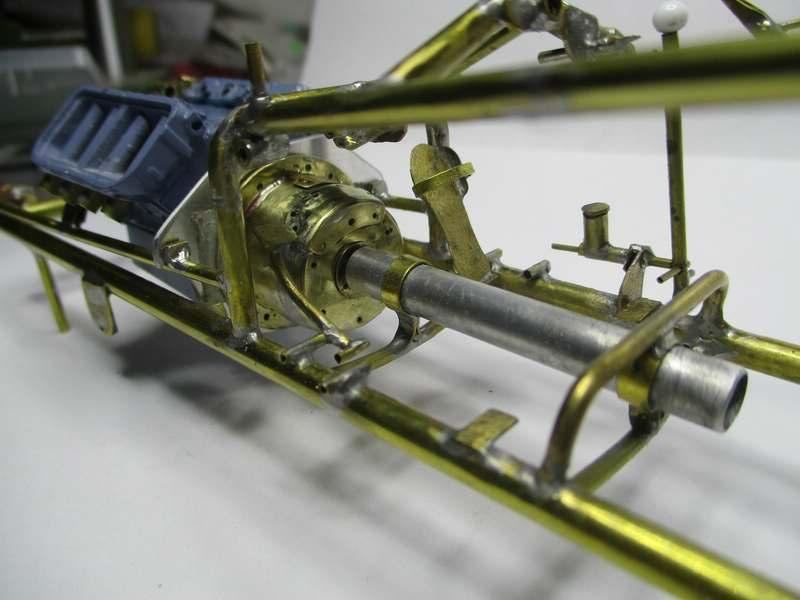
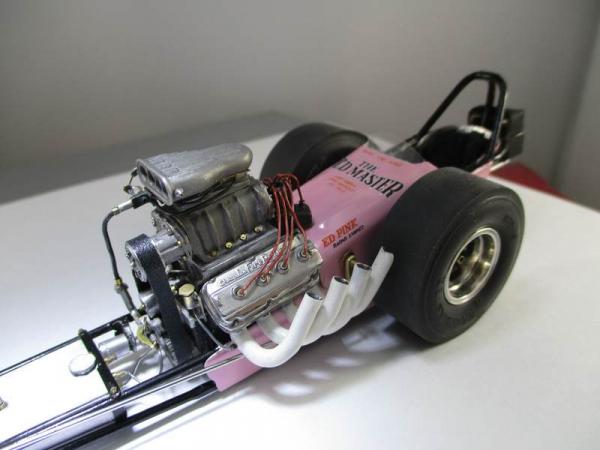
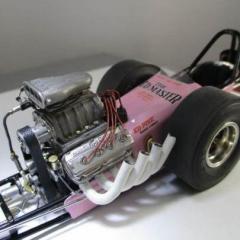
Thanks Ian, the 392 LPH motor kit is fun to work on. @Francis, yes the build is enjoyable, some of the brass items offer new methods for me, but I do like the results. UPDATE: More motor works is the agenda. Further along with the fuel system, the fuel block is done (except 2 throttle return springs, added later) and the fuel pump is in the works. Also added a few items to the motor front. Gear cover gets tiny bolts, already sleeved. A new crank pulley was fabbed using polished aluminum parts. Idler pulley will get the same treatment, yet unsure of the blower pulley at this time. Here a shot of the real motor, courtesy Scott Snizek; A closer shot of the fuel block, Here the latest additions, fuel lines shown are only mockup, already removed; The fuel pump extension dangles, not attached yet; A few more of the scratched aluminum and brass pulleys; The idler pulley is done in brass, on to the blower drive pulley and the starter bracket. More soon. Mike..
-
PACERS, Fuel Altered, 1:16 brass, 1965
Mike Williams replied to Mike Williams's topic in WIP: Drag Racing Models
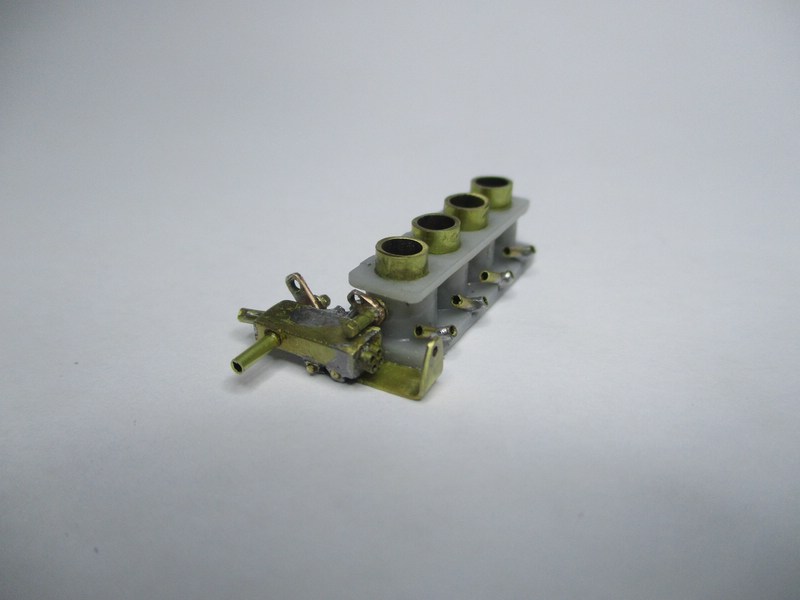
Thanks guys for looking, this is an enjoyable build. I'm satisfied with the results plus lots of new things being learned. @CT, just like in real life, it seems headers are also difficult on models. I've found this technique really secures the pipes, so tugging and pushing the pipes doesn't generally harm the foundation. They never seem to line up perfectly, so often gentle persuasion is needed. UPDATE: Motor works, this time around the injection gets attention. Many ways to get this done, I figured this is close to the real car setup and easy enough to boot. Real car injection nozzles; Here the brass nozzles with adjusting nut. Fuel line is 0.6 mm copper wire. Will be painted black. The other side, just the bare nozzles; Magneto done; Here with the hat, fits nice and snug on top of the brass ports; I like this shot; The real block is painted a 1963 Cadillac blue, so this is all but impossible to get in Germany. Duplicolor Pigeon Blue was chosen, fairly close to the real; I think it will be OK; Next up is the throttle linkage and fuel block. Mike..
-
PACERS, Fuel Altered, 1:16 brass, 1965
Mike Williams replied to Mike Williams's topic in WIP: Drag Racing Models
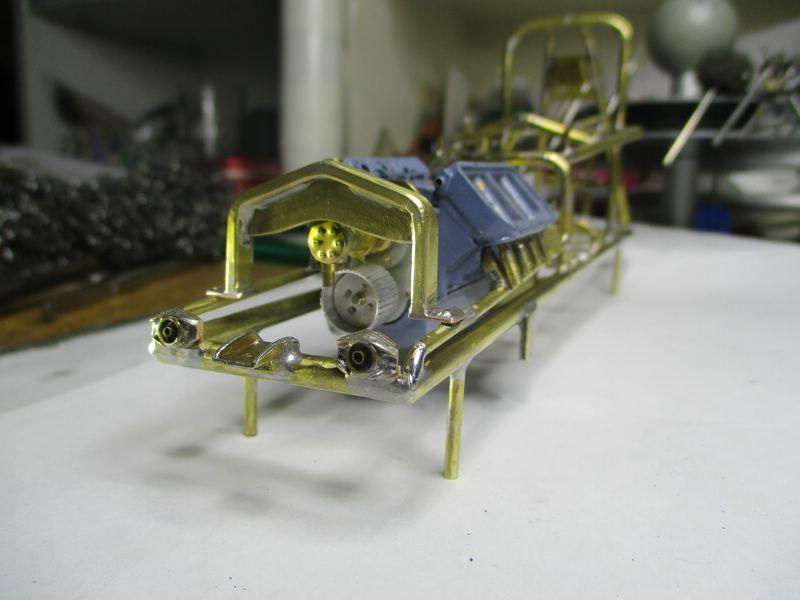
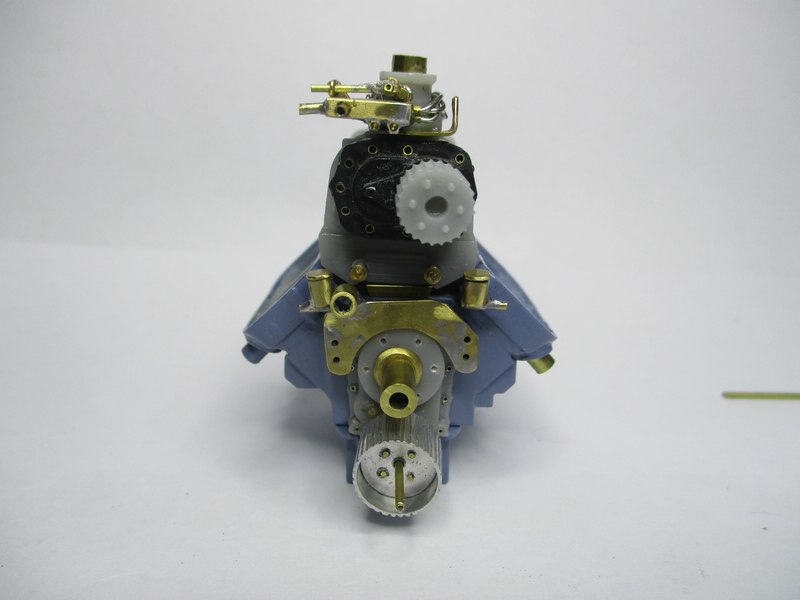
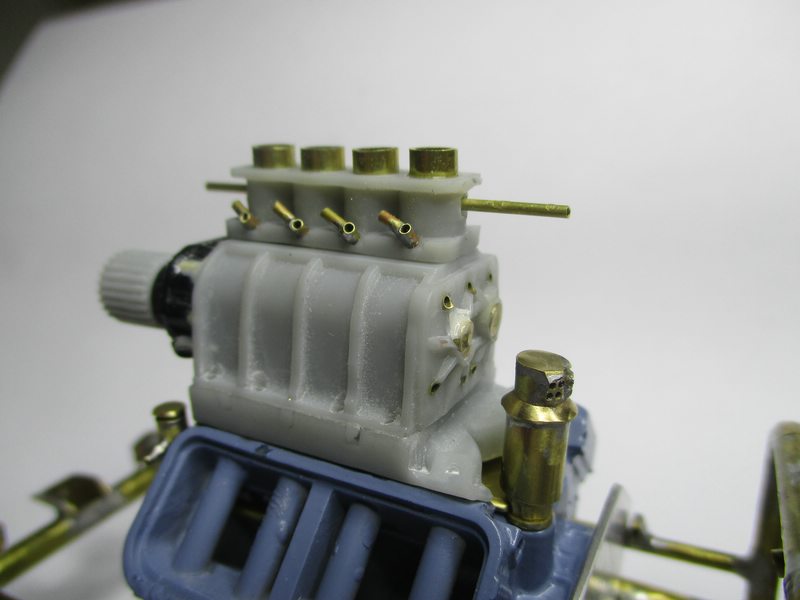
@CT, yes I think I've seen the 12 spokes on big motorcycles, also on hotrods, they look great! Not sure of the strength, but would think in steel they should work out. @Francis, happy you like. The grooves were just marked and ground out with my small micro-motor and the usual carbide bur assortment. The only machine I use is a drill press that holds the handpiece....from Proxxon. For the price, they're sensational, my opinion. @Marcos, appreciated. We're getting it done! UPDATE: Motor is in the works. This is a 3d printed, 392 Hemi from 1320 MODEL PRODUCTS over on FB only. Great parts, absolute scale and smooth. The block sits level and centered, Here the heads prepped for the scale 2.5" exhaust pipes. The big 4mm brass tubes need a sturdy foundation; Here a few brass additions, idler bar bracket, blower manifold burst plate, plus the front and rear covers with sleeved holes for the bolts. The manifold needs some massaging since I changed the shape somewhat, the gaps to the heads will be deleted. More small things to be added, more later... Mike..
-
PACERS, Fuel Altered, 1:16 brass, 1965
Mike Williams replied to Mike Williams's topic in WIP: Drag Racing Models
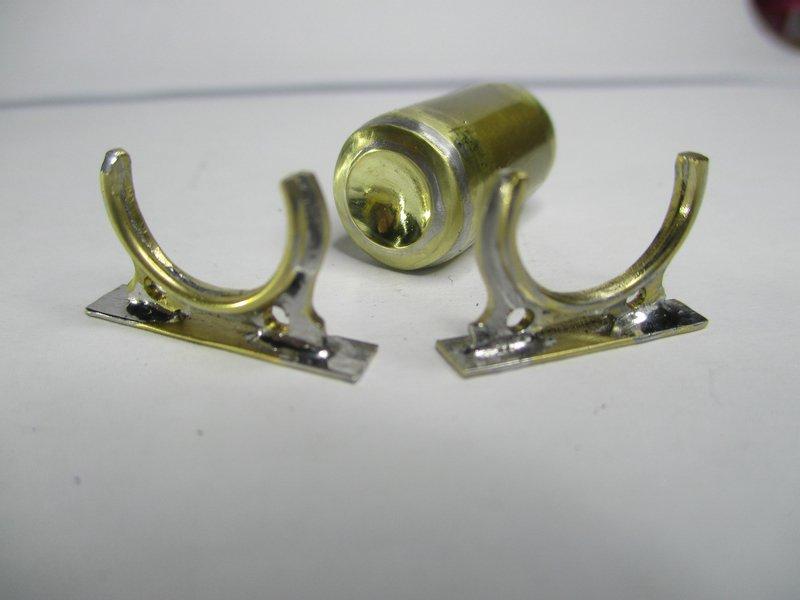
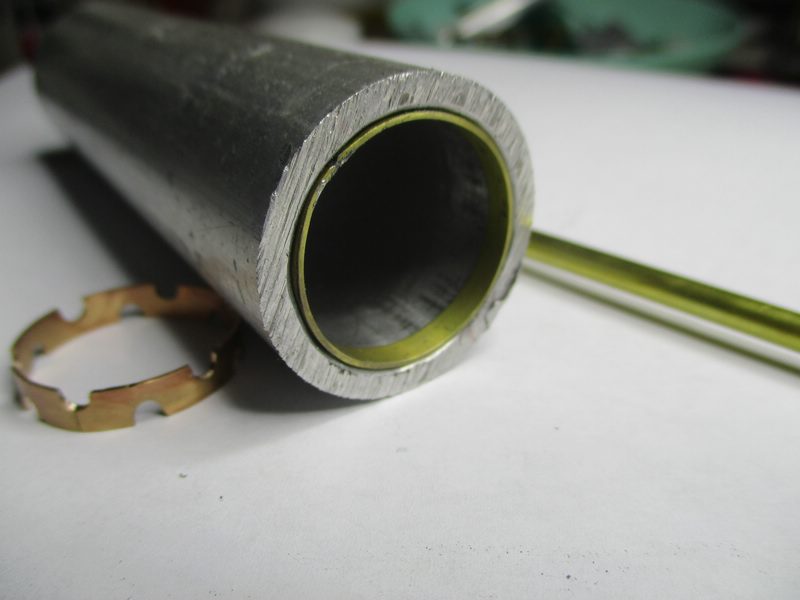
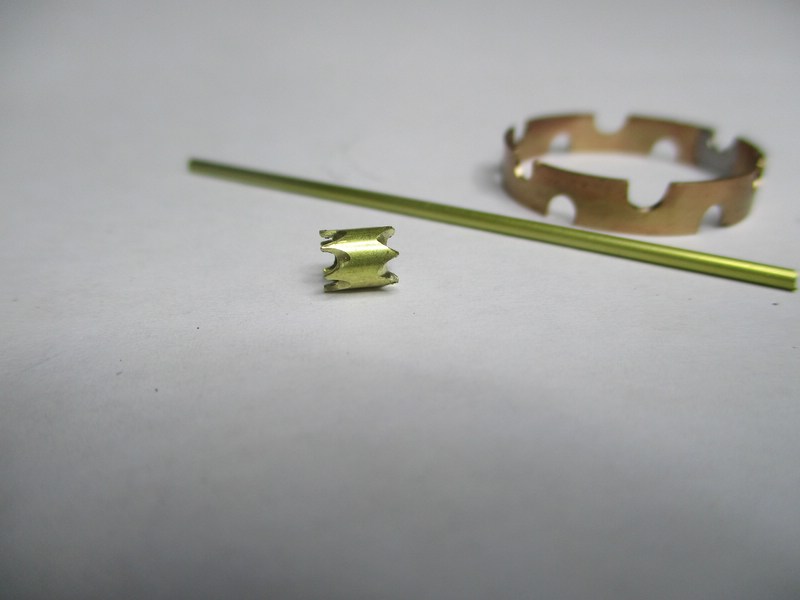
UPDATE: Finally, the 12 spokes are done. A test fit shows the front axle now has the correct height. 15", 12 spoke wheels and tires that aren't too tall, just do not exist anywhere. Waiting for parts that don't arrive, then getting resin and 3d parts that suck....well, do them yourself. Look, here a small how-to. First though, the revised 12 spoke wheel in brass. This one's a keeper; Here is the method. First, an aluminum pipe with the needed, correct inside diameter at 23 mm. Using a brass pipe, there's a danger of accidentally soldering the outer rim to the pipe....not good. The outer, brass rim is already annealed, bent and soldered shut; The outer rim shown along with the prepped inner ring, waiting for the spokes; The nylon, shore 70 O-ring, the inner and outer rims; The two rims slide fit nicely, no cement needed. The hub/spacer and the brass tube at 1.4 mm. The soldered 12 spoke inner rim, cleaned up and ready to slide into the outer rim. again, no glue needed. Moving along now... Mike..
-
PACERS, Fuel Altered, 1:16 brass, 1965
Mike Williams replied to Mike Williams's topic in WIP: Drag Racing Models
Thanks fellows! Finally an update with this project. Sidelined longer than expected, things are back on track once again. Speaking of on track, here the nylon O-ring tires, yet to be trimmed, and the 12 spoke wheels This is the first wheel, a spoke is out of whack, but a lot was learned here. The next wheel is in the works and I do believe the slight flaws will be worked out to satisfaction..... I'm using this wheel. The other is in the works, already an improvement noticed. More soon.... Mike..
-
64 Dodge D100 Pickup Pro Street
Mike Williams replied to AmericanMuscleFan's topic in WIP: Drag Racing Models
Oh my! Francis, the most inspiring on this forum are your updates. Might I write, this one in particular? Just wonderful. Mike.. -
PACERS, Fuel Altered, 1:16 brass, 1965
Mike Williams replied to Mike Williams's topic in WIP: Drag Racing Models
@Scott, thanks much for dropping by, truly appreciated. The front end suspension is finished, can't wait to show progress. @Ray, glad you like! Hopefully this year, my goal, I can post some finished pics....I'd like them to be as good as your recent Green Elephant photos. @Francis, wonderful...a hiccup. Exactly! The body is in the works, moving along now, again. Yes, actually I would like to live in Italy, weather, food and wines, plus much more affordable than Germany. I love the language. Being retired, I would move quickly....the wife though. You know the saying, you can take a gal out of Germany, but harder to take the German from the gal. She refuses to move. lol. Still, life is good. Mike.. -
Great looking model. Clean detailing on the front end and motor especially. I really like the paint finish. It's glossy and smooth, yet not a super, show car ultra gloss. The car is just believable. Also, compliments on the lighting for the photos, excepting the couple of blurry ones, truly well presented. Mike..
-
Atlantis 1/16 Chevy Vega Green Elephant funny car
Mike Williams replied to cobraman's topic in Drag Racing
You did good, Ray! This is the 1st one I've seen finished, and it looks super clean and neat. Well done. Also compliments on the photography and lighting, I do love a well presented model! -
PACERS, Fuel Altered, 1:16 brass, 1965
Mike Williams replied to Mike Williams's topic in WIP: Drag Racing Models
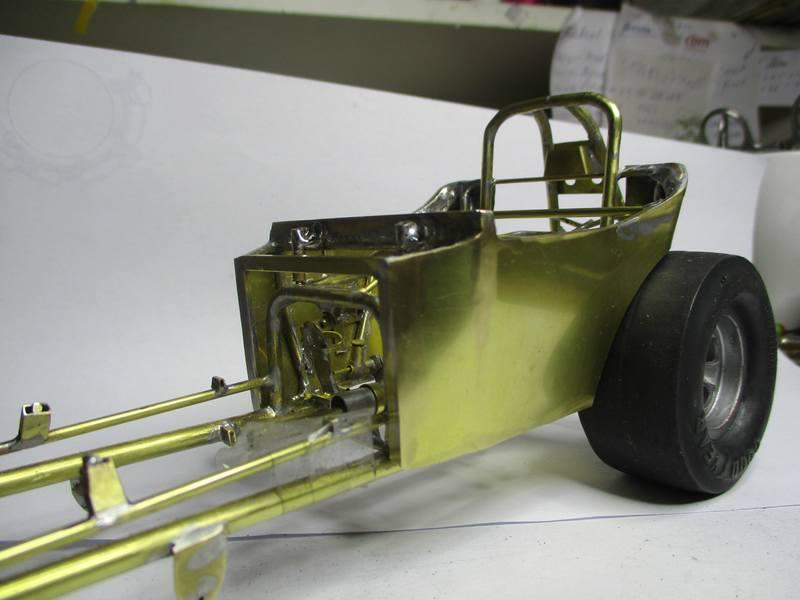
Just information now, things are not going as planned. Parts are not coming in yet, no motor. The package was sent back, improperly labeled, so the German customs. Front wheel progress is also stalled as tire size is a problem. New ones on the way. So, almost 4 weeks....I need to move forward. Front end is done, wheels later. Now, the brass body is on the bench. Brass panels and the turtle deck. I'm happy now, after vacation in Italy, time to get some blisters on the fingers. More soon. Mike.. -
PACERS, Fuel Altered, 1:16 brass, 1965
Mike Williams replied to Mike Williams's topic in WIP: Drag Racing Models
Thanks for dropping in, Charlie. I'm happy you approve. Yes, Francis is a great one! Also, great to see a Florida guy doing such great work as yourself. Jax. here, been gone a while though, still have folks there. Update coming soon, I'm still with the frontend, took 2 weeks off, most of the parts needed, have since arrived. Back to the bench tomorrow. Mike..