
Mike Williams
-
Posts
366 -
Joined
-
Last visited
Content Type
Profiles
Forums
Events
Gallery
Everything posted by Mike Williams
-
Vintage Top Fuel FEDs, 1:16 brass chassis
Mike Williams replied to Mike Williams's topic in WIP: Drag Racing Models
@Tim, you are exactly right. These pipes are in 1:25 and 1:16 equally difficult to get aligned properly. At the head, the distancing seems to be OK. Problems multiply with the bend and then the sway back. Then when you think you have it right, one of the pipes slumps down. Look above at 2nd photo....cylinder #3 pipe slumps at the bottom, is out of line. If I were using these pipes I'd leave it as is though. If I could get the right side as nice as these four, I'd keep the deal. Meantime I've pulled them and new brass pipes are in the works. A jig of some description would be an immense help but to be honest not much thought has been applied to this method. Hands on and hoping for the best. Mike.. -
Vintage Top Fuel FEDs, 1:16 brass chassis
Mike Williams replied to Mike Williams's topic in WIP: Drag Racing Models
@butter....yep, painting the aluminum and brass bodies always leads to an inner self debate and every time an argument ensues. This one though will probably be aluminum, unpainted. I like the look. UPDATE: Zoomie tubes... Left side is about finished, the 1, 3 & 5 tube ends need to be capped somewhat as the line doesn't run parallel with the valve cover panel. # 7 is in a good position to the tire surface. Right side has problems though as the radius is not tight enough, but since the tubes have been shortened already, they don't fit the tube bender anymore....my bad! Here the aluminum 4mm tubes which is about 99% real 2,5" scale. Right side has currently brass tubes in the works, more later.... Mike.. -
1/16 SCALE A/FC NITRO FUNNY CAR
Mike Williams replied to Ian McLaren's topic in WIP: Drag Racing Models
@Ian, yep, I don't visit here very often, I like our other place a lot better. This project is a joy to view, you're leaving no area untouched and the many improvements are truly an incentive. Looking very good! Mike.. -
64 Dodge D100 Pickup Pro Street
Mike Williams replied to AmericanMuscleFan's topic in WIP: Drag Racing Models
@Francis....Amazing, easy to imagine the hood just popping open with a slight movement....kind of like my lower jaw just now! SMILING! -
Vintage Top Fuel FEDs, 1:16 brass chassis
Mike Williams replied to Mike Williams's topic in WIP: Drag Racing Models
@Marcos, I appreciate your support, many thanks for looking here. @Francis, thank you for the Alclad advice. I'll surely heed as my Alclad success to date is minimal. In this case, the motor is a resin kit and unfortunately the surface quality has issues. I just simply cannot get the valve covers smooth, so the Alclad "Polished Aluminum" was sprayed today. I'm still unsure of success. The surface shine bothers me as well. I'll have to write I miss my real metal casings. Sand blasted, real nickel just looks better than any resin or styrene, to date I haven't seen a paint application that matches a real metal finish. But with this resin/styrene modus, I'm a beginner. More later. Mike.. -
Vintage Top Fuel FEDs, 1:16 brass chassis
Mike Williams replied to Mike Williams's topic in WIP: Drag Racing Models
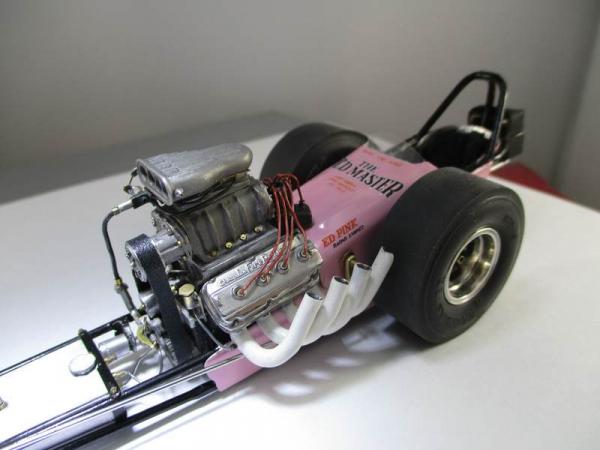
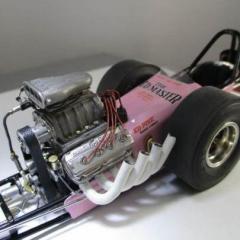
@GoatGuy, appreciated, thanks for looking. @Francis, I'll have to write, the brass body shown above was for the pink car, The Old Master. I thought it may be of interest, concerning the brass body. Meantime, the brass chassis is painted, and overall the aluminum body gains interest. The designer of this car, Woody Gilmore, preferred very simple body cowl designs, so this would be a breeze with aluminum sheet. Plus I do like the bare aluminum body look. These were not high dollar cars, just well built and simple in design. UPDATE: Motor work has started. Painting has been for exercise and getting acquainted so it was removed as lots of manipulation follows. The front cover was lacking, so a new brass piece was bolted on, the blower needs lots of work. The modeled-in bolts were shaved off and new holes drilled for better looking bolts. Some work with the starter support and then the manifold fuel lines. A word here, the scale is perfect for soft rubber hose, so these will (probably ?) be lightly brushed with rubber looking paint.....not sure yet as I have zero experience with the 1:16 scale. Still trying to figure out which color for the valve covers. Since the order for Alclad Black Base has arrived, chrome? Mike.. -
Vintage Top Fuel FEDs, 1:16 brass chassis
Mike Williams replied to Mike Williams's topic in WIP: Drag Racing Models
@CT, yes, happy about the shop with replenished Alclad supply, especially since I already had 3 different colors already....chrome too! @Francis, I'm excited about the paints, since no metal on this motor, I'm paying special attention to new paint techniques. The body is brass on the pink car. Two things make the real car special in my opinion. The toe blisters on top were hammered into the brass sheet, not soldered on. Then the special paint job to get the pink correct....a quality mix of fingernail polish. This was fun too! The current project will probably be made with an aluminum body, perhaps even with no paint! Time will tell. Mike.. -
Vintage Top Fuel FEDs, 1:16 brass chassis
Mike Williams replied to Mike Williams's topic in WIP: Drag Racing Models
@CT, thanks for the input. Meantime, I've come to the conclusion, blower parts can be about any shade you'd like, the duller finish being the most acceptable and realistic. When the dark rubber fuel lines are attached along with the bolts for the blower/manifold, the "steel" shade should work out. A couple of years ago, I was fascinated by "The Old Master", the blower, intake and top hat all sandblasted, here the original and my project using cast nickel and sandblasted parts for the all metal motor... EDIT! @CT, finally a shop has the Alclad Black Base, also ordered was the Airframe Aluminum! Looks good! @Tim, the bumper looks superb. I'll read up on the Caswell Plating deal. I like your family rides, looks like a fun collection. Mike.. -
Vintage Top Fuel FEDs, 1:16 brass chassis
Mike Williams replied to Mike Williams's topic in WIP: Drag Racing Models
Hello CT! The magnesium paints are fascinating and have lots of potential, as did the real metal! Polished, or left to its own weathering, always an interesting view. Rarely shiny, and this is the hard part for model painting. Getting the dull, real metal like finish. I do wish the shops in Germany offered more Alclad, the availability is lacking. After searching all of my files, I found one photo in my opinion that makes a statement. A period correct, close up view of an active FED from back in the day, no chrome! I like too, and this in the meantime satisfies my "dark blower look"....it's just a metal, not shiny. I like this one. Also important with this photo, the front gear cover is apparently a different metal! A wonderful study. What I've learned is important....do it like you want to....it's probably correct enough....just no kit chrome, we can do better. Thanks CT, Mike.. -
Vintage Top Fuel FEDs, 1:16 brass chassis
Mike Williams replied to Mike Williams's topic in WIP: Drag Racing Models
@Francis, thank you for the support and praise. I have a very good feeling about the durability of the paints, although I have noticed, when applying several coats, at least a 24 hour drying period should be implemented. I have zero luck with Alclad, hardly any shine, then it rubs off easily. As you know Francis, mounting these scratch built assemblies requires lots of hands-on when mounting....Alclad was not my preference. I have a better feeling with this paint, plus the ease in painting, a big difference. @CT, I love the satin finish on the blower hat. I realize a so-called chrome paint was sprayed but I've read where the finish you show is the best result. So difficult to wait for 2 days, but I believe this is the best way for these chrome-like paints. The appearance is like a brushed and polished metal to me, I like! Seems to be very similar to the "Stainless Steel" from AK, which I really like, even better than the chrome. @Marcos, thanks for looking, I'm still experimenting. I ordered the "Jet Exhaust" paint, it's not glossy, so I can mix in a few drops to make the "Steel" shade darker. More later. Mike.. -
Vintage Top Fuel FEDs, 1:16 brass chassis
Mike Williams replied to Mike Williams's topic in WIP: Drag Racing Models
The previous post was not completed. I'm not satisfied with the shade of the blower and manifold, still not dark enough. I do like the AK Xtreme Metal paints. More later.... Mike.. -
Vintage Top Fuel FEDs, 1:16 brass chassis
Mike Williams replied to Mike Williams's topic in WIP: Drag Racing Models
@Francis and @CT, on now with the new paints, the "AK-Interactive. Xtreme Metal" line. The brass wire wheels are spayed, black metal base till covered, then "Chrome" from the AK line. Not shown here the result after lightly brushing the finish with a cotton swab! More shine! Further along now, here the original Revell blue styrene blower, shot with "Steel" from AK. Hat is "Stainless Steel", valve covers original kit chrome. Here the left is kit styrene, right is white resin....Blower hat is white resin with Black base, Stainless Steel. Front is the blower hat, black base with "stainless steel". Maybe another coat to cover better... This is an ongoing process with a new paint line, more later. Mike.. -
64 Dodge D100 Pickup Pro Street
Mike Williams replied to AmericanMuscleFan's topic in WIP: Drag Racing Models
@CT, we have to realize, the cheap stuff will only melt when Francis mills these parts. Yes. Perhaps the new scale Francis has invented with this project has the industry thinking....no more cheap-A aluminum available? I do feel that Francis has made new territory with his work.... -
@Ashleigh, I can easily agree with Force. The easiest way my opinion, is to use either the appropriate sized solder wire or buy for cheap electronic insulated wire. The latter can be had for every size imaginable and is dirt cheap. Regardless of color, all can be easily painted when in place. Cheap and in scale! Mike..
-
Vintage Top Fuel FEDs, 1:16 brass chassis
Mike Williams replied to Mike Williams's topic in WIP: Drag Racing Models
@CT...yes, a wonderful insight! I'd like to add, I was born and raised not far away from where Mr. Garlits resides and hails. My place is close to the Atlantic coast. Just that the man answered you, is for him typical, I do believe he had a gleam in his eye too. He still answers questions in a decent way. Chrome will not make you faster, get rid of it and just be cool. Laughing now! I want a motor without chrome, a race car. Today I received for me a new line of metalizer airbrush paints, I'm going with the AK-Interactive, Xtreme Metal paints. The motors will have little or no chrome, we'll see soon what happens. For know though, I'm happy and excited. Thank you for your insight. Mike.. -
Vintage Top Fuel FEDs, 1:16 brass chassis
Mike Williams replied to Mike Williams's topic in WIP: Drag Racing Models
Thanks Marcos! The motors for the FEDs will be without much or no chrome. Garlits used darker motors, no bling and I like the look. Some new metalizers on the bench and I'll be trying out some new (to me) methods for metal-like looks. The zoomie pipes are 3mm brass tubes, as are the aluminum port injection tubes. Both were sliced to get the right bend, then the cuts were soldered/filled to make smooth. Here the 1:25 finished motor in an aluminum bodied FED from late 2019. Mike.. -
Vintage Top Fuel FEDs, 1:16 brass chassis
Mike Williams replied to Mike Williams's topic in WIP: Drag Racing Models
@Marcos, thank you. Good that your Garlits car has only chrome on the valve covers, perfect. What paint and finish did you use on the blower and hat, looks good. @Ian, consider the zoomie tubes to be a "J". The last third, towards the ends, would be straight. Only the first half or so will have a bend. Here a shot of 3mm brass tube on a 1:25 build, sliced and soldered up; Thanks for your interest, Mike.. -
Vintage Top Fuel FEDs, 1:16 brass chassis
Mike Williams replied to Mike Williams's topic in WIP: Drag Racing Models
Ian, the angle depends on the motor, specifically the exhaust ports, plus the length you'd like. For zoomies with a Hemi, a tad more than 90° should get you about right. The tubes should point to the middle of the slick. Also, looking directly from the side, I like the pipe ends to be lower than the spark plugs. A good length would be the second pipe should reach to the end of the valve cover. Minimum of 3" to the slick. Great shot here; Mike.. -
K.S. Pittman 33 Willys replica
Mike Williams replied to Tortuga Kustomz's topic in WIP: Drag Racing Models
Very nice detailing here, great that you have the plug wires and looms looking perfect scale, compliments. Also the touches for suspension and elsewhere make this a special '33 Willys. Going along nicely. Mike.. -
1/16 SCALE A/FC NITRO FUNNY CAR
Mike Williams replied to Ian McLaren's topic in WIP: Drag Racing Models
Hi Ian, love the way your project is moving forward. Rarely seen are the inner body brackets....sensational! You're doing lots of good here, I enjoy the updates. Mike-Jo... -
Vintage Top Fuel FEDs, 1:16 brass chassis
Mike Williams replied to Mike Williams's topic in WIP: Drag Racing Models
Hi Tim! Hold on about the chrome paint, I've ordered some new metalizer paints and am anxiously waiting. In a few days I can show the good or the bad. The gaps were a surprise for me as well, was not counting on much of a difference between the 2 inner rims for each wheel. Herein lies the demon. Getting each rim with 20 spokes soldered on to match another rim with the same. I've thought about an application that lets me slice 20 notches into each rim, then the wires will all but disappear and be flush with the rim edges. Drill holes? No way. New plan is in the workings as there is another FED to do right next to this one, both being ready to go forward. Tedious, a learning process for sure. I like the results and the process is good, just some method adjustments necessary. More later. Mike.. -
Vintage Top Fuel FEDs, 1:16 brass chassis
Mike Williams replied to Mike Williams's topic in WIP: Drag Racing Models
@Brad & John....Hobby Linc, back in 2015. -
Vintage Top Fuel FEDs, 1:16 brass chassis
Mike Williams replied to Mike Williams's topic in WIP: Drag Racing Models
@Big John...OK. Since I'm with the motor now, here a few photos of bending tubes. @Marcos, many thanks for your support. I've seen you on a FB group, great things you're showing! @Francis, many thanks again, your praise is appreciated. Meantime, the rim voids have been filled, I do believe they will come out very smooth and realistic looking. I'm quite satisfied with the result, just the method needs revision. I'm working on this. @Jim King, thanks for the heads up! I got caught up in watching tube videos, even hoping other glossy blacks will work. Many thanks. Bending tubes for zoomies; Here the usual method I prefer for bending tubes. Aluminum tube in 4mm was stuffed with annealed 3mm brass tube, the tubes will not collapse. The tool I prefer for most all of the bends needed. Then bent slowly and steadily until a "J" is visible. Mark it, and chop off the excess. Make the object longer as this will help leverage. Smaller tubes are done the same way. I've had success with the method, good enough for me. Next, holes will be drilled into the head exhaust ports for studs, these will fit into the zoomie pipes so the pipes will align better, plus the pipes will be much easier to cement. The method makes for a good bond. Mike.. -
Vintage Top Fuel FEDs, 1:16 brass chassis
Mike Williams replied to Mike Williams's topic in WIP: Drag Racing Models
The wire wheels are done, I've started filling the gaps from inner to outer rims. All chassis assemblies are finished, getting slowly ready for paint preparation. Next up is the motor, paint and buildup. Mike.. -
Vintage Top Fuel FEDs, 1:16 brass chassis
Mike Williams replied to Mike Williams's topic in WIP: Drag Racing Models
@Big John...many thanks for your interest, appreciated. 1. Slicing brass tube. The thicker tubes and rods for a 1:25 to 1:16 build will be around 1.4mm to 2.5mm diameter, these to be cut with a skinny cutting disc (0.3mm) mounted on a micro-motor handpiece with about 18k RPM's. Thicker, then 25k is better. Use only the cross hatched fiber thin discs, they should last till there's nothing left.....a great investment. A smaller Dremel-type handpiece is meant. Smaller tubes are thinner walled, so rolling them on a flat surface with an sharp Ex-Acto type flat blade works great. I cut these though with said slim discs, been doing this stuff for decades. 2 quality, super thin disc lasts me for a complete brass build, so the cost is justified. Last week I received 20 discs for $25 to the door. Considering...that's cheap. 2. Smooth bends. Luckily I was able to find a 1mm-walled copper tube that has the right measurements. To let the brass fit easily, I cut strips from brass sheet (using the above mentioned discs at high speed) after measuring the diameter needed, the length was determined. The thin strips were cut wider than needed, as the tendency to twist while bending is imminent. 1.25mm was needed for the single rim, so slices were cut at about double size. The rim strips were then annealed, holding over a propane Bunsen burner till they gently glowed. Now pliable enough to bend manually over the said copper tube. TIP: when the rounding process is close, clamp securely the lowest point of the ring, this will allow for lesser wandering and the rim will slowly bend into the thick copper tube. Clamps on the sides also encouraged. This takes time! Piece by piece, you'll see that the ends have to be trimmed a bit to make a perfect circle and meet correctly. To solder the ends, better is to make a mechanical retention available, like the slits shown in the photos. Every added surface for solder only strengthens the overall ring. 3. Filler. Yes, I use a styrene filler for the voids. Ethyl acetate is the chemical that makes our kit models and for glue. Place leftover sprues from a kit in the liquid, in the morning you have a wonderful paint-on styrene filler and glue too! Great for filling gaps with our kit models, and also great for filling metal gaps. The stuff will dry in a couple of hours, then you have styrene. Paint it. A small tin or glass jar will suffice for the concoction. 4. Yes. Clean joints are important! Flux will clean off with hot water. It's just a resin and will brush off. Mike..