
Mike Williams
-
Posts
366 -
Joined
-
Last visited
Content Type
Profiles
Forums
Events
Gallery
Everything posted by Mike Williams
-
64 Dodge D100 Pickup Pro Street
Mike Williams replied to AmericanMuscleFan's topic in WIP: Drag Racing Models
Francis, concerning the T6 aluminum, yes I have meantime several sources. Germany is a metal country...ahem. The stuff is almost hanging on the walls of buildings here....alongside all of the beer barrels. Among a few other things, actually a fun place to live. You can even buy bread and cheese nowadays, on Sundays in a drugstore. Life is great. Just some fun.... Mike.. -
64 Dodge D100 Pickup Pro Street
Mike Williams replied to AmericanMuscleFan's topic in WIP: Drag Racing Models
Oh my. Francis, once again your update has me grinning from ear to ear. Those small gadgets are hiding many fine parts...this is truly fun "watching". Mike.. -
64 Dodge D100 Pickup Pro Street
Mike Williams replied to AmericanMuscleFan's topic in WIP: Drag Racing Models
My goodness, beautiful fabrication here. Such a small scale, this is just delicious! Francis, thanks for the raw material information. Yes, I checked online with McMaster-Carr, the 6061 is correct, an aircraft grade aluminum, super hard in comparison with the butter soft micro tubes I struggle to get polished. What a task! I found some material I can use for front laced wire rims for dragsters. Your updates are a thrill to view....I like this! Mike.. -
64 Dodge D100 Pickup Pro Street
Mike Williams replied to AmericanMuscleFan's topic in WIP: Drag Racing Models
QUESTION; Francis, something I've been wondering about. While viewing the closeup photos, the initial cuts have some flash from cutting, this is normal. How do you get for instance, the long grooves so cleanly cut and smooth? Is the hardness grade of the aluminum you use here greater than let's say, the usual aluminum material for micro tubing? I know polishing that soft material is not easy, also all cuts made just smear. The results you show are indeed exceptional. The edges of the finished pieces are clean and crisp and not rounded from polishing, same with the holes drilled. Could you offer some insight? Mike.. -
64 Dodge D100 Pickup Pro Street
Mike Williams replied to AmericanMuscleFan's topic in WIP: Drag Racing Models
Truly exquisite. Seeing the metal parts come together in this fashion gives me lots of incentive and drive to be at the bench. This is a good thing, and a great model is being shown here. Wonderful work Francis. -
Walt's Puffer Too T-Bucket Altered
Mike Williams replied to gasser59's topic in WIP: Drag Racing Models
A really great build Brad! I'm still using your method on front axles, none better. Still appreciate your help on this. Also the tip about fly-fishing lines for electrical wiring, and later on using the line for making laced front wheels, the stuff is unbeatable and cheap. Mike-Jo....? -
Vintage FED, 1966, 1:25, FINAL
Mike Williams replied to Mike Williams's topic in WIP: Drag Racing Models
@Bainford, Trevor. I'm with you, the simple aggressive look....exactly this! It's become a lot of fun building dragsters from the 60's. No nonsense, simple design, plus they don't take long. Thanks for your praise, greatly appreciated. @gasser59, thanks Brad. I had a good laugh at that one yesterday! Jo, the wife, it's her profile....FB doesn't allow more than one person per IP, it just does not work. I've given up. Since the community is maybe 100 times what it is here, I got tired of setting things straight...useless. Quite a chuckle though! The body on the white car with red trim is not that difficult really, the side panels are half round, the top edge is all the way is 1/4 round, the middle area is a slight inverted U all the way to the nose. A beautiful car, my opinion, and really interesting. Mike (still)... -
Model King A/FX ‘65 Plymouth Satellite “Golden Commandos”
Mike Williams replied to Matt T.'s topic in WIP: Drag Racing Models
Well done. This kit does look like it has values. I like the way you show it too, as if it were just delivered yesterday, nice and white. The clean and lean look always gets me with the 1st generation A/FX cars. Nice finish on the wheels and tires too. Matt, one thing that bothers me though, read, this is not a critique pointed your way. This is not a post door car body. What's with the obvious door posts? I don't get it. Are they like this in the kit? -
64 Dodge D100 Pickup Pro Street
Mike Williams replied to AmericanMuscleFan's topic in WIP: Drag Racing Models
Hello Francis, the front cover looks excellent. Also I agree with using here and there another metal, even as you stated later on it's barely visible. But, this tiny gleam of brass will add tremendous depth to the entire front section of the motor, and this is what pays off in the long run. I can well imagine how the cover will be still slightly visible, while viewing the fuel pump area or whichever pulleys you will be employing. It's posts like this that get my blood pumping up and enthusiasm awakens to get the bench dirty again! Many thanks. Mike.. -
Vintage FED, 1966, 1:25, FINAL
Mike Williams replied to Mike Williams's topic in WIP: Drag Racing Models
@Guido, hey, great to see you here. Thanks for the thumbs up, appreciated. Mike.. -
Vintage FED, 1966, 1:25, FINAL
Mike Williams replied to Mike Williams's topic in WIP: Drag Racing Models
Thanks Dave and Chris, this was a fun little build, with the exception of the injection stack setup it was a real quickie too. Makes me want to stick with the genre for a while. But the Magwinder will be a challenge, no plans available, lots of drawing to do before this one gets ready for construction. I'm luckily though in having contact with a fellow who knows the car firsthand, as his father piloted the car for a while. Also the original owner is still available, and these two gentleman will be helping out with my many questions. Mike.. -
Oh my! What do we have here? I'd say sensational work, very clean and well photographed. Delicious. Mike..
-
Excellent! My opinion, gold on our models is a fantastic color. Along with the other gleam, this just looks sensational, very well done. Mike..
-
Vintage FED, 1966, 1:25, FINAL
Mike Williams replied to Mike Williams's topic in WIP: Drag Racing Models
Thanks fellows for the kind words, very much appreciated. This was a fun and quick build. Learned a new wire wheel fabrication process, fairly easy in the meantime and they look great on the car as it sits on the shelf. The injection setup was challenging as I hadn't gone this far yet, but help was provided from the H.A.M.B., great guys there willing to help out, even for small scale car guys. Also, my first attempt at a full streamlined body and nose in sheet metal. It worked and looked good, but strangely enough, the car didn't appeal to me as much as it does now. Too much aluminum killed the simple look. No problem though, I can use the experience for my next project, also an all metal endeavor. Thanks much, Mike.. -
Vintage FED, 1:25 WIP, motor is finished...
Mike Williams replied to Mike Williams's topic in WIP: Drag Racing Models
Thank you Charlie, I'm really happy with the way things turned out. I was worried the valve covers might not be right, since they're styrene. I wanted to cast them in nickel, but the virus dilemma has closed down my source at the time. But the folks are back at it, so I can soon stock up on metal valve covers! I like 'em. Francis, Thank you. Yes, that was a funny remark, made me laugh. The wheels and front axle are of course already finished, the unit will be attached when all else is finished. This would be the last stage of the build. Mike.. -
Vintage FED, 1:25 WIP, motor is finished...
Mike Williams replied to Mike Williams's topic in WIP: Drag Racing Models
@Larry, Dennis and Edgar....thanks very much, appreciated. The plan was for a very simple vintage FED, but with a different kind of motor. No blower, but a nice stack injection, I like these injected Jr. Fueler -style FED's. I made a full body for this car, but deleted the long nose and cowl, the car didn't look as good as with the simple cowl design. Mike.. -
64 Dodge D100 Pickup Pro Street
Mike Williams replied to AmericanMuscleFan's topic in WIP: Drag Racing Models
@CT, maybe Francis will just make a plastic pan, painted gold, this way he won't need to polish it either....lol Francis, very nice work. Great idea also for a different metal being utilized. Make for an excellent contrast, yet blending in well. Satin aluminum and brass look excellent together. Oh my! I do believe you even beveled the edges somewhat! Smiling now and joking. Also, it appears as if the solder flowed all the way to the outer edges...excellent, totally sealed. Mike.. -
Vintage FED, 1966, 1:25, FINAL
Mike Williams replied to Mike Williams's topic in WIP: Drag Racing Models
Merci CT. Yes, this rhymes, I like. Simplicity. Excellent. These cars are simple, but relay a strong statement. I'm hooked on these. Already a new project in the works, just different from these two. But still Lions style. I like this one... A Kent Fuller car...quite different; Greetings, Mike.. -
Vintage FED, 1966, 1:25, FINAL
Mike Williams replied to Mike Williams's topic in WIP: Drag Racing Models
Thank you Francis! Fact is, as a fellow mentioned in an earlier update, the beauty of a FED is the simplicity of design. From and function. I love building these old Altered and FED cars. No electronics, not many rules, just what worked. The brass chassis is done in one day. The motors are built in an hour. More detailing takes more time. This car has an intricate fuel injection manifold, more than 100 parts. I realize this is not the norm here, just as you choose, I like to show a different method for building a model car. This car can be built in 2 weeks easily, I like to take time, just a few hours in the afternoon and late evenings. The injection setup though , took a lot of time researching and building. This was not an easy task. Now I have learned. Also, I think it might be better just to show a future project when finished. No more WIP topics here from me . There is a much greater acceptance and feedback in the diverse FB groups. Great feedback and tips exchanged, much unlike the silence here. This is what modeling is about. You like, you say so. You don't, you say this as well. An exchange is great for modeling. Silence is stupid. I choose though to further support your excellence in modeling, every entry just lets me smile. Thank you! Mike.. -
THIS! Great and cheap spray paint from a huge can. Dries quick, not super glossy, I use it for all things black on my models. Flat black sucks, my opinion. Man, nothing on a car is that color, a terrible choice, throw flat black away, period. Satin black is the way to go. Duplicolor has other satin colors too. Look here, a satin red, actually a primer for metal. Just polished up a bit. Originally though to be a base coat over white, just I like this color on an old race car... Great paint and cheap as dirt....almost. Mike..
-
Vintage FED, 1966, 1:25, FINAL
Mike Williams replied to Mike Williams's topic in WIP: Drag Racing Models
@1320, Jim thanks much for the appreciation. I know well from the FB groups that Australian modelers are just excellent craftsmen, and I'm happy for your praise. @alan barton, Alan, I surely appreciate you commenting. I think we may know each other from FB possibly? Also, as stated above, Australian modelers have excellent qualities, plus your very friendly and open attitude is a real treat. I do love the earlier FED's, as a fellow here stated recently, the simplicity of design, is very attracting. Yes, the memories, I agree. @Pro Tech, Charlie, very humbling, much appreciated. I use lots of your products, braided wire...none better. Looking forward to the seat belt buckles, they're on the way! Mike.. -
Sensational! I tried once adding valve stems to a rear mag wheel, just no cap on them, a poor attempt, plus they can't be seen. These look great, with cap! How was the "dimple" done, where the stem exits the wheel rim? Looks like magic, and utterly real. QUESTION: Now the tire. I use the AMT "Tall Dragster" slicks, also a 11.75 x 16 tire, which is actually fairly close in scale. I like the soft rubber material, makes it easy to bloat the tire around the wheel. The tire you show, appears to have the more realistic rounded tire edge at the pavement surface area, also that the tire has a domed appearance, not completely flat on the track surface. Are these your tires? I like. Mike..
-
Model King A/FX ‘65 Plymouth Satellite “Golden Commandos”
Mike Williams replied to Matt T.'s topic in WIP: Drag Racing Models
Nice looking kit. So why don't you post photos here too? -
Jo-Han Maverick-Dyno Don's Ride
Mike Williams replied to mustang1989's topic in WIP: Drag Racing Models
That's a nice improvement Joe, along with the sensational shifter and equally well done dash and pedals , small things like this really add up. I like this. Mike.. -
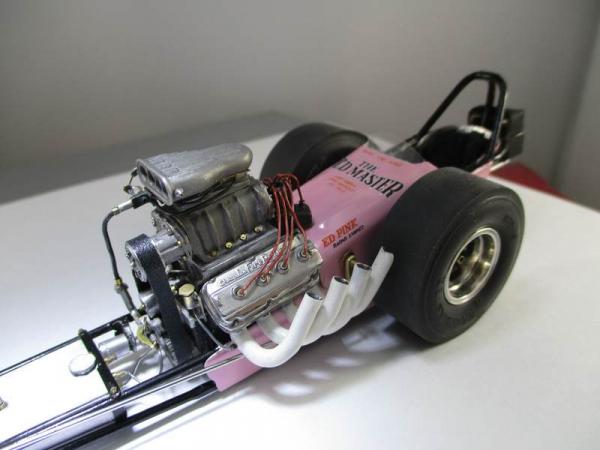
This project is completed. I'll order ProTech 5 star seat belt buckles, a really fantastic product. Due to the China virus, and the post overseas, this will take a couple of weeks. Thanks Charlie! I'll add the seat belt setup later on, then the chute pack can also be completed. For now, this car is sitting alongside The Old Master and I like the view. This might be updated later on with the belts and chute pack completed. Mike..