
Mike Williams
-
Posts
366 -
Joined
-
Last visited
Content Type
Profiles
Forums
Events
Gallery
Everything posted by Mike Williams
-
64 Dodge D100 Pickup Pro Street
Mike Williams replied to AmericanMuscleFan's topic in WIP: Drag Racing Models
Wonderful work here Francis, many thanks for this. Already, your skills and attention to detail has become quite an incentive for me. I've changed the front of the Hemi I'm working on and adapted the front plate accordingly. Looks much better now. Merci. -
A couple of members have asked for a closer look at lacing wire wheels for dragsters. We all know how the kit wheels look on 1:25 models, we can do better with a little effort. A couple sets on finished cars from last year are here; http://www.modelcarsmag.com/forums/topic/146828-the-old-master-1966-125-brass-model/ http://www.modelcarsmag.com/forums/topic/143663-amt-23-ford-t-fuel-altered-new-pics/ 1. First off a hardwood base is needed. Here a rest piece from a hardwood floor. This will be a 32 spoke wheel, so 8 studs are needed, evenly spaced to make a "clock". The studs should be inserted deep enough to hold up to a little pressure, but steady enough to not wiggle around; 2. Since this wheel will be soldered, I chose an 18mm copper tube from a plumbers supply shop, and cut slices off the tube to end up at about 1mm thickness each. Two rims will be needed for one wheel; 3. Here the wire used, a 100yd. roll of silver plated copper wire, 0.20mm thin. Amazon has this, but comes from China...your choice. 4. Start the procedure by wrapping the wire around the top most stud. For ease in fabrication, number the studs as you would a clock. The first wire should be wrapped around often enough to secure it from wandering. Wrapping around the center stud, which will be the hub, go straight across, then one number to the left, or counterclockwise. This would be starting at #2, then go around the hub to #8; 5. Go around #8, then straight across then one number left, would be now #14. Continue this way until the last remaining stud is completed. Then the last single wire should go back to where you started, being in this case #2. Wrap it up and secure the last wire; 6. Now the wires and rim can be centered and the wires evenly spaced out on the rim, solder them up to the rim. at this point let me write that a hard plastic tube could be used, and for the wires you can use fly-fishing line in ultra thin gauge. The stuff is cheap. Glue it on the rims with a good CA. 7. Cut the wires off between the studs and the rim, then carefully lift the single rim off the middle stud; 8. Here the visible side. The inside, soldered up parts will be soldered together to make a complete rim. 9. The excess wires should be removed right up to the rim surface. If soldering these wires, there's an immenent danger the excess wires would otherwise start to float around and lose their position when soldering the rims together. Clean the rims up, here the visible side of a rim; 10. Any excess solder should be removed between the wires to reduce the overall thickness, and to let the two halves come together better. With two rims at about 1mm width each, the final result will end up being about 2.5mm, which makes out for a scale of about 2.5", perfect for a dragster tire, and perfect for the Tony Nancy kit tire. Here the finished laced wheel in direct comparison to the kit wheel. Left is a 32 spoke wheel, right is the better, 40 spoke laced wire wheel. 11. Here on a vintage FED model, the 32 spoke version. I like the 40 spoke better though, in the last photo from the current WIP. 12. The 40 spoke version; I hope this might work for you in case you're interested. Mike..
-
Vintage FED, 1:25, brass WIP, driveline
Mike Williams replied to Mike Williams's topic in WIP: Drag Racing Models
UPDATE; wire wheel lacing. This time around I thought to try a revised method for lacing the front wire wheels. They were made to fit the Revell Tony Nancy dragster tires, which are a scale 19", just right for a scratch build. First off, we need a sturdy station to attach the studs for the wires to be wrapped around, here a nice block of hardwood flooring, with a "clock" showing at first 8 studs. This will make a 32 spoke wheel. Here the rims being prepped. Since the wheels will be soldered, copper tubing from a plumber supply shop will be perfect., here 18mm with a 1mm wall thickness; Here two slices cut off, making rims which should be no larger than 1mm thickness. There will be two rims coming together, which will fit perfectly inside the Revell tires; Then a silver plated copper wire from a 100yd. roll....Amazon. At first 0.25mm was used, later on for a 40 spoke wheel, 0.20mm is the preference. Cheap too, about $5; Now, returning to the clock, start by numbering the studs. This clock will be for a 40 spoke wheel, 10 studs. Wrap wire around securely and do around the middle post, then choose a number directly across, then minus two. In this case this would be stud number 10 at the top, go around and wrap the 1st wire counterclockwise being number 4; Then from #4 straight across then 1 counterclockwise, this would be number 8. And so on....; After the last wrap, the final single wire leftover would be wrapped around just exactly where you started. Secure tightly, then solder each wire to the rim. When all wires are attached securely to the rim, cut off the excess and lift the rim off the "axle stud". Here the outside, visible surface; One rim with 10 studs, makes for 20 spokes. Important now to trim off the excess, right down to the rim itself. If using solder, the spokes must be flush with the outside surface of the rim, or a floating of the wires during the process of soldering two rims together might happen! Catastrophe! You can use other rim material, like hard plastic, and with a good CA you can use fly-fishing line!! Also very realistic! Here the period correct 40 spoke laced wire wheel on 17", 18" or 19"" tires, with super thin spokes. Then compared to the 1:25 kit wheels. Your choice. which is better?; Left the 32 spoke wheel, right the 40 spoke; Finally, another view of the 32 spoke wheel, I like the 40 deal better though; Thanks for looking, hopefully maybe someone can use the method. Mike.. -
Jo-Han Maverick-Dyno Don's Ride
Mike Williams replied to mustang1989's topic in WIP: Drag Racing Models
Coming along nicely Joe, I'm enjoying the progress with this project. Mike.. -
70 Plymouth HEMI GTX 1/25 Scale
Mike Williams replied to AmericanMuscleFan's topic in WIP: Drag Racing Models
Hello Francis, gorgeous fabrication, seeing shiny aluminum on our models is always a treat, and your specific skills are mind boggling. What a thrill to view and study, maybe there's something here that I can pick up to improve what I do....I'm grateful to see what you accomplish, and will further enjoy your entries. Thanks for posting these wonderful photos. Mike.. -
Vintage FED, 1:25, brass WIP, driveline
Mike Williams replied to Mike Williams's topic in WIP: Drag Racing Models
Things are closed down everywhere, lots of modeling time now. The aluminum seat was bent and fitted, the header pipes have been roughly bent, and the front axle fabricated. Also a nice and easy method for making scale banjo fittings figured out. Stay safe. Mike.. -
Vintage FED, 1:25, brass WIP, driveline
Mike Williams replied to Mike Williams's topic in WIP: Drag Racing Models
Hello CT, I'm happy you enjoy the progress, much appreciated. Greetings Francis, yes a Hemi is a must, I do believe they model the best. Concerning the soldering, I have a simple $50 analog soldering station, with high, medium and low temperature settings, and two different tips for the "pencil iron". The main tip is a 2.5mm wide spatula, and a very thin "pencil" shape for ultra tiny parts. My opinion, I don't need anything other soldering method. The joints are only reduced and smoothed up with small diamonds or burs, then rubber points to reduce the grinding marks. A clean solder joint is more pleasing to the eye. I'm at these silly joints all of the time, getting them smaller and smaller. Hi Carl, I'm pleased with the progress. This build is going quickly. Just last November another FED was finished, so the momentum is still moving forward. Mike.. -
Vintage FED, 1:25, brass WIP, driveline
Mike Williams replied to Mike Williams's topic in WIP: Drag Racing Models
Update; a few interior details added, and the motor got some paint. The heads are prepped with studs on top for the injection setup, and with tubes for the zoomies. -
Vintage FED, 1:25, brass WIP, driveline
Mike Williams replied to Mike Williams's topic in WIP: Drag Racing Models
Kurt, excellent link, thanks. I saved it. Yes, HAMB is a gold mine. Mike.. -
Vintage FED, 1:25, brass WIP, driveline
Mike Williams replied to Mike Williams's topic in WIP: Drag Racing Models
Hi Kurt, thanks, appreciated. Yes, I have an ongoing query about mechanical fuel injection. Lots of knowledgeable guys there. No, legs over. This car is about vintage 1968. Mike.. -
Vintage FED, 1:25, brass WIP, driveline
Mike Williams replied to Mike Williams's topic in WIP: Drag Racing Models
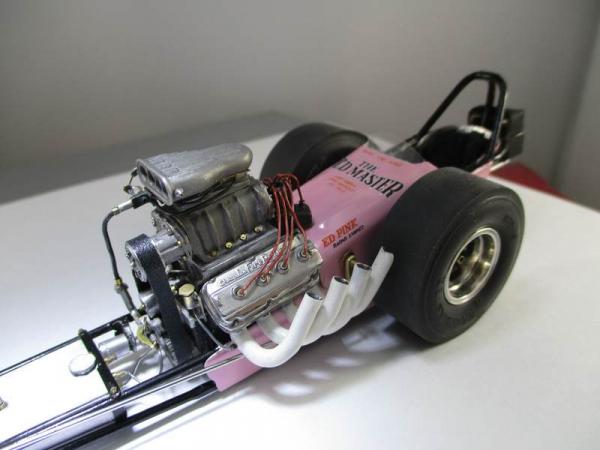
@Bainford, many thanks. I feel the motor choice is a good one. Still a Hemi though, without a hat. UPDATE: Driveline setup. Short block and the rearend housing all lined up, with an 8° motor dump. The firewall is 23.5" out from the axles. The rear wheels are Comp Resins, cast in a nickel alloy. -
Vintage FED, 1:25, brass WIP, driveline
Mike Williams replied to Mike Williams's topic in WIP: Drag Racing Models
Hi Larry, thanks! When I see NC, your area.... I think you boys know what to do with a motor. Read NASCAR. Special attention will be given to this build, which will be stack injected, not a blower motor. We want something different here. -
Vintage FED, 1:25, brass WIP, driveline
Mike Williams replied to Mike Williams's topic in WIP: Drag Racing Models
Thanks Ed, North Coast, Jax here. There are indeed excellent cars to be built, restorations with weed burners. This one will be with zoomies and the then newly introduced 426 Hemi, just not supercharged. We've seen enough of these. A nice and clean stack injection might be nice on a shorter dragster. -
Hello drag racing fans, I kind of like the mid to late 60's dragsters. This one is a modified Kent Fuller chassis. This car will be built to a scale 150" wheelbase in 1:25. Thanks for looking.
-
Yep, this is the way to move forward. WASH YOUR HANDS. Going grocery shopping? Wanna grab a shopping cart handle? No. Not anymore. I've advised the wife, surgical rubber gloves box at the console in car, take them off after you take the cart back. Spray the hands and steering wheel with alcohol spray disinfectant. Granted, my wife is often ill with flu and other ailments. We practice cleaning door knobs and when going to the garbage cans, only with rubber gloves. I'm from a medical lab profession, and lucky. I haven't had the flu or similar for more than 23 years. Just be safe, and do finger lickin' good only at home after you've cleaned your possibly absolutely infected fingers and hands. This can be safe for you, keep your head.
-
This is an excellent post. Less clutter would be a great incentive for all of us here. Ron, since you've rejuvenated this older topic, could you show us a front view of this rusty car? Also, I didn't want to make another quote, do you still want to see my cars? No problem, just I don't prefer to show my stuff on another member's topic. Just give an OK, I have one or two. Yes, I do build occasionally. All good here my friend. Just a modeler who likes details.
-
Don Garlits' 1970 Swamp Rat 13
Mike Williams replied to Guy Beaudette's topic in WIP: Drag Racing Models
Thanks for the reply, much appreciated. I have several pairs of nice slicks that I'll be trying this out ASAP. I do like the look. Guy: I don't understand about the "slicks are flattened using a piece of glass". Could you offer some insight? Mike.. -
Very well done, excellent Mopar. Gotta love the paint on this one.
-
Don Garlits' 1970 Swamp Rat 13
Mike Williams replied to Guy Beaudette's topic in WIP: Drag Racing Models
I really like this. My opinion, the Garlits cars always looked kind of dirty, compared to the West Coast cars. Maybe the only chrome he had was valve covers and front wheels. But the '"dirtiness" was just unpolished and nothing but business intentioned. Just like this model. Excellent finish on the parts too, lots of love shown here, and knowledge. Heck, even the wheels fit into the slicks, no rim sticking out around the whole tire like most guys show. The slicks looks like you could press down on them and the car would shake a little. QUESTION: Guy, concerning the slicks and the "deflated look", are those just slits cut into the tire walls? Impressive. Mike.. -
The Orange Crate. Probably three words that have defeated most older modelers. Well it sure whooped me back in 1963 or so when it came out. I wanted this kit like no other before. Well, let me write, right along there with the AMT Double Dragster Kit....the Fiat! After much research, I bought the kit last December, and had big plans for it. Again, karma struck. It's on ice for now. Then this one comes along. I had to look often to see if it was the real car or the model. Thank goodness for wooden table tops. Only then could I comment, "this is the best model I've ever seen". Still true. The chrome finish just kills me, yet the slight wash on the rear brake backing plate is so subtle, they look correct. Not a single flaw in my opinion. To top things off, the front tires show some tread wear. Still the best in my opinion.
-
1970 Sox & Martin 'Cuda Pro Stock
Mike Williams replied to Guy Beaudette's topic in WIP: Drag Racing Models
"otherwise it's very good"....? I have to laugh now. I don't know of anyone online that can build a better model kit, with such a precise attention to detail and such an excellence in presentation, than this fellow. Granted, I've seen his other works, but this is not an issue here, agreed. What we have here is in my opinion just sensational! Period. Look at the door lines to the body. The doors open too. The praise could, and should go on for hours. This is a model to be looked at and studied. I dare to write, this new member makes the most realistic kit cars that I've with my recently achieved 69 years, have ever seen. I'd also like to add, we've never had private messaging contact. -
Junior Johnson...now that's a race car name for sure! I've read articles about this man, from his and others' days of back roads and moonshine running from the law. An extraordinary driver, able to slide cars on small roads, paved and otherwise, like the law had never encountered previously. The back woods boys from the east still do amazing, and have amazing knowledge of how a motor can work. Read NASCAR. These guys are the real motor builders...period. Yes, RIP Junior Johnson.
-
Here's what I want for Christmas.... I want this wonderful time to be like most of the others I've experienced. Far away family is coming around and we'll meet soon. Always joyous, a great event. This time of year in my area it gets dark at 16:00, read, way up north. Snow on the ground. Home is lit inside with a decent and warm lighting. The fireplace is on. I love the dimmed lights at home, and trimmed table, spruce branches and some small figurines the wife has from her Grandmother...they're small angels, in a beautiful white porcelain. The wife and some family gals are polishing up the silverware, and cleaning and shining up the crystal glassware. The place smells good. Some real candles too on the tree, no electrics. We light these on Christmas Eve, after church. Great and traditional meals being prepared. Folks around that you love, family...your own history is looking you in the eye. This is a great thing. Nowadays you get older and after a while, you realize you and your generation are the next ones to go, you've lost family and nature says you're next. I hope this to be true. I'm grateful, and thankful for good health and some good breaks in life, and a good wife and that we support each other, good and not so good times....just like we promised. I want this to continue, yes. I want also, that our country continues to be strong and true.
-
Triple Nickel inspired '29 Ford Roadster drag car
Mike Williams replied to Bernard Kron's topic in WIP: Drag Racing Models
Wow! Bernard, the "teaser" is just sensational...respect! I've never seen this photo technique used for a model car before. This car is just plain clean, my opinion. A wonderful replica from the very beginnings of hot rod days, way back when. Cleanly built and wonderfully presented, this only is a direct result of your intensive search for factual and relevant information about how things really are, and were back in the older days. I still think you are a treasure chest of valuable information, should one choose to model an actually correct car in the correct scale. I do wish more guys would follow this path, build a model with research and understanding the "why" it was done the way it's presented. Thanks Bernard. -
.
