rob1957
-
Posts
151 -
Joined
-
Last visited
Content Type
Profiles
Forums
Events
Gallery
Everything posted by rob1957
-
Thanks for feedback David . Dimensions for diorama are 140mm x 190mm and roughly 100mm height . Rather difficult to find British/CDN soldiers to build , either WW1 or WW2. Dragon , which has a nice product line , offers mostly German WW2 . The ICM Ford truck is a very kit to build , excellent fit up and details . We have never built any MENG kits , but I hear they are quite nice . Some day might we might build some armour .
-
Woodland Scenics turf material and undergrowth for foliage . Soldiers are ICM kits . Nice products to work with. Planning the layout was tricky , it evolved over time until a final scene was decided on . With Covid lockdown here in our province this provided hours of enjoyment to build.

-
Here is the inside of our farm bldg. . Balsa wood door/frame and window . Electrical conduit is .050'' diameter rosin core solder bent to suit .
-
Our camera isn't the best . Sorry for blurry pictures . Tiles on roof and eavestrough are A&W paper drinking straws cut and painted . Our grenade thrower in back of truck was placed there due to lack of space .
-
Hello everyone . Here is a diorama that we just completed after a few months work . The truck was previously posted in Trucks thread . Diorama base is a cheap picture frame which we modified , felt is applied on bottom to prevent scratching . Plaster on bldg. is tile grout with some pigment . Potting soil mixed with water/PVA glue is ground .
-
Nice choice of colour on this build . I need more practice on my paint to get that polished look. I found that the windows weren't the greatest to fit up. And I agree with your point about the headlights on this kit . When I first got to the ,roof-to-body stage, I was racking my brains on what to do with this major fit-up issue . I applied lots of extra glue on the inside seams to try and prevent cracking issues . This kit might have been beyond my skill level , I'll be the first to admit . It was a challenge to get it done . Big sigh of relief .
-
Thanks for feedback everyone . Some pre-drilled holes for door handles and those tail lights would have been nice .Tail lights req'd some re-shaping as NOBLNG mentions . Unfortunately I didn't look that far ahead in the instructions and drill these holes myself. I need a bit more experience and some artistic technique with the final paint job.
-
The biggest issue we had was the coupe top to the body . It was challenging , lots of Vallejo putty and delicate sanding . And some material removal on top of pass side interior tub. Fortunately this colour hid a lot of the work . Plastic thickness on interior tub walls was much thicker on pass. side than driver side . Something went wrong at the factory . We had fun . It was a challenge/learning experience . Enjoy .
-
And there we have it . A different type of build from the 1970's muscle cars which I have done . Would I do another ? Of course .
-
Fit up around grille and hood ornament was tricky . Inside tire diameter was too small , had to cut out some rubber to get rim assembly to fit . Tires are solid rubber , tough stuff .
-
I should have installed the rear tail lights before painting . Fit up wasn't the best so I left off pass. side tail light . My mistake .
-
Colour is Tamiya TS-43 Racing Green . My front end seems to be a bit lower than I expected .
-
Here is my first build at this type of kit . Picked it up second hand in antiques mall. My difficulty was getting the hood together properly . I had detailed the engine but in the end I had to glue the hood in place so I miss out on seeing my engine work .
-
1917 WW1 Ford
rob1957 replied to rob1957's topic in Model Trucks: Pickups, Vans, SUVs, Light Commercial
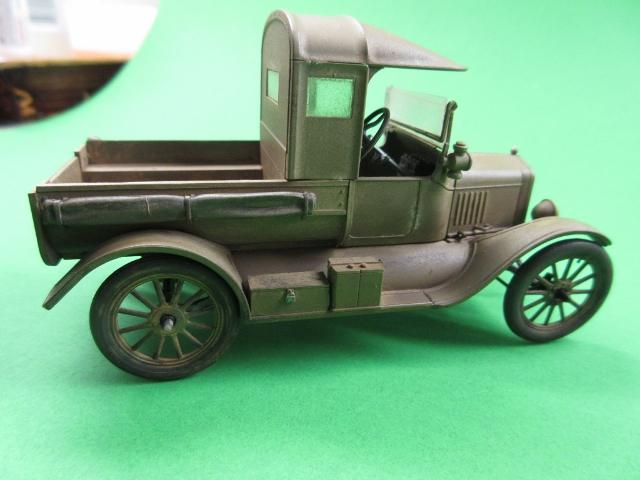
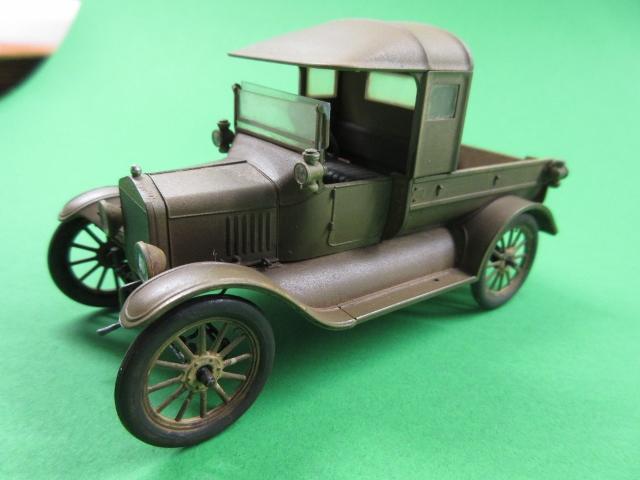
Thanks for feedback . We airbrushed Tamiya Buff/Khaki for colour . Soft artists pastels shaved down with Vallejo pigment binder was lightly applied for effects . Tamiya flat clear / Tamiya thinner to seal off . No door handles in kit . Tires are plastic . -
1917 WW1 Ford
rob1957 replied to rob1957's topic in Model Trucks: Pickups, Vans, SUVs, Light Commercial
This truck will be used in a WW1 diorama coming up . The final verdict : Nice kit to work on with endless possibilities for add-ons . Very little flash to sand . Instructions are straight forward . I'd recommend this kit . Enjoy. Robert.
-
1917 WW1 Ford
rob1957 replied to rob1957's topic in Model Trucks: Pickups, Vans, SUVs, Light Commercial
For some reason the rear wheels seem to fit too far ahead under the fenders . I went back underneath to re-check my work , starting with fit-up of driveshaft to transmission. All was in the correct location . This engine had lots of detail so an open hood version would work quite well . I need more practice with the weathering .
-
This is the ICM , WW1 Ford pick up for Australian Army , 1/35 scale . Nice kit to build . Lots of detail . Excellent fit-up . I had a bit of trouble with the wind shield though .
-
1978 Phantom Corvette Convertible - MADE IN BRAZIL
rob1957 replied to uelder valongo's topic in Model Cars
Nice looking corvette Uelder . Magazine on front seat is a nice touch. My wife is from Belem . We visited Rio , Copacabana , last Christmas . Keep on building . -
Nice colour , looking fwd to trying it on the Tamiya Mazda Savanna . After the Tamiya 3 compounds could I finish off with their wax , or not necessary ? I thought we saw a MK41 go flying by us once on the DVP !
-
Excellent diorama Patrick . Outstanding ! What scale is this , 1/35 ? Tell us about the figures you have there , who made them ? Is your building a kit or scratch-built ? That workshop is great .
-
Hi Chang. I have the : Alpha Abrasives Ultra Fine Waterproof Finishing Kit . I assume I can wetsand with their 2K grit . Then I have these Micro-Mesh Cushioned Abrasives , they're a square sponge . And I could do the 3K wet sand as you mention ? Finishing off with the 3 Tamiya Compounds . I have a Tamiya Mazda Savanna RX7GT motorized 1/24 scale kit , bought it used , not many interior parts . Tamiya TS-39 Mica Red , I think it'll look nice .
-
Thanks everyone . I wish I could have filed the seam lines in the grooves on the top of the radiator a bit better but I don't have a small enough square file that could have done that . And I would have liked to have found a front bench seat rather than the buckets . As way back -when, I owned a 340 Duster , front bench , automatic on the column . No power steering , rubber floor matting . Red paint , white stripes , had it re-painted without the stripes . Headers to top it off . Looked like a real sleeper . Fast little car .
-
Those are great . I like the prop-driven Russian snow-mobile , nice weathering on that . I've always had difficulty with water in a diorama , problems with product shrinking when drying .
-
Fantastic work . Something right out of Mad Max genre . What method are you using to create that excellent rust effect ? I haven't had any luck with that at all. I see videos explaining chipping effects on armour but nothing like what you have created here . The Picasso of rust effects .
-
Hi Ray . One of the most difficult areas of figures , besides painting eyes on the face , is proper positioning of arms so the soldier can hang onto a rifle and have it appear realistic .
.jpg.33439d02f961e8e8a5745e78c8b18d10.jpg)
.jpg.7f306eee3e1f83b440dc3b65327c4a0d.jpg)
.jpg.30579bdd202717f2c472f3b6b9598113.jpg)
.jpg.5ce76d8cabdddea0da4ba4b82c1a0527.jpg)
.jpg.5ee767a97f6d03fa2162ad9159af5090.jpg)
.jpg.83d37effe61aa3d6ec7d34cca2399ff6.jpg)
.jpg.b816beb02294d90a708287d1a8345d12.jpg)
.jpg.52e113a40a23d227e227c7059b3b9fc0.jpg)
.jpg.222af86f5c753ff4113de0295acef5a7.jpg)
.jpg.e2ac17d565187fb44ed7e8a01fcb5dc6.jpg)