RCprofile.JPG.6b95b19b856bf00a3becd6aeaaa48f3b.JPG)
Ian McLaren
-
Posts
1,360 -
Joined
-
Last visited
Content Type
Profiles
Forums
Events
Gallery
Everything posted by Ian McLaren
-
RCprofile.thumb.JPG.1691ea753d0f0897fdc1b2510cf06775.JPG)
1/16th 55 Thunderbird BB/FC Funnycar "GIRL TROUBLE"
Ian McLaren replied to Ian McLaren's topic in WIP: Drag Racing Models
After constructing the basic Vega chassis and compairing it to the thunderbird body it became apparent that the differences are somewhat larger than originally thought. So a redesign of the template was going to be easier than adjusting the original jig. Here is the early redesign of the Thunderbird chassis with the Keith Black out its correct 68 inches from the rear axle centerline and the relocated rear engine plate .
-
’72 Dodge Demon Drag Racer 1/25 scale
Ian McLaren replied to AmericanMuscleFan's topic in WIP: Drag Racing Models
The block is amazing and a testament to patience and carefull planning. I'm not a machinest, although I did take a rudimentry course as part of my drafting technology program nearly fifty years ago. I was however the general manager of Davenport Racing for several years and we did race motor design and machining to a very high tolerance. So I do have an appreciation for the efforts involved. To see you working on an item nearly 25 times smaller and achieving this type of accuracy is simply mind boggeling. I cannot wait for the next batch of wonders that emerge for your very high performance race engine machine shop. Very well done indeed! -
1/16th Vega Funnycar With a difference
Ian McLaren replied to Ian McLaren's topic in WIP: Drag Racing Models
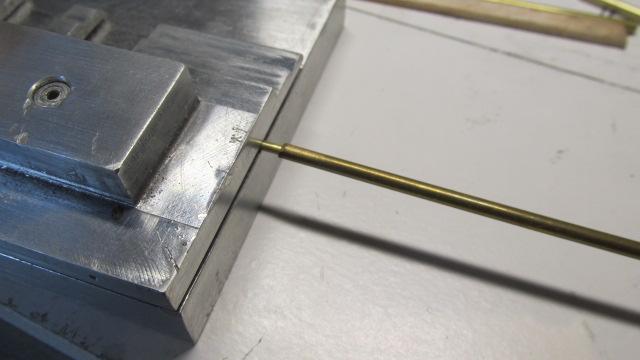
Thank you Tim I was actually putting a tutorial together on how I do a chassis (brass or Plastic), it is certainly not the definative method but it's quick, easy and simple. Here are some photos of the beginning of the process. I use simple white shelving material as a base and draw the chassis side view on it to scale, I use 1/8th hard balsa to build the guides for the main rails and superglue them to the shelf the photos will expand on the process including the sleves for joining the tubes. once the main rails are completed I simply cut and fit the vertical bars to press the main rails to the sides of the jig and then solder them in place
- 17 replies
-
- 2
-

-
- 3d
- scratch built
- (and 1 more)
-
1/16th Vega Funnycar With a difference
Ian McLaren replied to Ian McLaren's topic in WIP: Drag Racing Models
Progress continues
- 17 replies
-
- 1
-
-
- 3d
- scratch built
- (and 1 more)
-
1/16th Vega Funnycar With a difference
Ian McLaren replied to Ian McLaren's topic in WIP: Drag Racing Models
Right side of the Hadman chassis has all of the major tubes in place, and the left side is in the jig now. Once it is done I'll make the minor changes required to the jig and build the sides for the Thunderbird, as they are basically the same except for engine placement
- 17 replies
-
- 1
-
-
- 3d
- scratch built
- (and 1 more)
-
1/16th 55 Thunderbird BB/FC Funnycar "GIRL TROUBLE"
Ian McLaren replied to Ian McLaren's topic in WIP: Drag Racing Models
My rendition of the Hadman chassis in the Vega and Thunderbird the only difference will be the rear section of the upper main rail to accomodated the difference in how far out the engines are from the rear axle centerline. Generally the more power the further out it is.
-
1/16th Vega Funnycar With a difference
Ian McLaren replied to Ian McLaren's topic in WIP: Drag Racing Models
My rendition of the Hadman chassis in the Vega and Thunderbird, the only difference will be the rear section of the upper main rail to accomodated the difference in how far out the engines are from the rear axle centerline. Generally the more power the further out it is.
- 17 replies
-
- 3
-
-
- 3d
- scratch built
- (and 1 more)
-
1/16th Vega Funnycar With a difference
Ian McLaren replied to Ian McLaren's topic in WIP: Drag Racing Models
Here is a look at the Hadman chassis I'm using for both cars. The basic chassis will be the same except for the motor placement. The Cosworth will be around 55" out where as the KB was 66" out from the rear axle centerline, if was running on Nitro it would have been 68" out with a second set of mounts as per how the original Girl Trouble Car was set up.
- 17 replies
-
- 2
-
-
- 3d
- scratch built
- (and 1 more)
-
1/16th 55 Thunderbird BB/FC Funnycar "GIRL TROUBLE"
Ian McLaren replied to Ian McLaren's topic in WIP: Drag Racing Models
Skipping ahead, the last few days have been refining the surfaces and adjusting the body for clearances of various items related to the chassis. Starting designing the chassis for both cars. The Vega will be getting the lions share of the effort which will transfer directly to this car in most areas.
- 63 replies
-
- 4
-
-
- 3d printed
- scratch built
- (and 2 more)
-
1/16th Vega Funnycar With a difference
Ian McLaren replied to Ian McLaren's topic in WIP: Drag Racing Models
I think a blown, injected, nitro Cosworth V8 Vega is moving well out of the box. -
1/16th Vega Funnycar With a difference
Ian McLaren replied to Ian McLaren's topic in WIP: Drag Racing Models
Yes Francis, the body is one of my extra Green Elephants with the Comp Resins slant nose conversion, The 1/16th Cosworth DFV is from a STL file from Ron Olsen, It rivals the detail in the Tamiya 1/20 and 1/12 versions. I have built both of those and this actually has more oprions as per the various series this engine competed in back in the day. This is in essence a V8 Cosworth Vega.- 17 replies
-
- 1
-
-
- 3d
- scratch built
- (and 1 more)
-
Sometimes you just wander off into the wilderness with a project concept, this is going to be one of those times. I have normally built representative models of real cars over the part few years. This one most certainly is not one of those. To paraphrase Straightliner59's tag line This is a replica of an imaginary car. Sorry Daniel, I just couldn't resist. LOL
- 17 replies
-
- 4
-
-
- 3d
- scratch built
- (and 1 more)
-
1/16th 55 Thunderbird BB/FC Funnycar "GIRL TROUBLE"
Ian McLaren replied to Ian McLaren's topic in WIP: Drag Racing Models
Thanks Bob, I'm kind of excited about this one. I haven't modeled a Hadman chassis before so there is going to be a lot of research and drawing involved in its developement -
1/16th 55 Thunderbird BB/FC Funnycar "GIRL TROUBLE"
Ian McLaren replied to Ian McLaren's topic in WIP: Drag Racing Models
Thanks Daniel, I'm doing this one at the same time as my Vega project, which I will post in the next couple of days.- 63 replies
-
- 2
-
-
- 3d printed
- scratch built
- (and 2 more)
-
1/16th 55 Thunderbird BB/FC Funnycar "GIRL TROUBLE"
Ian McLaren replied to Ian McLaren's topic in WIP: Drag Racing Models
Hi Brian, I really appreciate your kind words and also your offer. That being said I live in Canada and freight on the T-bird would be in the 40 to 60 dollar range, and as I said I'm well down the road with the printed body already. It's a great kit and an excellent starting point for a S/G or S/C roadster project and I'm sure someone you know in your area could benifit from the kit. I'm jumping ahead a bit showing this to you but here's were it stands today after about two weeks of cutting fitting and sanding, with a very rough read wing/ spoiler assy made out of cardboard trying to refine the size and shape of it. Please keep following as I go over the steps needed to get to this point in the project.
- 63 replies
-
- 8
-
-
- 3d printed
- scratch built
- (and 2 more)
-
I'm a ways down the road on this one as I didn't know if I could pull it off initally. There is no 55 T-Bird 1/16th kit and I didn't want to buy Revell 1957 T-bird kit just to throw 80% of it in the parts box. Also no 1955 T-Bird STL files werer found, but I did find a reasonable 57 factory stock style file that could be modified but it was going to be a huge undertaking. To turn a factory stock file into funnycar proportions I had to save three versions of the file changing only the length, once the width and height were adjusted. I ended up with a 20% shorter, 10% longer and 30% longer files. The files were then sliced and the required parts saved, body behind the roof at -20%, roof rear window and windshield section at 10% longer, and front end from in front of the windshield at 30% longer. The challange was to print and convert the nose to a 55 from a 57 which required changing everything but the headlamps and hood line. This took the better part of three days but I do have a creditable result so now the project can advance. The real car was driven by one of the daughters (Courtney Mageau) of a friend of mine and was run out of Edmonton Alberta. Initally Rodek powered it was up graded to a KB Hemi with a 14-71 to bring the performance up to standard. This is the version I'm modeling. If you are going to follow along on this adventure please feel free to ask questions or leave comments, they will be replied to.
- 63 replies
-
- 10
-
-
- 3d printed
- scratch built
- (and 2 more)
-
’72 Dodge Demon Drag Racer 1/25 scale
Ian McLaren replied to AmericanMuscleFan's topic in WIP: Drag Racing Models
No excuse Francis, they are suppost to idle like a coffee can full of rocks😎 -
Tim, first off I hope things are going well with your arm. Your Lenco absolutely has blown me away, having R&R'd, stripped down and generally thrown around the real item, and built what I thought at the time was a fairly good 1/16th scale version, I feel justified in commenting on your final product. I have a 30 inch monitor in my model room and really looked at your transmission. I have said in the past that such and such part was virtually indistinguishable from the real thing, in the case of of this item I can't say that. I see nothing at all that would tell me that this is not the real part, not the surface finish, fasteners or linkages. So I am trusting you that this is not in fact a real transmission. Simply amazing work Tim!
-
Just simply a masterpiece model!!
-
’72 Dodge Demon Drag Racer 1/25 scale
Ian McLaren replied to AmericanMuscleFan's topic in WIP: Drag Racing Models
The fuel tank is a seemingly simple part but as usual you manage to bring it to another level. Amazingly realistic looking, to rephrase an old saying, nothing looks plastic like plastic, your material choice was right on. -
full detail 1/16th Gordie Bonin BubbleUp Trans Am Funnycar
Ian McLaren replied to Ian McLaren's topic in WIP: Drag Racing Models
Thank you so much Dave, I really like being a part of the forum due to the camaraderie and inspiration here. Just being here and looking at other peoples projects has made me a better modeler.- 190 replies
-
- 1
-
-
- scratch built
- brass chassis
- (and 1 more)
-
full detail 1/16th Gordie Bonin BubbleUp Trans Am Funnycar
Ian McLaren replied to Ian McLaren's topic in WIP: Drag Racing Models
Thanks Ian, I think he might have but I enjoyed building it regardless -
full detail 1/16th Gordie Bonin BubbleUp Trans Am Funnycar
Ian McLaren replied to Ian McLaren's topic in WIP: Drag Racing Models
Thank you so much Tim, it means a lot as you are one of the builders on this site I look to for inspiration. -
full detail 1/16th Gordie Bonin BubbleUp Trans Am Funnycar
Ian McLaren replied to Ian McLaren's topic in WIP: Drag Racing Models
Thanks Mike for following along on the marithon build, I appreciate your intrest! -
full detail 1/16th Gordie Bonin BubbleUp Trans Am Funnycar
Ian McLaren replied to Ian McLaren's topic in WIP: Drag Racing Models
Thankyou Jim i'm glad you liked it.- 190 replies
-
- 1
-

-
- scratch built
- brass chassis
- (and 1 more)